Quantcast
Channel: Man Made DIY Recent Posts
Viewing all 2425 articles
Browse latest View live

One Thing You've Probably Never Changed in Your Vehicle...But Really, Really Should

$
0
0

created at: 05/20/2015

Before I headed out on a short road trip this weekend, I did a quick checkup on my car. I had been having some issues with my engine rattling when my air conditioning was on. I'm really not much of an auto-DIYer, but YouTube has certainly helped me become a better mechanic than I once was!


After digging through some forums, a few people mentioned that I may want to check my cabin air filter. It's a small filter, usually hidden behind your glove compartment, that cleans the air coming into your car from your A/C unit. I pulled out my car manual, found the filter, pulled it out and this is what I saw:

dirty air filter

 This, my friends, is at least 5 years of gross (as long as I've owned the car). I know that I have never replaced this thing, nor has any mechanic or dealership I've ever taken it to. I almost puked after seeing all the grime, bugs and debris caked on this filter. My compressor was working so hard I think I broke it because I never replaced this thing.  

You can bet I immediately got a new one. The results were almost instant, my rattle was gone and my car smelled fresher than I remember. 

I know this isn't a typical ManMade post, but I felt like it was a friendly PSA to check your cabin filter. Get a fresh filter from your local parts store and follow the instructions in your vehicle manual for cabin filter replacement (it's probably behind your glove box). While you're at it, pick up a new air freshener! 


10 DIY Ideas to Stay Occupied While You're Snowed In

$
0
0

10 man-made snow day projects

This week they're predicting record-breaking winter storms in my area which means, aside from braving my drive to and from work, I'll be stuck inside. So, instead of heading to the grocery store for bread and milk I'm headed to the hardware store to get some supplies to keep myself busy under the snowpack.

Here's a list of 10 projects you could do in a day or two. Some take care and attention to detail and others will prove beneficial during these cold months. Either way, you'll definitely keep yourself busy!

Tartine Bread Recipe

1. Make bread

This time-consuming recipe is certain to keep you warm. Especially when you have to cook it at a ripping 500 degrees! Here's our ManMade guide to the whole process.  We still love this technique. It has such a great flavor and the method of making the bread is methodical and calming.

carve your own spoon

2. Try your hand a spoon carving

I started spoon carving during the winter of 2014. I bought a hook knife and a small axe and went to work on a few nice pieces of firewood. It's a great indoor hobby. I'd recommend a vacuum too, it does make quite a mess! Check out this video tutorial on basic spoon carving to get you started.

3. Print your Instagram Pictures

Take this opportunity to get your favorite pictures off your phone and onto paper. Check out websites and apps like printstagr.am or Snapfish that will allow you to print straight from your phone.

4. Binge-watch Shameless

All but the current season is on Netflix. This is a smart, different way to look at family. I particularly like that it doesn't pretend like the abstract concept of being part of a whole is the value, but rather focuses on the individual relationships among each person that creates a whole. These people don't want what's "best for the family." They want what's best for the people they love. At least give the first season a shot; it's worth your time. 

http://readywisconsin.wi.gov/winter/images/winter_car_kit.jpg

5. Make Your Own Emergency Snow Prep Kit

If the snow is piling up there's a chance the power might go out. Get ahead of the game and make your own emergency candles. You can also assemble one to keep in your car so you're prepared for getting stranded. Here' s a great kit list from Ready Wisconsin. I bet they know how to handle the snow! 

7 winter movies

6. Watch Some Winter Themed Movies

Embrace the cold and bundle up with these seven movies based on your favorite time of year. "Your" is subjective, of course.


7. Make a Scrap Wood and Leather Serving Board

Raid the cutoff bin and turn it into something worthwhile. David's full how-to is here. 


http://s3.amazonaws.com/manmadediy-uploads-production/photos/24370/IMG_0246_large.jpg?1419801940

8. Make Some Pantry Essentials

Start a batch of vanilla extract or turn some wine into vinegar while you're stuck at home.


9.  Waterproof a Jacket Before You Head Into the Snow

Check out this tutorial on applying wax to a canvas coat.


10. Render Some Fresh Pork Lard

It'll make everything you eat this winter taste better. And if you do it right, it can be healthier than butter.


7 Essential Cocktail Recipes You Should Memorize Right Now

$
0
0

Often, when I try to explain the idea behind ManMade or what I do for a living, someone who doesn't quite get it will inevitably say to me, "You mean like MacGyver?" Um...I guess?

For the record, I do not think of the kind of making stuff out of ordinary materials that we do on ManMade to be anything like MacGyver. But I do like the approach of understanding how things work, and then applying standard techniques to whatever materials sit in front of you. Especially when those materials are bottles of spirits, and the techniques result in something like delicious cocktails.

Cause here's the thing: when you become known amongst your peers as a guy who knows something about tasty cocktails, you will become the guy who everyone turns to to make a tasty cocktail, whatever the occasion. And that's a good thing. It's a solid skill to have, and it's even more impressive if you don't have to look a recipe up on your phone before you start shaking and stirring.

So, with that in mind, here are seven standard recipes, ratios, and approaches to cocktail making that you can tuck in the back of your mind to whip up a tasty option, whatever you find in front of you.  (Oh, and if you need bottle recommendations, here are our picks for stocking your home bar without spending a ton of money.) 


1. The Highball

Representative Cocktails: Moscow Mule, Cuba Libre, Whiskey Ginger, Greyhound, Dark & Stormy, Scotch & Soda, Vodka Cranberry


This is your classic _______+_______ drink, where a single spirit is combined with a mixer to make it easier to sip. Often the mixer is either carbonated (scotch & soda), sweet (vodka & orange juice) or, most often, both (bourbon and coke).

Given the number of spirits and palatable mixers out there, there's likely thousands of variations on this guy, but many classic combos have emerged as good places to start. Here's our list. 

However you combine 'em, the ratio is the same:

4 oz of mixer + 1.5 oz of spirits

That's a shot, plus ice, and a liquid to fill an 8 oz glass to the rim. It works, every time. See our full breakdown of the highball technique here. 


2. The Sour

Representative Cocktails: Margarita, Daiquiri, Sidecar, Whiskey Sour

This style of drink is all about balancing the bright flavor of citrus, sweetness, and the punch of the booze. The general recipe is this:

2 oz spirit + 1 oz something sweet + 3/4 oz fresh citrus juice

So, a Sidecar becomes 2 oz of brandy or cognac, 1 oz of triple sec (orange liqueur), and 3/4 oz of fresh lemon juice. A whiskey sour is 2 oz of bourbon, 1 oz of simple syrup, and 3/4 oz lime juice.

The same goes for lime-featured drinks. A margarita is 2 oz tequila, 1 oz triple sec, and 3/4 fresh lime, and a standard Daiquiri could be 2 oz white rum, 1 oz simple syrup, and 3/4 lime juice.

Couldn't be simpler. 


3. The Old Fashioned 

Representative Cocktails: Anything with the words "Old Fashioned" 

Likely, this is the first cocktail...ever. There are references as old as the novel Huckleberry Finn, which describes the adults drinking a mixture of whiskey, bitters, and sugar. These days, any nouveau cocktail bar is likely to have a cocktail "based on the Old Fashioned," where the bartender gets creative with the classic combo of spirits, a sweetener, and aromatic bitters. Start here for a recipe:

2 oz spirits + 2 dashes bitters + a sweetener (not a sweet liqueur)

Unlike the sour, the something sweet here is not a sweet liqueur like cassis or triple sec, but actually a sugar, like a sugar cube or maple syrup or agave nectar or housemade simple syrup. If you order an Old Fashioned in a bar, you'll be getting the standard bourbon + Angostura bitters + sugar/simple syrup, garnished with an orange. (And maybe a cherry). But there are several variations that have emerged as go-tos as well. Here are some favorites.


Classic Old Fashioned

  • 2 oz bourbon
  • 2 dashes Angostura bitters
  • 1 sugar cube 
  • Garnish: Orange peel

 Oaxaca Old Fashioned

  • 1 1/2 oz reposado tequila
  • 1/2 oz mezcal
  • 2 dashes orange bitters
  • 1 tsp agave nectar
  • Garnish: grapefruit or orange peel

Canadian Old Fashioned

  • 2 oz Canadian whisky
  • 2 dashes Angostura bitters
  • 1 tsp maple syrup
  • Garnish: lemon peel

For any of these, muddle the citrus peel (not the white pith) in the glass with the sweetener and citrus peel to make a syrup and express the oils. Add ice to the rim, then pour in the main spirit. Bonus points for a second citrus peel twisted over the top and rubbed on the glass rim before adding. 


 4. The Collins

Representative Cocktails: Anything with the word Collins in it, Paloma, Fizzes, Pimm's Cup 

Long, bright, and refreshing, a Collins is a cocktail you want to drink when it's hot out. Because they're often sipped before five o'clock, these are typically served tall, buoyed by something fizzy, in a Collins glass (about 10-12 oz. You can just use a water glass)

1.5 oz base spirit + 4 oz something carbonated + something tangy + something sweet (maybe)

The most well known of these is the Tom Collins, a classic combo of gin, lemon, sugar, and club soda... basically, a fizzy lemonade plus gin. Add Sloe Gin and cut the sweetener a bit, and you're enjoying a Sloe Gin Fizz. Switch out the gin and lemon for tequila and lime, and you've got a Juan Collins. Swap the club soda for a grapefruit soda, and you've got the most popular cocktail in Mexico, a Paloma. 

This category also encompasses the Pimm's Cup - the official drink of the Wimbledon tennis tournament. Here, the spirit is Pimm's No. 1, the fizz lemon-lime soda or ginger ale (which also takes care of the sweet), and some fresh lemon, garnished with a cucumber. 

The point is: something tall and very cold, with a lot of ice, a carbonated mixer, and a bit of citrus. Experiment with the sour and sweet to taste, and you can't go wrong. 


5. The 1:1:1 

Representative Cocktails: Negroni, Americano, Boulevardier, Massimi

Perhaps the easiest to remember, it also makes you look like you really know what you're doing. It's considerate to make your date a rum and coke, but it is something else altogether to bring her a bold and cold Aperol Negroni. The thing to keep in mind here is that one of parts needs to a bitter liqueur, and one of them needs to be sweet. Add one more part of something to bring those together, and you're go. 

1 oz bitter liqueur or amaro + 1 oz something good + 1 oz something else that's good and maybe sweet

The classic representative here is the Negroni, which is equal parts London dry gin, Campari, and sweet vermouth stirred together. These days, I often prefer its predecessor, the Americano, which swaps the gin for club soda. That way, I can drink twice as many ;) A Boulevardier is Bourbon with sweet vermouth and Campari, and lovely for wintertime.


6. The Hot Toddy or Irish Coffee or Anytime You Spike Something Warm

Representative Cocktails: Hot Toddy, Irish Coffee, Cider & Rum, Hot Cocoa & Bourbon


This whole category is less about a standard recipe of ingredients, and more about what you need to keep in mind whenever you add spirits to something warm, whether it's whiskey to your coffee or cognac to your tea. And that is:

Use no more than 1 1/2 oz total spirits in a hot drink. 1 oz is even better. 

Heated up, the spirits take on a much stronger flavor, and mask whatever else you've added. Plus, if it's any boozier, you'll naturally slow down your sipping, and that makes your hot drink a lukewarm drink. I lay out my full argument and technique here, but just keep in mind: in order to be truly enjoyable, hot drinks should be weaker. 


7. The Manhattan and Rob Roy

For the final option, we chose not the martini, because a martini is just a bunch of cold gin and a tiny bit of vermouth. You don't need a recipe for a martini, you need a technique. 

But the Manhattan, that other great Speakeasy era cocktail that starts with an M, is one worth mastering. And once you get it, you can play around with flavor variations.

2 oz. aged spirits + 1 oz. sweet vermouth + 2 dashes of bitters

For the classic Manhattan, stir and strain 2 oz. rye whiskey, 1 sweet vermouth, and 2 dashes of Angostura bitters. A Rob Roy is the same, but with 2 oz. of blended Scotch whisky instead of rye. For variations, swap the spirits for Canadian whisky, añejo tequila, brandy, etc, and sweet vermouth for any number of things, like dry vermouth, or a fun sweet-ish liqueur, such as Cuarenta y Tres, coffee liqueur, ginger liqueur, or the like. 


Armed with this knowledge, you can make something seriously tasty wherever you end up. And that is an important skill, indeed. Cheers. 


U.S. National Parks Will Be Free to Visit On These 10 Days in 2017

$
0
0
Photo: NPS.gov

If you read this site and also make New Year's Resolutions, I'd bet some variation of "getting out in nature more" made it onto the list. Well, this Martin Luther King Jr. Day (Monday) all National Park Service sites that usually require entrance fees will be FREE. That, and nine more days this year...    

It's all part of the National Park Service's celebrating 100 years of existence thanks to good ol' Teddy Roosevelt. The other free dates are: 

  • January 16: Martin Luther King Jr. Day
  • February 20: Presidents' Day
  • April 15-16 and 22-23: Weekends of National Park Week
  • August 25: National Park Service Birthday
  • September 30: National Public Lands Day
  • November 11-12: Veterans Day Weekend

Click here to read more about from the National Park Service itself and git on out there!


Make This: DIY Vintage Electric Camp Lantern

$
0
0

created at: 10/19/2014

Autumn is the perfect time of year for camping, pumpkins, crunchy leaves and hurricane lamps. Ok, maybe it's just me, but I love these lamps. They bring a certain sense of camp-like nostalgia to my heart and I have a couple around the house.    There's nothing new about using oil lamps in your home. However, it didn't seem like the safest option these days. So, I recently had the idea to retrofit one with a cool Edison vintage bulb. Here's a fairly easy tutorial on turning your own oil lamp into a beautiful electric lamp.   

I originally set out to build this project thinking it would take me forever. To my surprise and your benefit, this entire task, from start to finish will take you less than an hour and cost less than $30 (if you buy a brand new lamp). 

Here's what you'll need:

  • Outdoor Hurricane Lamp. I got this one from Amazon.
  • Vintage-style T-6 Bulb Get it here.
  • Tin snips or a Dremel with a metal cutting bit
  • Candelabra socket with a threaded bushing and wires attached
  • 6 feet of electric wire (or however long you might want)
  • Electrical tape
  • Wire cutters and strippers
  • Male plug kit
  • 2 wire twist caps
  • Pliers
  • Drill and drill bits
  • Phillips screwdriver

If you plan on using an old hurricane lamp, please make sure there is no fuel residue inside the tank. I recommend avoiding used lamps all together. Electricity and fuel fumes don't mix. I used a brand new lantern for this project to avoid a surprise fire in my shop.

created at: 10/19/2014

First, remove the cap that holds the wick above the oil well. This particular brand has one that removes with a twist.

created at: 10/19/2014

Using pliers, remove the shaft in the middle of the bracket. This removes the wick dial. 

created at: 10/19/2014

Using a Dremel with a cutting bit or tin snips, remove the cross bar to create an opening to house the socket. Sand and bend any protruding pieces that might cut you.

created at: 10/19/2014

Slip the socket through the hole and twist on the threaded bushing. I had to wrap some electrical tape around the socket to help it with tighter in the opening.

created at: 10/19/2014

Insert the socket back over the well and place the glass base back on top. Using a marker, make a line where the wick guard should be cut to reveal the socket and free up space for the bulb. Use tin snips or a Dremel to cut at the line. Be sure to sand and smooth out the cut so you don't hurt yourself.

created at: 10/19/2014

created at: 10/19/2014

created at: 10/19/2014

Now you can drill a hole with a bit that's large enough to fit a wire through. I would love to have found a rubber bushing to go in the opening. If you are really crafty, I'd recommend putting one over the opening. Doing so will prolong the life of the wire.

created at: 10/19/2014

Fish your line through and tie a knot to keep it from slipping back out. Then, strip the ends with wire strippers.

created at: 10/19/2014

Twist the two sets of wires together and stuff everything back into the oil well. 

created at: 10/19/2014

I grabbed an easy plug kit at the store and followed the instructions for attaching the wires.

created at: 10/19/2014

What's a good lamp without an on/off switch. I picked up this switch at the store too. You have to cut one of the lines and fit it snuggly in this space. There are vampire teeth (technical term) that bite into the cut line and the switch uses that feature to cut the circuit. 

created at: 10/19/2014

Screw in your lightbulb of choice and place the glass back on and you're finished! Now all you're missing is a tent! 

How to Shine Your Shoes in 1 Minute

$
0
0

You know those tasks. The ones that you know won't actually consume that much time, but you imagine will take *just* long enough that you just can't motivate yourself to just step up and get it done.

Shining your shoes doesn't have to be one of them. True story. Provided you've got the right gear and a little technique, you can bring your leather shoes and boots back into shape in less than sixty seconds.     

YouTube channel RealMenRealStylecreated this quick video to show you how it's done.


Of course, you'll want to give your shoes a complete onceover every other season or so, but with this approach, there's no need to every leave the house with scuff marks. 

This Nearly 2,000-Year-Old Piece of Advice May Help You Wake Up & Get Out of Bed in the Morning

$
0
0

If you're a morning person — congratulations. Seriously, we're legitimately happy for you. The ability to sleep well, feel rested, and then be ready to get going nice and early is a real gift, and you're lucky to be wired that way.

For the rest of us, mornings can be rough. Especially in the wintertime, when it's dark, and cold, and tens of thousands of years of natural selection are encouraging you to stay hibernating so you can protect your genes from freezing off. 

But, of course,  in the post-industrial age, when we no longer have to physically work to procure our food on a daily basis, and we have things like furnaces and alarm clocks and jobs with commutes, you've still gotta get up, no matter how hard it may be.

Last week, I stumbled across this article at Brain Pickings. It explores a selection from the Meditations of the Roman Emperor and Stoic Marcus Aurelius, where the philosopher muses on the fact that it can be hard to get out of bed in the morning. He begins, 

At dawn, when you have trouble getting out of bed, tell yourself: “I have to go to work — as a human being. What do I have to complain of, if I’m going to do what I was born for — the things I was brought into the world to do? Or is this what I was created for? To huddle under the blankets and stay warm?

I admit, sometimes...at 6:00am in January, I kinda do feel like staying under the blankets is what I was created for. But he continues, arguing that even animals know how to sleep, but human beings are created with a "nature" of working with others, helping the world, and keeping it in order. And if you don't live out that nature, then "you don’t love yourself enough. Or you’d love your nature too, and what it demands of you."

It's a pretty interesting read, and one that, I admit, has occurred to me every morning since I first glanced at it. It hasn't made waking up in the cold any easier, but it has helped me get out of bed and get moving. Whatever it takes.

Read the full piece at Brain Pickings: Marcus Aurelius on How to Motivate Yourself to Get Out of Bed in the Morning and Go to Work


Make This: DIY Health Tonic to Help You Feel Better During Cold and Flu Season

$
0
0

I'm a big fan of a glass of DIY fire cider to help keep your system in prime fighting condition during the winter months. It's the single best way to keep your immunity up as best can be. (We love you, too, flu shot!)

But, still, sometimes you get sick. And you feel terrible. And all the OTC bottles in your medicine cabinet just don't seem to be doing anything.      

Then, too, you might also try a DIY solution. Perhaps this Cold Elixir from recipe developer and cookbook author Julia Turshen. It's designed to give your system a boost while also soothing your throat, sinuses, and other sore bits. You can whip it up in batches and keep it in the fridge for a few days, and enjoy it either hot or cold.

Thankfully, I just got over a bug and am feeling pretty tip-top this week. (Well, tip-top for January). But I'm filing this away for the next time something hits me and I just can do anymore orange goo.

Get the recipe from Julia at the Chronicle Books site: A Cold Elixir to Help Ease Flu Season


DIY Idea: Large Scale Outdoor-Inspired Wall Art

$
0
0

Sometimes, you need a little inspiration. Something to remind you to get off your phone, get outside, and soak up all that nature has to offer. 

And sometimes, you simply need something to fill up that blank wall you've been ignoring.     

Take care of both with this elegant idea from Pam Lostracco. She translated a stylized mountain motif from a calendar into a huge piece of DIY wall art. The subtle color changes mimic the look of geological ranges as visibility decreases, and the subdued color motif makes for a big impact, without overwhelming the space.

In short: we dig it. About the materials used, Pam says,

This mural is 120 square feet and took 3 full days to draw the outline and paint. I used 3 different colors of paint: the white and natural white were leftovers from previous projects so only $50 was spent on a gallon of Kendell Charcoal from Benjamin Moore. The colors were selected to blend with the neutral tones in my bedspread, curtains and furniture.


If you don't trust your hand skills, a digital projector will make the whole thing possible. See the full transformation, including a helpful video, at Apartment Therapy: The "Mountain Mural" Bedroom Makeover


ManMade Essential Toolbox: Why You Definitely Need a Pocket Hole Jig System

$
0
0


Pocket Holes

Joining wood can be as much art as it is skill, and beautiful joinery really defines a piece of furniture. But for the times when you just need to quickly join a few pieces of wood securely, try the pocket-hole.  

A few years ago, I picked up a small single-hole Kreg Jig for drilling pocketholes. It was simple, easy to use, and produced a nice strong joint that made completing projects much faster. Since then, I've used that small jig for at least a dozen projects, from end tables to shop-made cabinet doors and it's dependably provided a fast joint that holds up well over time.

Pocket Hole Jig and Step Bit

The way a pocket hole works, is fairly basic. A stepped bit is positioned at an angle to provide a recess that a special self-tapping screw fits into. The angle allows for a strong mechanical joint between pieces that stays level and straight. The self-tapping screw minimizes splitting, and adding a bit of glue makes the joint impressively strong.

Pocket Hole Screws

Using this technique, joints can be made fast and strong so putting together than next weekend project won't actually take an entire weekend. A few tips when working with pocket holes:

1. Start drilling slow, and make sure the jig is secured, otherwise the bit can "wander" on the wood.

2. Use the right size screw for the job to avoid splitting the wood and to keep the top of the screw from sticking out from the surface. Also, the screws have a square head so make sure you have bits to match.

3.  When screwing the joints together, it's best to use a clamp to keep the parts flush. Check out this pocket-hole specific face clamp.

4. The Kreg System has single, double, and full clamp jigs to make drilling the holes fast and easy. If you're investing in a new system, take a look at the options to find one that will grow with you and your projects. 


Kreg Pocket Hole Jig

 ManMade Recommended: 

Do you love or use the Kreg Pocket Hole system? Tell us about it in the comments below


Carve an Anatomically Correct Wooden Heart This Valentine's Day

$
0
0

Valentine's Day isn't exactly around the corner, but it's close enough that if you want to make a handmade gift (and if you can, you should) then now is the time to get cracking. And I don't know about you, but to me nothing seems to say "true love" quite like a hand-carved, anatomically-correct human heart. Well except maybe for this.     

Woodworker Dustin Penner put together this design on his YouTube channel and it's definitely worth checking out. Thankfully my girlfriend doesn't read my posts so here's hoping she doesn't see this coming...


19 Powerhouse Ingredients Every Man Needs in His Pantry at All Times

$
0
0

You know the basics. The onions and carrots.  The potatoes, rice and noodles. The salt and pepper. The goods that can help accompany fresh proteins and vegetables into a proper meal. But today, we're talking those "secret ingredients" — those back-of-the-lazy susan bottles and powders that improve anything they come in contact with, and take food from being simply filling to truly satisfying. Keep them on hand, understand and respect their powers, and you can use them to blow any dish out of the water.     


1. Fresh Garlic - Garlic powder has its place in rubs and seasonings, but if you have one of those jars of prechopped little cubes of months old garlic in your fridge door, it's time to move on. Here's why: whole garlic bulbs give you the ultimate control. Want just a hint of garlic? Add one-two whole smashed cloves as it cooks, then remove them before serving. You want a breath-ruining allium fest? Mince them super fine to break down all the cell walls and add with aplomb. A head of garlic costs, like, 50-75¢, making it a seriously good value. Buy one every time you go to the grocery. 


2. Kombu - Kombu is a dried kelp, and a key component for making dashi, that simple and deeply satisfying Japanese stock. Its strength is revealed in all that little white powder you see on the surface: it's basically powdered umami. Kombu is extremely high in glutamic acid, the amino acid that alone creates the experience of savory and rich umami. Dried kombu lasts forever in the pantry, and can be simmered in any soup, broth, or sauce to add incredible depth. If you want your thirty minute dish to taste like it was cooked all day, add just a bit of kombu. Amazing stuff.


3. Chipotle Puree - Chipotle peppers are freaking delicious. These smoked jalapeños and the adobo sauce they come in make everything they come in touch with taste a little more interesting.

Here's the problem. Chipotle peppers are also incredibly spicy. So spicy that one or two of them is enough for an entire meal. So what do you do with the rest of the can?

You puree it. Then you freeze it. Then you have them on had for whenever you need to add a smoky, vibrant backbone to all sorts of things. Here's how you do it: First, take the seeds and the ribs out of the chiles. A lot of the heat lives here, so by removing the seeds you can get more chipotle flavor for the same amount of piquancy. Then, add about half of the adobo sauce they come in to a blender or food processor, or mash and chop finely with a knife. Place these in tablespoon sized portions in an ice cube tray and freeze. Once solid, move to a plastic bag, and grab 'em whenever you need. 


4. Canned Chickpeas - If you have a can of chickpeas, you have a meal. These versatile legumes can become a salad, soup, side dish in ten minutes, and add body and substance to any sauce-y recipe, like a braise or pasta sauce. Or, you can put them in a 400° oven for an hour until they become crispy, and use them to add crunch and texture or to satisfy a salt fix without potato chips. They keep their shape and won't break down like other beans, and so they give a sense of elegance to almost anything they're added to. They're also full of protein, so they make you feel full for fewer calories, and, frankly, are amazing.


5. Smoked Sweet Paprika - This is seriously good stuff. It's paprika, but smoked, and smoke is flavor. Simple, right?

Smoked paprika is also a great starting point for all kinds of spice mixes, rubs, and soups. Add it to your pot while sauteing onions and garlic, and it gives everything a deep fruitiness, subtle smoky flavor, and a lovely red color. This is probably the most used spice in my pantry, and it's surprisingly versatile ingredient in cuisines of all types. Anything that would taste good on the grill benefits from a bit of smoked paprika. It's also an awesome way to give vegetables a meat-like depth, perfect for vegetarians or when you're trying to clean out the fridge. 


6. Dried Mushrooms - Basically, an umami puff. They last indefinitely in the pantry, so I like to buy a big bag of dried shitakes at the Asian market. They don't necessarily make food taste like mushrooms, though they can if that's what you're going for. Add some anytime your using fresh mushrooms to make the whole recipe taste more like "mushroom," or throw a few into a soup or stock pot to add depth and earthiness. I use 'em in chili and tomato-based sauces all the time. Or, pulverize them to a powder to mix with salt to season a steak, whole chicken, or piece of pork. It gives younger, fresher meat that pleasantly funky dry-aged flavor for just a few cents. 


7. Gochugaru: Korean Red Pepper Powder - Boy, do I love this stuff. Taste-wise, it's like a cross being paprika and those red pepper flakes in the shaker at the pizza place, but with a bit of sweetness and lots of fruity flavors. But, most importantly, they have incredible texture and color, and so they're great for anytime you don't totally want the seasonings to disappear. They're essential to cooking Korean food (which you should), but they also add a wonderful je nais se quoi to western dishes. Once you get familiar with the flavor, you'll find all sorts of excuses to bust out the bag. 


8. Tomato Paste - Truth: tomato paste taste more tomato-y than actual tomatoes. Which makes sense... it's literally concentrated tomatoes. There are entire bolognese and ragu recipes that don't use a since whole or canned tomato, just a bunch of tomato paste reconstituted with flavorful liquids. Use it anytime you saute aromatic vegetables for a soup or braise, even if you don't plan to add additional tomato product. As it browns and darkens, it adds major depth and "cooked" flavors to whatever it touches.

Like chipotles en adobo, you scarcely need the whole can, so it's another good candidate for freezing in portions. Just scoop out tablespoons and freeze them on a silicon mat or parchment paper. Place in a ziptop bag once they're hard, and grab as needed.


9. Maggi Sauce - Why this hasn't taken over the English-speaking world, I'll never know. Thankfully, it's immensely popular in Latin America and Asia, so it's easy to find if you know where to look. It does what it says, right there on the bottle: "Improves the taste of soups, sauces, salads, and vegetable dishes." It's made of hydrolyzed wheat and soy proteins, which boost big umami flavor, like soy sauce that's been wrung out of a steak. Use it like soy sauce but when you don't want all that sodium, or like Worcestershire when you don't want to add acid (or stay vegan). It makes a killer bloody mary or michelada, and I love adding a bit to homemade salad dressings. A few drops will do it, so it lasts forever. Lots of impact for $2.00. 


10. Really, Really Good Finishing Olive Oil - You likely know the flavor and health benefits of cooking with extra virgin olive oil. But you also want a truly great oil that will never see heat. Add just a splash on top of soups, salads, plated pasta dishes, and the like for a big burst of fruity grass flavors and some lip-smacking tastiness. Keep it stored out of the light, and don't let it go near the oven, and it's worth it's weight in flavor gold. 


11. Anchovy Paste - To anyone who thinks they don't like anchovies - yes, you do. You might not like chomping down on a whole fish, but I promise if you tasted the same recipe side-by-side, one of which has an appropriate amount of anchovies hidden in the background, and you'll prefer it. The reason here, again, is glutamates, which provide umami, and a pleasant brininess that makes food taste... mature.

I prefer to buy the stuff in tubes, because like tomato paste and chipotles, I rarely need a whole can of anchovies. Just squeeze out what you want, and enjoy the added benefit of not having to chop anything. 


12. Fried Shallots - If you know to look for them, these are a common sight at Asian markets, where they're almost always labeled "red onion." But they're shallots, and they're crispy and crunchy and add great texture. I especially love using them on leftovers and dishes meant to clean out the fridge, where they add some much needed contrast to softer foods and pleasant bite. They are fried and a bit oily, so use wisely, but they last forever, and many times, they're exactly what you need to make something stand out. 


13. Ancho Chile Powder - Chili powder (note the "i") is a blend containing dried chiles, and cumin, oregano, and other spices, and it's meant to be used as a flavor base for a pot of chili. Chile powder (with an "e") is simply whole dried chile peppers that have been ground. You can find it in all sorts of flavors in the Latin American market or aisle of the grocery store - pasilla, New Mexico, California, guajillo, etc - but it you're only going to keep one on hand, choose ancho. It a has an amazing dried fruit flavor with just a tiny, tiny bit of heat, no more than black pepper. It's a great basis for a rub or to season a piece of chicken, pork, or fish before pan roasting it, where it will help promote browning. 


14. Fish Sauce - Just because something doesn't smell good doesn't mean it can't taste amazing. And if you stick your nose in a bottle, fish sauce certainly doesn't smell appetizing. But used sparingly, it brings an amazing richness to anything.

Known best for its presence in Southeastern Asian cooking, it has a place in almost anything you cook in a stock pot or Dutch oven. Seriously, try it. You know those everything-but-the-kitchen-sink soups or pot of beans that you take time to cook all day, but never really pop? Add a splash of fish sauce, and the whole thing comes together. It does wonders to Italian-style tomato sauces, or southwestern chili. Just make sure you're careful with the salt, as it contains enough sodium to season the whole pot. 

Tiparos is a well-known Thai brand, but I prefer the flavor of Vietnamese fish sauces like Three Crabs or Phu Quoc. Or Red Boat, a pricier craft product that, like aged balsamic or extra-virgin olive oil, is designed for drizzling on top and finishing a dish. 


15. Fresh Chile Peppers - These technically aren't a pantry item, but they deserve a mention here because: fresh chiles are the single best value ingredient in the entire supermarket. Typically around $1.00 a pound, that makes the very light in weight jalapeño or serrano or fresno chile about 10¢ each.  And I can't think of anything that can improve a dish as well for a dime.

Sure, chile peppers can be hot, but they're also incredibly flavorful. You can add cayenne or hot sauce if you just want heat, but use fresh hot chiles when you want flavor and texture. The best chiles add green, grassy brightness and subtle sweetness. I say buy a few every time you go to the grocery. You'll find a use for them, and even if you let one get a little wrinkly, you're only out 10¢. 


16. Furikake - Some say that in Japan, furikake is little butter and jam: a great way to add a lot of flavor to a basic starch. Typically enjoyed with rice or noodles, these little jars are typically a mix of sesame seeds and some kind of sea vegetables, plus signature ingredients like shiso, miso, egg, or dried seasfood. They make basic home-alone dinners into something worth eating. Some rice, a fried egg, and furikake sprinkled on top and you've got a whole meal. 


17. Maldon Salt - If you really want to impress someone, serve them food with a bit of Maldon sea salt sprinkled just at the end. It makes food salty, sure, but its texture adds little pops of flavor and somehow manages to make any protein or vegetable taste more like itself. A little goes a long way, and by long, we mean very, very long. Great stuff, never disappoints. Keep on hand at all times. 


18. Sambal Oelek - Sriracha gets all the love, but the garlicky spicy sambal is a strong base to begin any dish with a little heat. The cool thing is, once it's cooked, it doesn't really taste "Asian," so you can use it everything from pasta to tacos to salad dressing. Sriracha is amazing when squirted on top, but as an ingredient to build layers of flavor, reach for the sambal. 

19. Chili Crisp - Known mostly for that grouchy face on the label, this concoction also gets dubbed "woman" or "lady sauce." What it is is amazing. It's chiles fried in soy bean oil with a couple peanuts, and while that combo is basic, this stuff is totally insane and completely addicting. Perhaps the best description comes from the Lucky Peach cookbook, which says, "Crisp fried chilies embedded in oil add a punishing wallop of heat to anything, and the dour-looking lady on the jar is a signifier to other food nerds that you've crossed the sriracha river into the land of freak-deaky hot sauces that will never be trendy."


Honorable mention: Vodka, Tequila, Bourbon, etc - These typically go on the bar cart or liquor cabinet, not the pantry, but a little booze belongs in your list of go-tos. Why? Flavor compounds are most typically water soluable (water, stock, etc), fat soluable (oil, butter, animal fats), or, you guessed it, alcohol soluable. So adding a splash of liquor or wine to any dish, especially slow-cooked ones like sauces, stews, braises, etc, will bring out flavors that you simple couldn't achieve without it. What you choose for your source of ethanol molecules doesn't really matter, as long as it doesn't conflict with what's in the pan. (I wouldn't go for something like gin, but might be worth a try on occasion.) I, honestly, mostly opt for vodka 'cause it's pretty neutral and the least expensive, or tequila, cause we always seem to have it in the house. 


Making a DIY Pour Over Coffee Stand for Fun and Profit

$
0
0

I am in love with coffee. I'm not ashamed. I think, probably, coffee has been secretly dictating the course of human affairs for many centuries now. Think of any great woman or man, and I suspect coffee was right there, in the thick of it, driving them to get up in the morning, or work late in the evening. 

Teddy Roosevelt got by on only about a gallon per day, and Voltaire downed 40-50 cups daily, which sounds great to me, if I didn't have to do anything else that day, or interact with people, or operate a moving vehicle. 

Me, I enjoy just one good cup in the morning. And that's the important part: it has to be good. Like, really, really good. I mean, yeah, I can drink crappy, burnt, bitter coffee if I need do. But why? Why would I drink bad coffee, and start my day out with something suboptimal? Isn't that just setting up the rest of the day to suck?

Anyway, I recently discovered pour-over coffee. I know, I know, I'm late to the game. I'm not yet totally converted; I've been an Aeropress brewer for more than four years now. But my morning routine actually involves making two cups of coffee, one for me and one for my wife, and the Aeropress is, frankly, a little putzy for making more than one cup. 

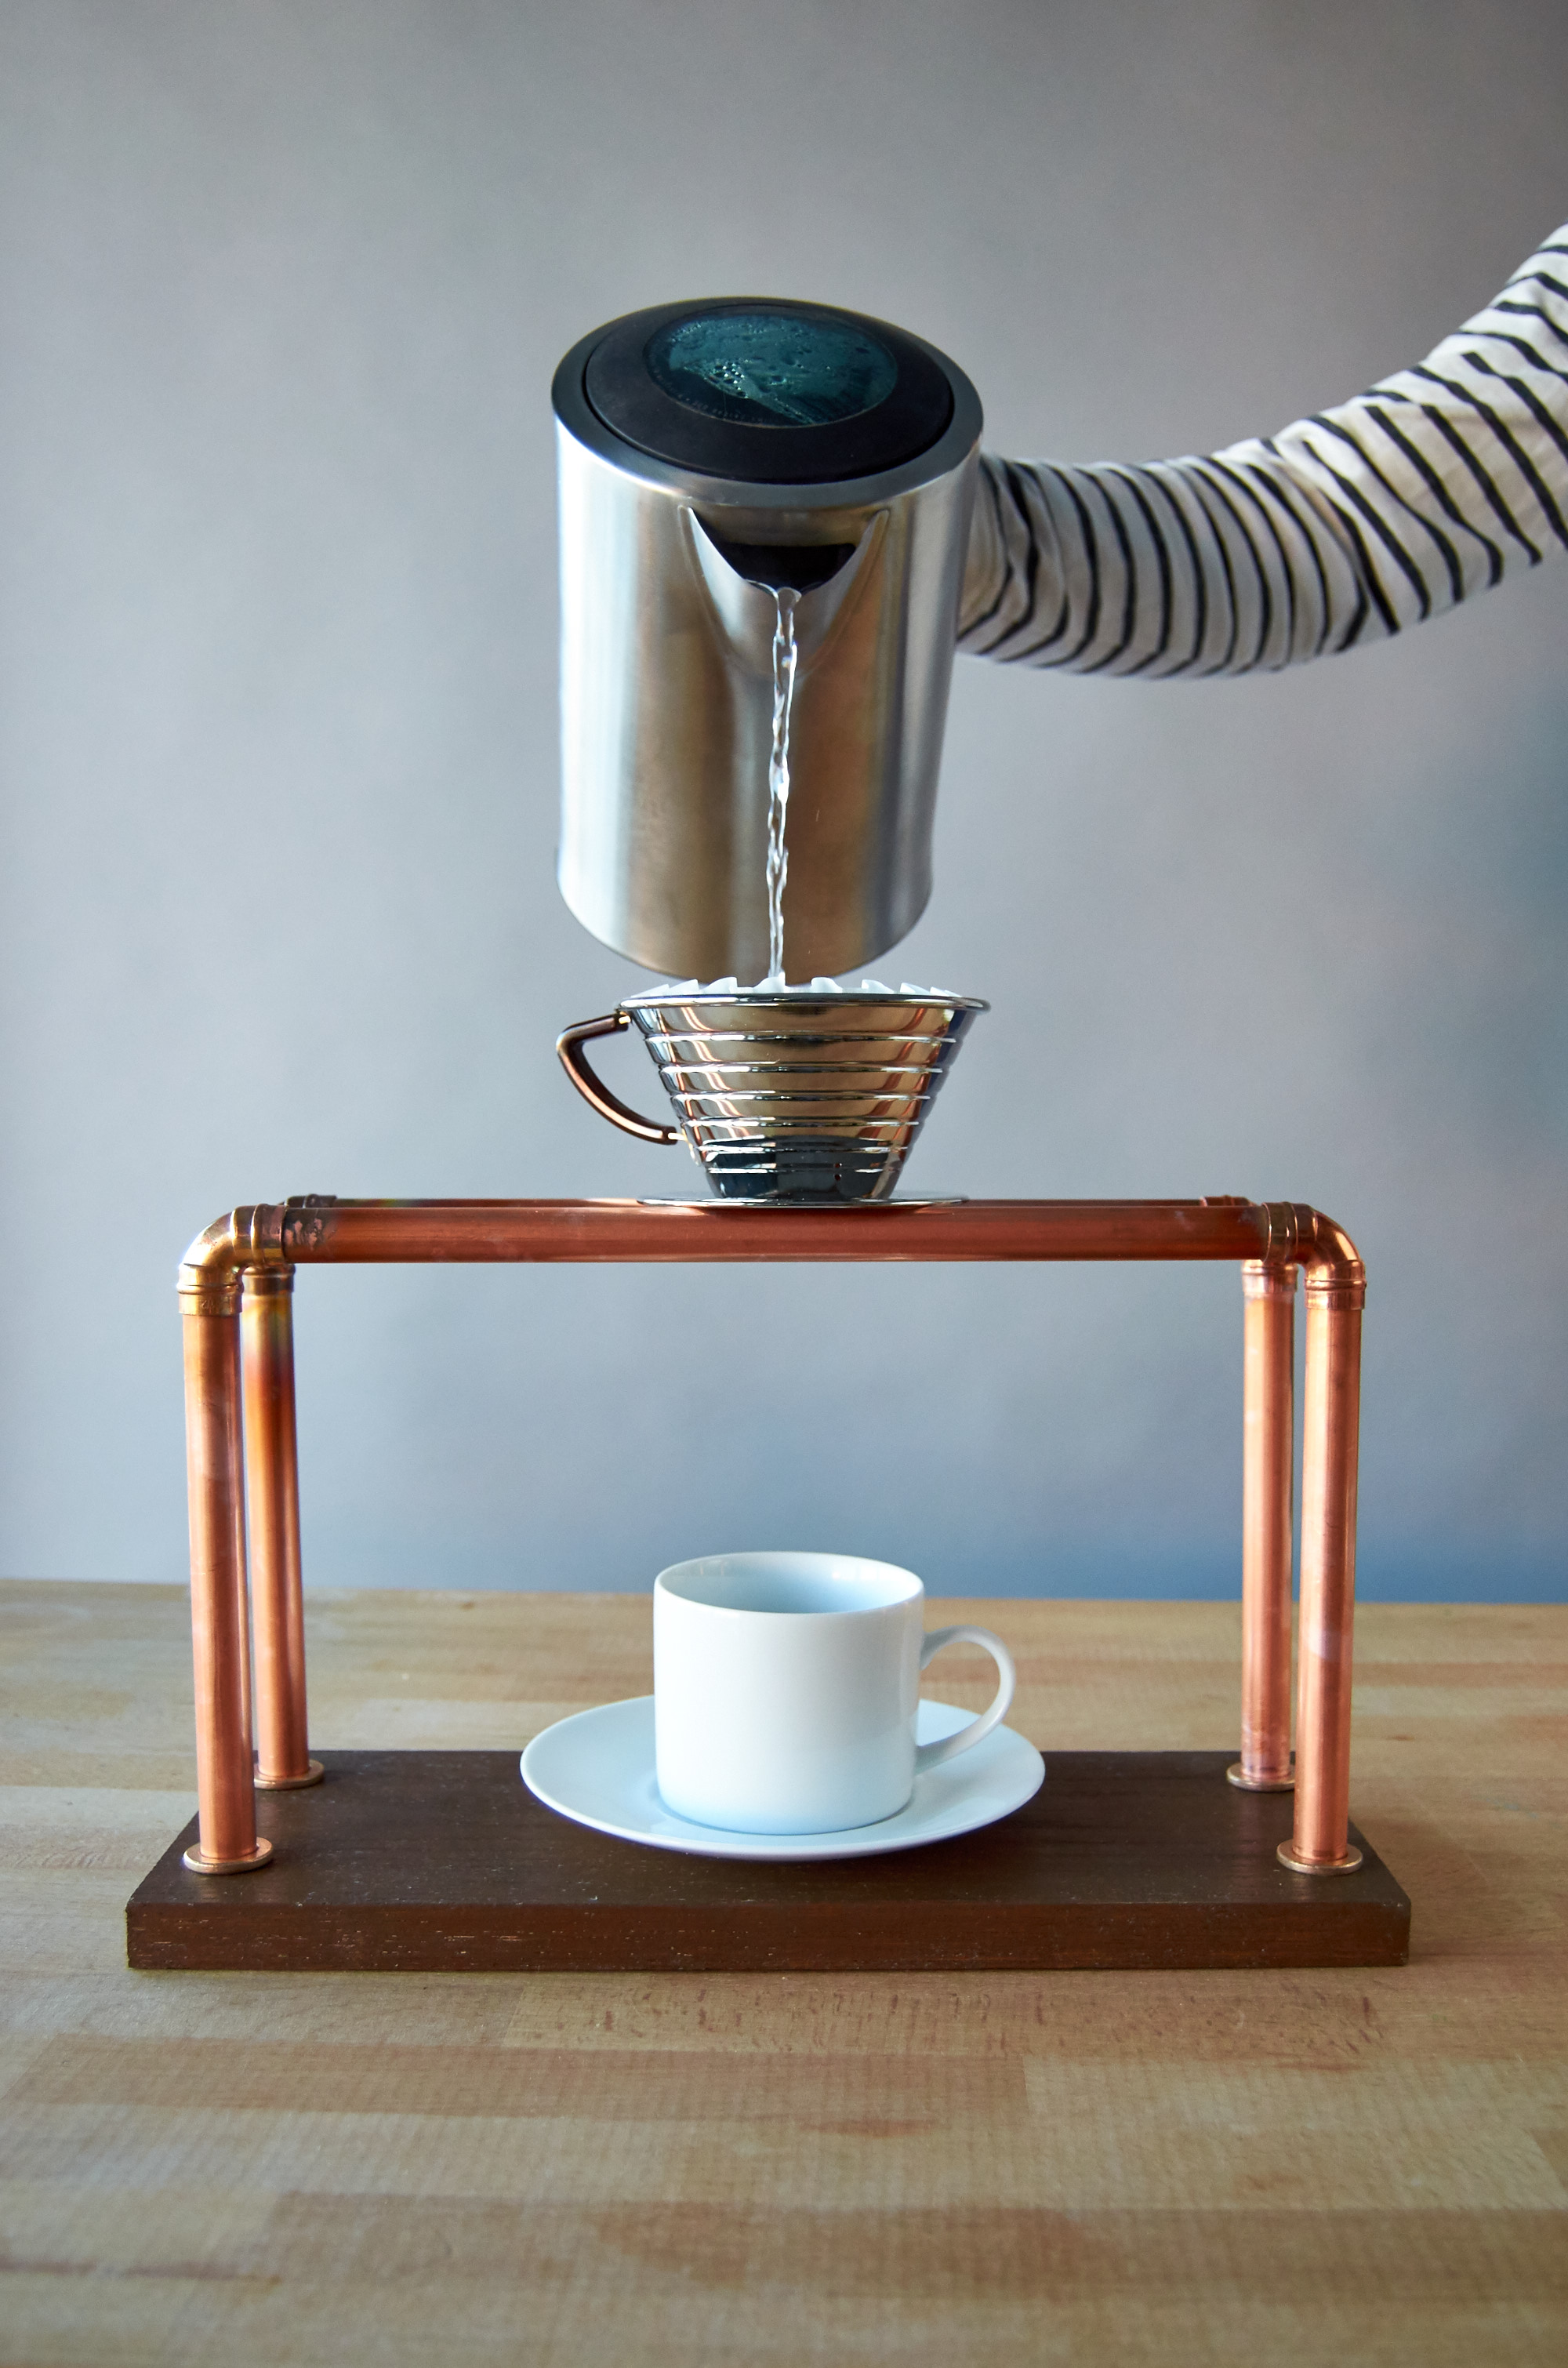
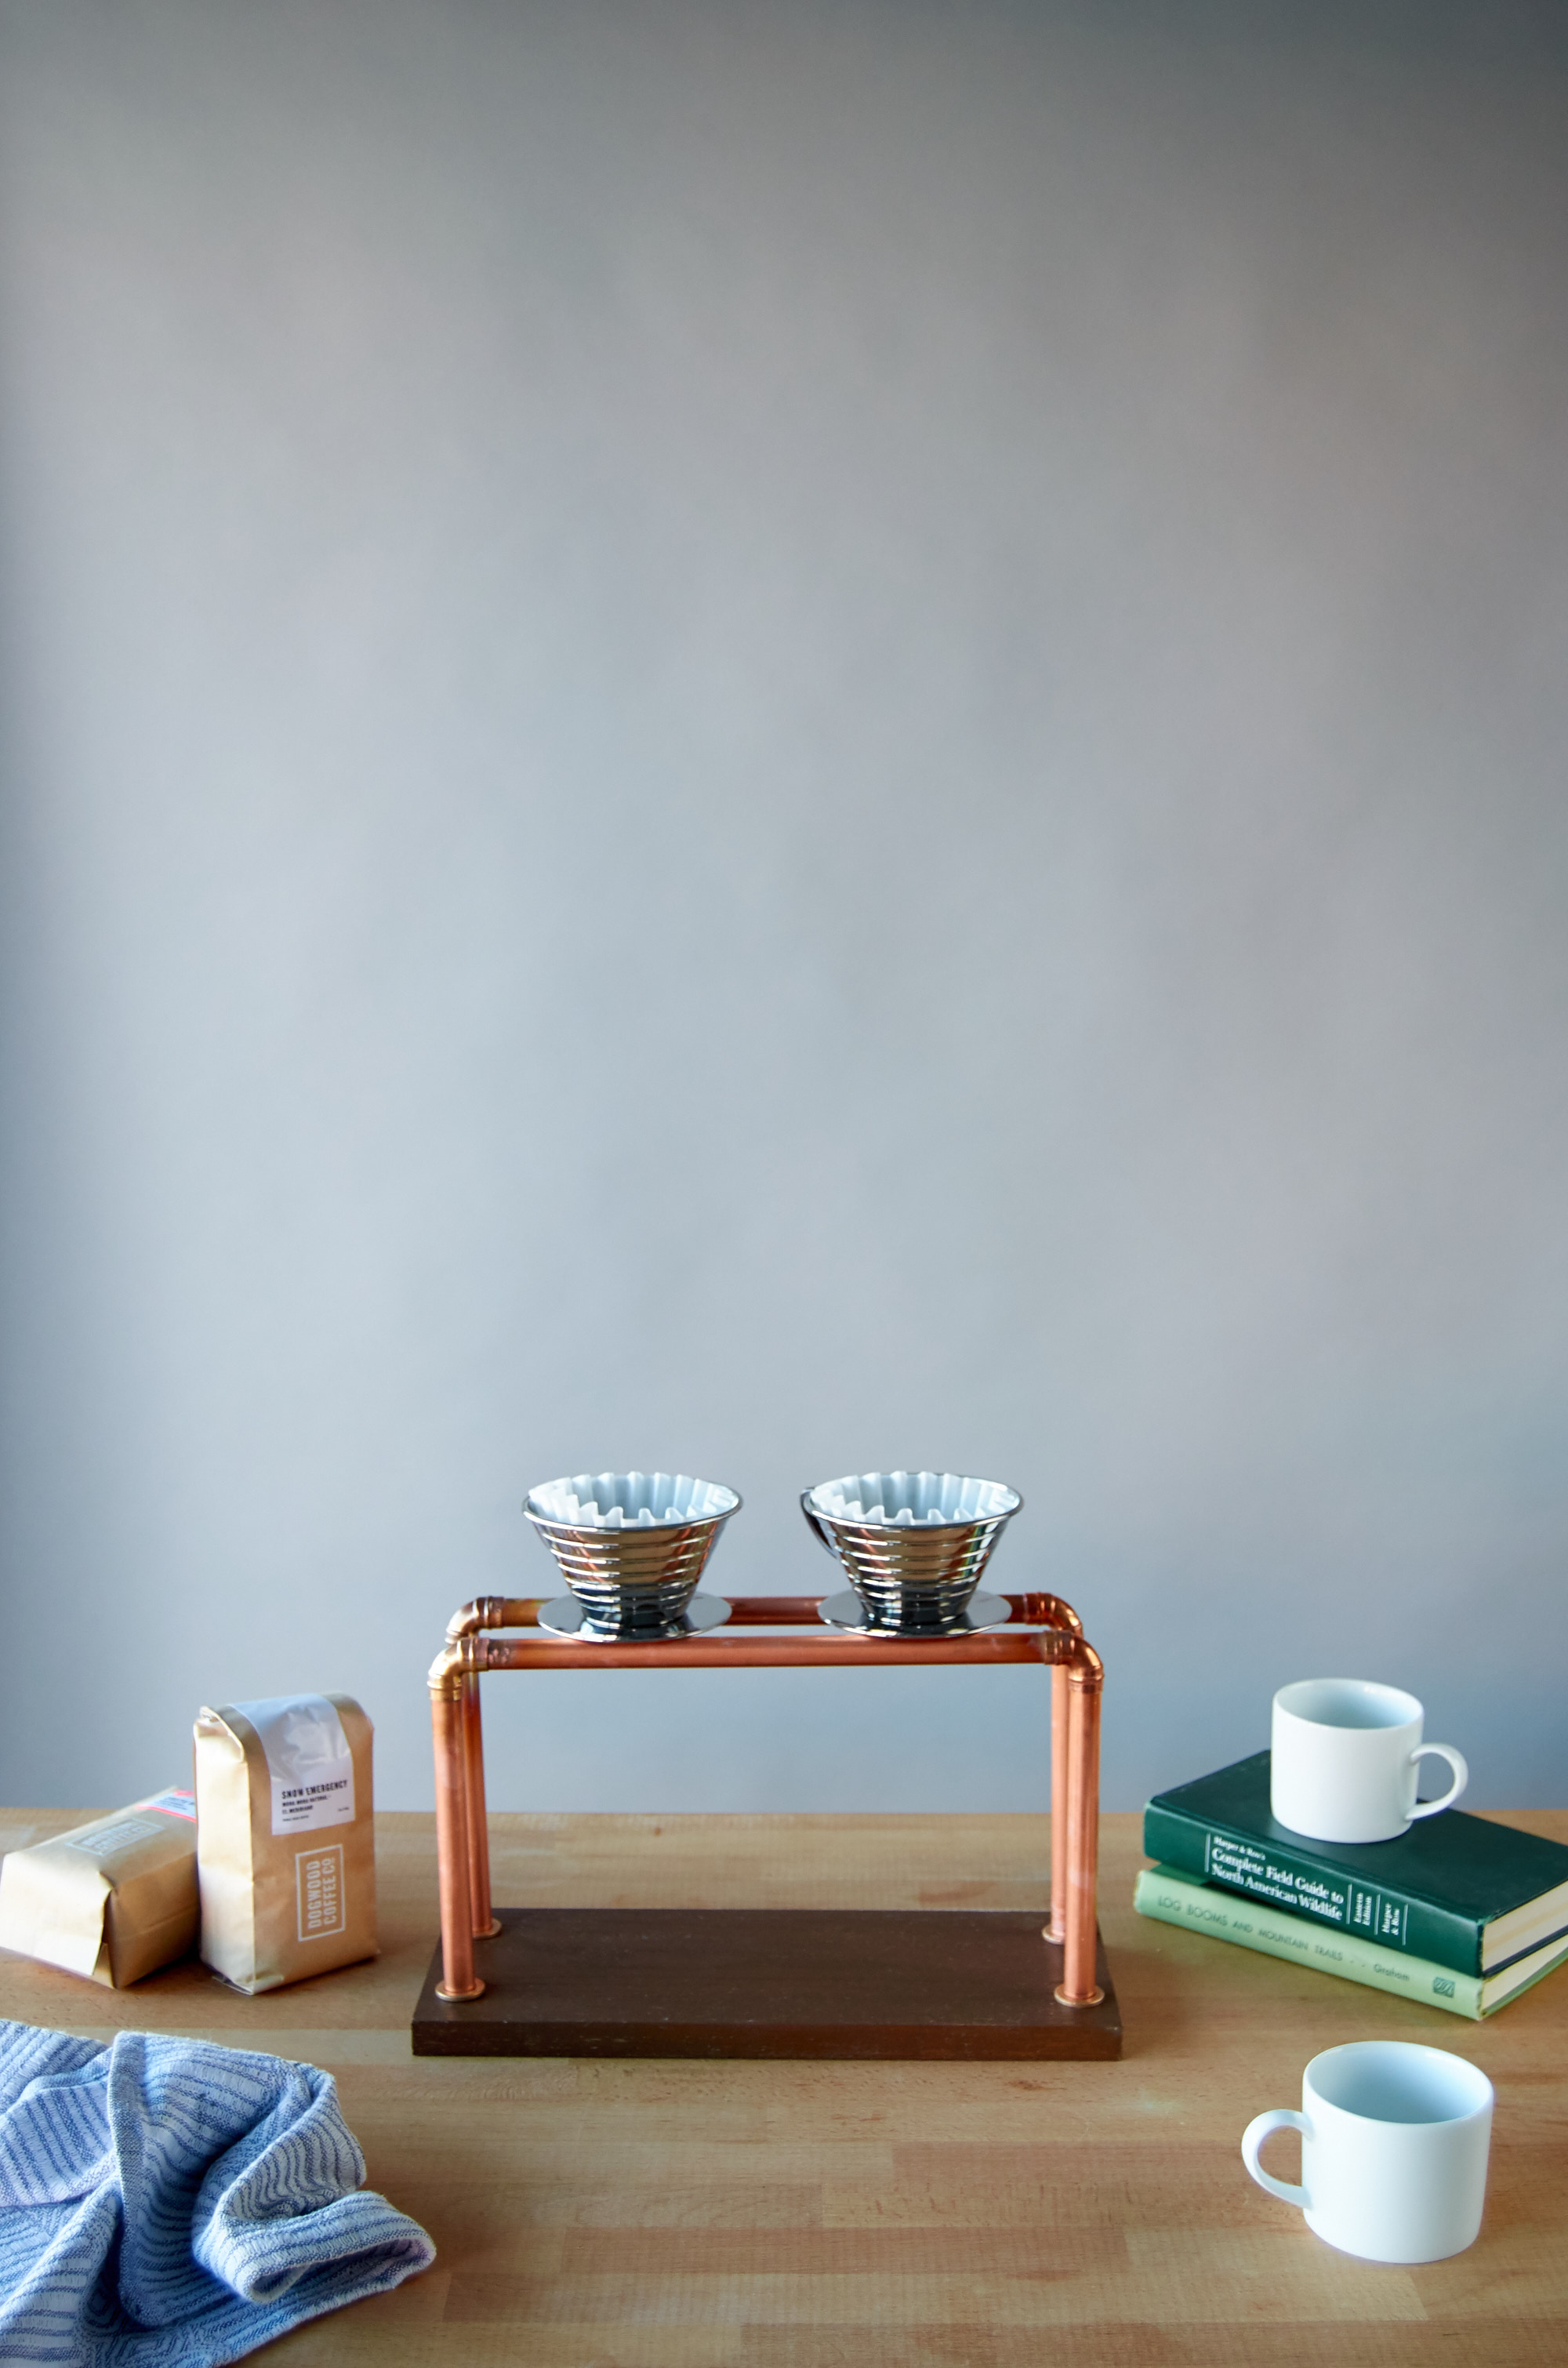
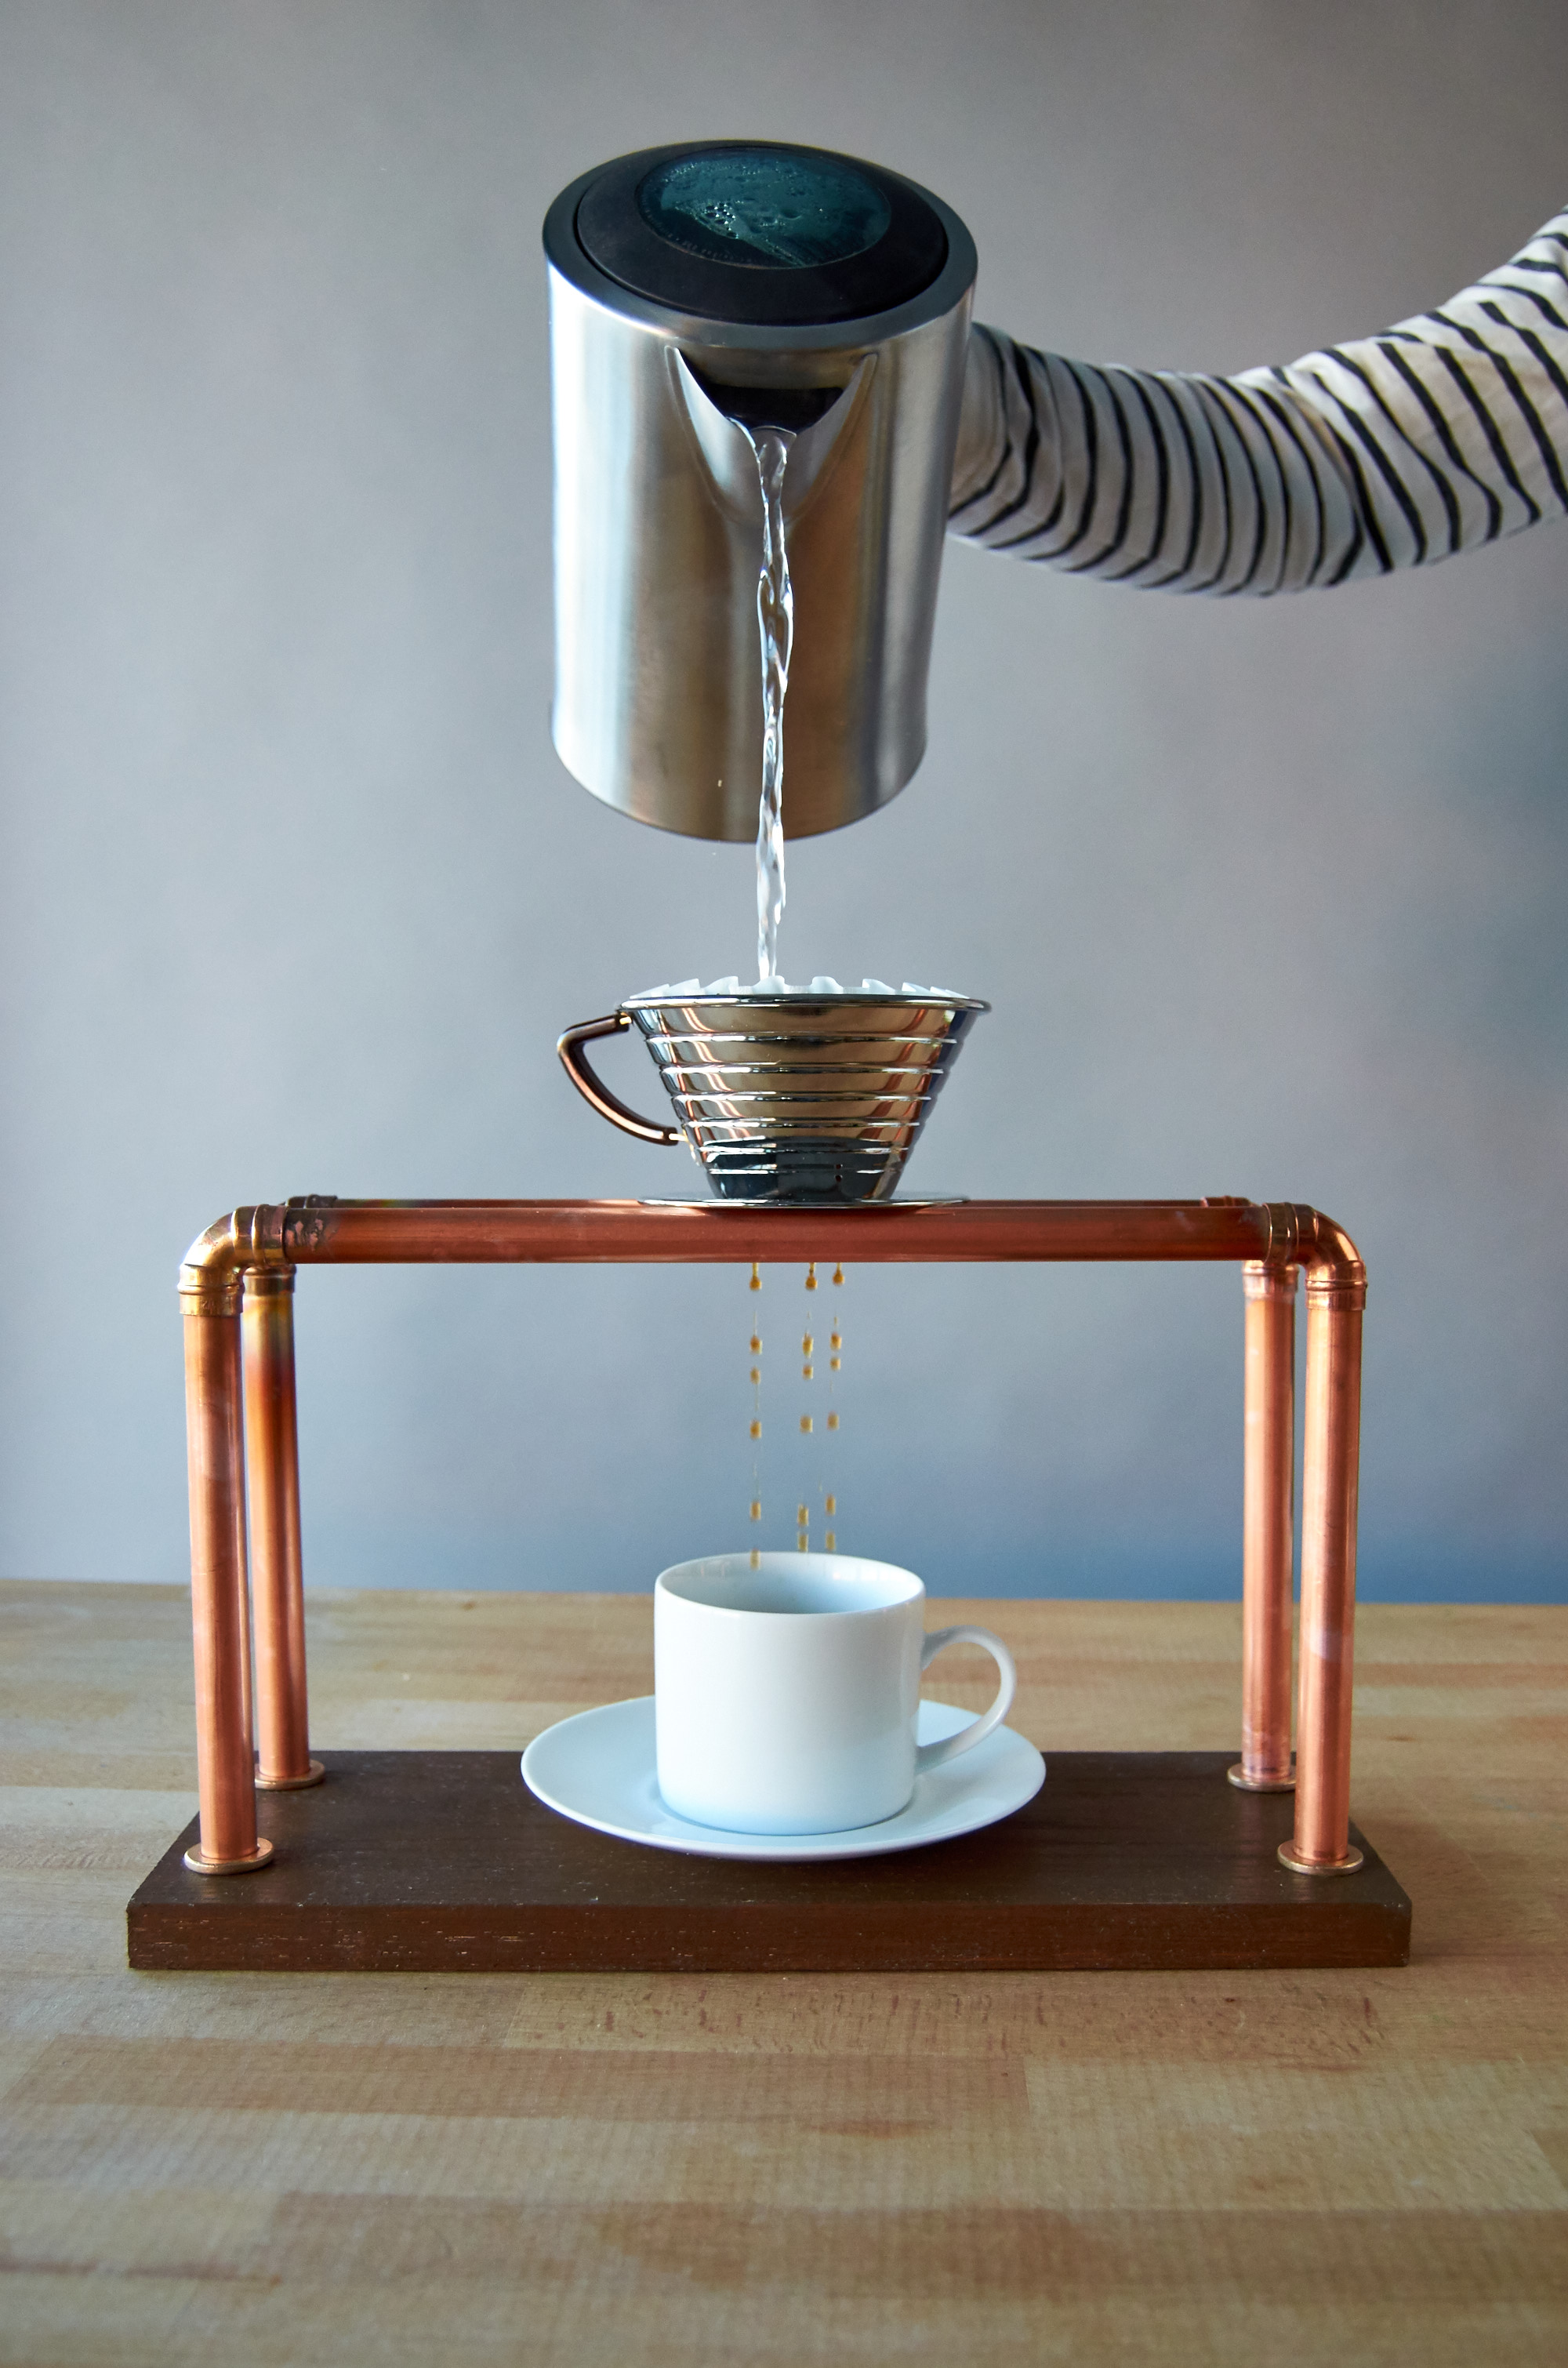
So I decided to try a new approach. The Kalita Dripper makes a perfectly nice cup of mildly sweet, delicious coffee. It's fast and easy to use, and a breeze to clean up. No wonder coffee shops everywhere like these things.

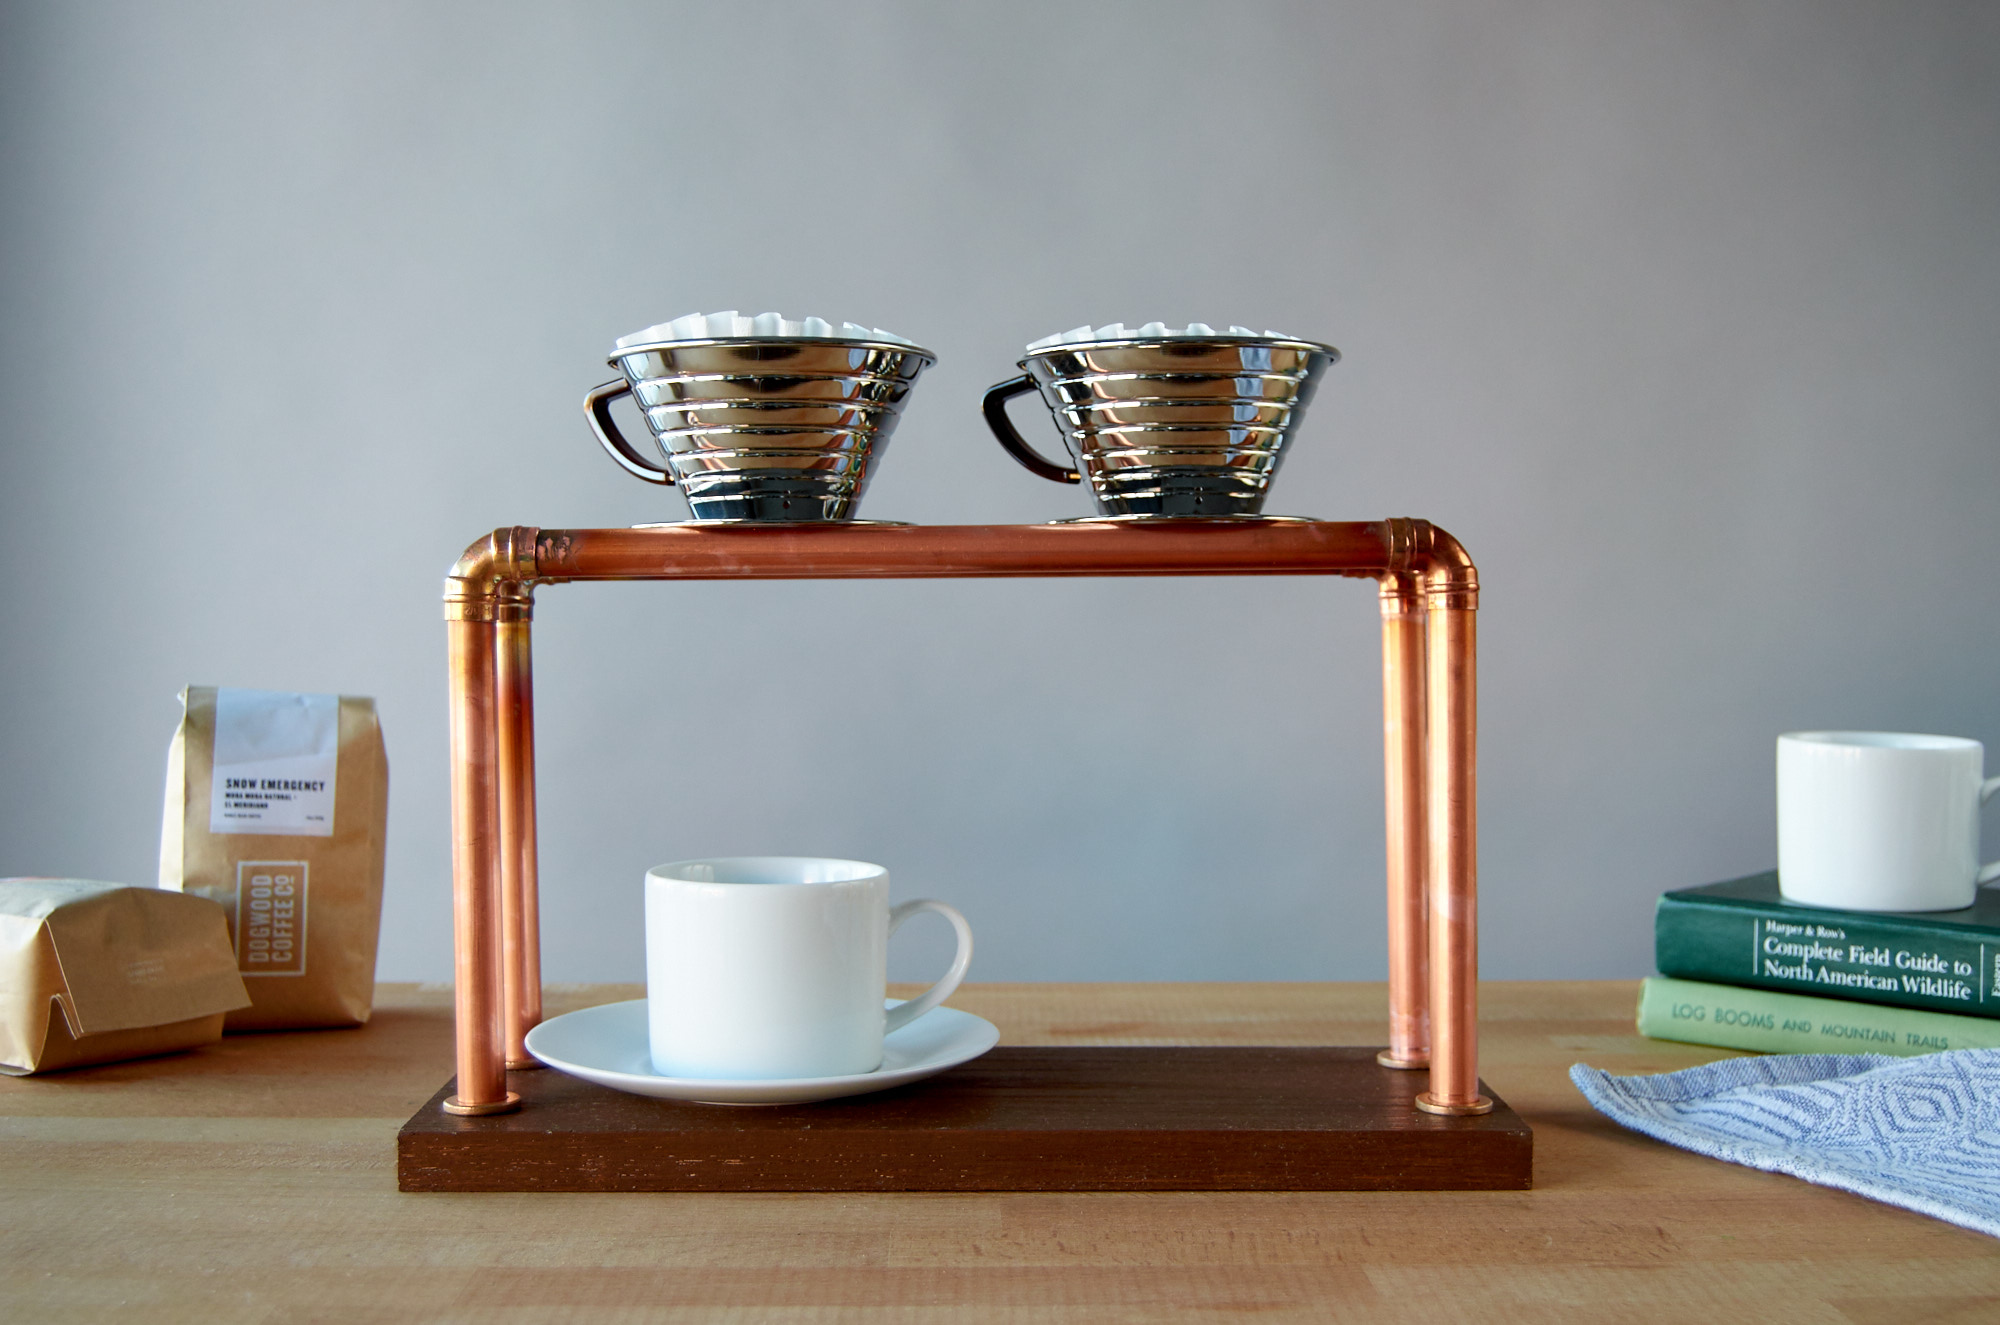
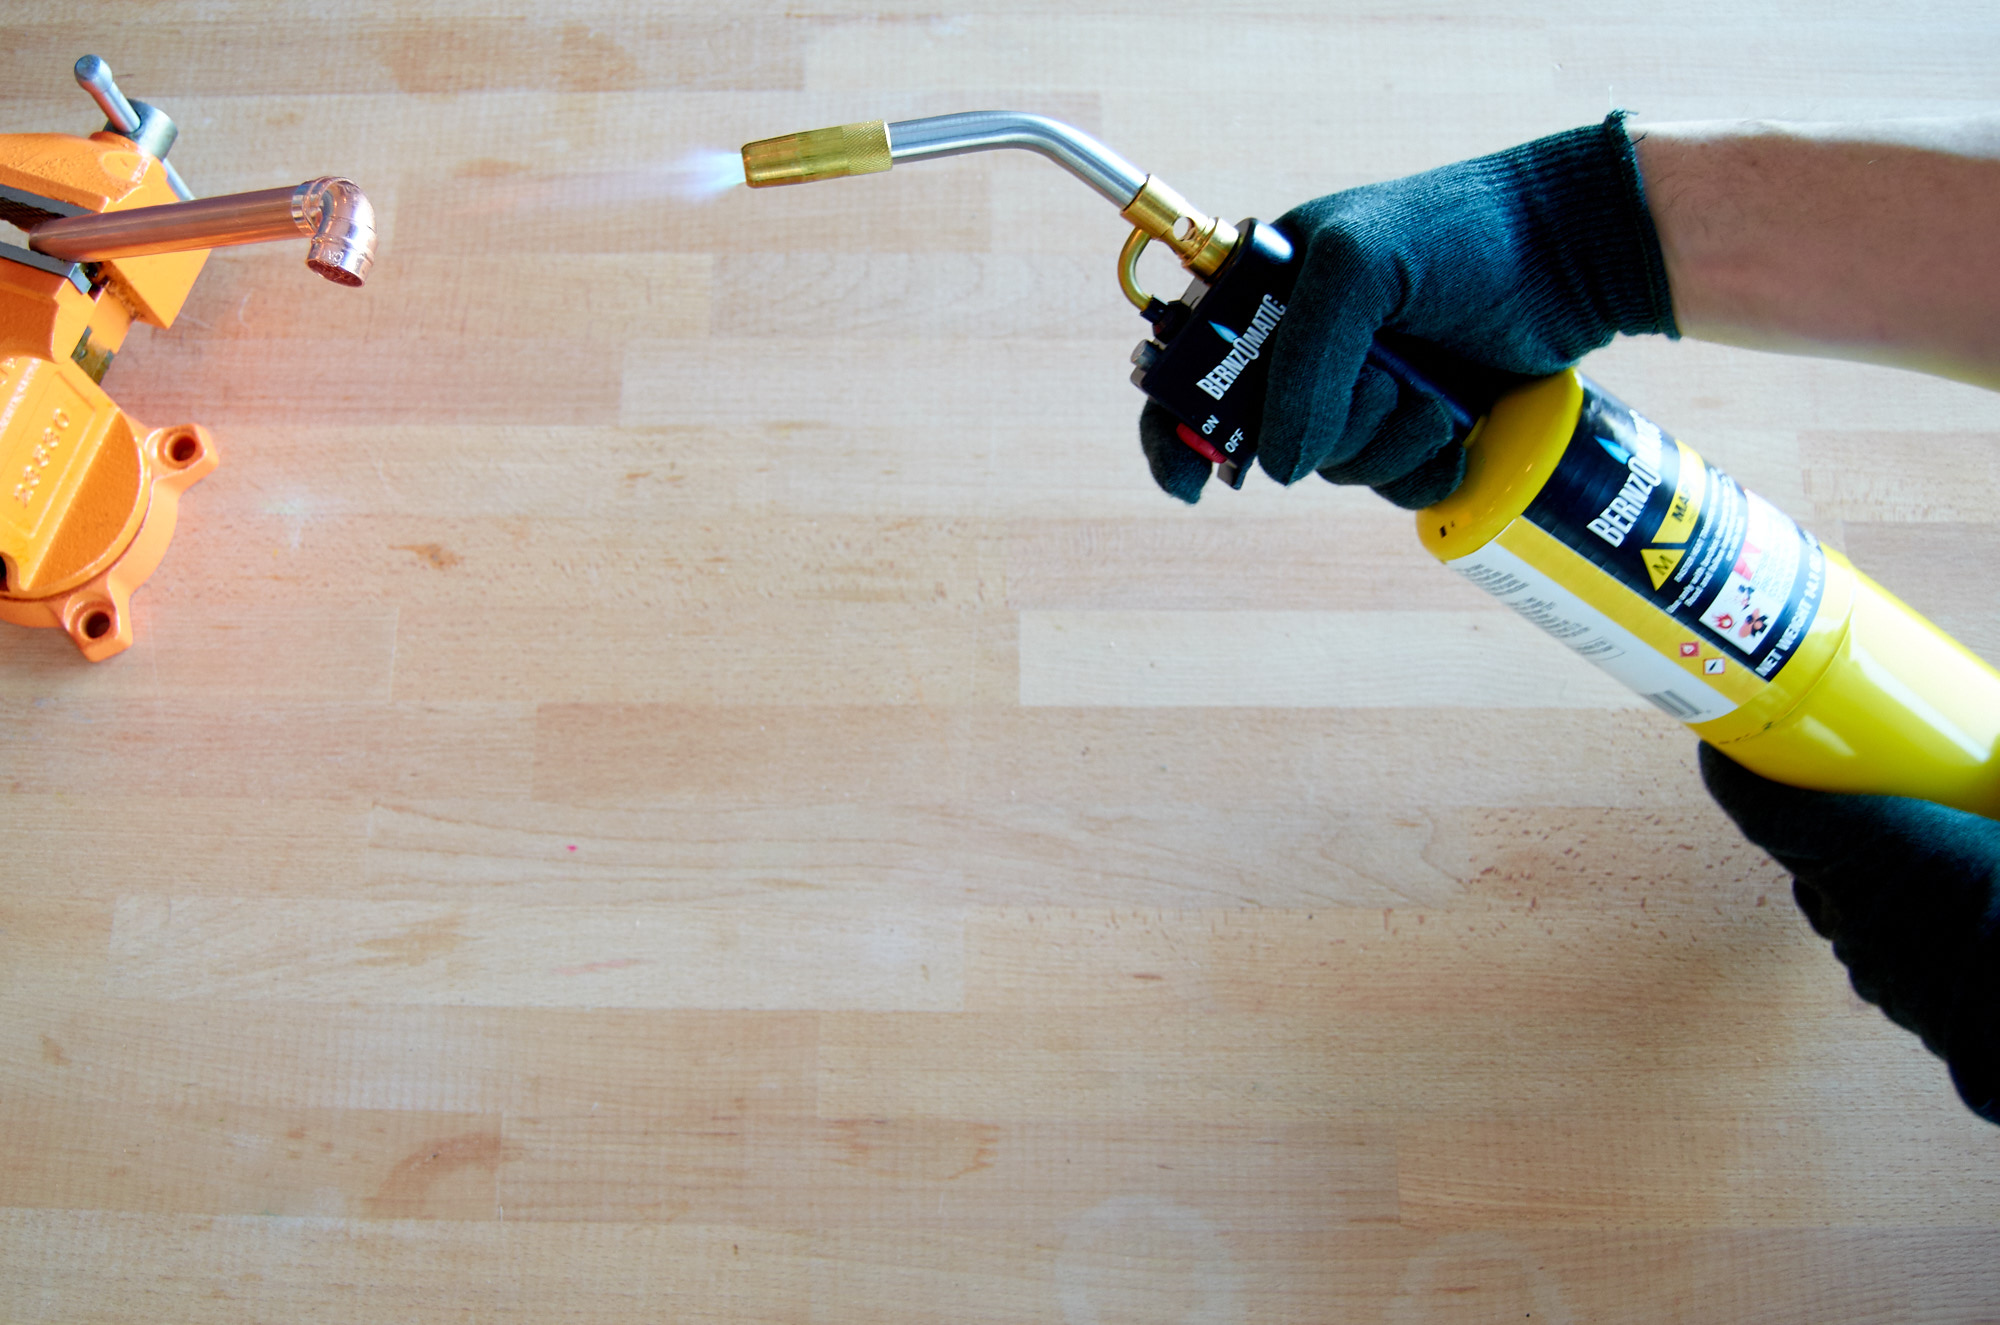
I decided to build a simple pour-over coffee station that looks nice, and helps me brew up the best part of the day for me and my wife with minimal fuss. My tool of choice for this project: the ever-essential blow torch. With a good blow torch and some shiny copper in hand, there's almost nothing you can't build. 

This year ManMade is part of Bernzomatic's Torch Bearers program. We'll be following up over the next several months with some creative projects and clever ways to use a blowtorch around the house. In fact, this isn't the first time we've waxed poetic about the hottest tool in everyone's workshop; last year we showed you why we like lighting our grill with a blow torch, and walked you through the basics of simple, safe pipe soldering.

And, just for fun, we decided to make a video of the whole process. Watch it below, then scan the tutorial for all the details.


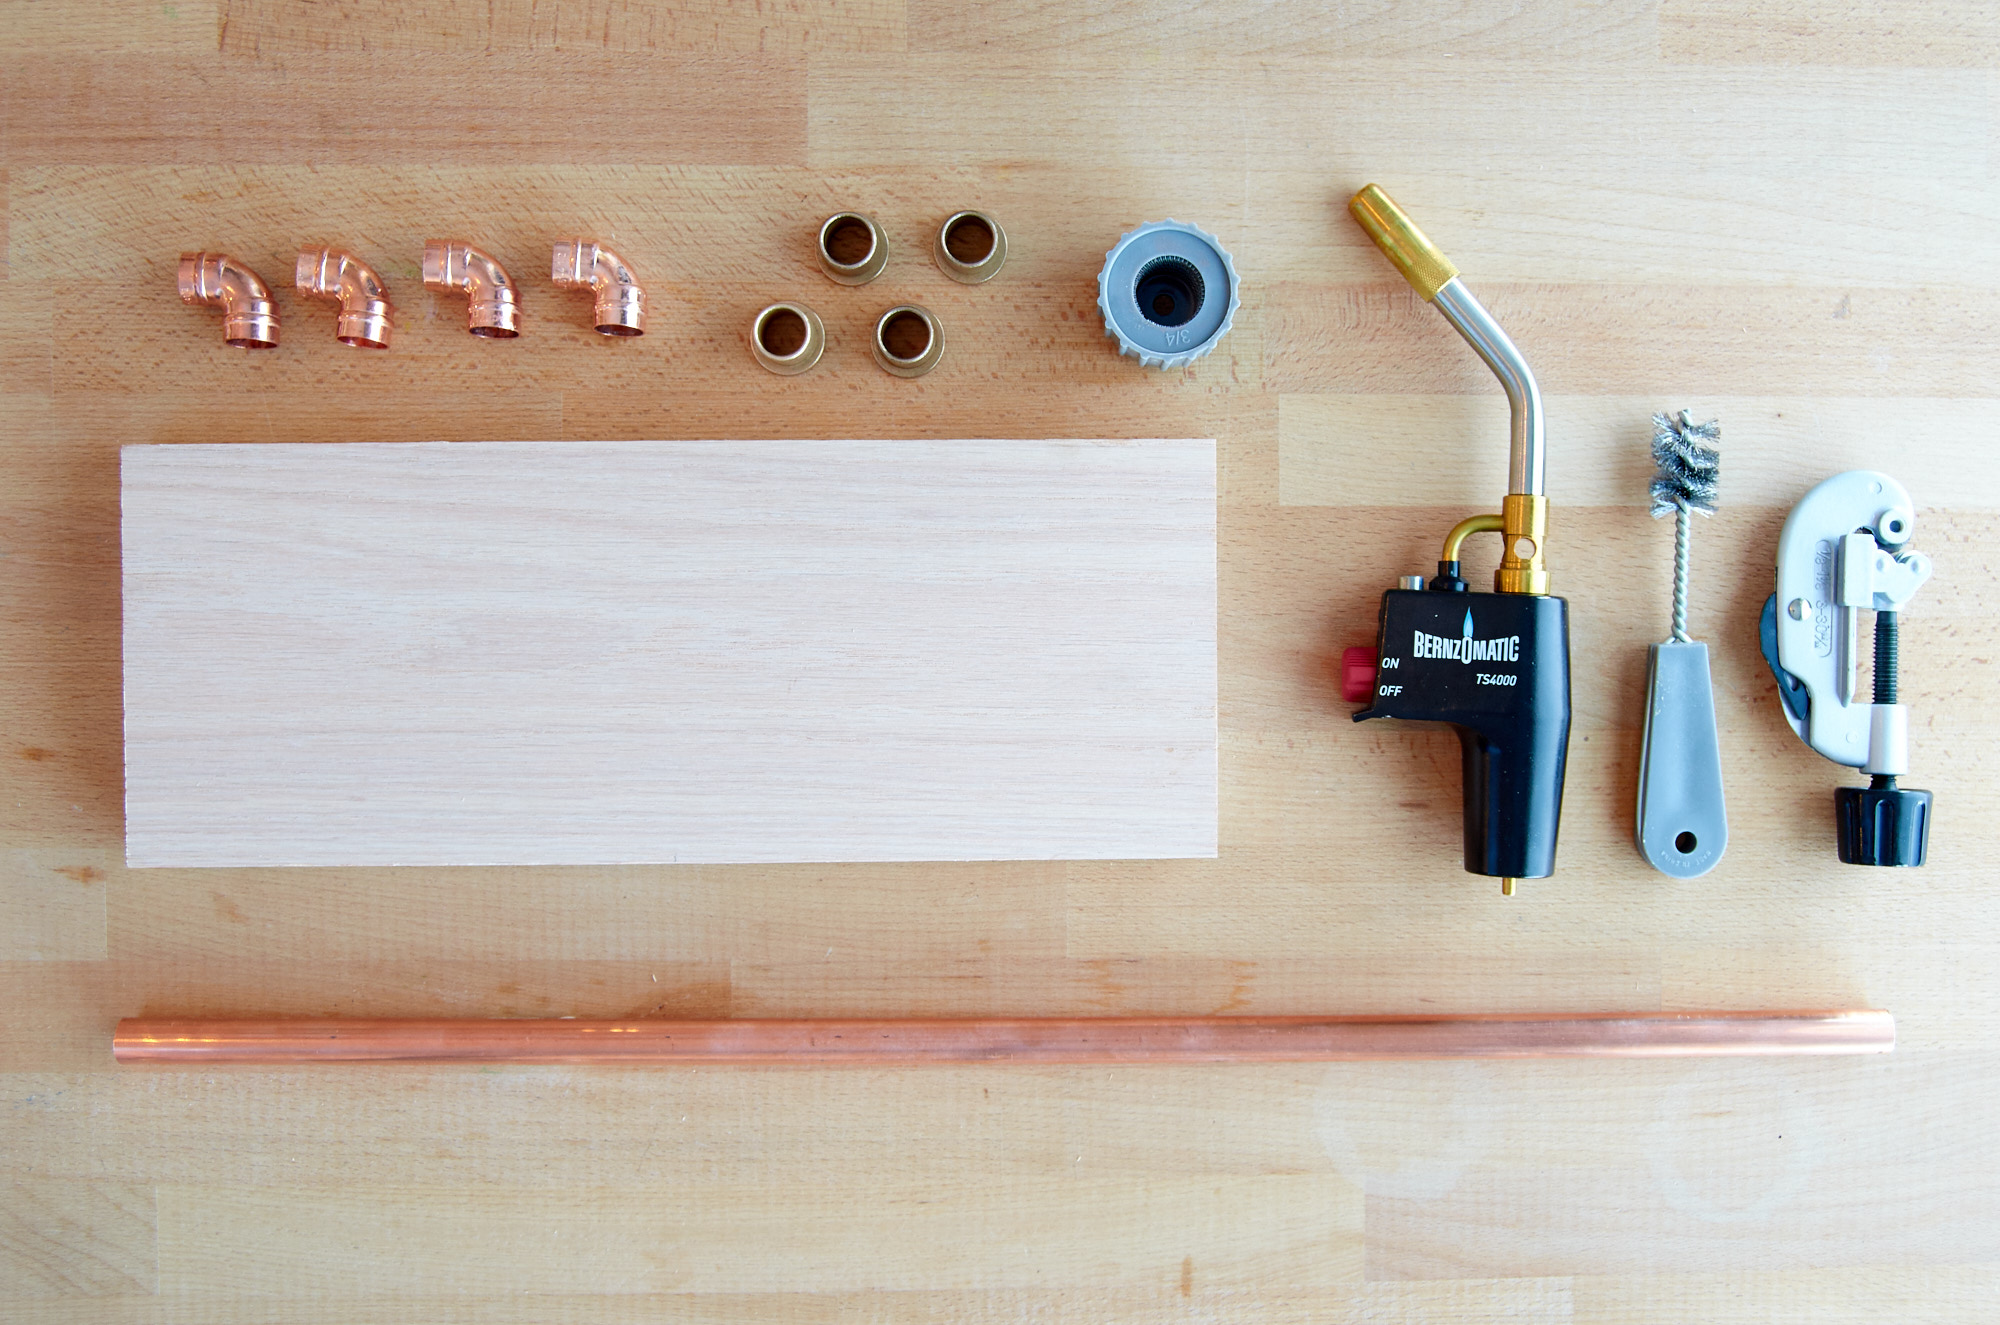
Materials

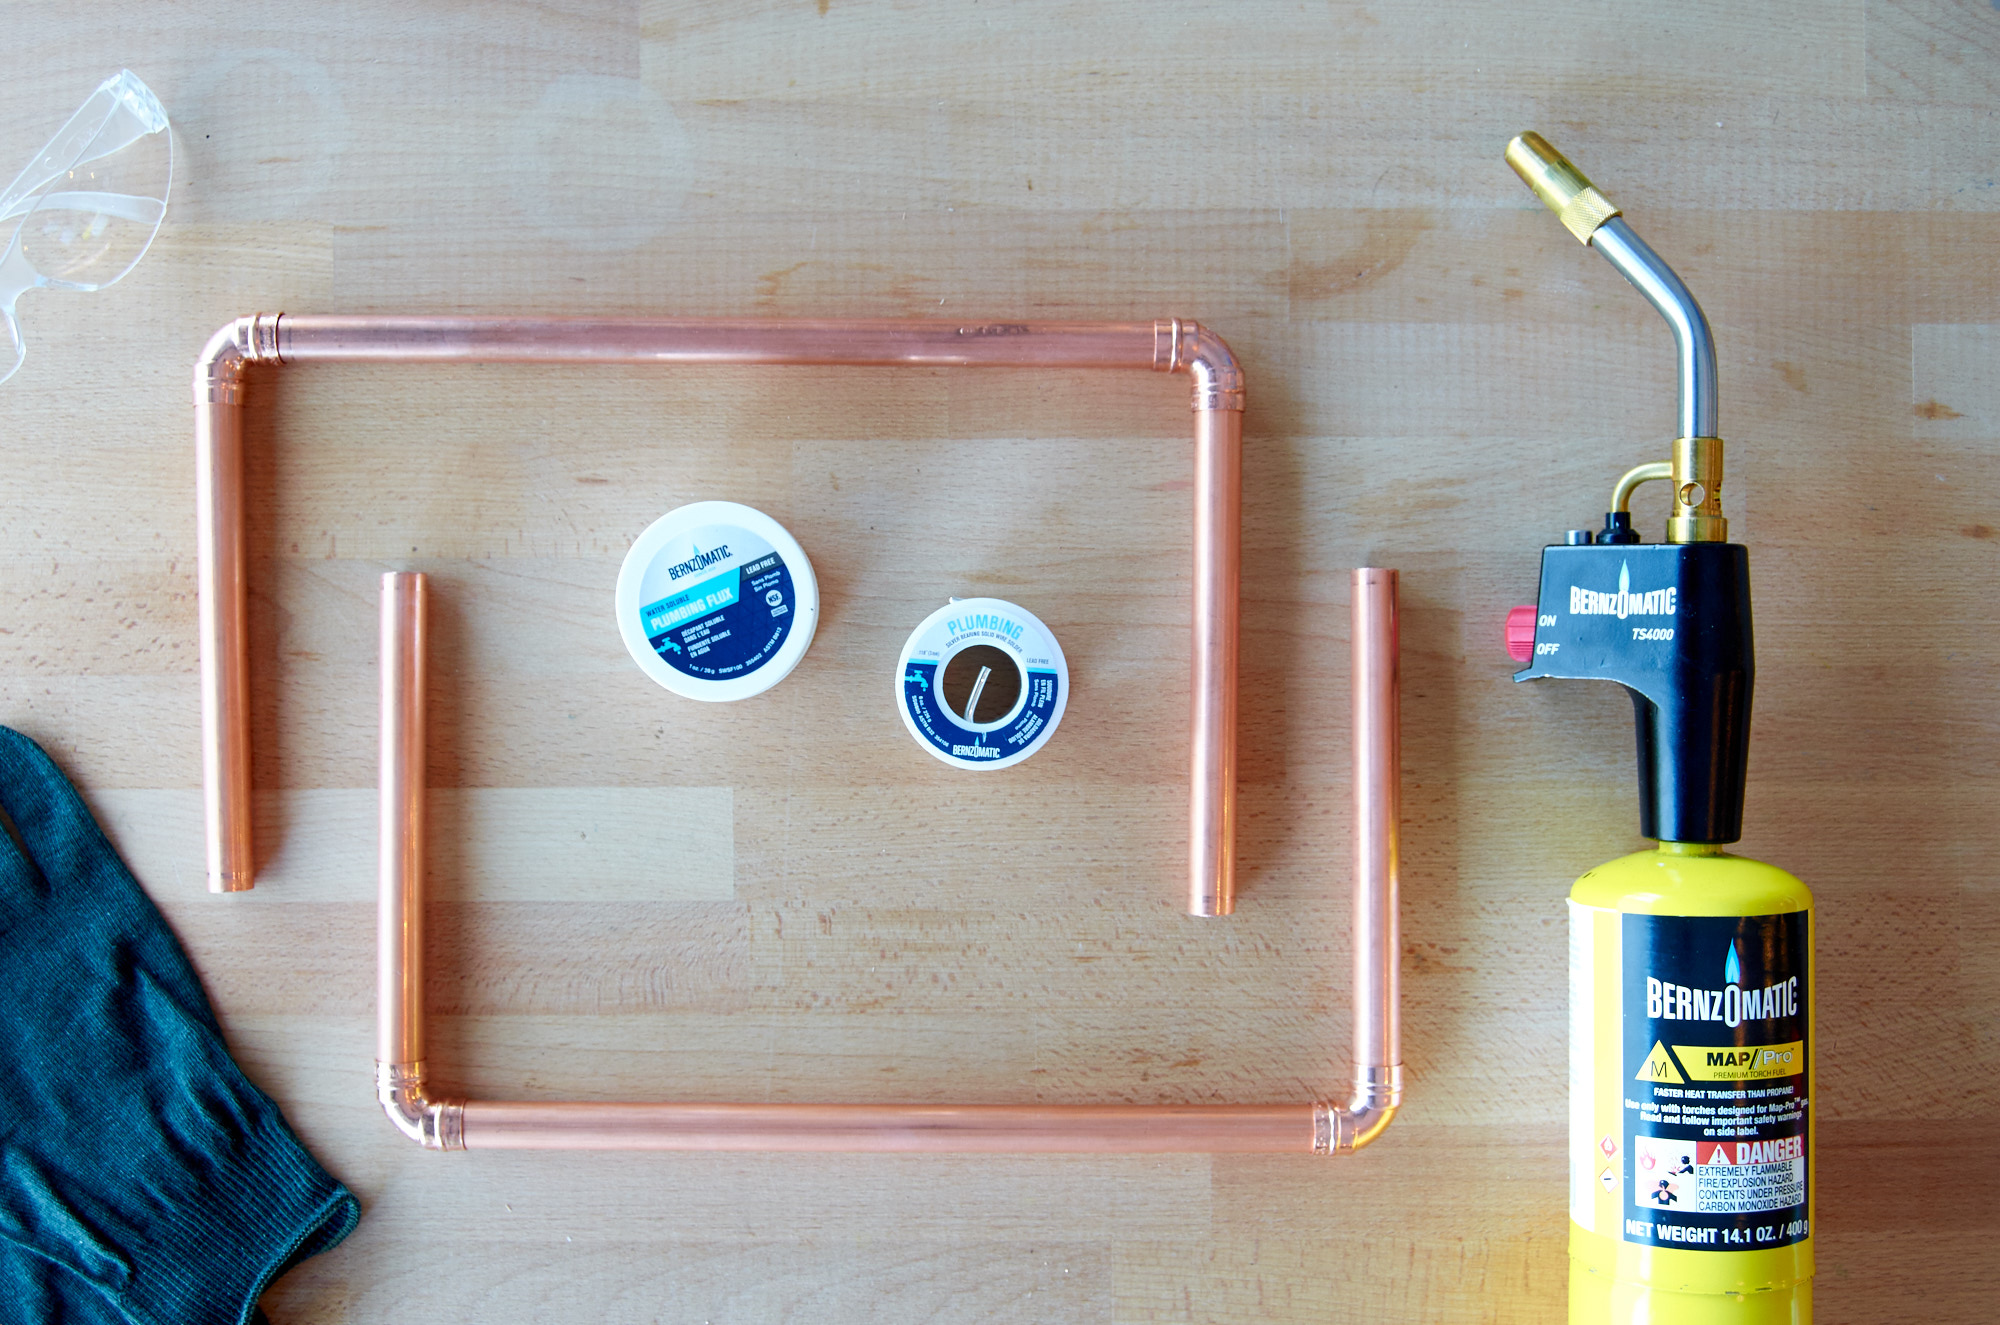
  • Flux
  • Solder
  • Blow torch
  • Copper pipe (3/4" diameter)
  • Four 90-degree elbow fittings
  • Four brass collars (I found mine in the hardware section)
  • A nice-looking piece of wood
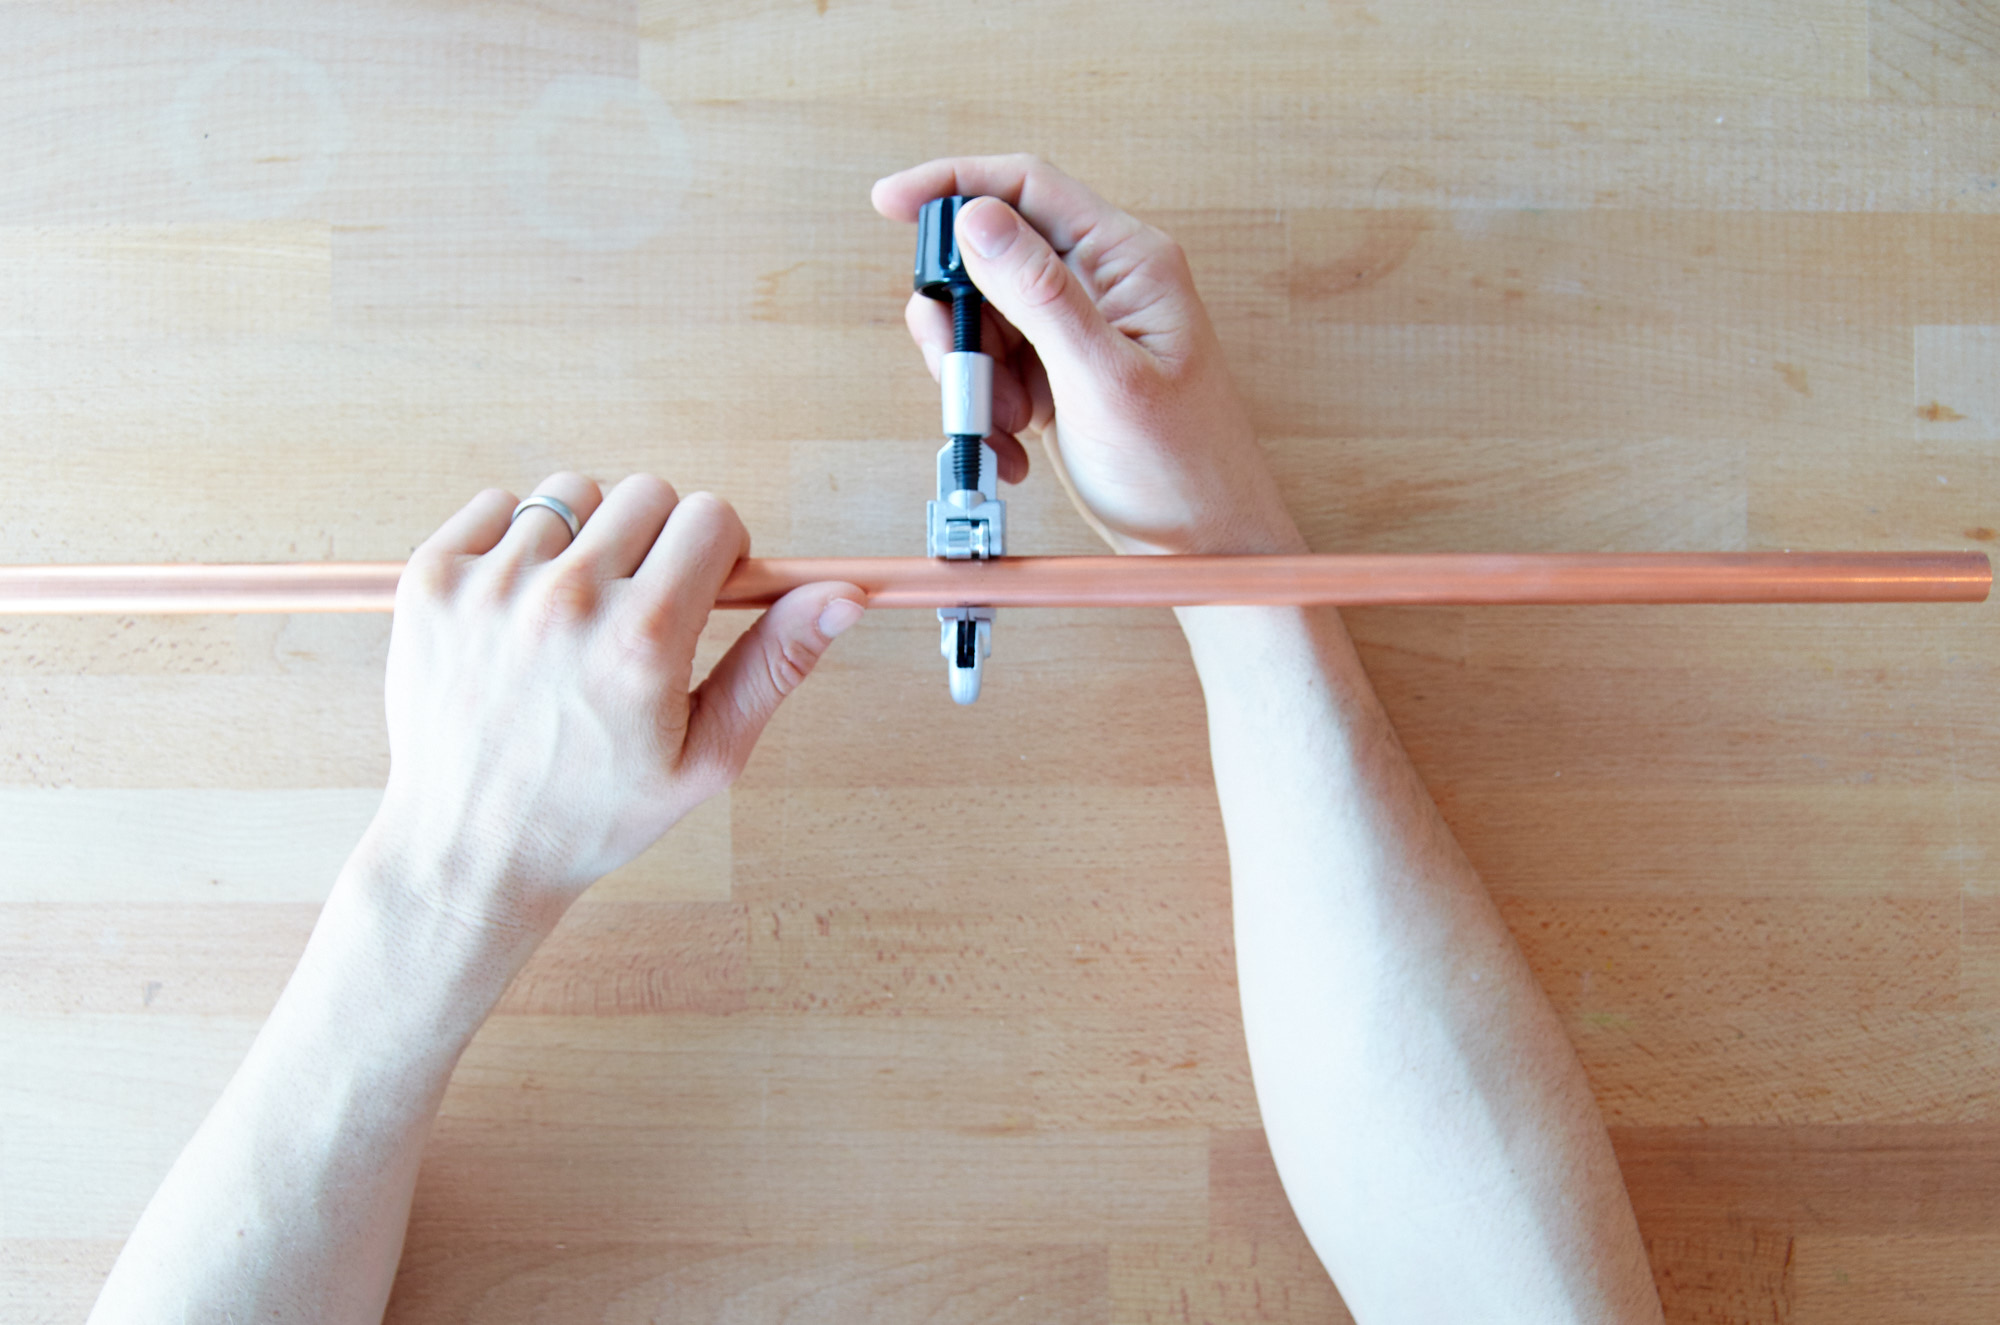
  • Pipe cutter
  • Sandpaper

Step

Cut your wood to size. This will mostly depend on the dimensions of your favorite coffee mugs, and the pour-over brewing system your using. In our case, we went with a 5" x 14" piece of one-inch thick red oak. Stain or finish the wood as you'd like. Remember that it will be in contact with lots of heat and moisture. 

Step

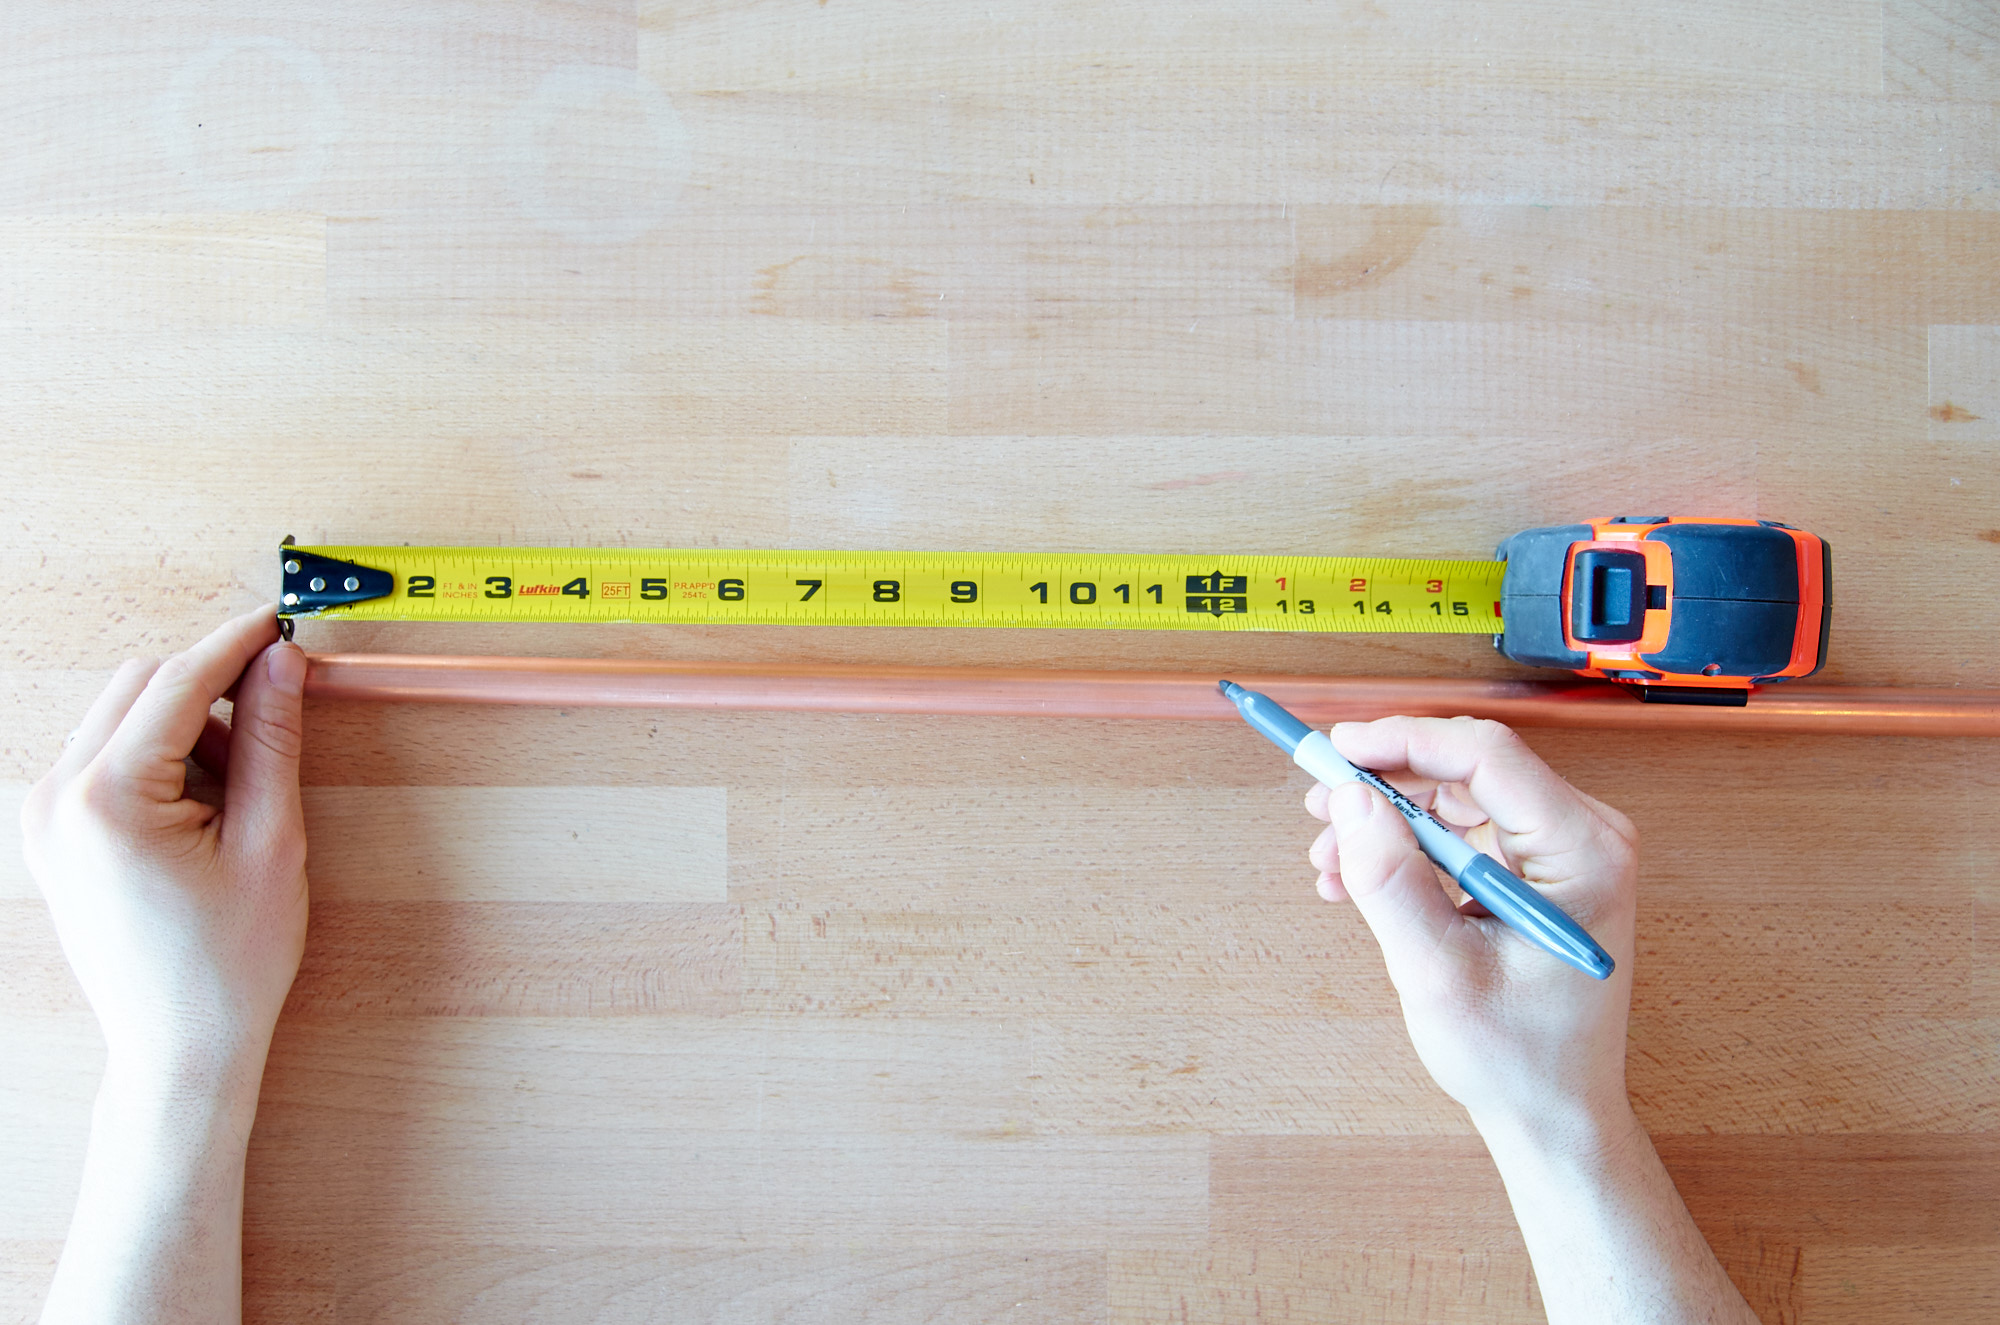
Cut your copper. Here we did four short sections (legs) at 6", and two long pieces at 12". The important thing here is, again, to size the height of the thing to your mugs. We ended up making ours a little too tall, so when the coffee drips down, it splashes a little much. Fortunately, the copper legs are easy to shorten, so after we photographed it, we cut them down a few inches so the dripper sits closer to the top of the cups, diminishing the splashing.

So, when sizing your parts, I'd say go for about two inches of clearance above your cups. 

Step

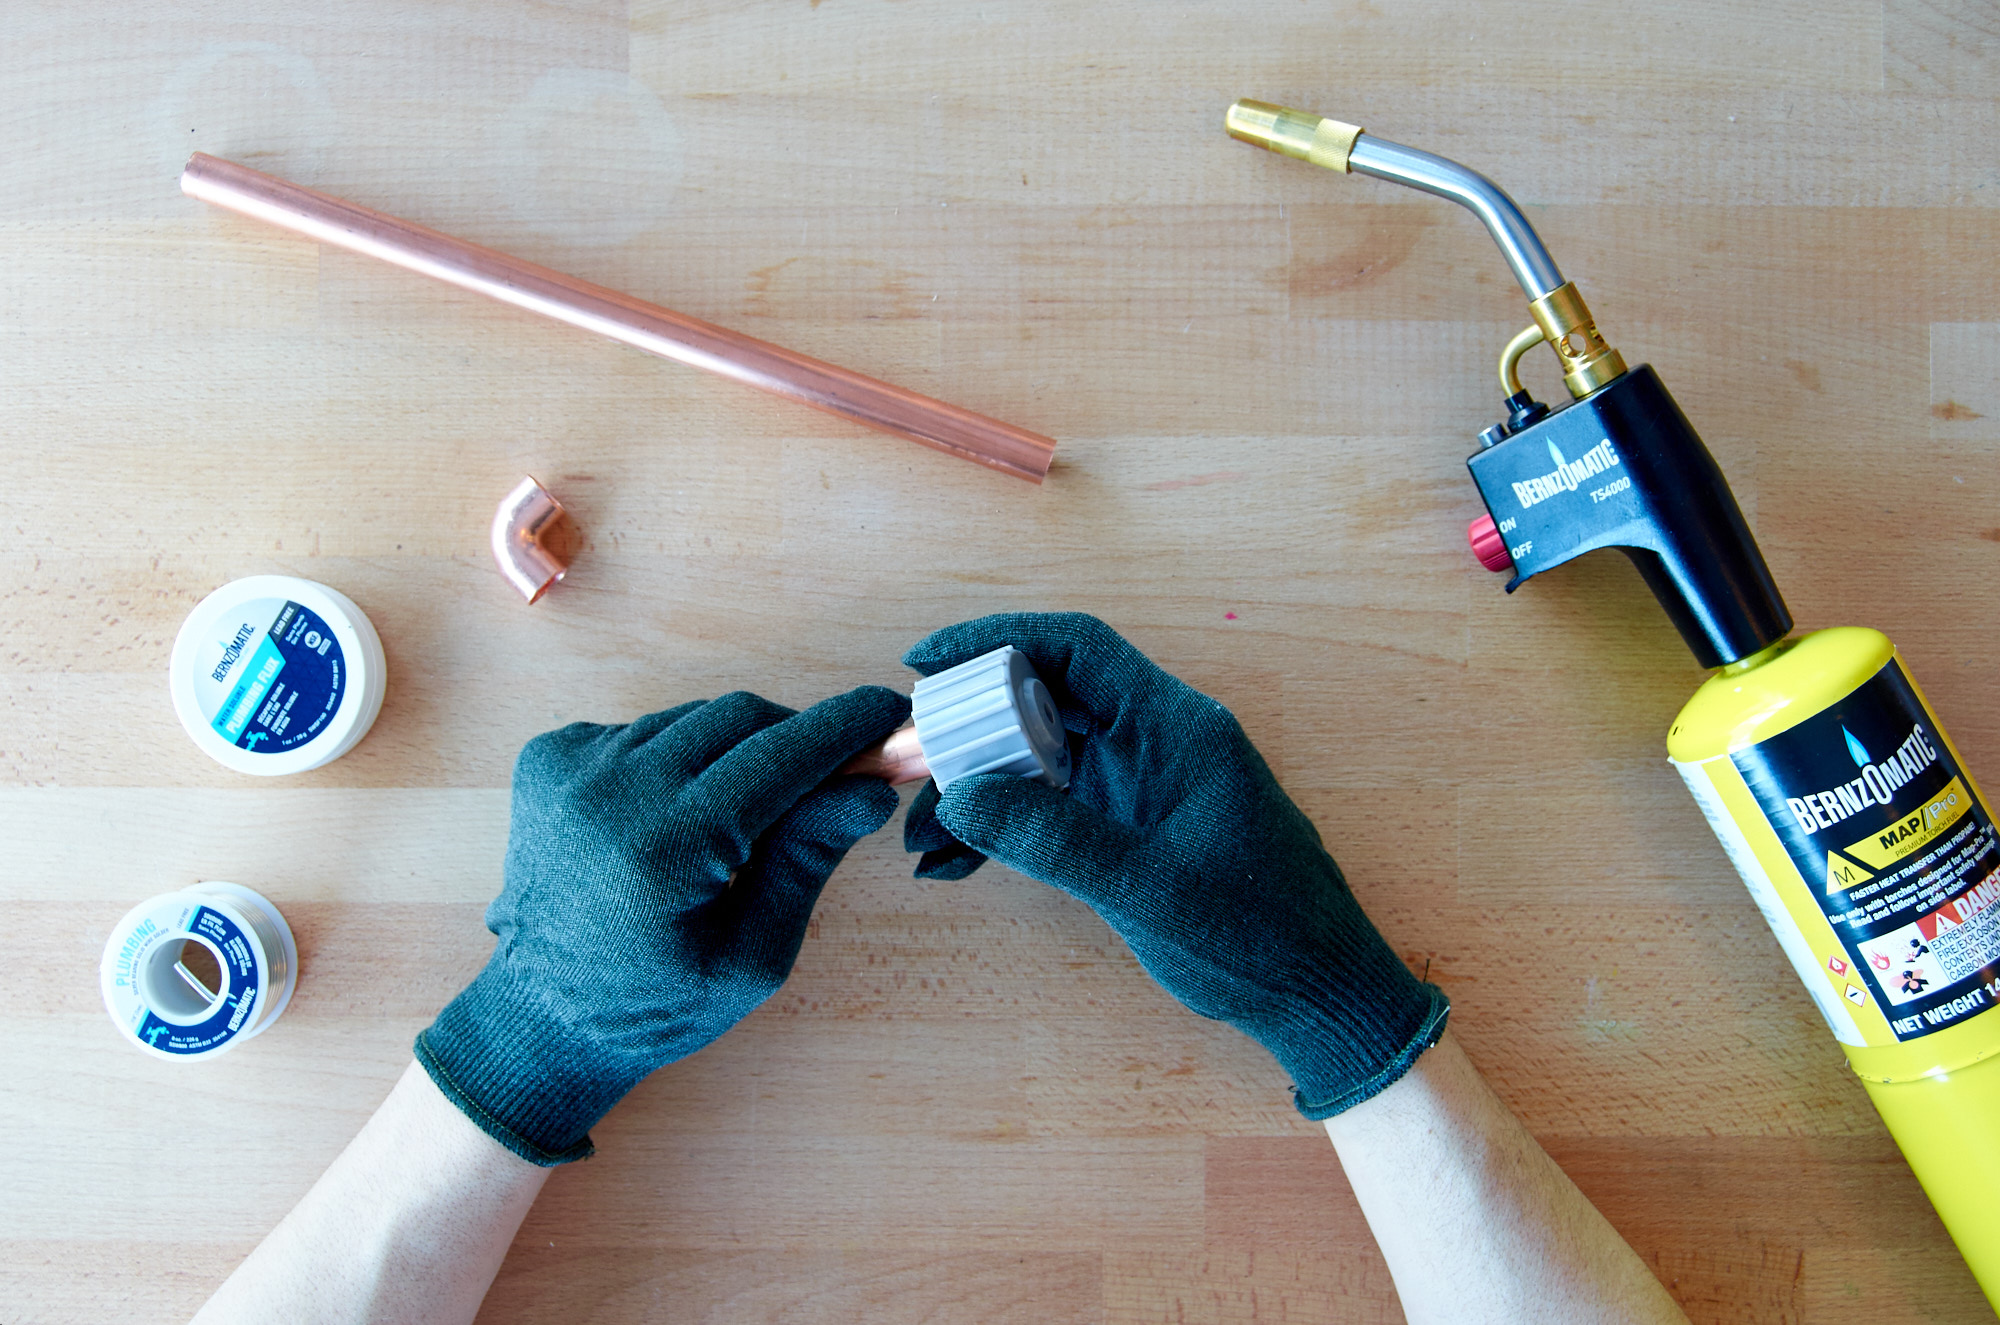
Clean all the ends of your copper pipe with sandpaper or a pipe cleaning tool (below). If you were using these for actual plumbing, this step would be more important, but since these pipes won't be functional, it's just about roughing them up a bit to help strengthen the joint.

Step

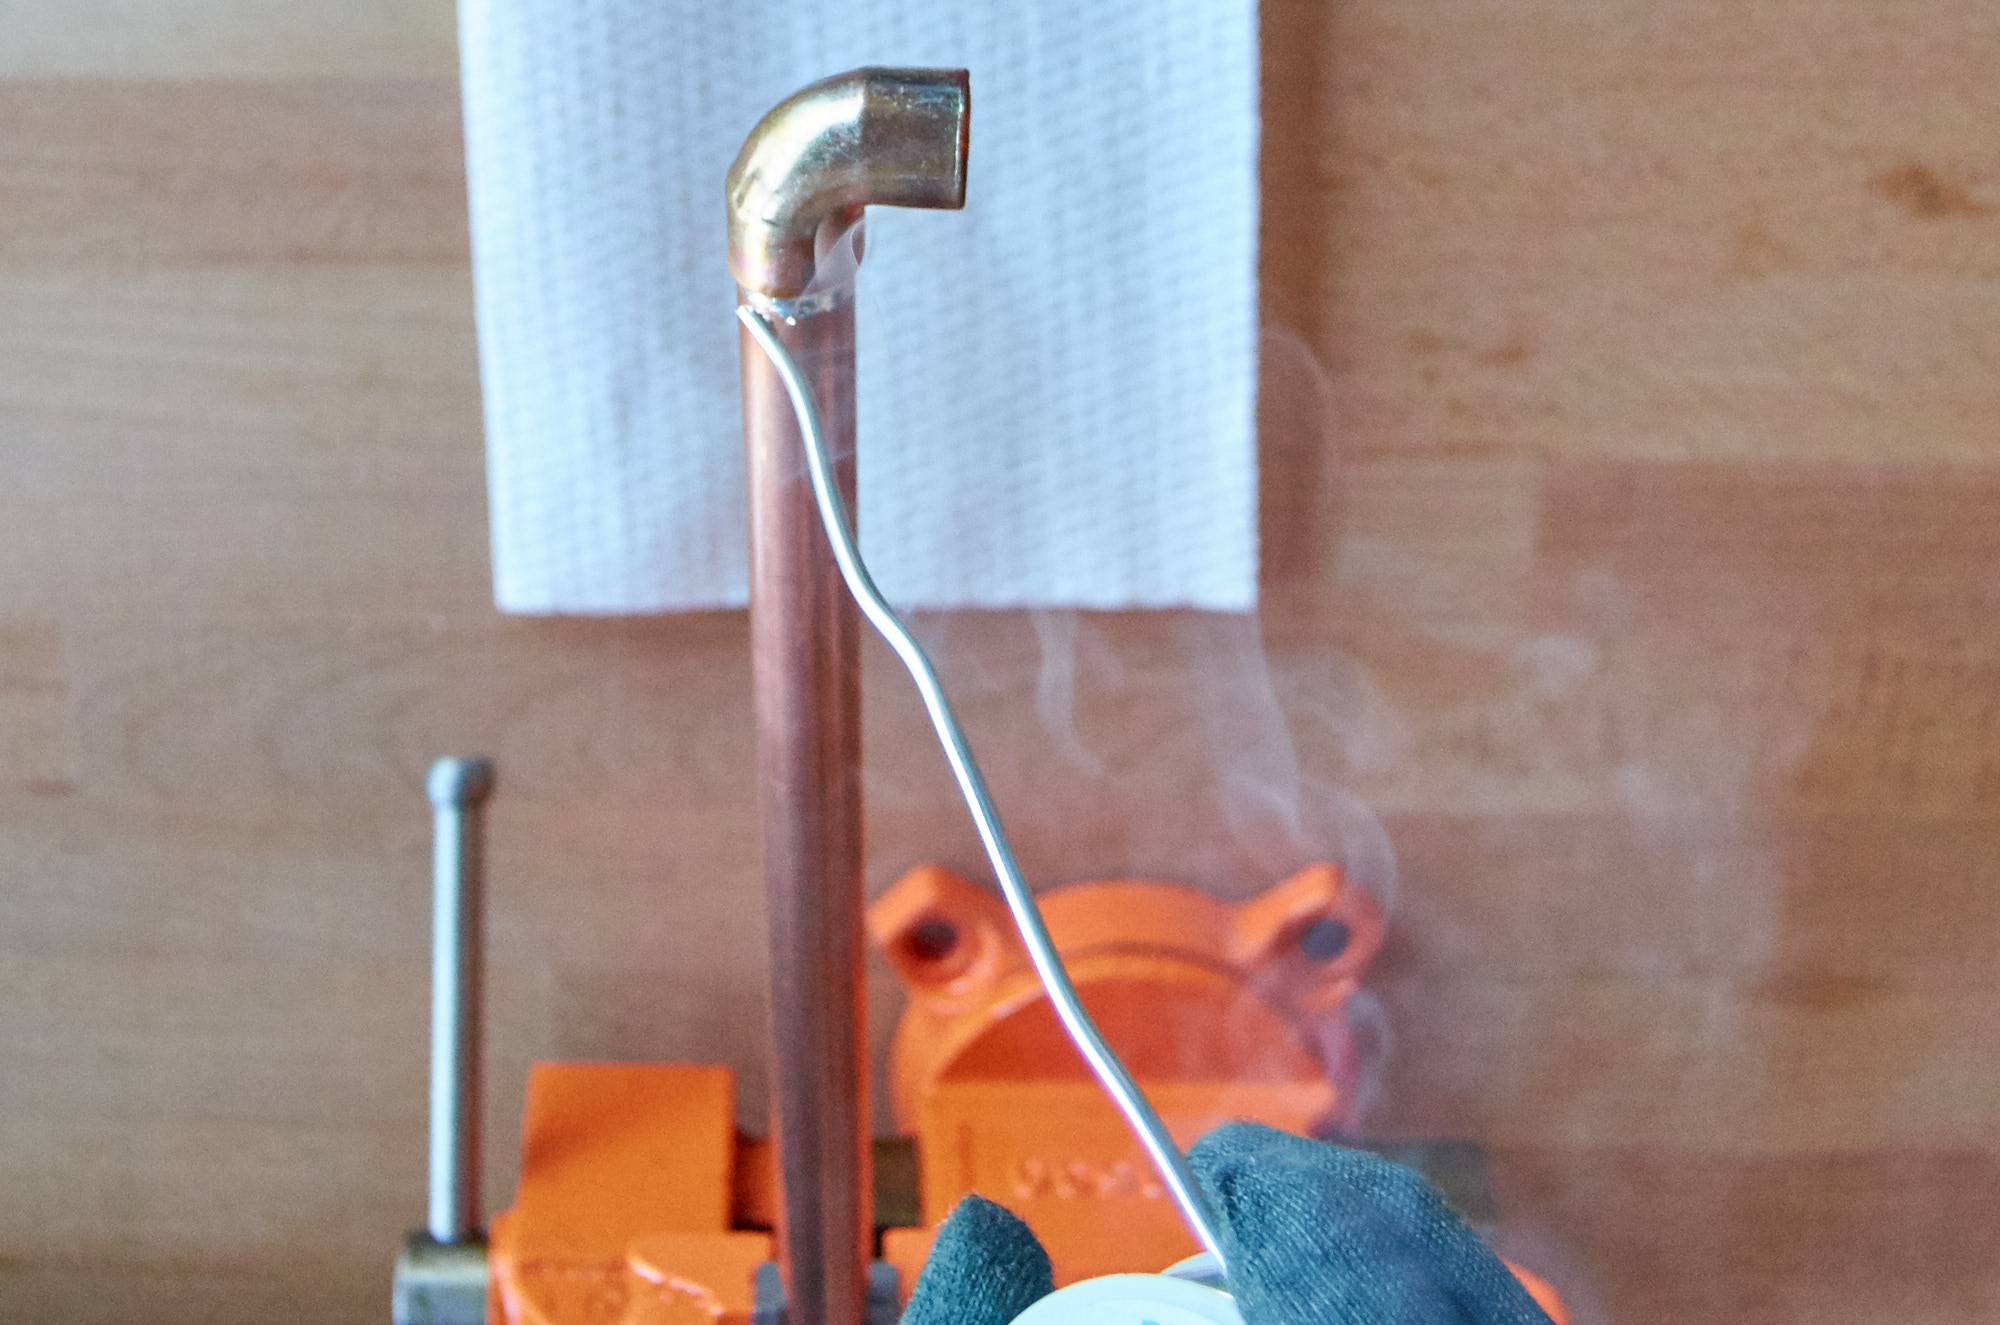
Solder the pieces together. Make sure to use proper safety equipment and do this in a well-ventilated area (a garage or even outside). The solder will smoke a bit and you don't want to set off any fire alarms. Read my post from last year if you need some help with this part.


Step

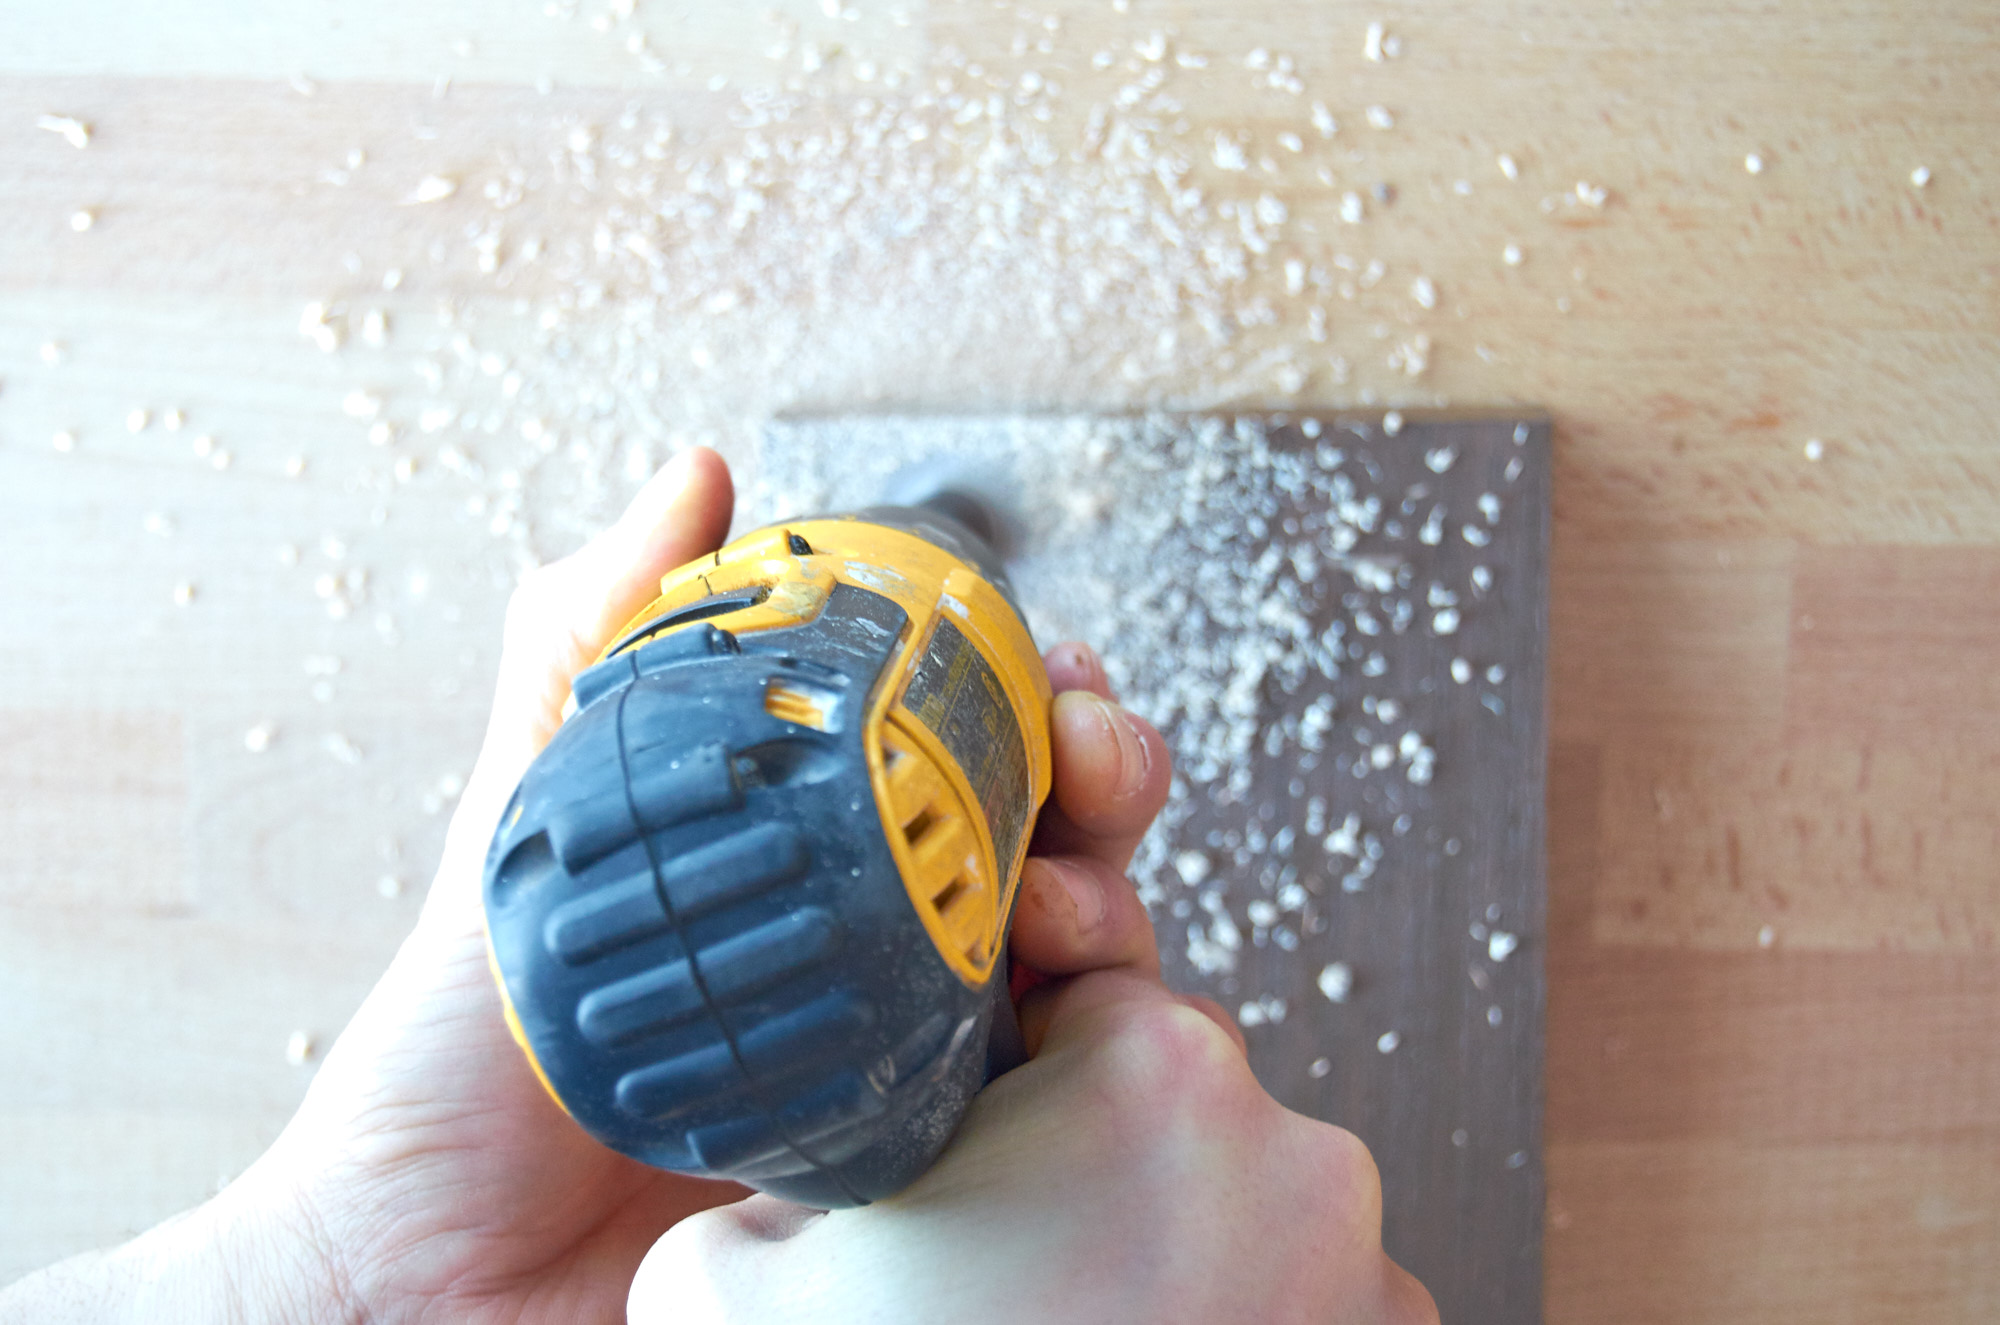
Drill a hole to insert the brass collars, the same size as they're outer diameter. (Ours were 3/4".) You can measure the positions, but the copper is a little forgiving, even when it's all soldered up, so you have a little bit of play. I just eyeballed it and marked the spots with a marker.


Step

Lastly, slide the copper structure onto the collars, and put the kettle on. 


Now brew some delicious coffee!


Thanks to Bernzomatic for sponsoring this post, and thanks to our readers for supporting the brands that support ManMade.


How to Cut a Mortise with a Table Saw

$
0
0

A mortise and tenon is an extremely sturdy and strong way to join wooden furniture. A recess is created in one member (mortise) that allows a protruding tongue from the other (tenon) to fit tightly inside. There's no better way to assemble table bases, chairs, benches, and even frames. 

Except, mortises can take a serious amount of work to cut. Unless you have a dedicated mortising machine, you're in for lots of time with a chisel and mallet, especially on large mortises like the one shown above.    

Woodsmith magazine came up with this clever solution to cut the time significantly. (At least 75% saving by my guess). This would be particularly useful on mortises designed for large cross members, like a workbench or big dining table. The answer: cut the mortise with a table saw. 

How's it work? Well, the leg needs to be in two pieces, and then it's cut before being glued to make a solid leg. Anything that's that beefy is likely going to need to be made from a glued up block anyway, so you can save yourself lots of time. Of course, this will only work with a through mortise, where the tenon goes all the way through instead of being buried inside, but that looks cooler anyway. 

I wish I'd known about this when I built my workbench. Check out the full technique from Woodsmith: Cut a Mortise on the Table Saw


You Need to Watch: "Raw Craft" (Free on YouTube)

$
0
0

If you're the type of person who reads ManMade, you're no doubt familiar with the modern genre of the artsy, dreamy behind-the-scenes video that captures the processes of creative types who make cool stuff. They're fun to watch: a bit poetic, a bit inspiring...and hopefully, they include lots of droolworthy shots of cool benches and workshops and tool walls.

But, there are a lot of them, and all that shallow depth-of-field and voiceover is nice, and... sometimes it can be hard to tell the difference between them.  

So, I'd seen episodes "Raw Craft with Anthony Bourdain" pop up in that little sidebar recommendation thing on YouTube. But over the weekend, I actually clicked on one, and now I'm totally hooked.


Here's why the series is different from other process videos: it's meant as entertainment. It's edited like a TV show. Not an advertisement, not an instructional video, and not lush, focus-racking tool titillation. They're working with actual filmmakers to create compelling visuals and stories. It's got a bit of the modern PBS vibe, and Bourdain's an asset here.

I appreciate that the show acknowledges that "handcrafted" has become a term used too broadly and by the wrong people, but the series seeks to profile true artists who've figured out how to be full time makers. Bonus points: each episode is exactly long enough for a YouTube video. 

The show is sponsored by Scotch whisky makers The Balvenie, whom I applaud for this effort. A lot of brands try for this native advertising, but Balvenie, an independent, family-owned company, has placed themselves in line with craftspeople they want to support and see as their analog in other media and traditions. It's one of those branded setups where everyone wins.  Good work, Balvenie. (Also, your whisky is delicious).

If you've never seen an episode, I'd recommend starting with this one featuring guitar and instrument maker Rachel Rosenkrantz. The two have a nice rapport, her workspace is awesome, and she's a great advocate for her craft. 


All current episodes are live now on the BalvenieUS YouTube page: Raw Craft with Anthony Bourdain


DIY Gift Time: How to Make a Simple Necklace from Scrap Wood and Simple Tools

$
0
0

Handmade Olive Wood Necklace for Valentines

It's that time of year! And by "that time," we mean: time to start thinking about getting a head start on a quality Valentine's Day gift. Skip the flowers and chocolate nonsense and get your hands to work on this elegant, modern necklace that is sure to stun your special someone.    

If you don't have a lot of tools, you could make this whole project with a coping saw, sandpaper, a pair of pliers, and a drill. 


Here's what I used:

  • A small piece of exotic hardwood
  • Saw: coping saw
  • Wipe-on poly finish
  • "Antique brass" necklace chain cut to 21" in length
  • 2 jewelry jump rings
  • Brass jewelry clasp
  • 1/16th drill bit
  • Sandpaper Sheets ranging from 80-1600 grit
  • Needle nose pliers


created at: 02/08/2015

I picked up a packet of pen blanks from a wood crafting store. This is some super cool Bethlehem olive wood. I love the color and contrast it has. It reminded me of a blonde tortoise shell. When looking for a piece, you'll want something that has some closely packed swirls and colors since you'll be cutting out a small piece for the jewelry.


Handmade Olive Wood Necklace for Valentines

 I started by milling a 1/8" thick piece from the blank. To make sure that I got the perfect piece, I milled the entire piece into several strips. I have a bandsaw, but you could easily use a coping saw for this. 


Handmade Olive Wood Necklace for Valentines

After looking at all my cuts, I think I'll go with the second one from the left. Look at all that swirling! 


Handmade Olive Wood Necklace for Valentines

I have a sanding station with an 80 grit paper. This thing can really tear out some wood. So, I'm going to use it to sand my chosen piece down from 1" to 1/4". I went with the sander because my bandsaw has a mind of its own and this sander can allow me to sand down to the perfect size and shape.

A piece of sandpaper attached to a flat piece of glass or plexi with spray adhesive would work well here.


Handmade Olive Wood Necklace for Valentines

Once it's been sanded to the right width, I used a small pull saw to cut it to length. Coping saw also good on this.  


Handmade Olive Wood Necklace for Valentines

Minimize drill tear-out by attaching a piece of tape to the back of your jewelry and set it on a block of waste wood to stabilize your piece.


Handmade Olive Wood Necklace for Valentines

Now for some meticulous sanding! Start with 80 grit and work your way up to 1600. I taped each piece of sand paper to the table to make it easier to sand.

Handmade Olive Wood Necklace for Valentines

When the wood is super smooth it's time to coat it with poly. I recommend at least 2 coats. Sand with 1600 grit in between each application.

If you prefer a mirror finish, you can use automotive polishing compound to buff out a really nice shine.

Handmade Olive Wood Necklace for Valentines

Gather all the jewelry making supplies you have laying around. Or, if you're like me, you have to go out and buy everything because you've never made jewelry. Assemble everything like you'd imagine. Attach the link rings to the holes on the wood piece. Then, attach the chain to the links. At the halfway mark, cut the chain and attach the clasps.

Finally, give your piece a final polish and put it in a jewelry box and you'll be ready to amaze!

Handmade Olive Wood Necklace for Valentines

Note: You'll notice a difference in the cover image piece and the final piece. After my wife tried it on she said it was a little too thick. She was right. So I sanded it down from 1/2" to 1/4". 


DIY Gift Time: How to Make a Simple Necklace from Scrap Wood and Basic Tools

$
0
0

Handmade Olive Wood Necklace for Valentines

It's that time of year! And by "that time," we mean: time to start thinking about getting a head start on a quality Valentine's Day gift. Skip the flowers and chocolate nonsense and get your hands to work on this elegant, modern necklace that is sure to stun your special someone.    

If you don't have a lot of tools, you could make this whole project with a coping saw, sandpaper, a pair of pliers, and a drill. 


Here's what I used:

  • A small piece of exotic hardwood
  • Saw: coping saw
  • Wipe-on poly finish
  • "Antique brass" necklace chain cut to 21" in length
  • 2 jewelry jump rings
  • Brass jewelry clasp
  • 1/16th drill bit
  • Sandpaper Sheets ranging from 80-1600 grit
  • Needle nose pliers


created at: 02/08/2015

I picked up a packet of pen blanks from a wood crafting store. This is some super cool Bethlehem olive wood. I love the color and contrast it has. It reminded me of a blonde tortoise shell. When looking for a piece, you'll want something that has some closely packed swirls and colors since you'll be cutting out a small piece for the jewelry.


Handmade Olive Wood Necklace for Valentines

 I started by milling a 1/8" thick piece from the blank. To make sure that I got the perfect piece, I milled the entire piece into several strips. I have a bandsaw, but you could easily use a coping saw for this. 


Handmade Olive Wood Necklace for Valentines

After looking at all my cuts, I think I'll go with the second one from the left. Look at all that swirling! 


Handmade Olive Wood Necklace for Valentines

I have a sanding station with an 80 grit paper. This thing can really tear out some wood. So, I'm going to use it to sand my chosen piece down from 1" to 1/4". I went with the sander because my bandsaw has a mind of its own and this sander can allow me to sand down to the perfect size and shape.

A piece of sandpaper attached to a flat piece of glass or plexi with spray adhesive would work well here.


Handmade Olive Wood Necklace for Valentines

Once it's been sanded to the right width, I used a small pull saw to cut it to length. Coping saw also good on this.  


Handmade Olive Wood Necklace for Valentines

Minimize drill tear-out by attaching a piece of tape to the back of your jewelry and set it on a block of waste wood to stabilize your piece.


Handmade Olive Wood Necklace for Valentines

Now for some meticulous sanding! Start with 80 grit and work your way up to 1600. I taped each piece of sand paper to the table to make it easier to sand.

Handmade Olive Wood Necklace for Valentines

When the wood is super smooth it's time to coat it with poly. I recommend at least 2 coats. Sand with 1600 grit in between each application.

If you prefer a mirror finish, you can use automotive polishing compound to buff out a really nice shine.

Handmade Olive Wood Necklace for Valentines

Gather all the jewelry making supplies you have laying around. Or, if you're like me, you have to go out and buy everything because you've never made jewelry. Assemble everything like you'd imagine. Attach the link rings to the holes on the wood piece. Then, attach the chain to the links. At the halfway mark, cut the chain and attach the clasps.

Finally, give your piece a final polish and put it in a jewelry box and you'll be ready to amaze!

Handmade Olive Wood Necklace for Valentines

Note: You'll notice a difference in the cover image piece and the final piece. After my wife tried it on she said it was a little too thick. She was right. So I sanded it down from 1/2" to 1/4". 


How to Get Fit and Lose Weight this Year without Spending a Dime

$
0
0

Many will make resolutions on New Years, vowing to drop the additional pounds leftover from the holidays, and generally making more healthful choices starting January 1st. And while new beginnings can be a helpful motivation, we think the best time to actually get started on new goals is actually now:  late winter and early spring. So, while we hope you made some good progress in the first few weeks of January, the real question is: how's it going come February 1st?    

Of course, choosing fitness is all about resources: where is the time going to come from? How will I be the most efficient? And do I have all the gear and access that I need in order to make it happen?

Here's our vote: don't go buy....anything. Not a gym membership. Not a new bike. Not a bunch of free weights. And certainly not a big expensive home exercise machine. 

Instead, use what you have — you're own body, a wall, a chair — in whatever space you can come by, using your own built-in form of resistance. These two types of exercises, known as body weight exercises and interval training, are free, accessible, and provides a great workout. You'll not only build strength, you'll burn many more calories than straight cardio like jogging. 


1. Start with a video to learn the basics. YouTube is there with all its info (good and bad) for the taking. So, find a few videos from a source that looks trustworthy, and figure out the moves, form, and vocabulary.  Wanna know what a "burpee" or an "extended plank" is? Here's where to find out. We like this beginner video from Nerd Fitness. 


2. Dial it in. Once you've figured out what you're doing (and learned to do them effectively and safely), start digging around the internet to find some other versions that you can integrate into your day. We love this "Seven Minute Workout" from The New York Times for its efficiency. If you can, do it once in the morning, once over your lunch break, and once right before dinner. There's also an advanced seven minute workout, and an app to help you through it. 


3. Add Some Variety. By the time you familiarize yourself with these forms, you're also likely to have become a bit bored with the routine. Now's the time to spice it up. These workout graphics from DareBee are free, simple, and easy to follow. And, most importantly, there's a whole heap of them to keep things interesting. 


4. Add in Some Intervals. It might not seem like it during the early weeks of February, but eventually, temps will warm up, the days will get longer, and you'll want to move your fitness routine outside. Whether you run, bike, row, walk, swim, or roller blade (yes, people still do this), moving around outside is always better than tumbling around in your living room. Whatever you do, try to get the most bang-for-your-0-bucks by adding in some intervals to your training. Rather that just run at 60% for a half hour or cruise along for a twenty miles easily spinning the pedals, vary your level of intensity to keep things interesting and make your body work for it. A great place to start is the 10-20-30 method, where you move at a manageable pace for 30 seconds, increase your intensity to medium-hard for 20, and then go all out for 10 seconds. It's super easy to remember, and you don't need to check a watch or timer. Plus, all that counting actually makes things go faster. Seriously, it's fun. 


5. Use Apps for Accountability and Reminders. Your smartphone is your friend. There are hundreds, maybe thousands, of fitness apps out there, and many of them have a free versions. While you could use them to track everything you're doing, we like to choose specific apps to help reach identified goals. So, try something like "learn to do a hundred pushups in three months" or complete an extensive core workout program. All of these apps have little reminders that will gladly pop up on your lock screen and casually motivate you to get some good work done. Use 'em!


Okay, okay. If you absolutely need something to buy, these are the two best value investments you can make for your health. Thankfully, they're super affordable.


What are your favorite ways to seek fitness and strength for free? Share your thoughts in the comments below. 


Make This: Stylish Leather Headphone + Cable Organizer

$
0
0

DIY Leather Earbud Organizer

For those of you who have already made the switch to wireless earbuds (thanks Apple), tangled cords aren’t really an issue you have to deal with any more.

But, if your like me and carry around "old school" wired earbuds in your pocket, you understand the wad of knots you pull out every time you go digging. And, though some may appreciate the eternal struggle (and contemporary art sculpture?) it really doesn’t have to be that way.

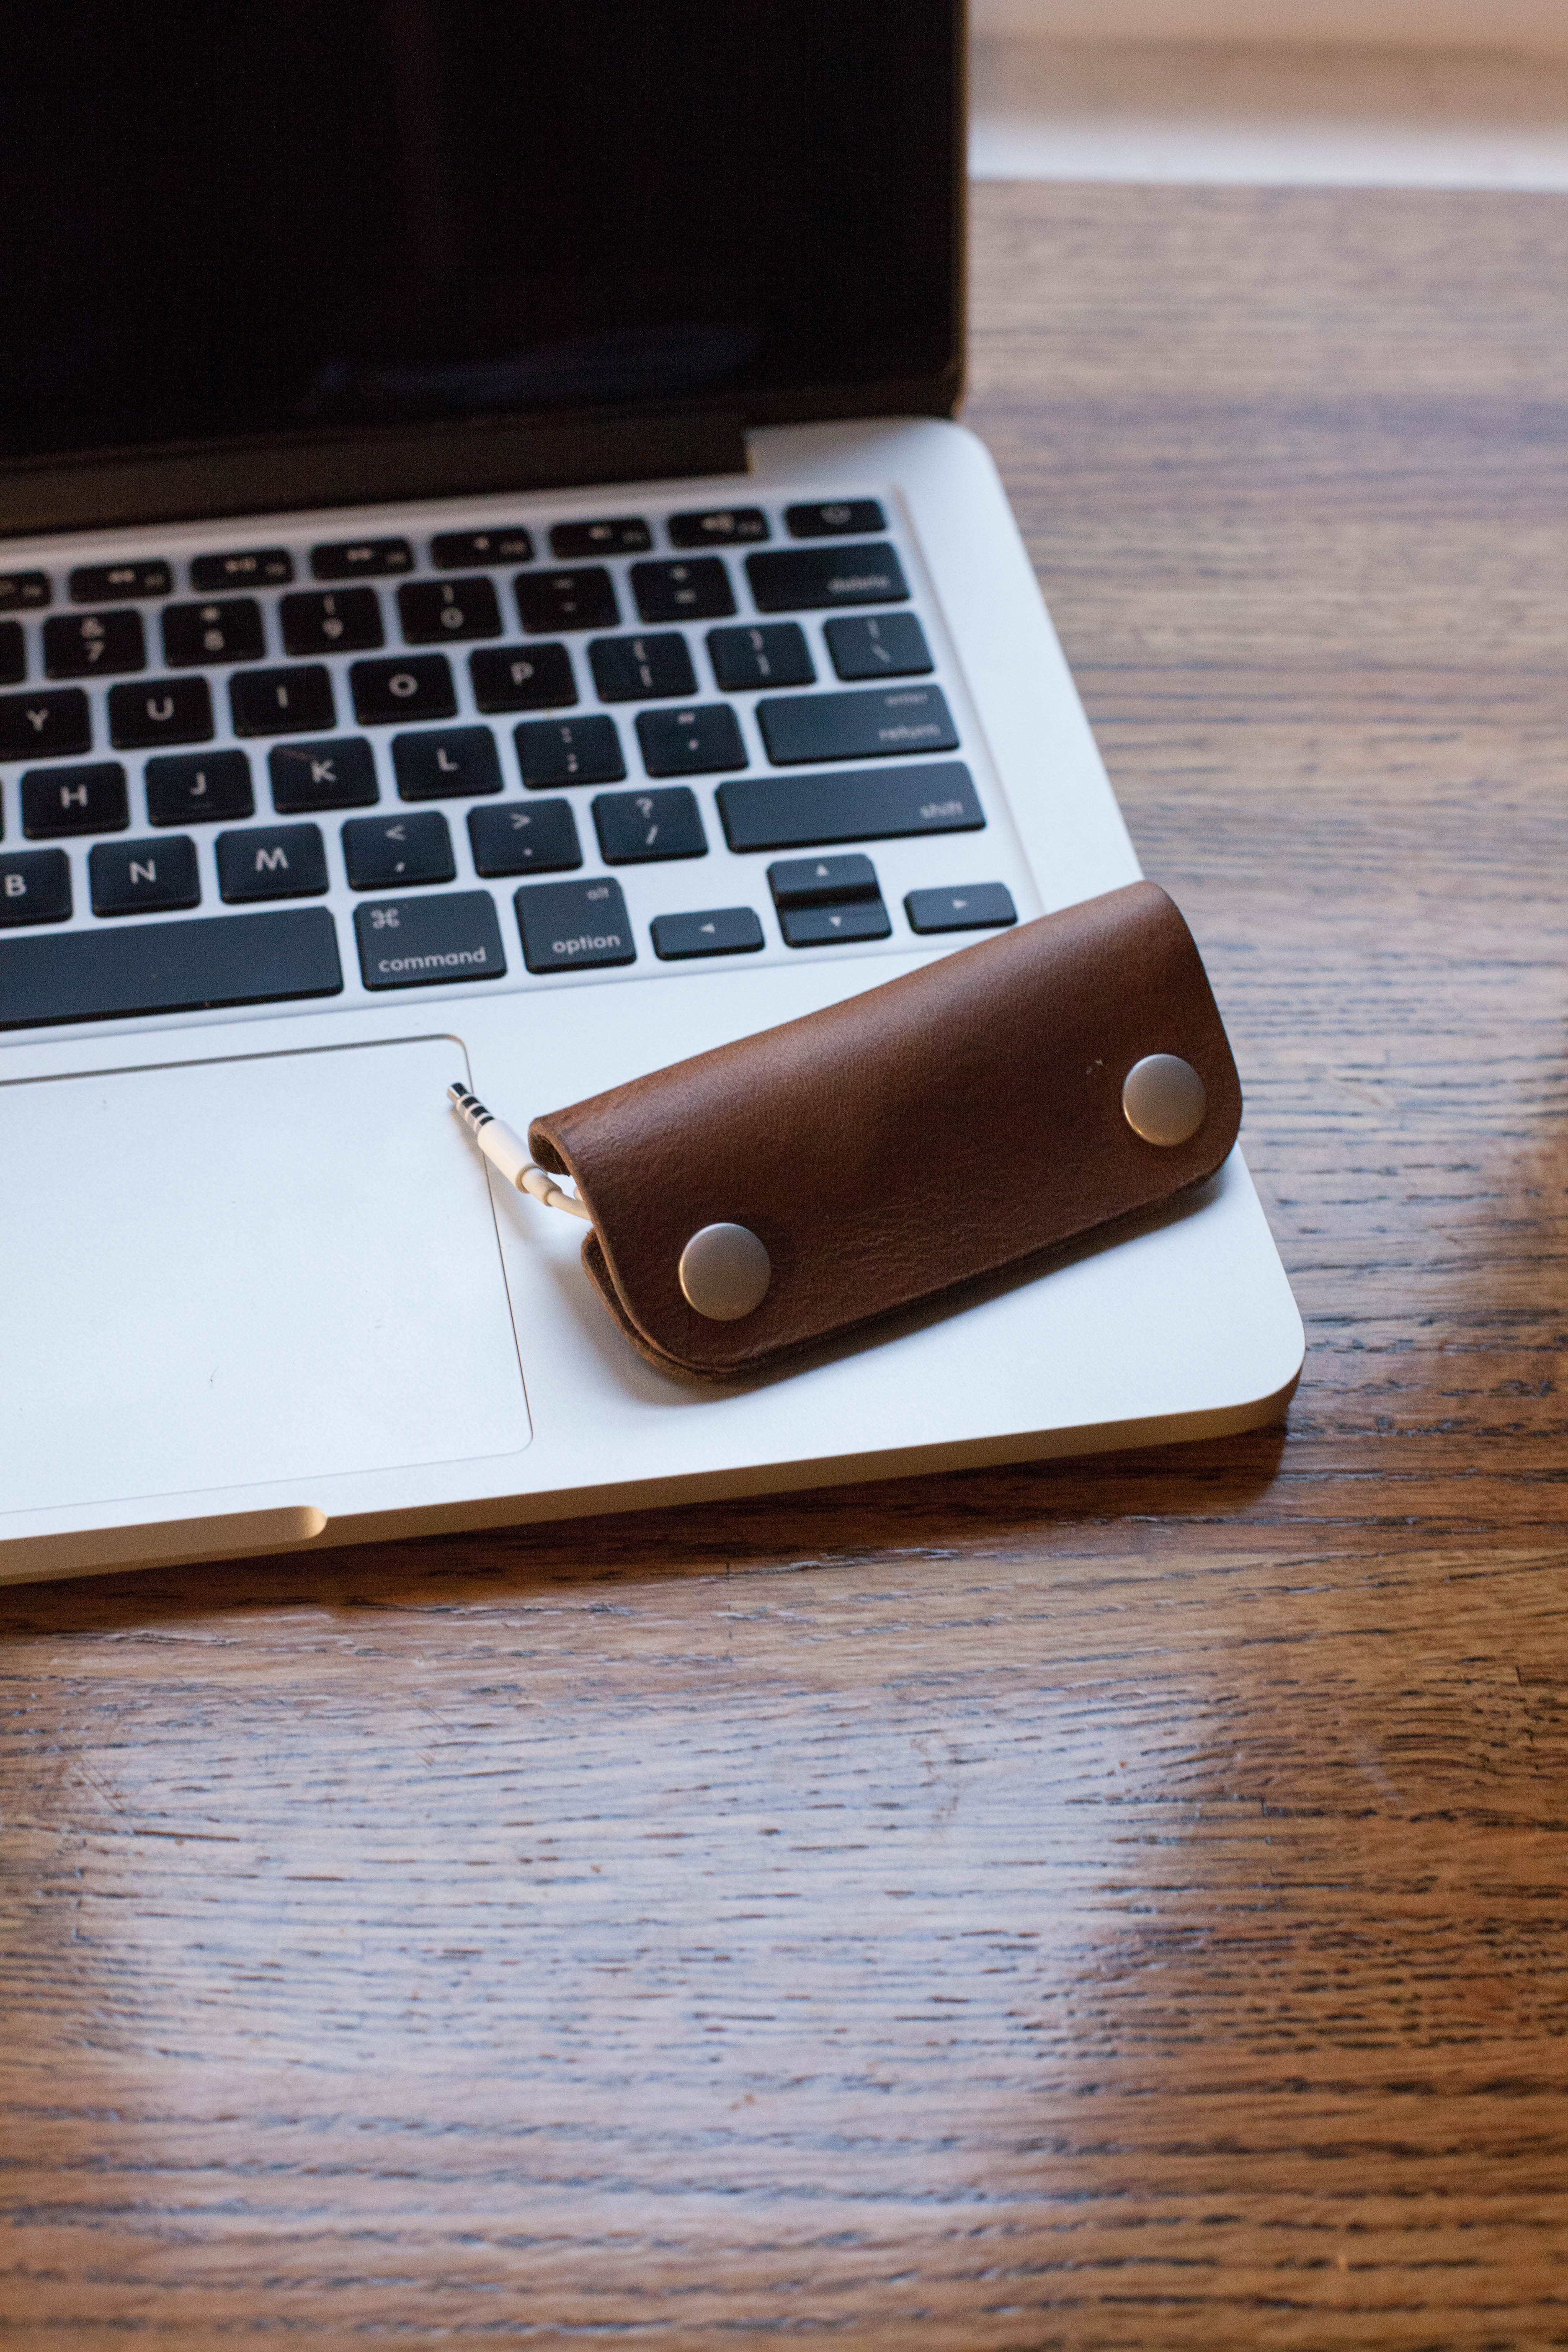
This simple DIY earbud/headphone/cord organizer keeps your cables knot free and still fits sleekly in your pocket. Using it is easy: all you have to do is wrap your earbuds around the organizer and snap it closed. And making it is just as simple.


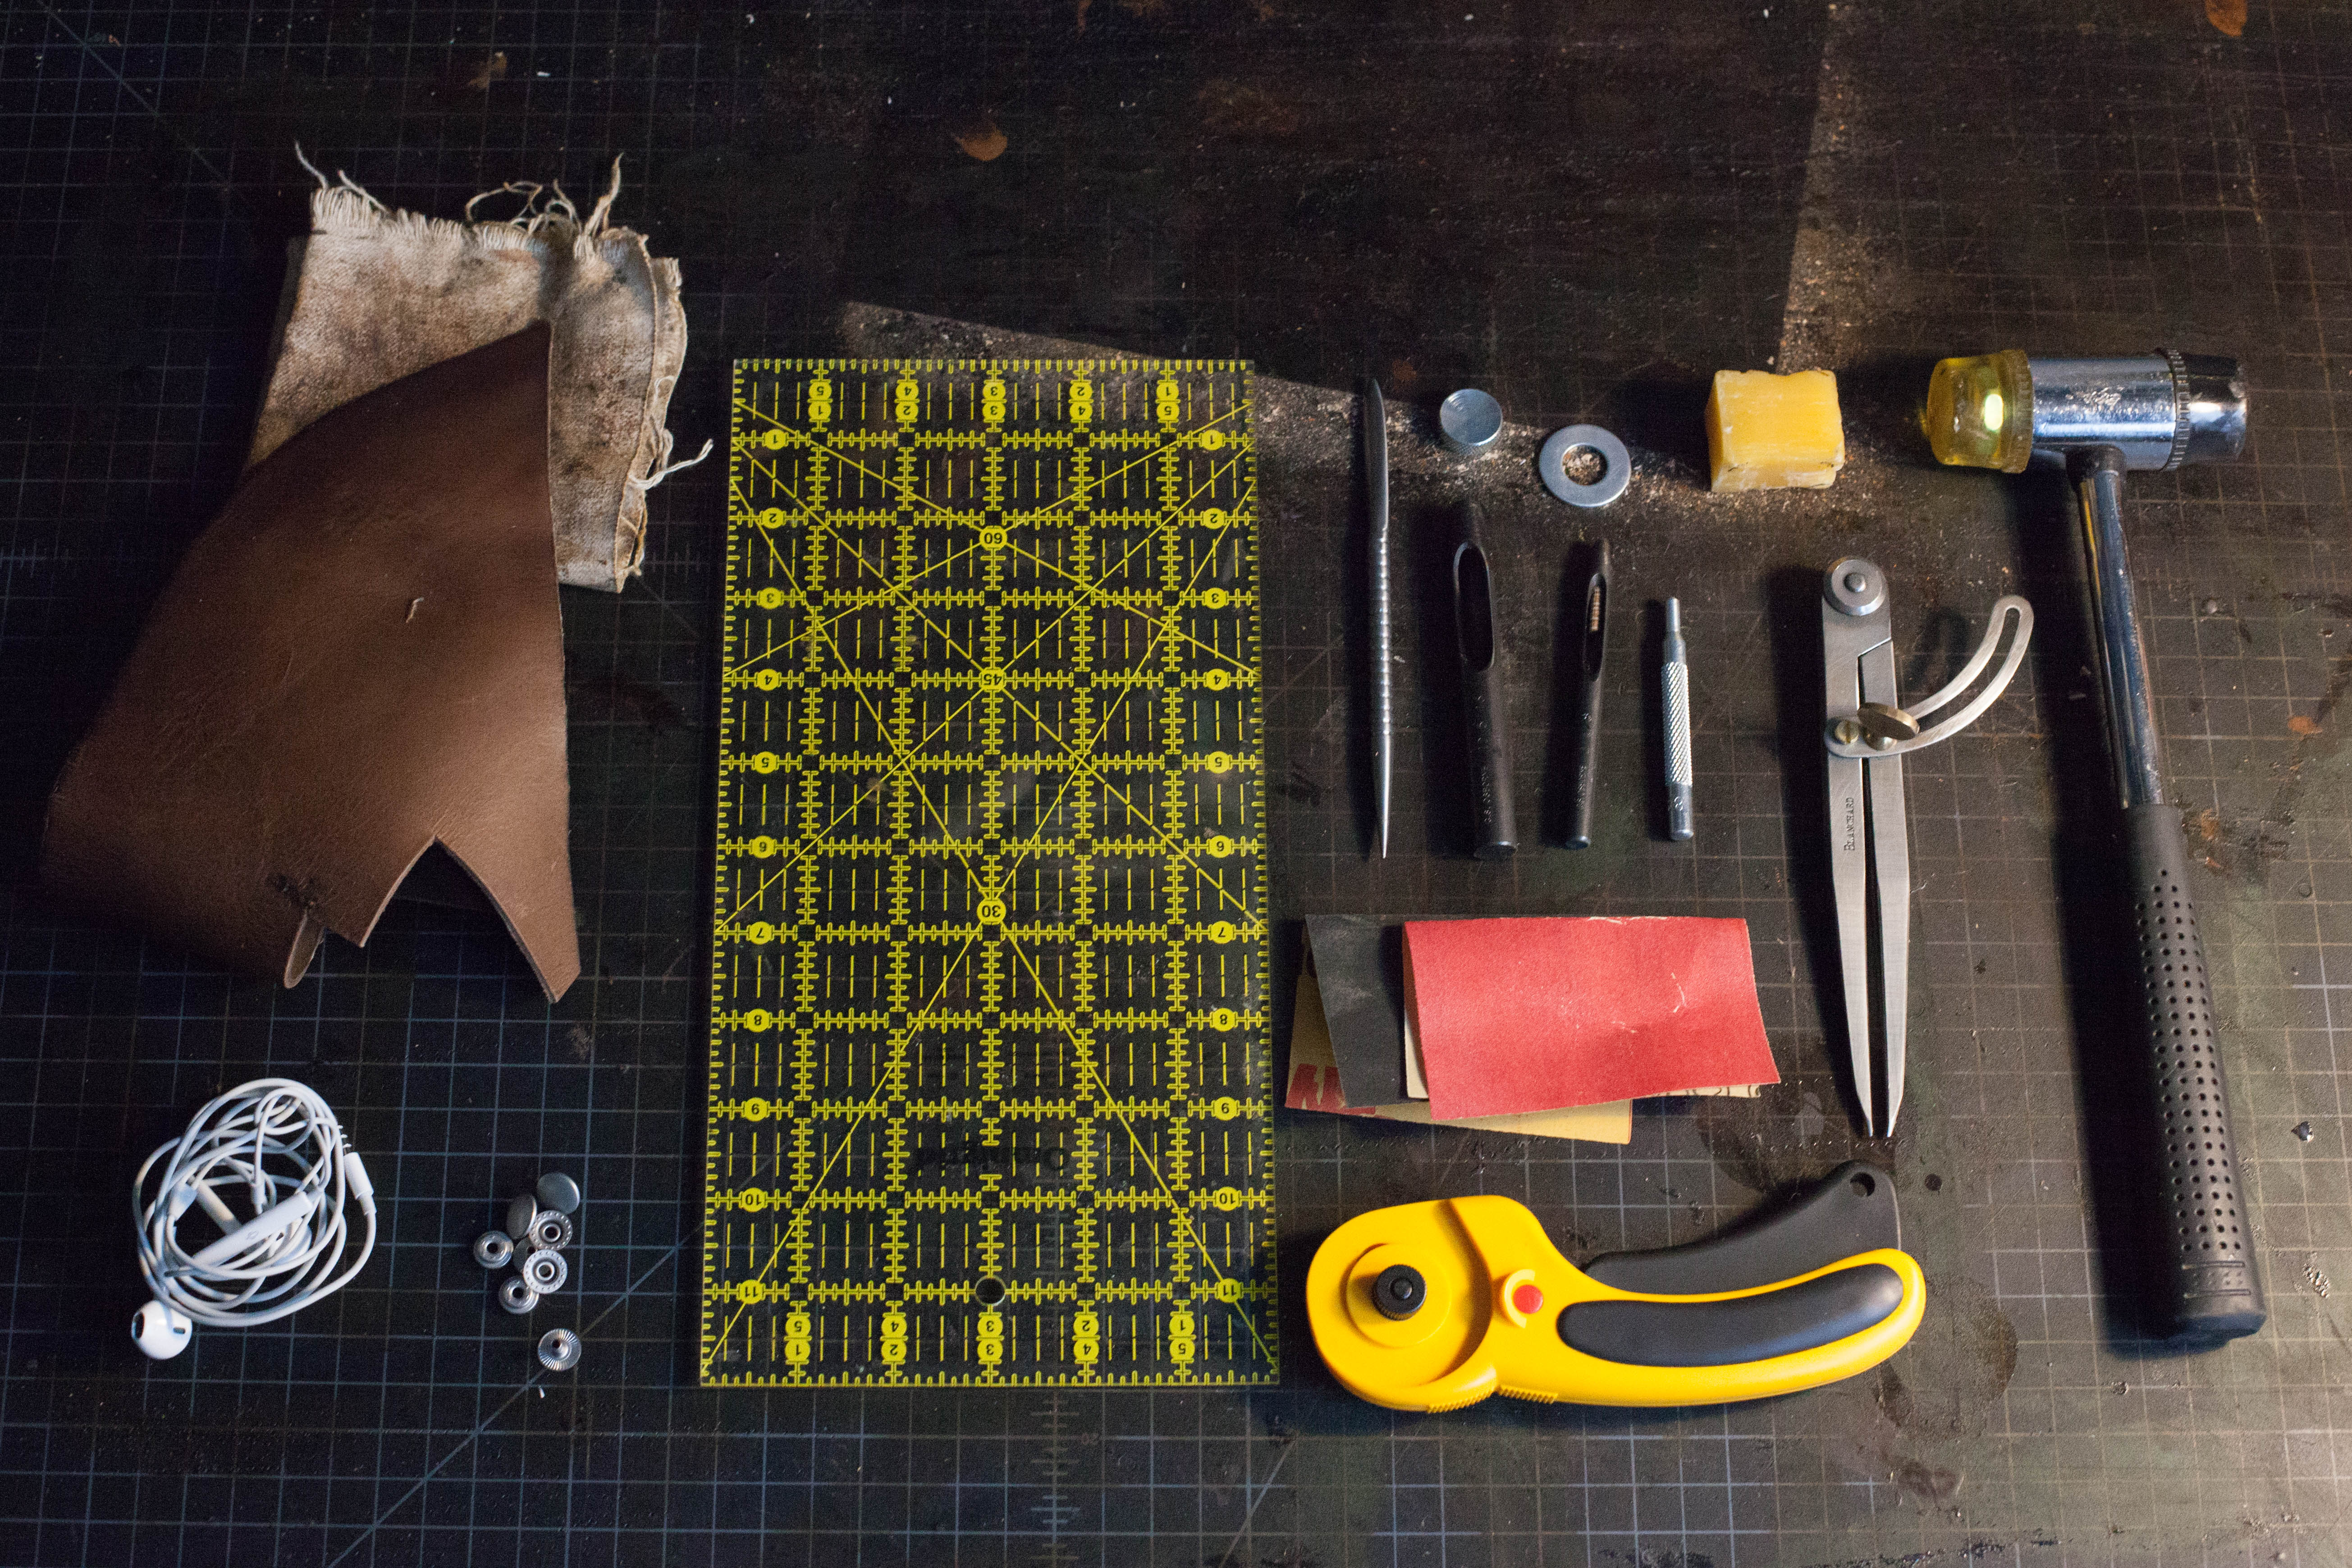
What You NeedWhat You Need:

  • 5oz finished leather scrap, approximately 5x5 inches

  • a wad of earbuds, charging cables, what have you

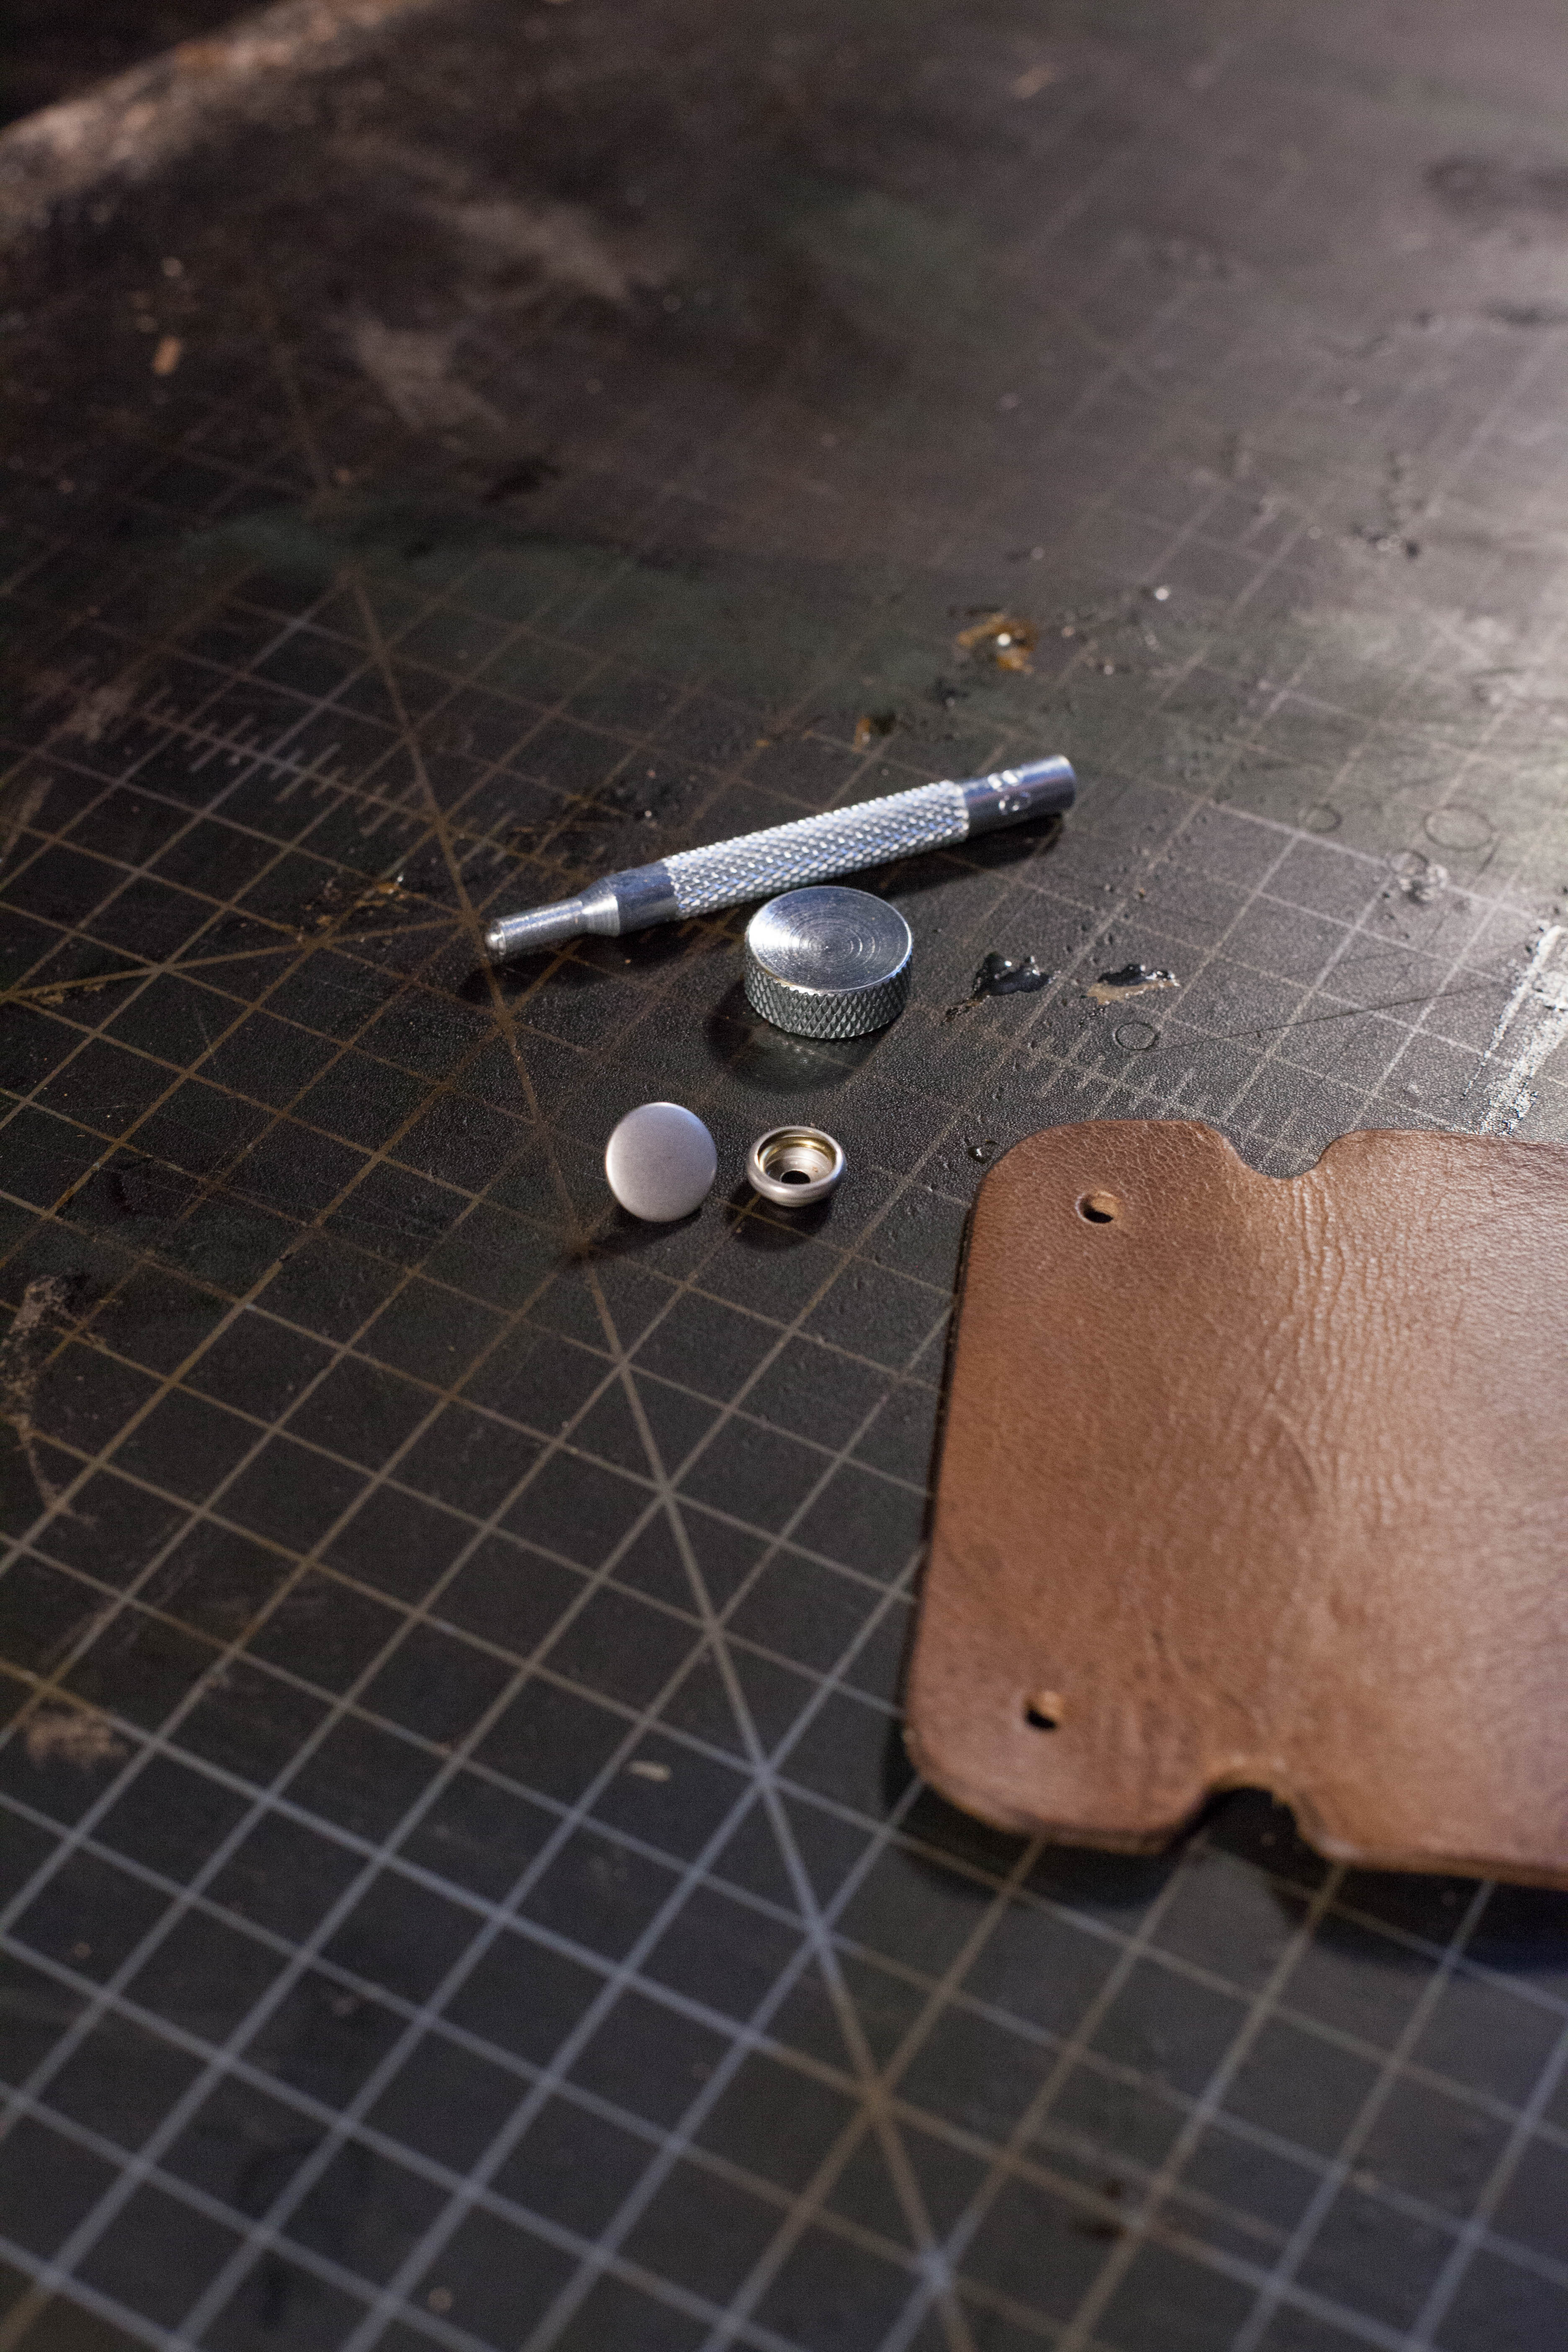
  • 2 sets of snaps (4 domed pieces, 2 female pieces, and 2 male pieces)

  • a ruler

  • a piece of canvas

  • 220/600 grit sandpaper

  • a leatherworking knife or rotary cutter

  • punches (size 5/16" and 5/32")

  • a washer

  • rivet setter and anvil

  • beeswax

  • a hammer

Step

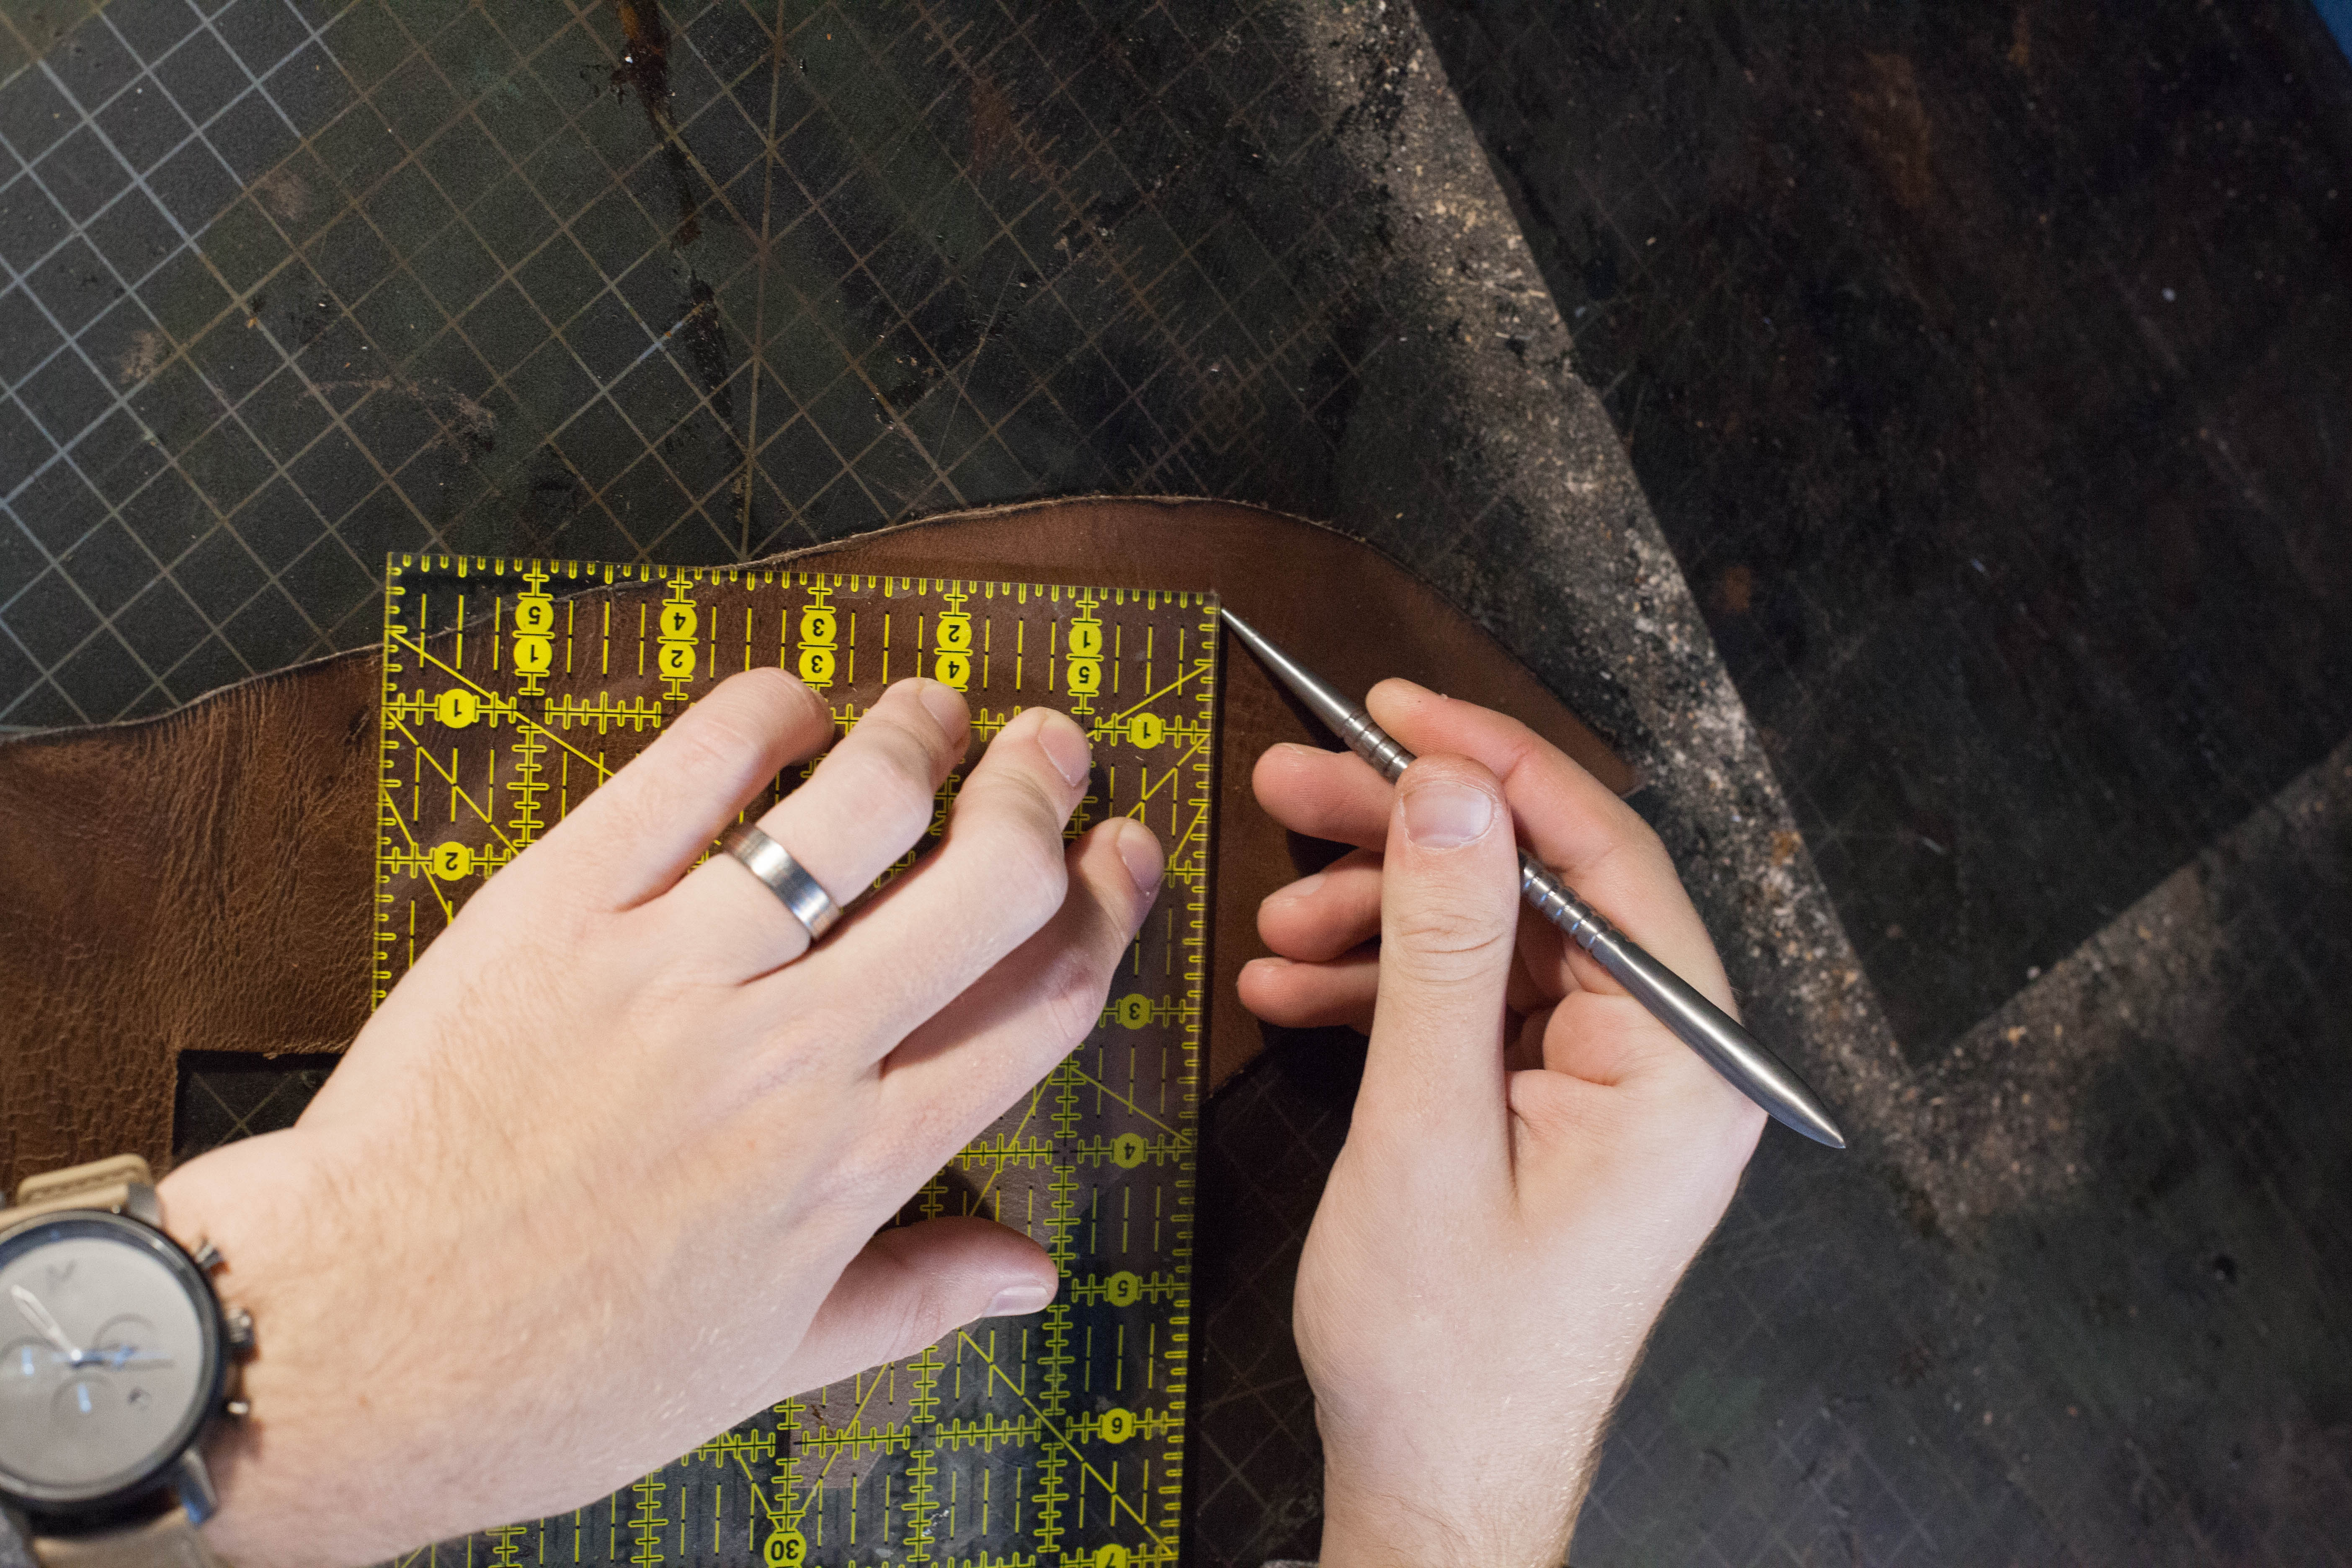
Using the ruler and the scratch awl, trace out a 4" x 4" square onto the leather.


Step

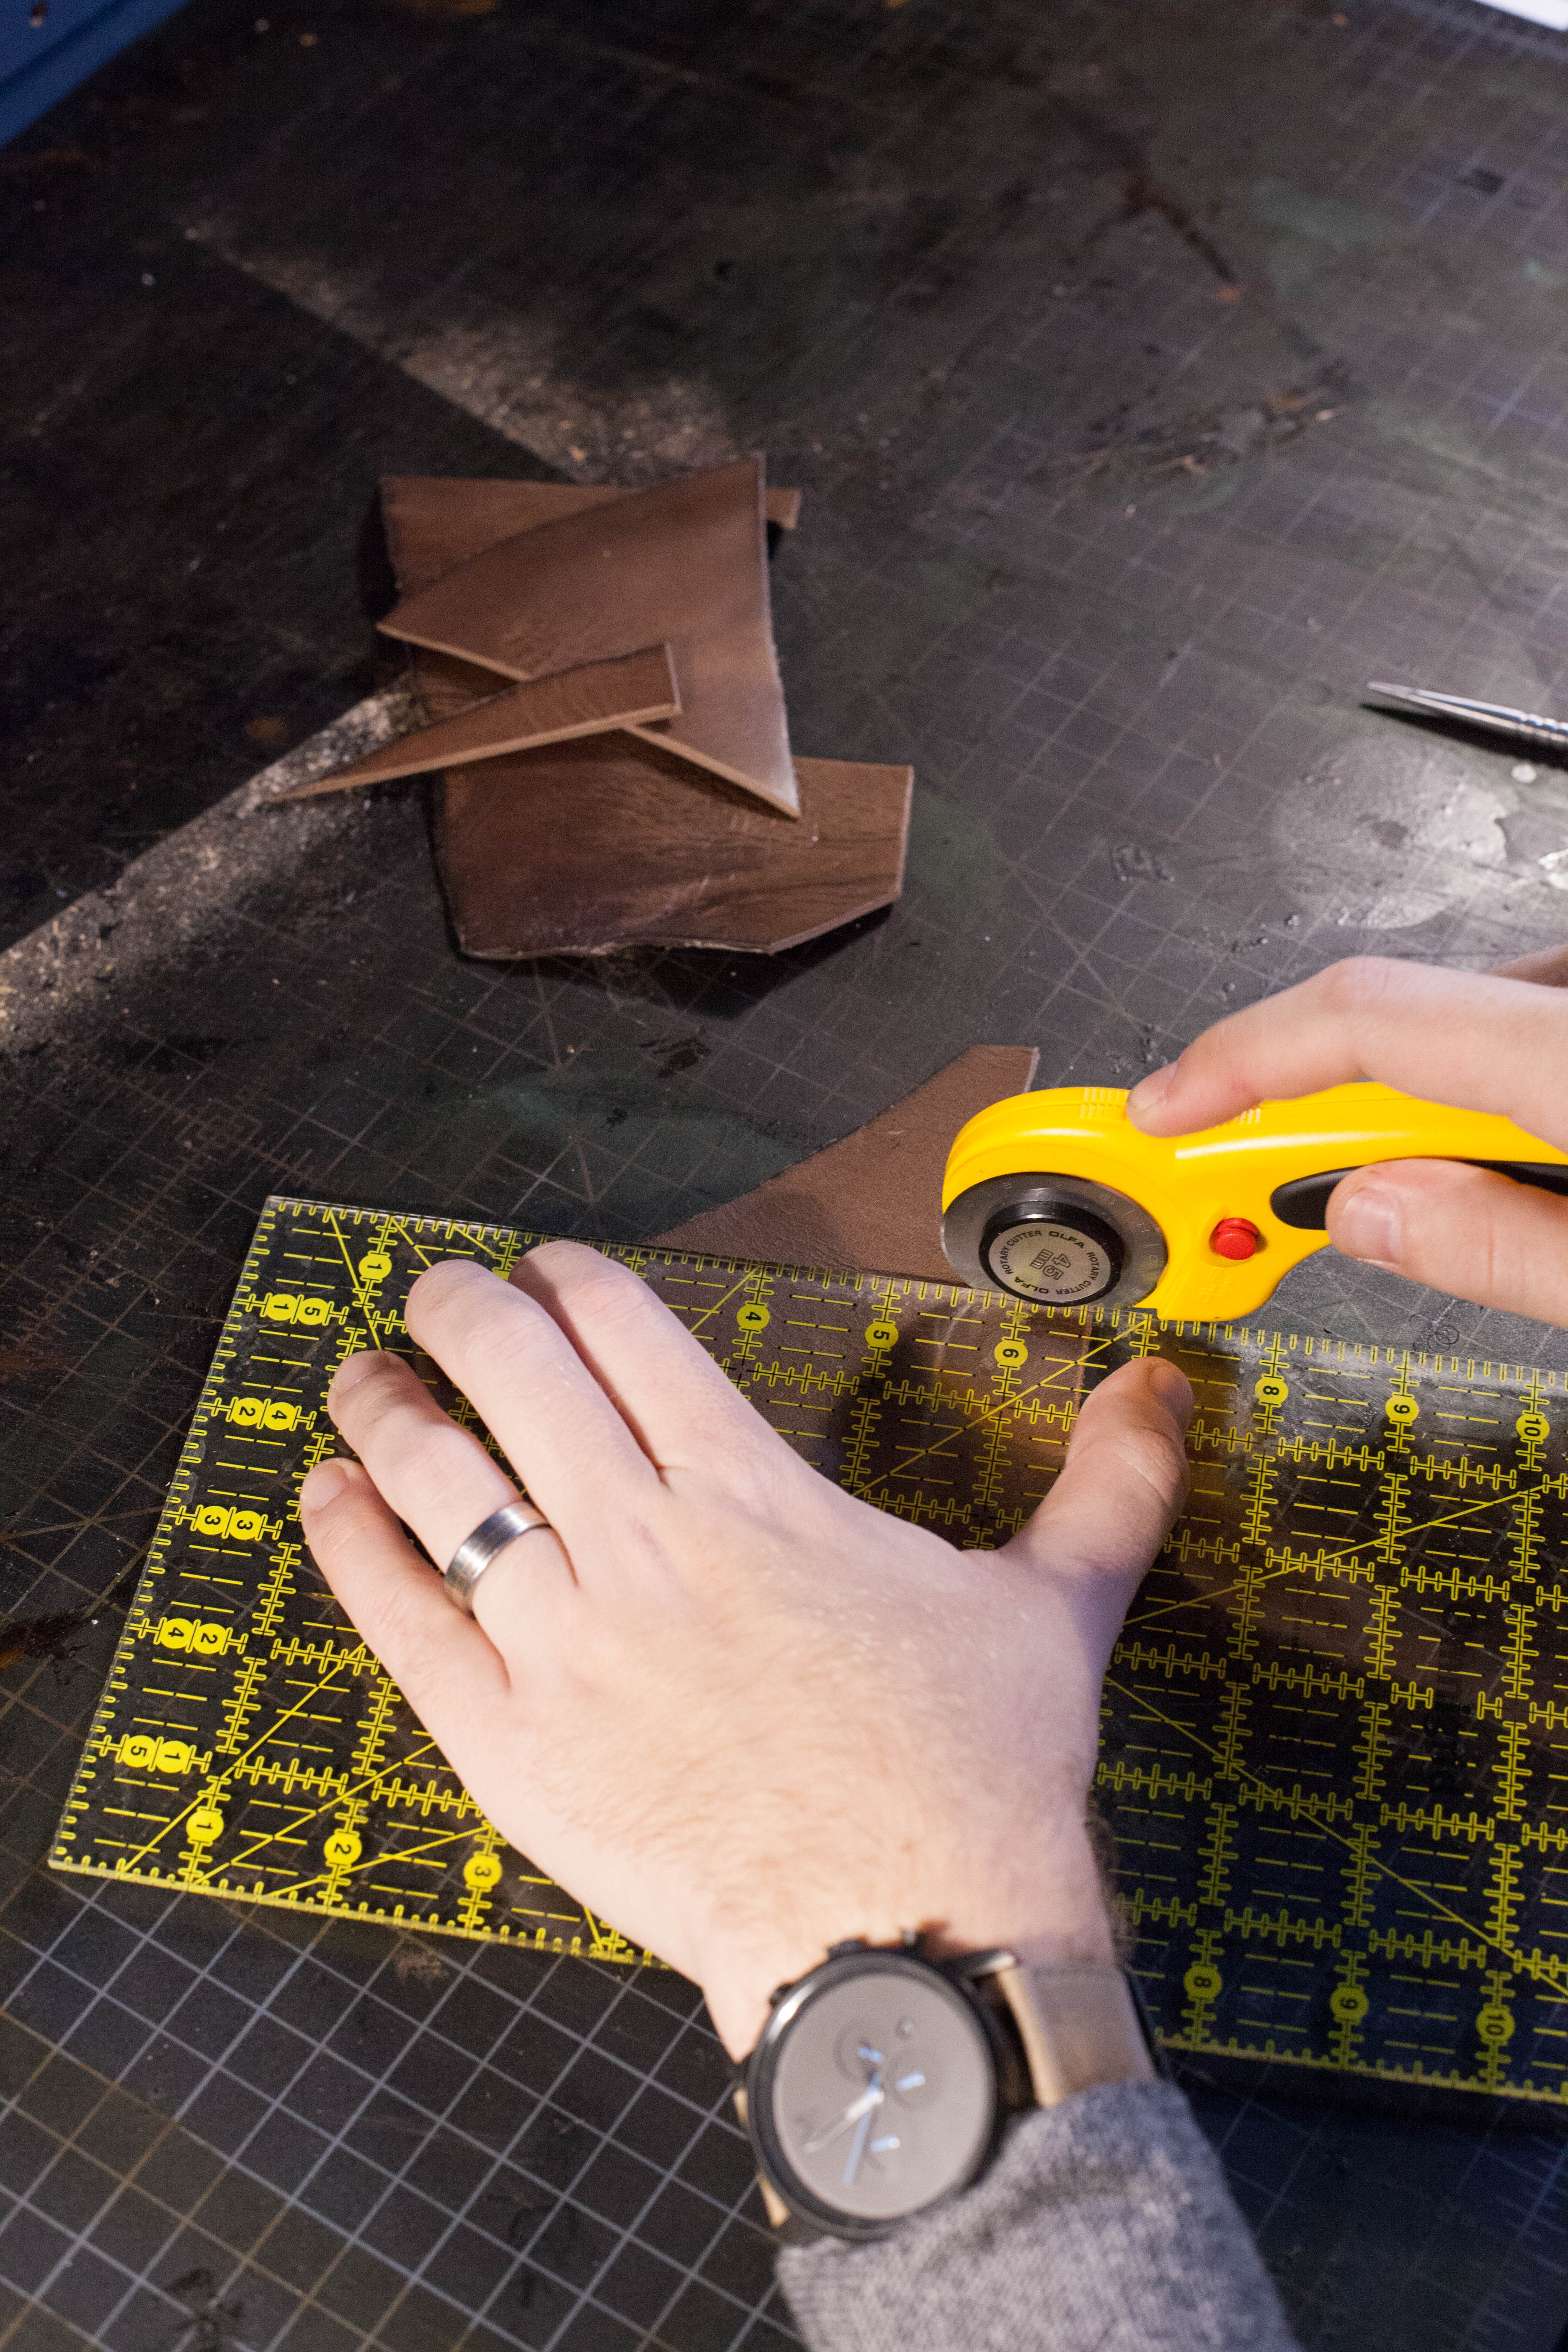
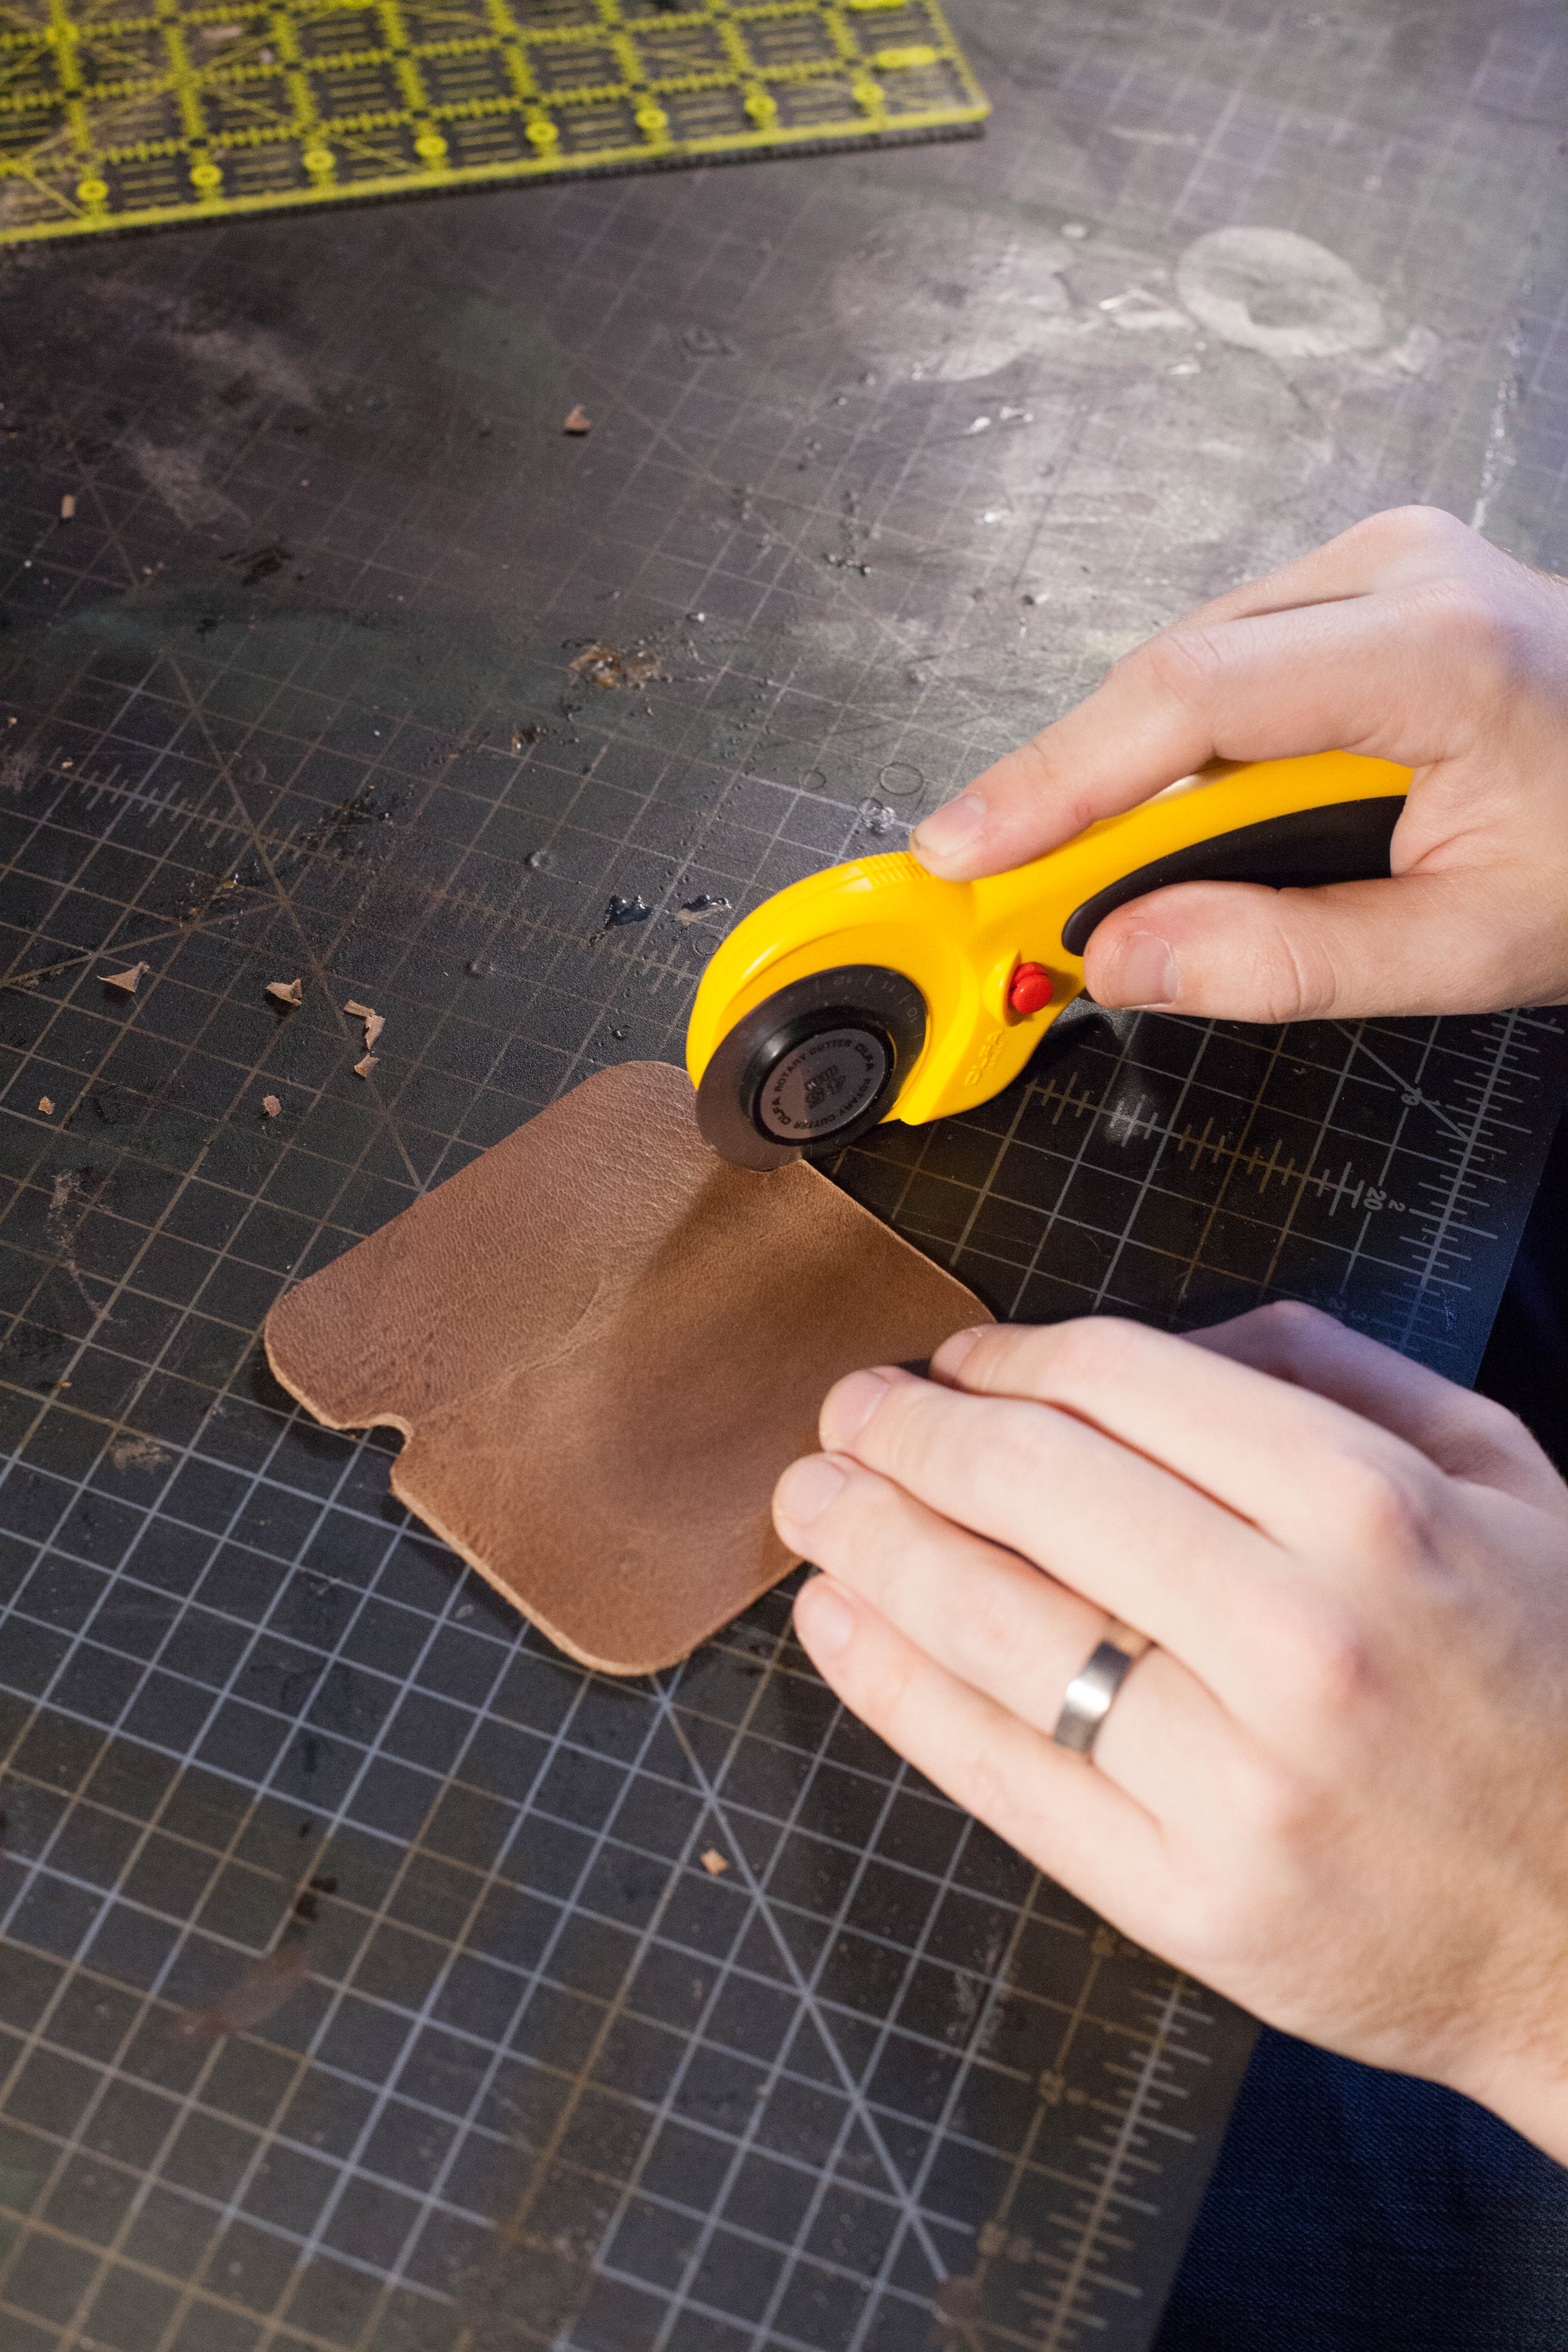
Still using the ruler, cut out the square with a rotary cutter. There really isn't anything tricky about this, but to make sure your edges look good by the end of the project, make sure to keep the rotary cutter perpendicular to the surface of the leather. If you allow your hand to roll, even though your cuts look straight, your edges will not be.


Step2


Step

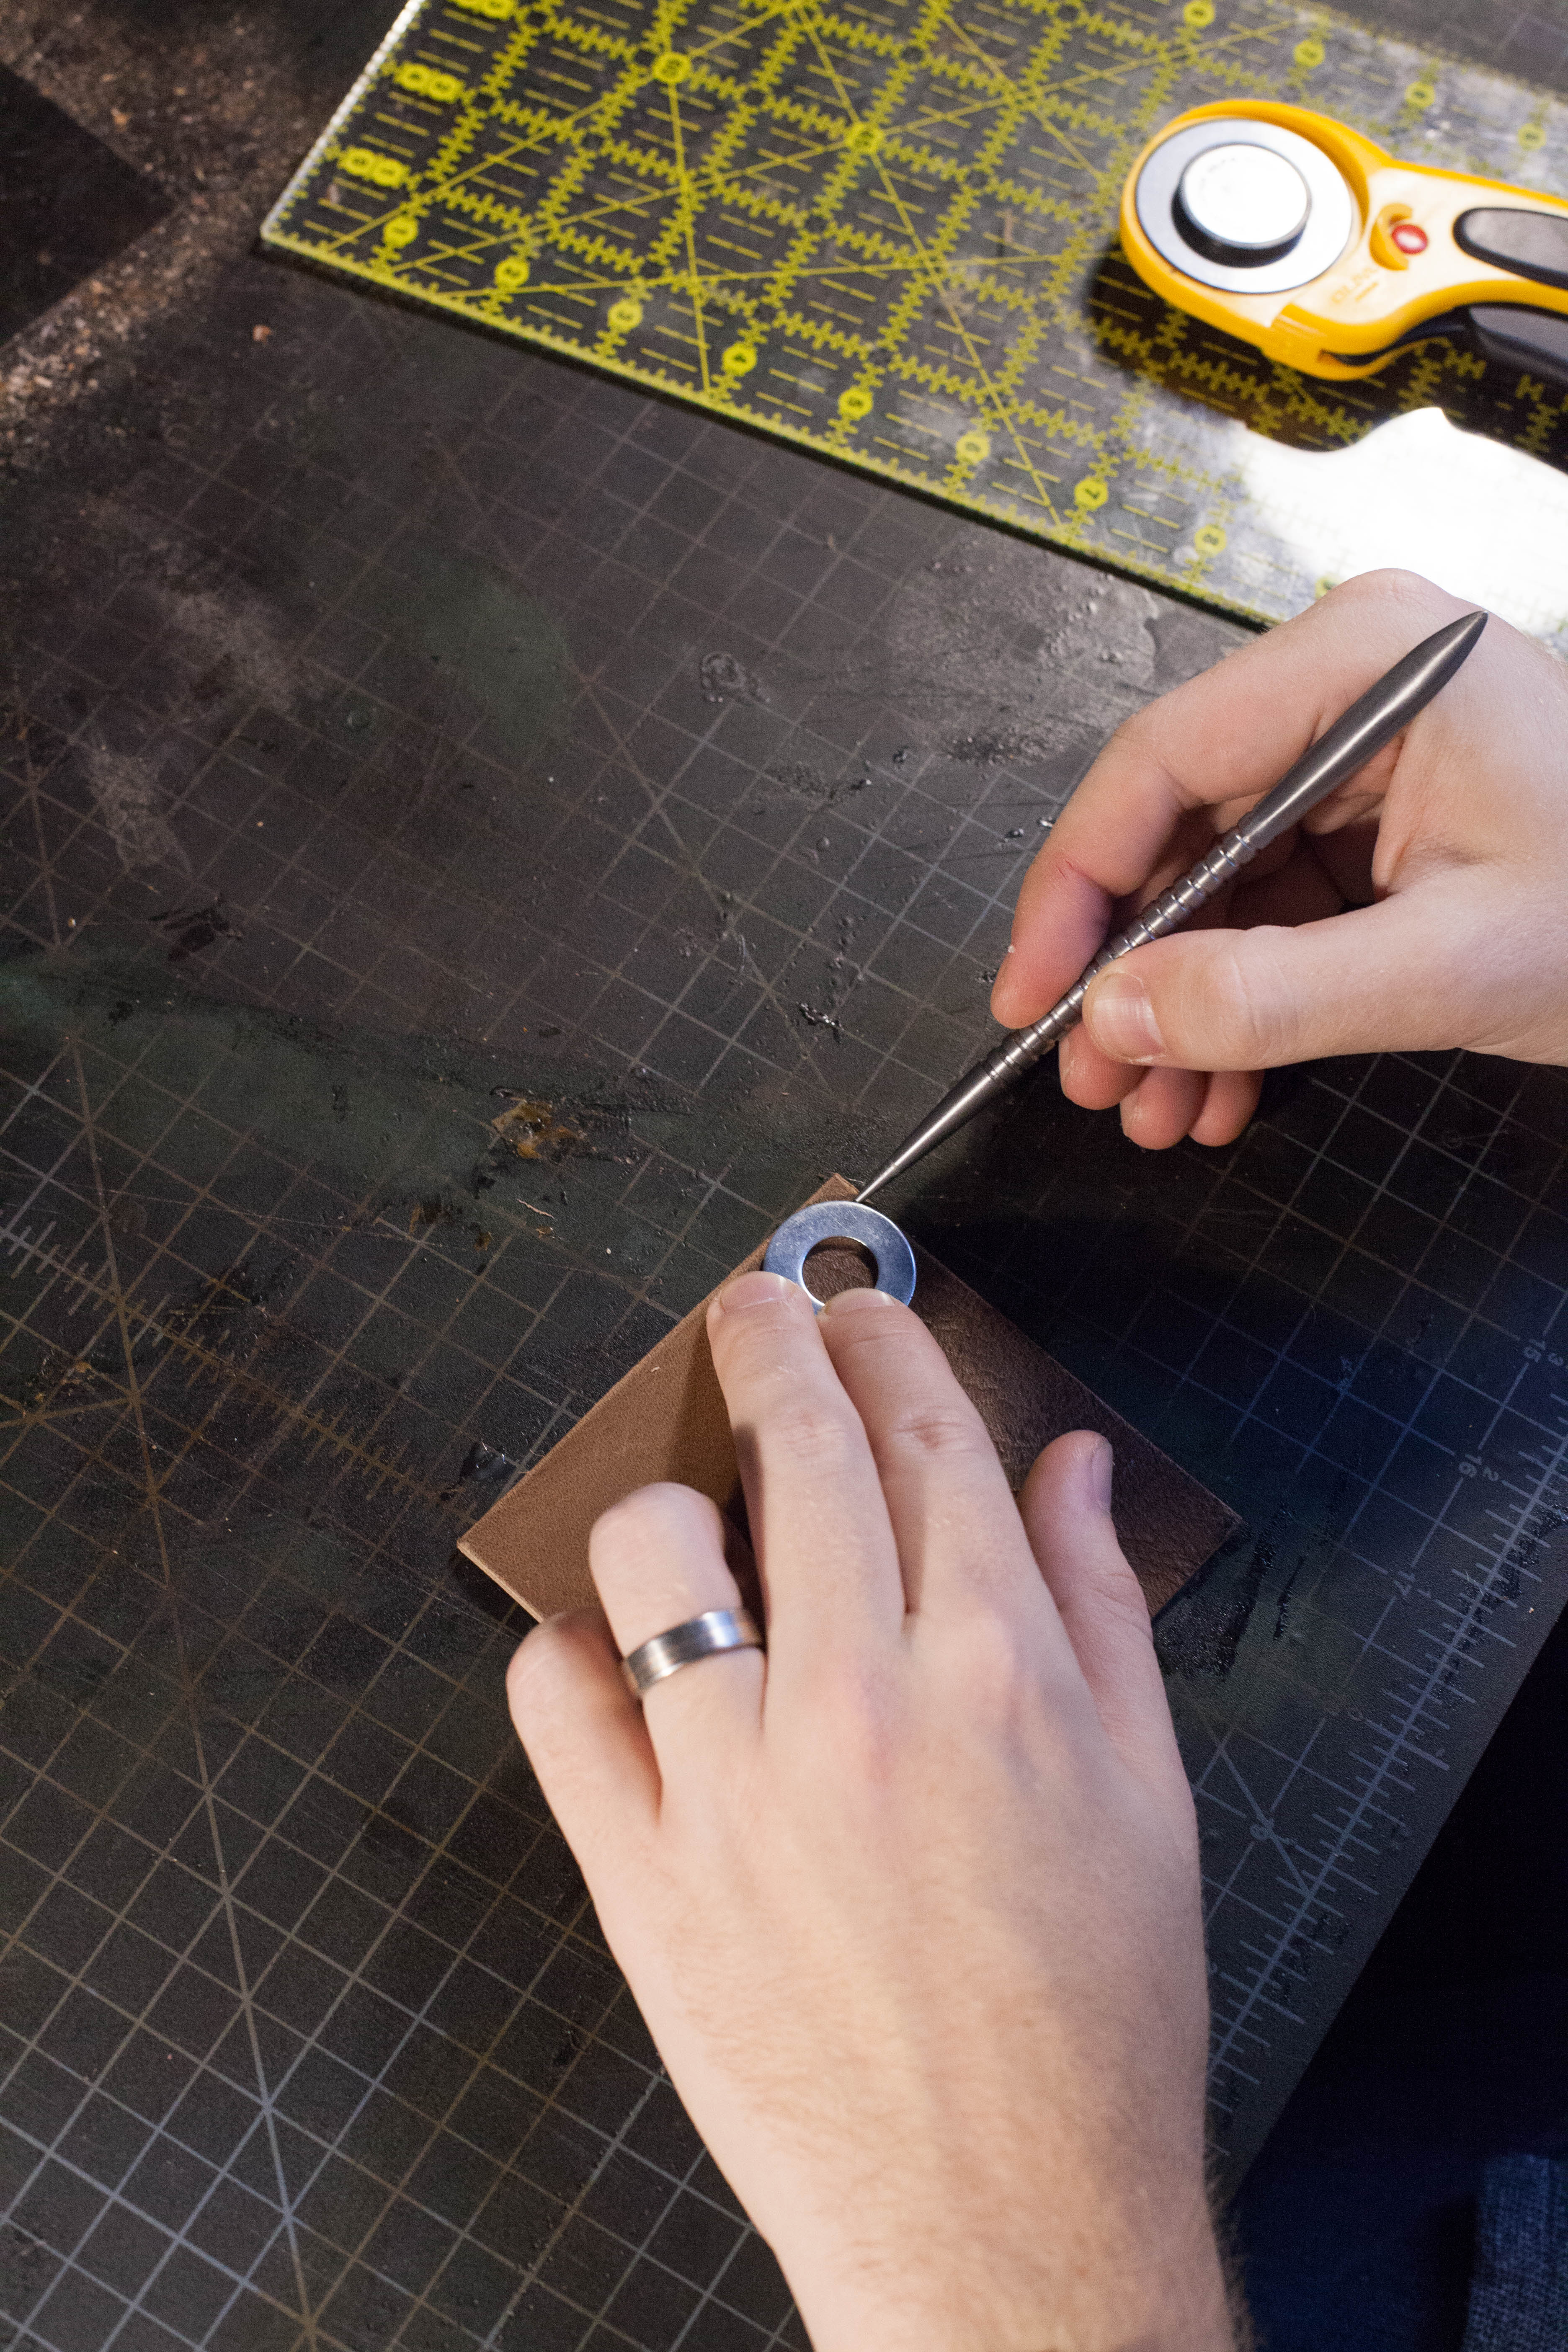
Rounded corners wear much better than squared ones, so now's the time to round them out. While you can get punches for making rounded corners, they are just as easy to make with washers. Set the washer in each corner, making sure to line it up the edges of the leather, and trace it with your scratch awl.


Step3


Step

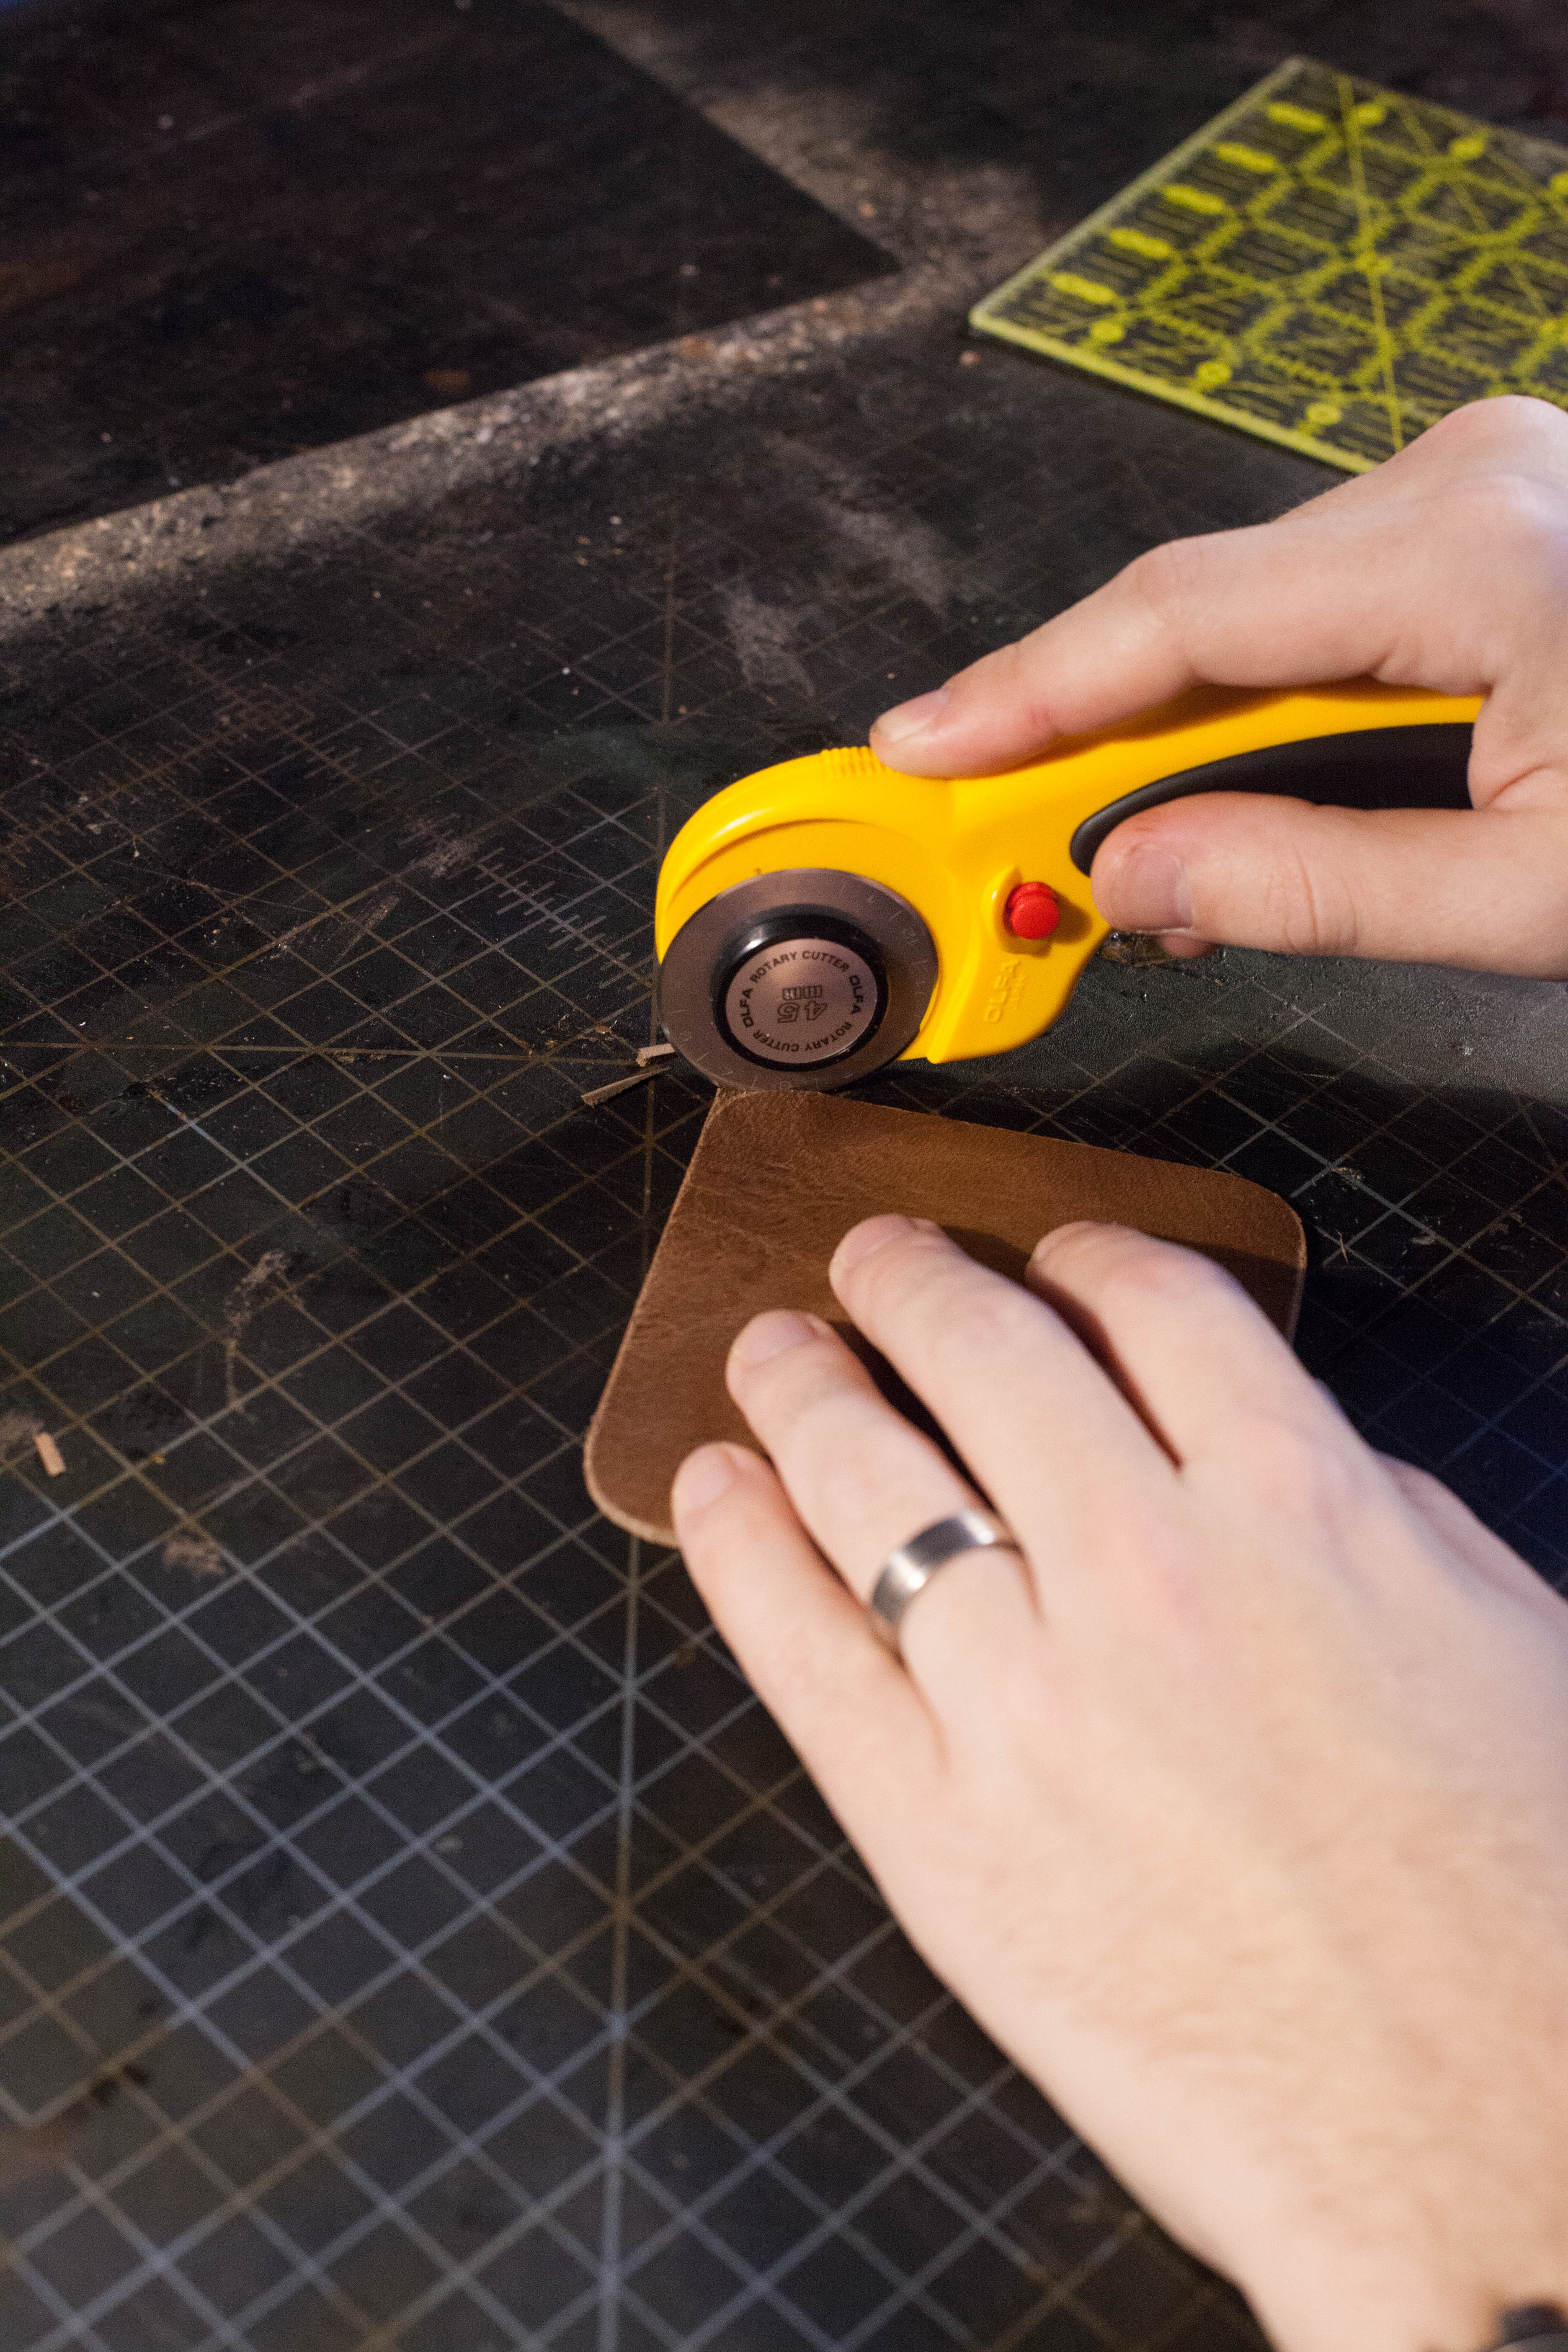
Now, using your rotary cutter or leather working knife, cut out the corners you've previously traced. There are a few methods to cutting corners well, but the easiest is by making many small cuts. You can read more about that method here: http://www.goldbarkleather.com/sourceblog/cutting-corners


Step4


Step

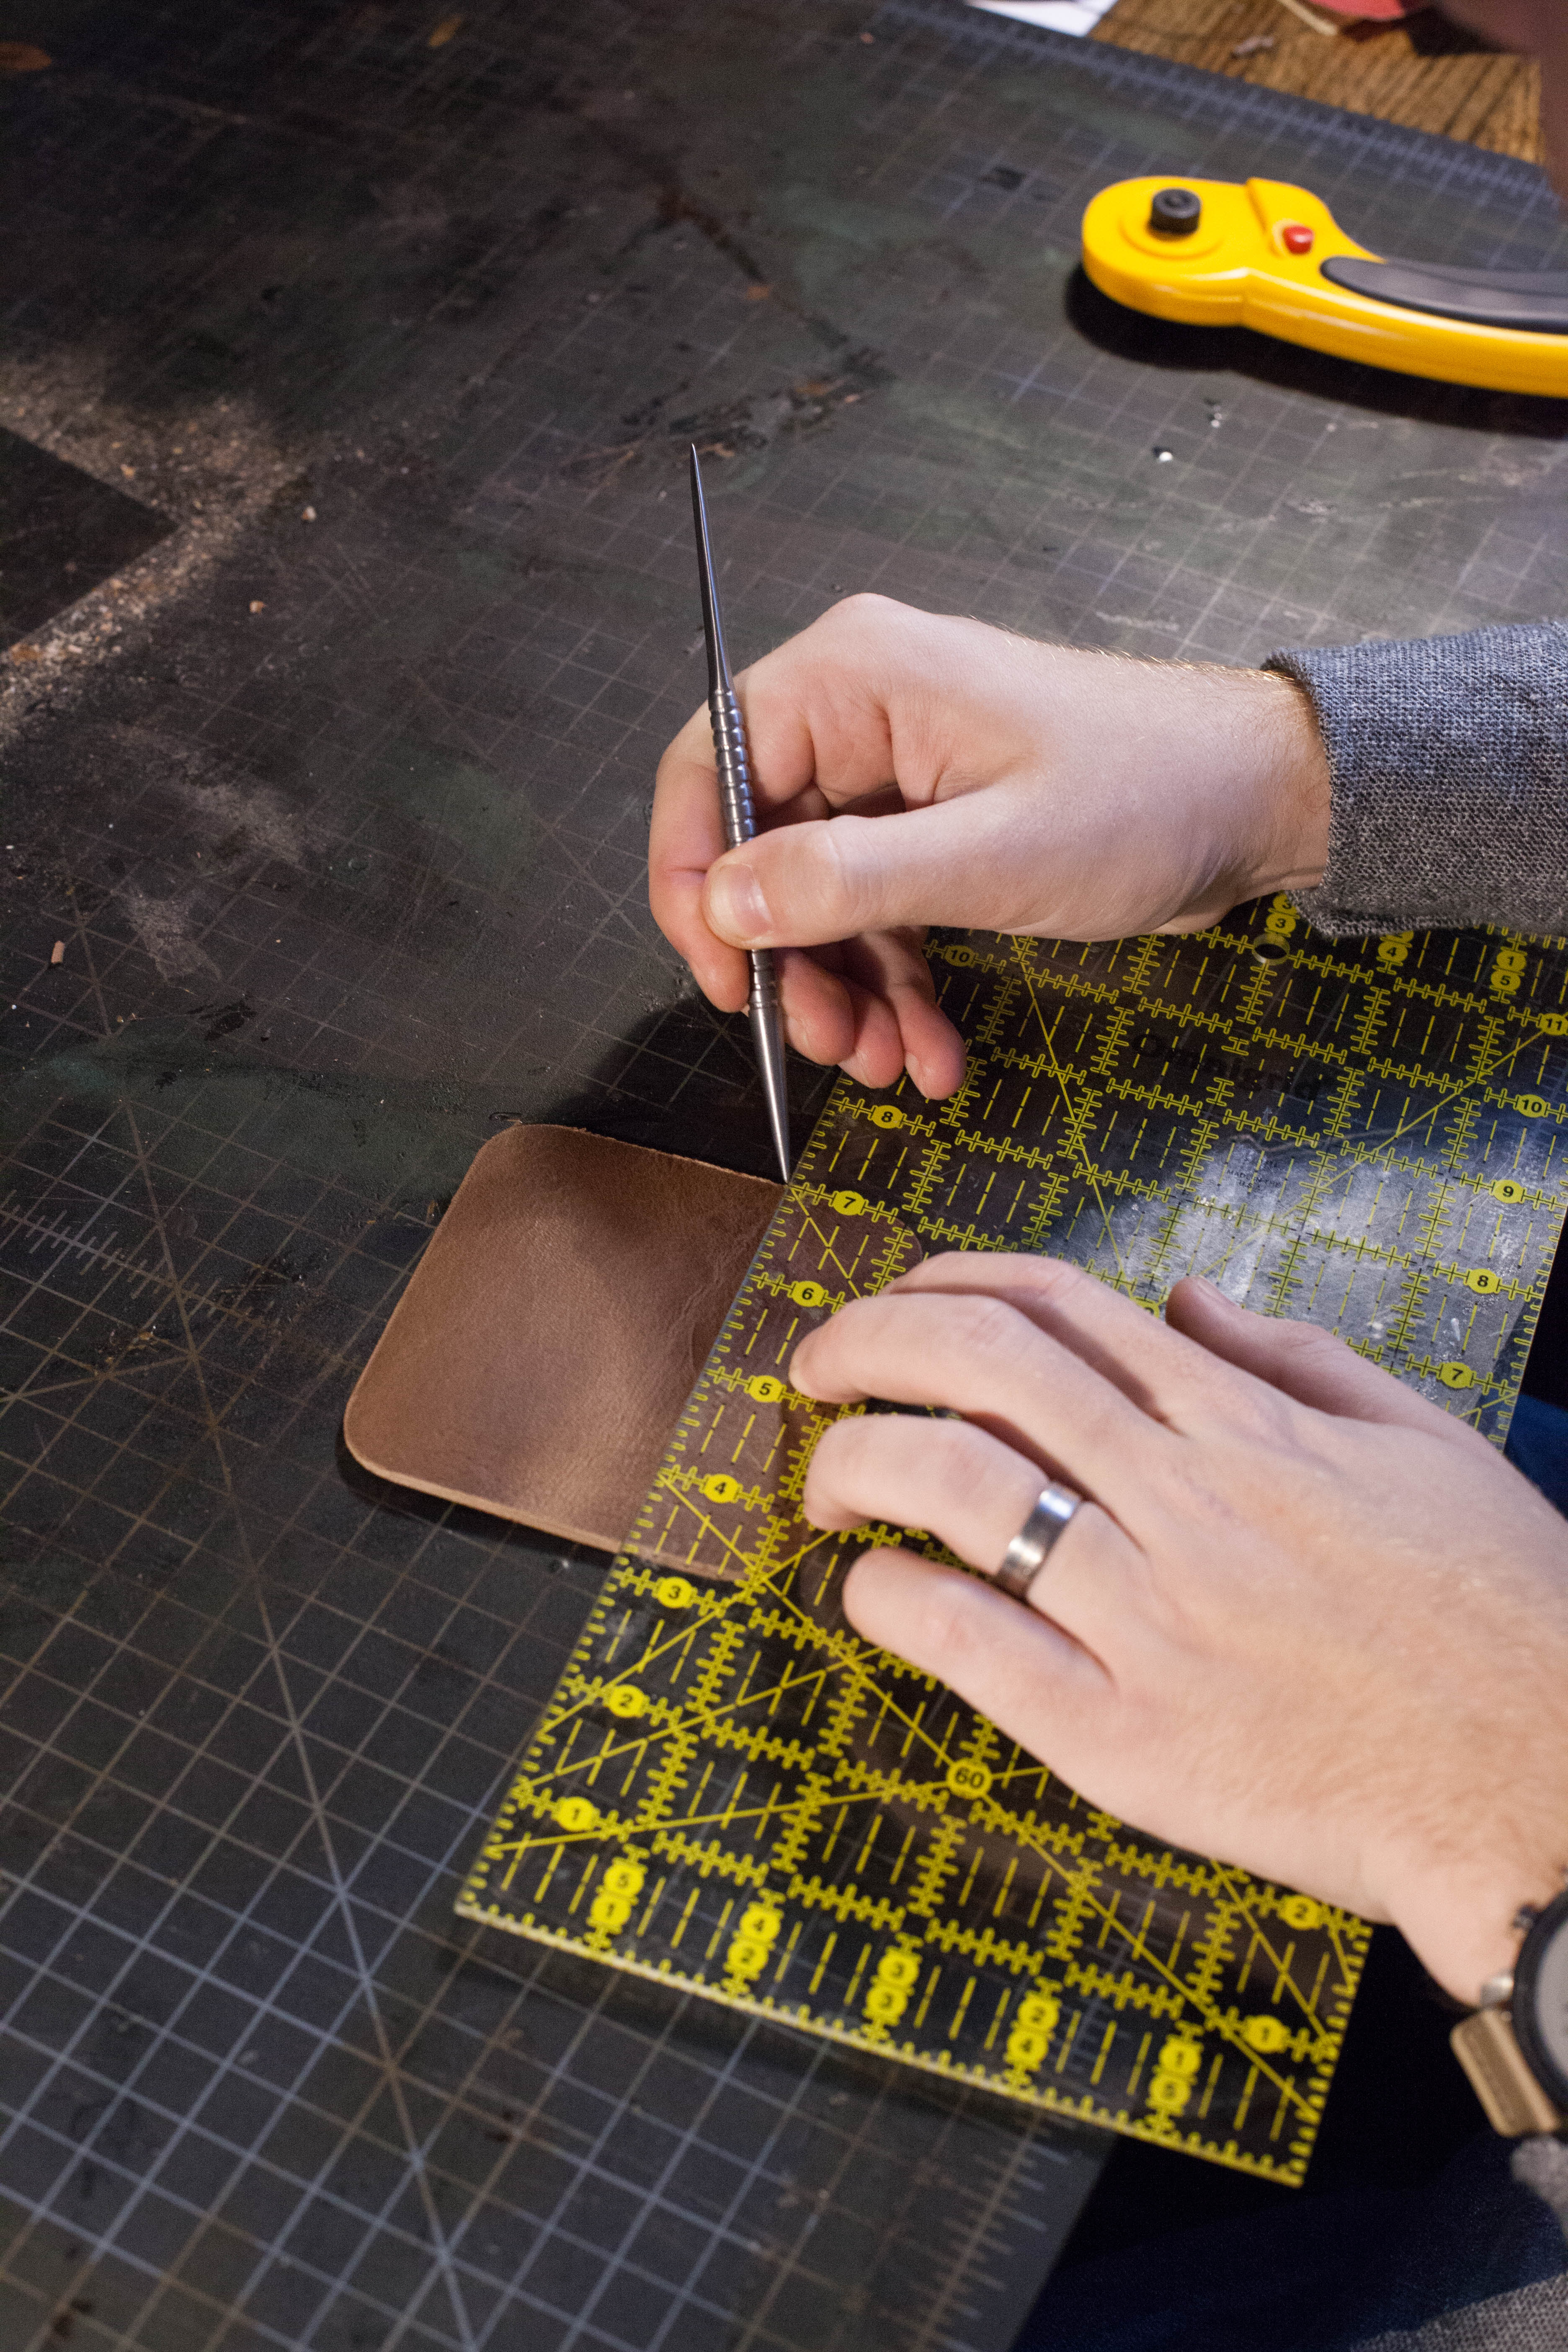
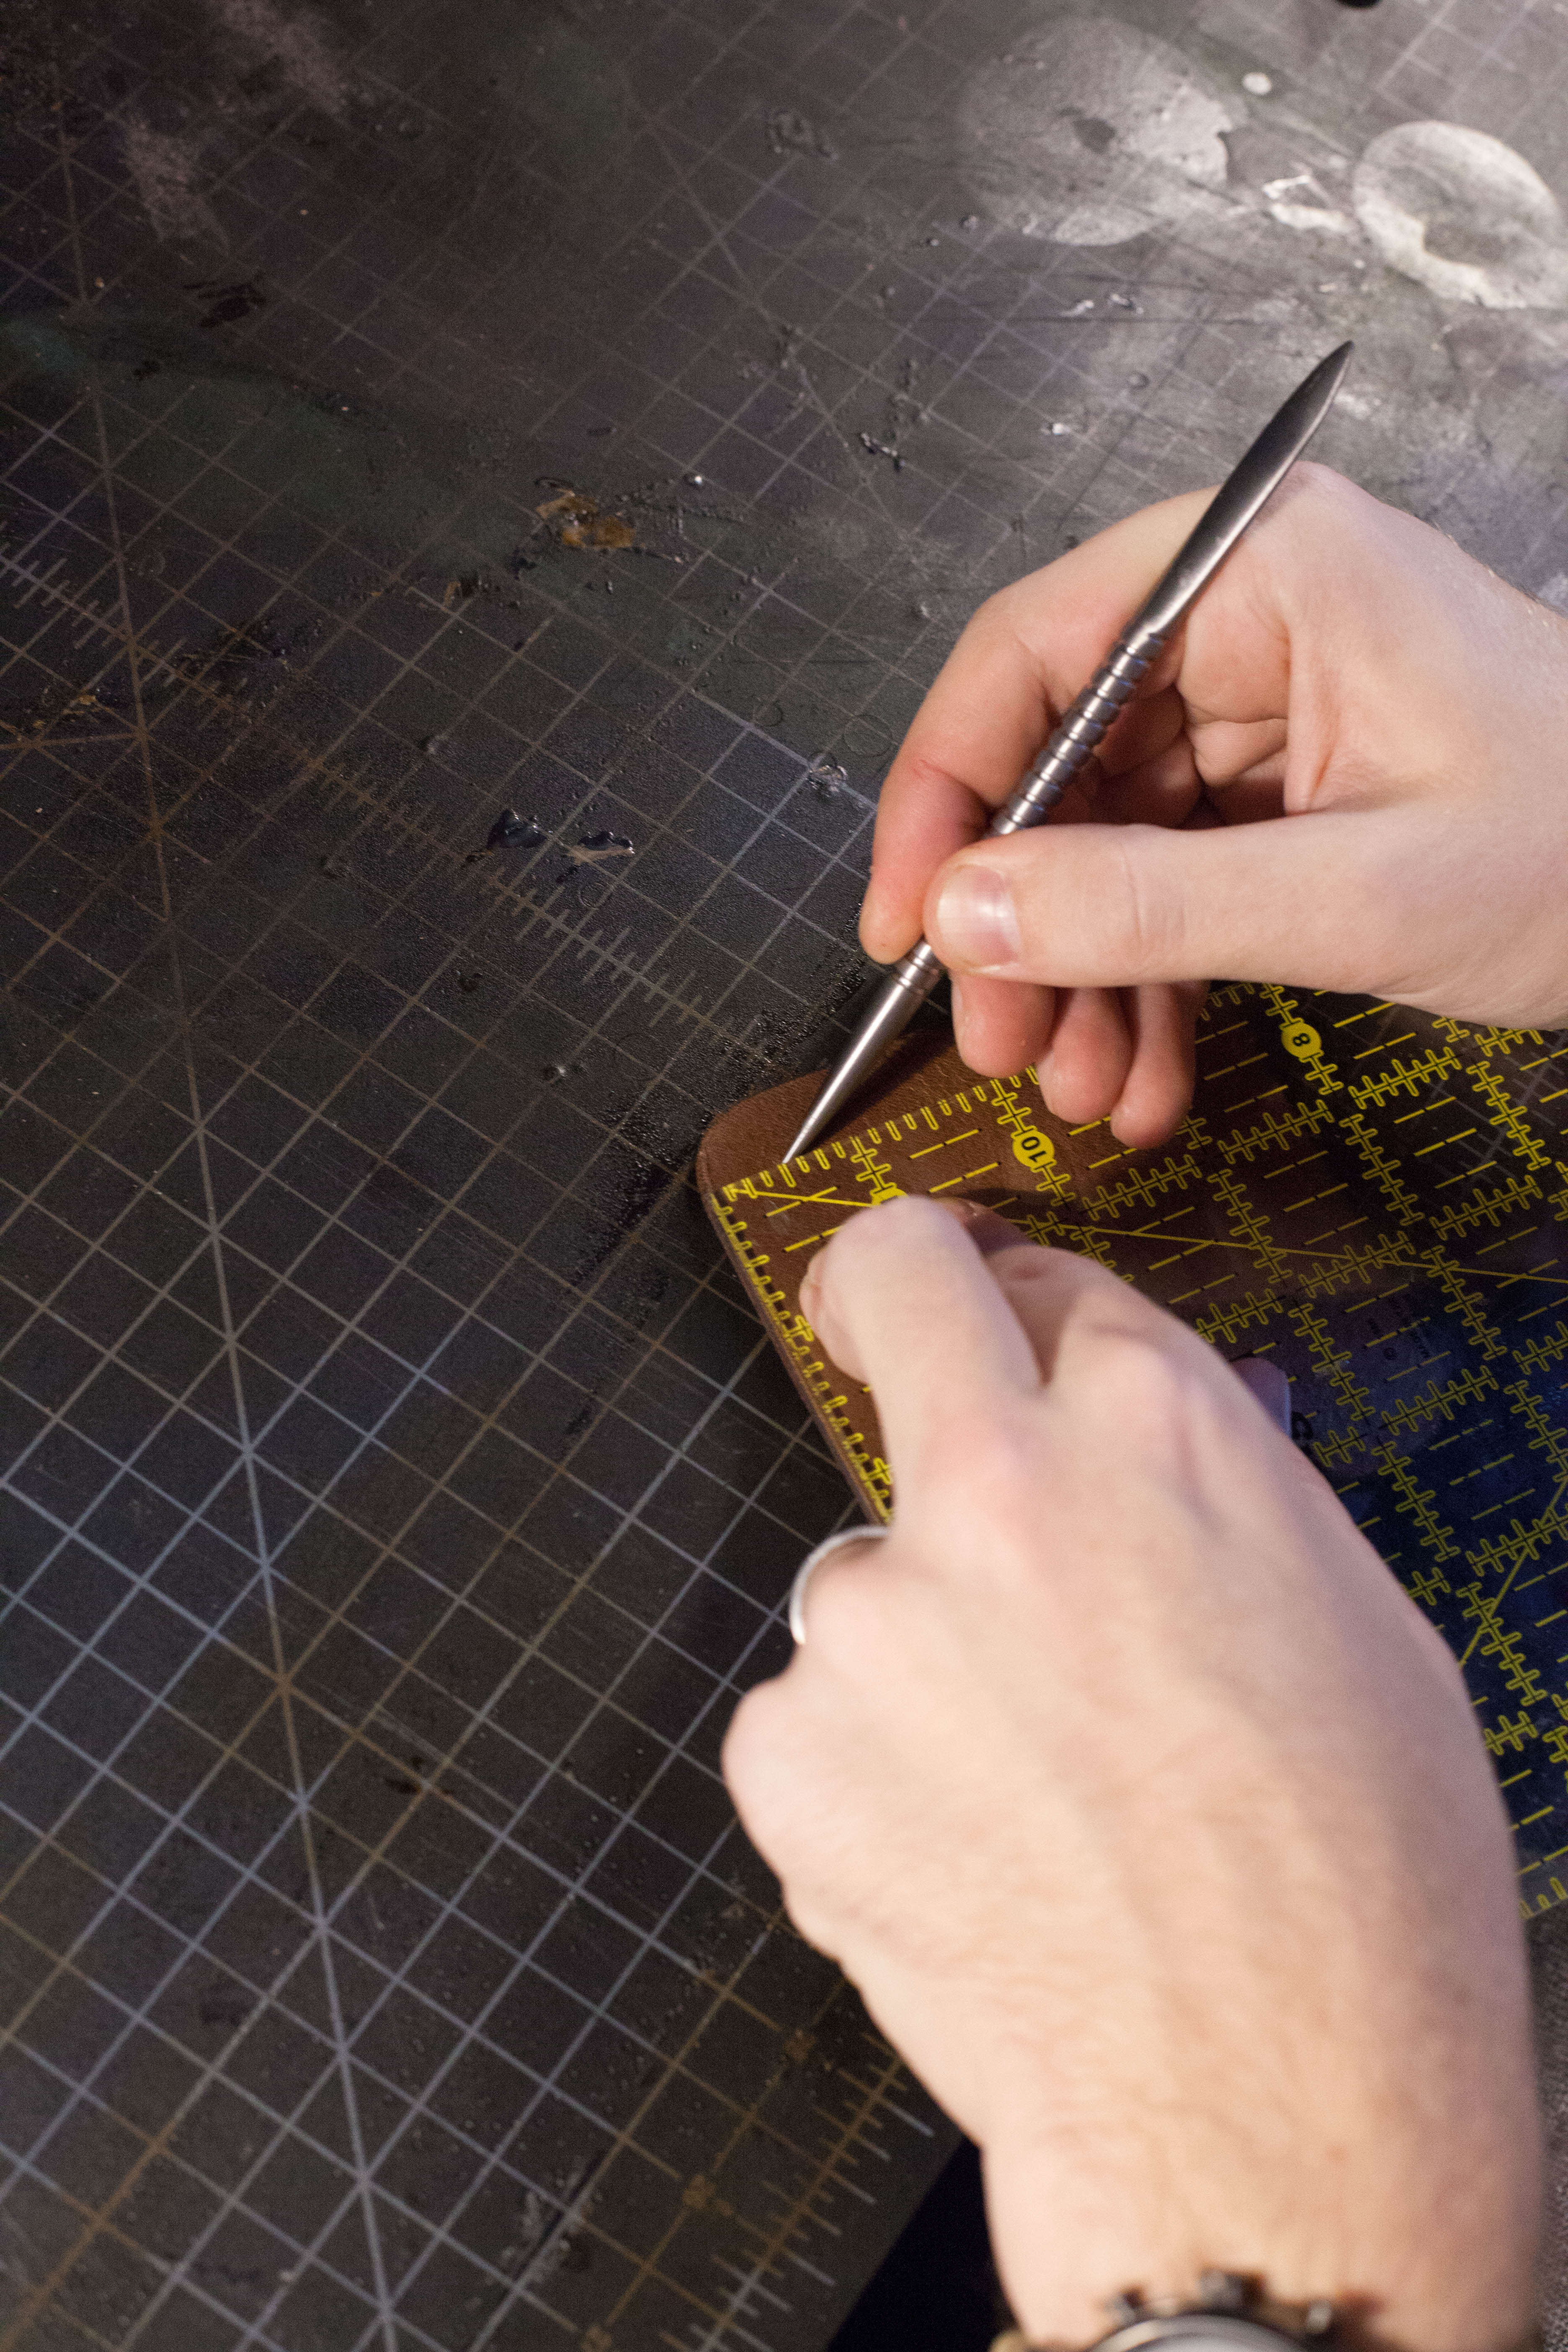
Now it's time to create the slot that your earbuds will sit in. To do this, make a mark with a scratch awl on either side of the leather square about 1.25" in.


Step5


Step

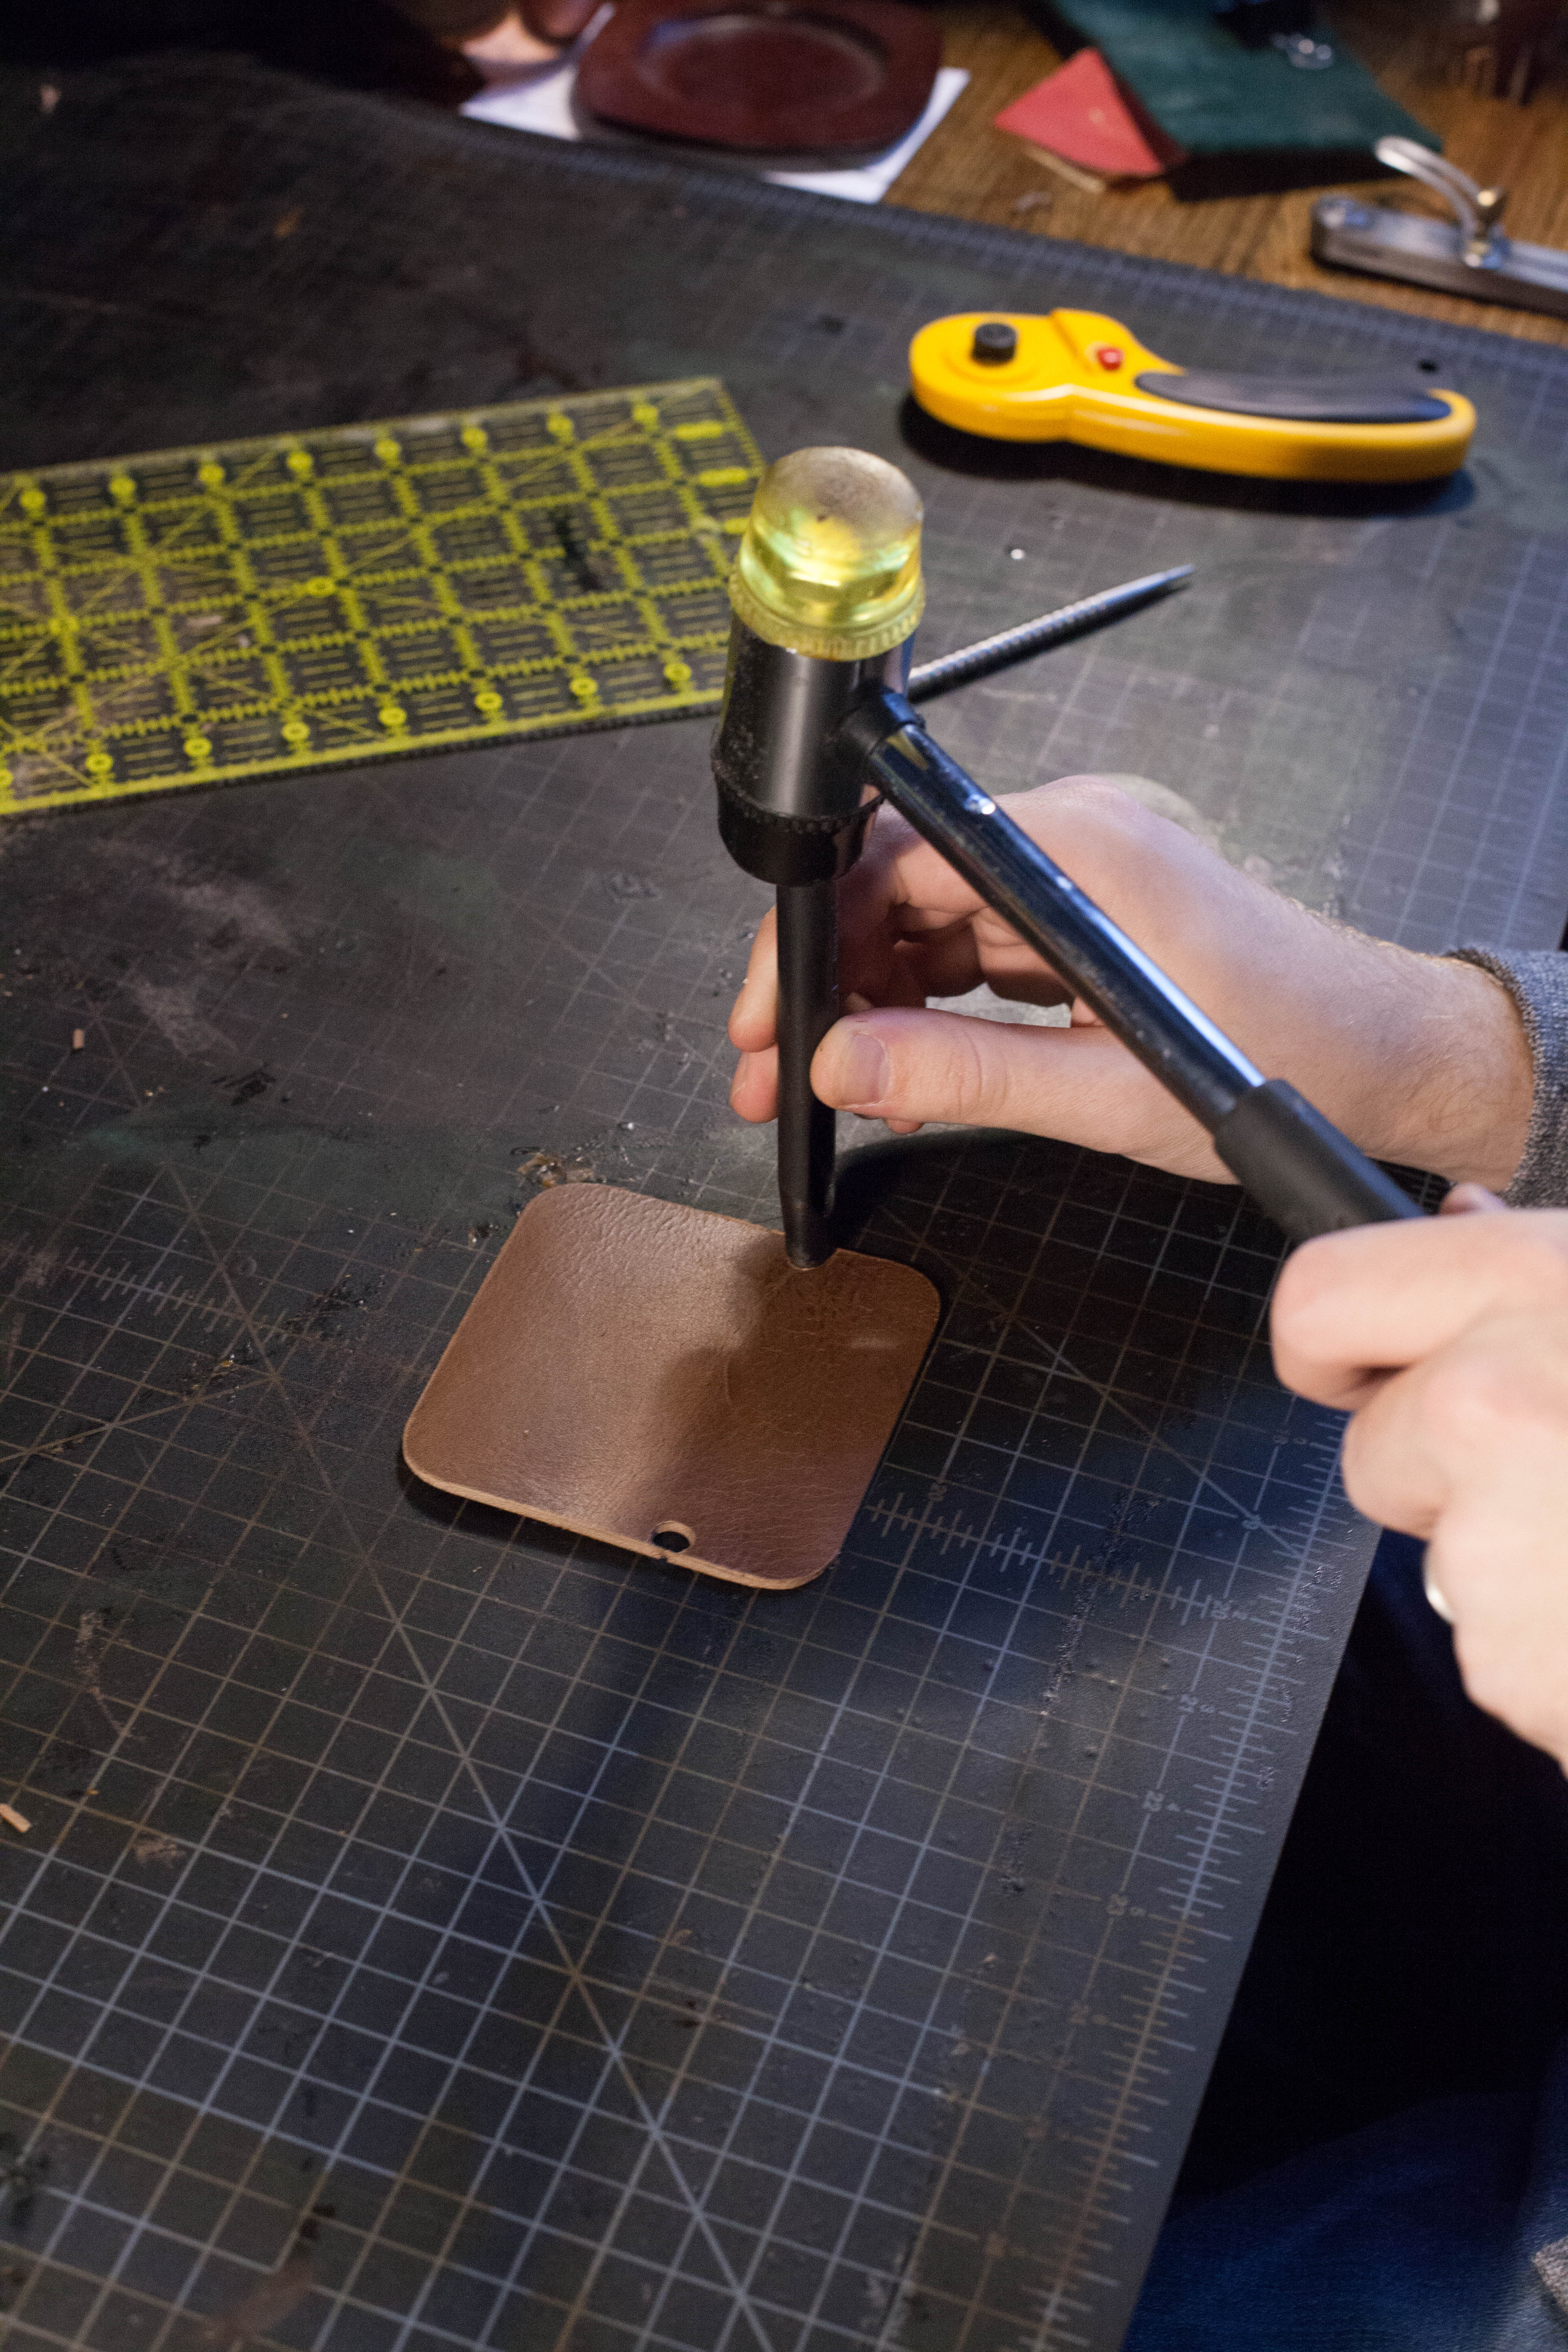
Using a 5/16" punch, punch out a hole where you made the mark in the previous step. Make sure the edge of the punch rests just on the edge of the organizer, as shown in the picture.


Step6


Step

It's time to round out these edges too. I used the rotary knife I was already using, but honestly this step would be a little bit easier if you were using a leather working knife or X-acto knife. With your knife selected, round out the corners as you did before. The hole you made is so close to the edge that it makes it pretty easy to eyeball, so I didn't use a washer this time. You can use a washer if you like, but I would suggest using a smaller washer so you don't round off too much of this smaller corner.


Step7


Step

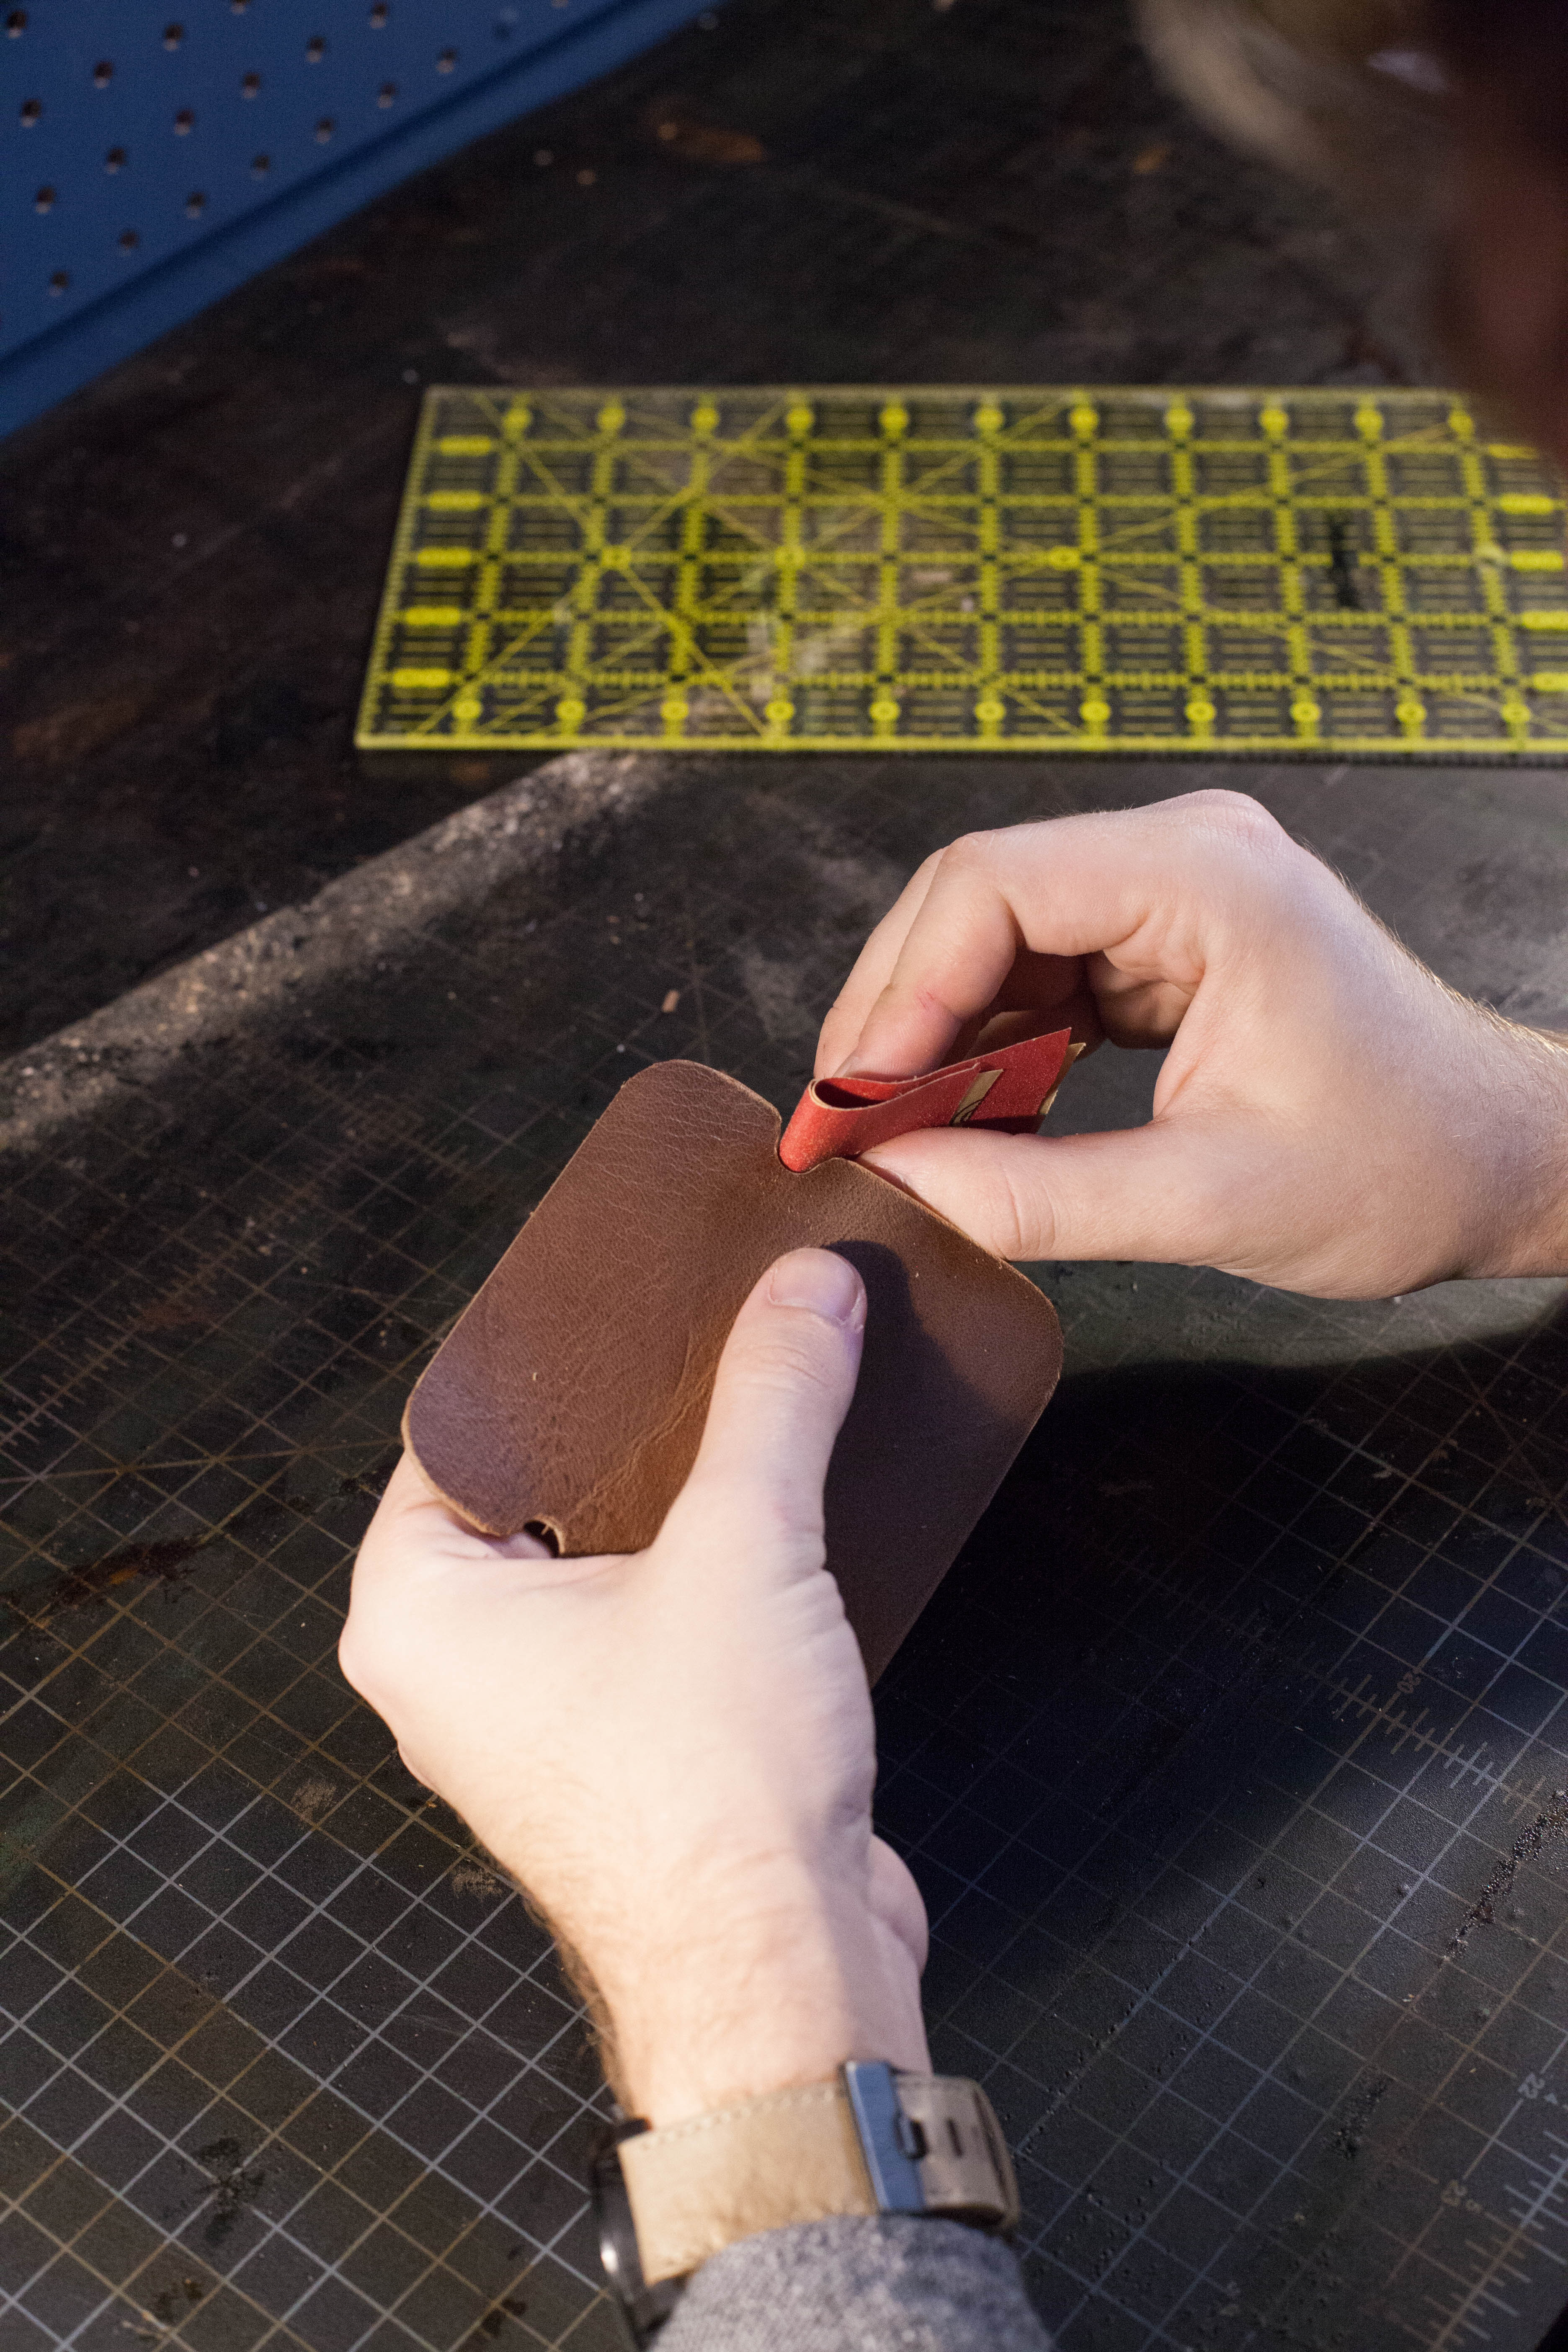
All edges need to be sanded prior to burnishing. It's pretty difficult to make perfectly rounded corners and sanding helps to make your rounded corners look a heck of a lot better. In addition, it removes a lot of the lose fibers on the edge, which will give your edges a better finished look after you've burnished. To do this, hit the edges with 220 grit sand paper. This grit is really just for smoothing out rough areas, like the corners. So once your edges start to look even, you can stop. After that, hit it with 600 grit sand paper. This grit is less about shaping the edges and more about eliminating loose fibers. So once your edges feel smooth to the touch, you can stop.


Step8


Step

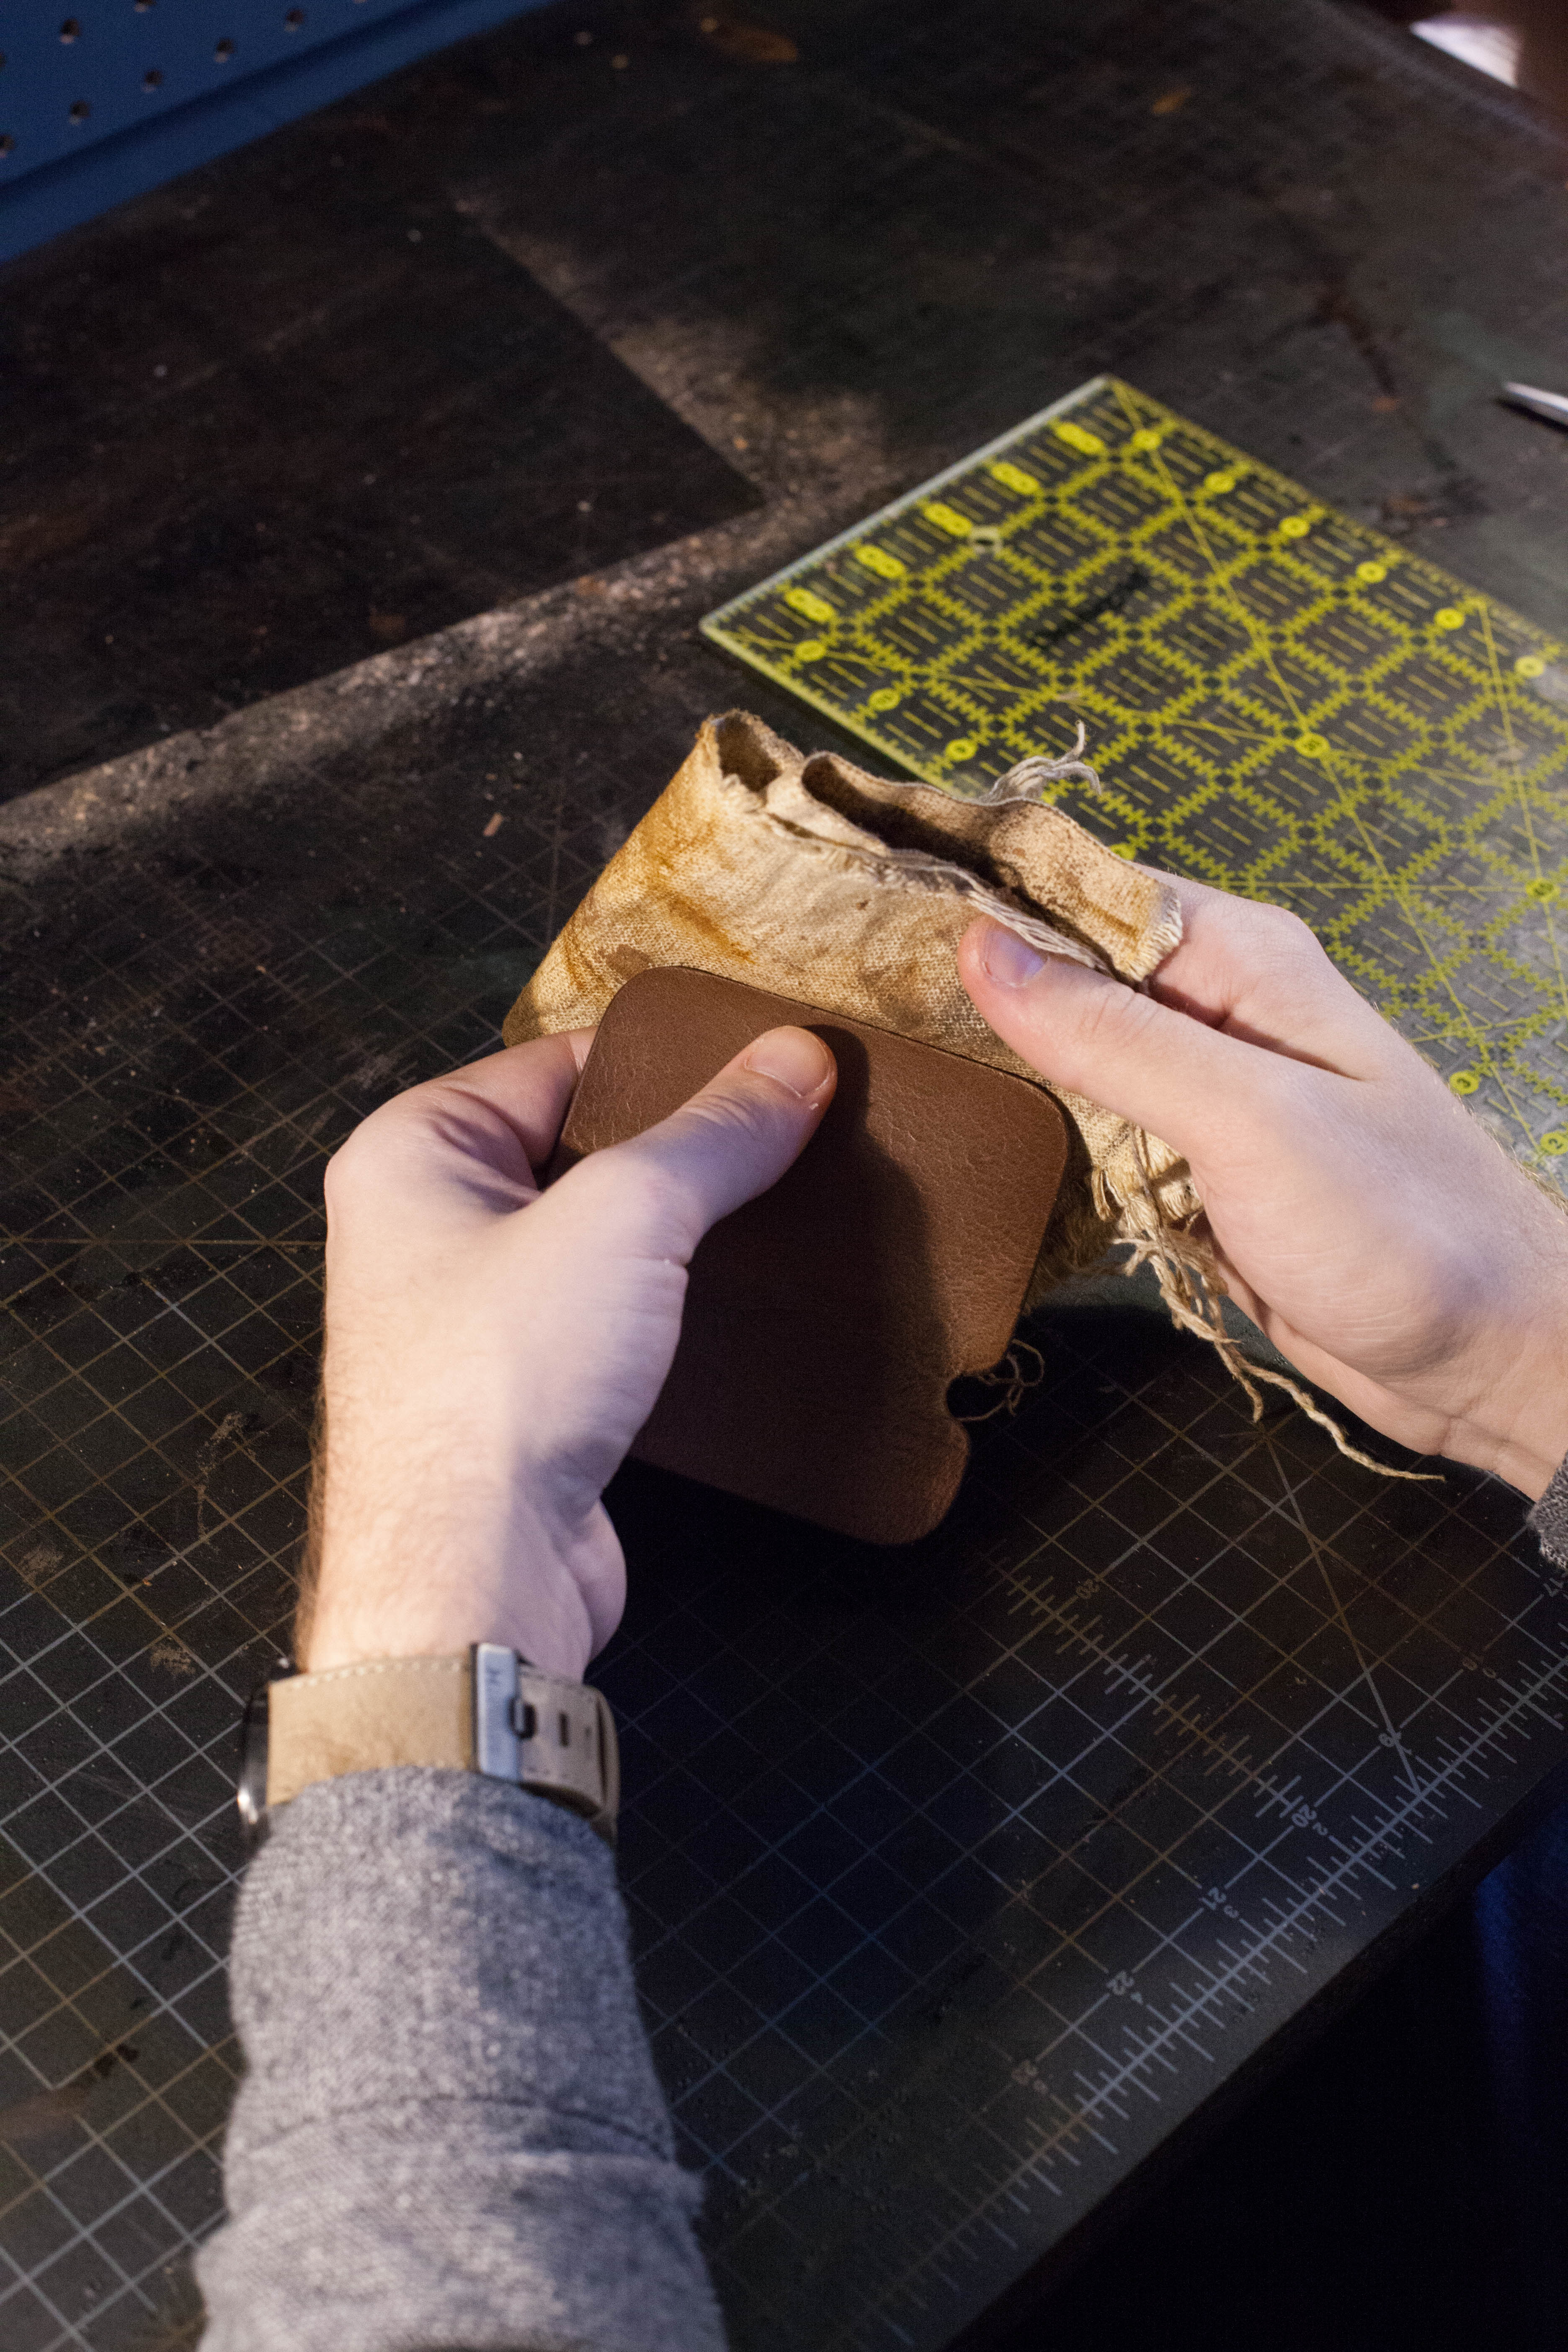
After sanding, you can start the burnishing process. Most leather workers have their own take on the burnishing process, and I've written a basic one here. To start, lightly wet one edge with water. Then, using a canvas cloth, briskly rub the edge. You'll know you're done when the edge darkens, has a shiny surface, and starts to make a tacky sound. With one edge done, finish the other three remembering to lightly wet each edge before hitting with the canvas cloth. Finally, apply a small amount of beeswax to all the edges and work it with the canvas cloth.


Step9


Step

All that is left to do is install the snaps. To start, use your scratch awl to make a mark at each of the four corner .5" in, as shown in the picture below. After you've marked the location of the holes, go ahead and punch them out with a 5/32" punch.


Step

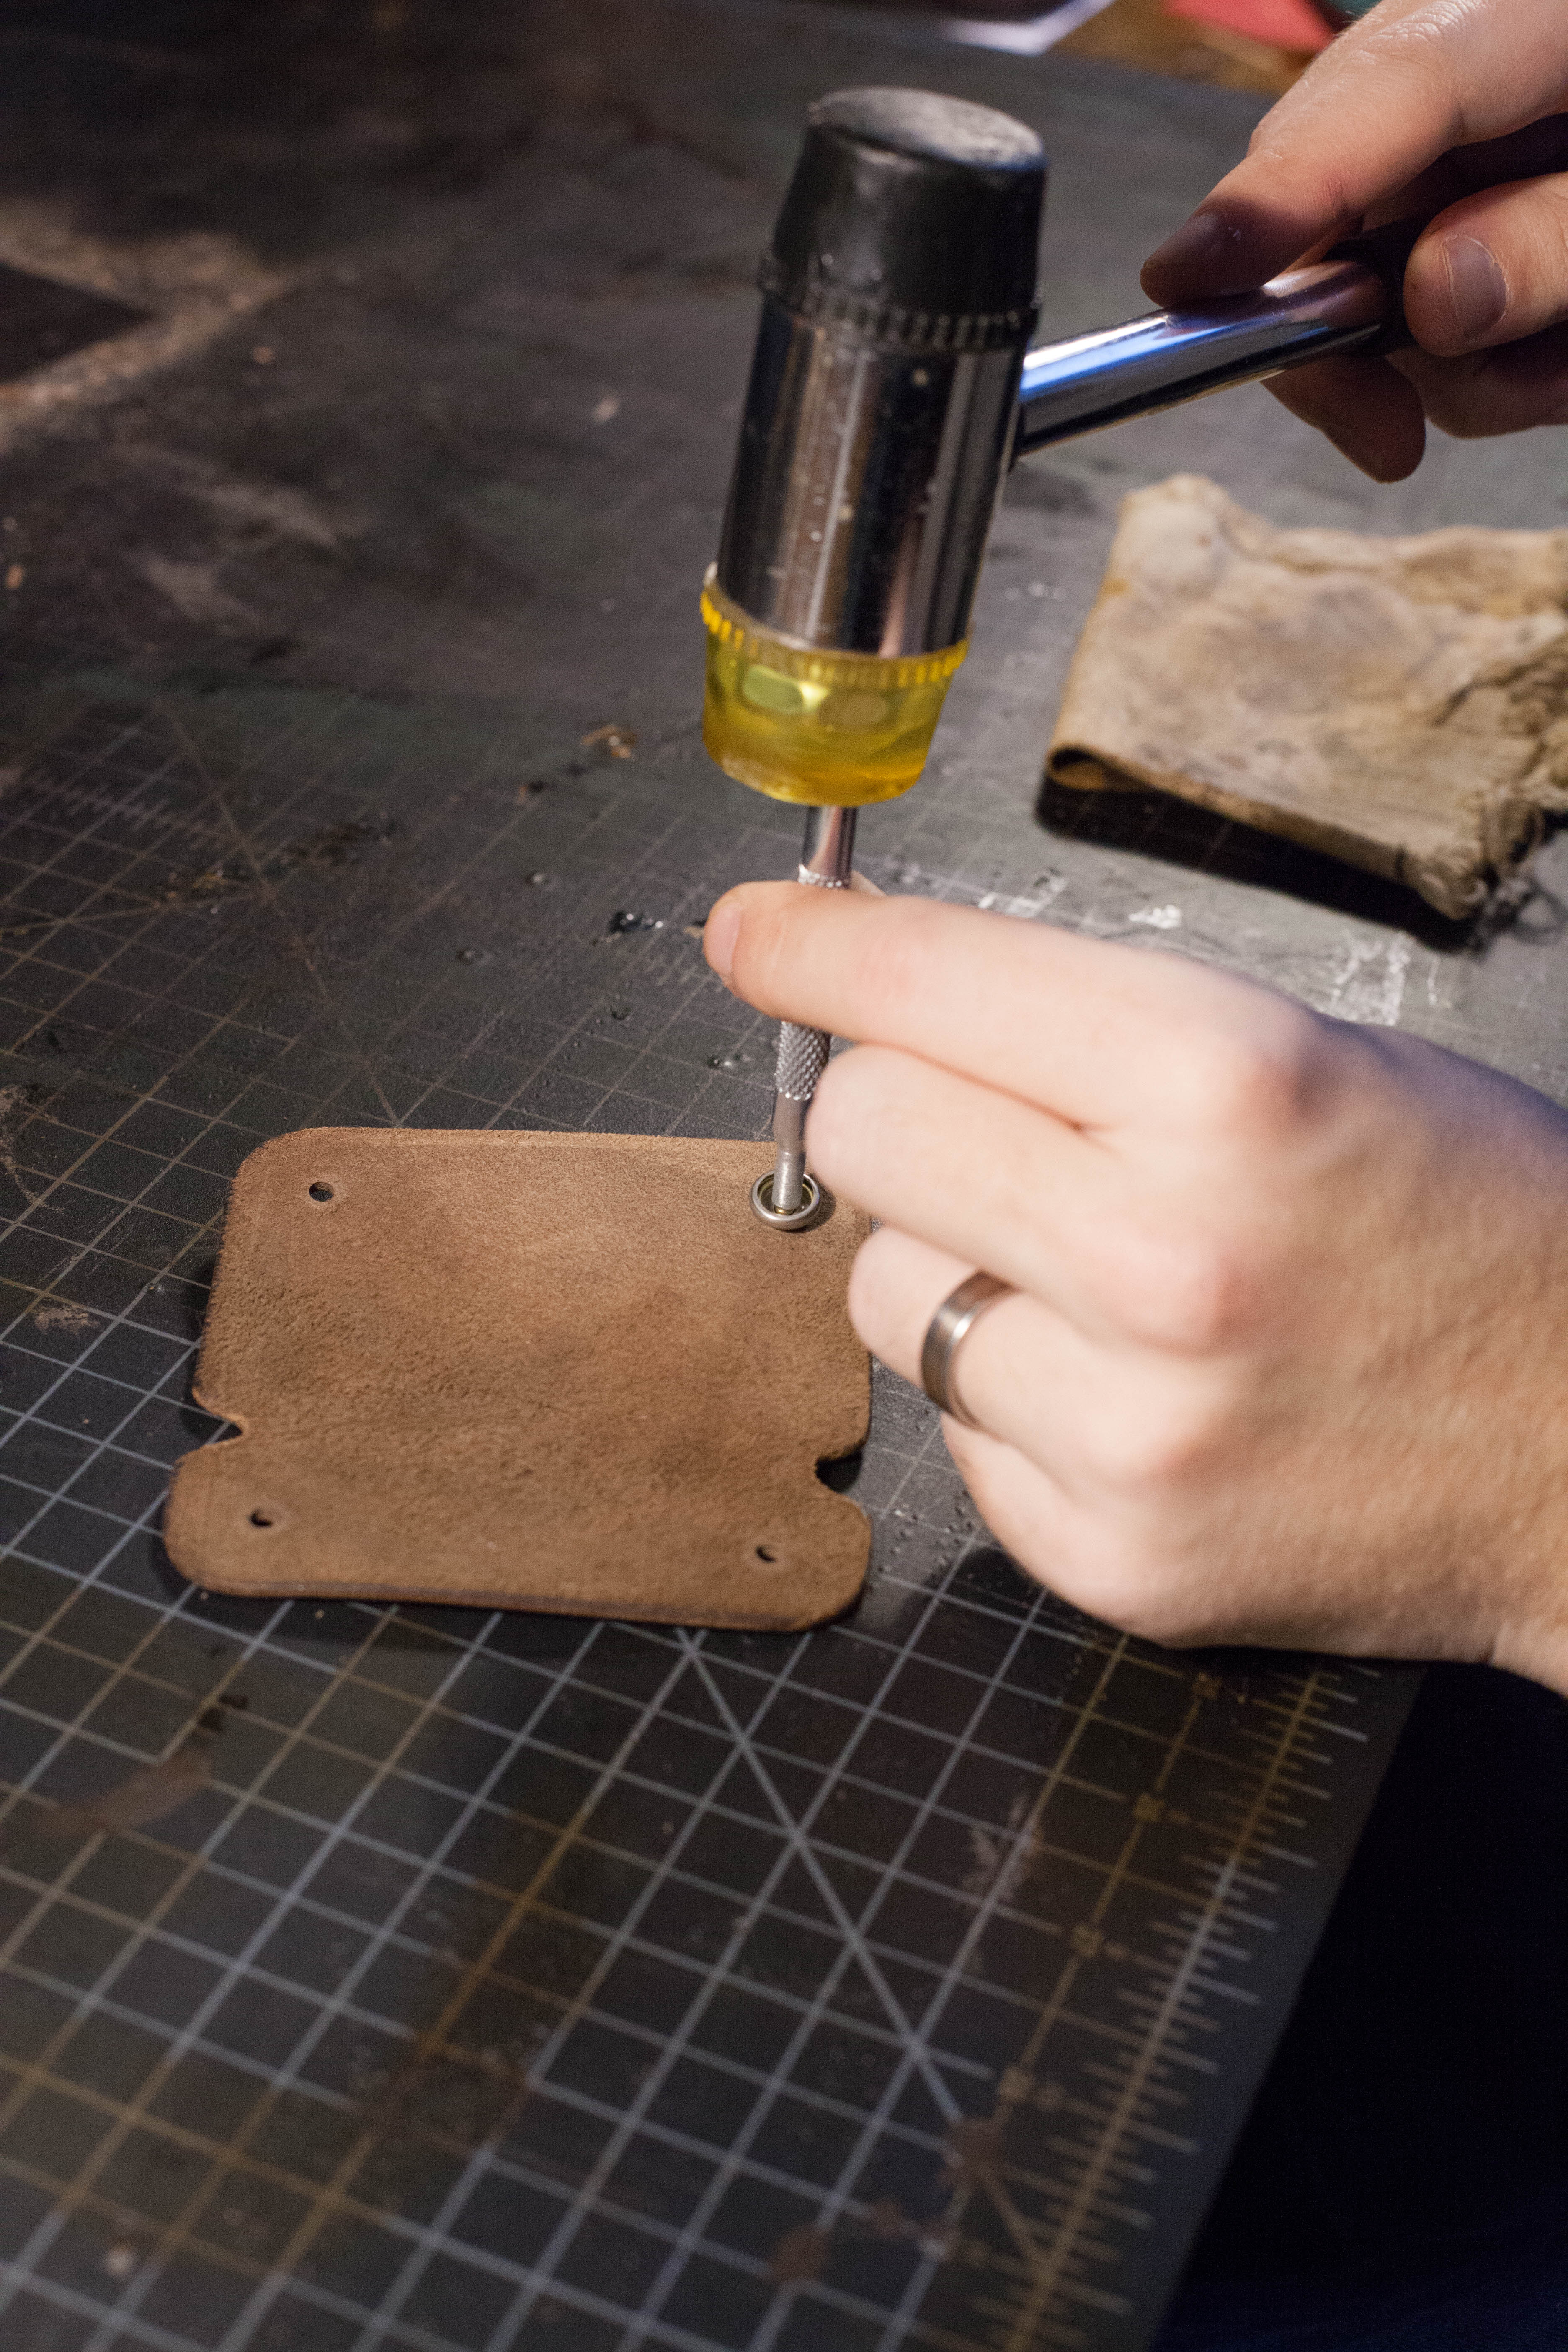
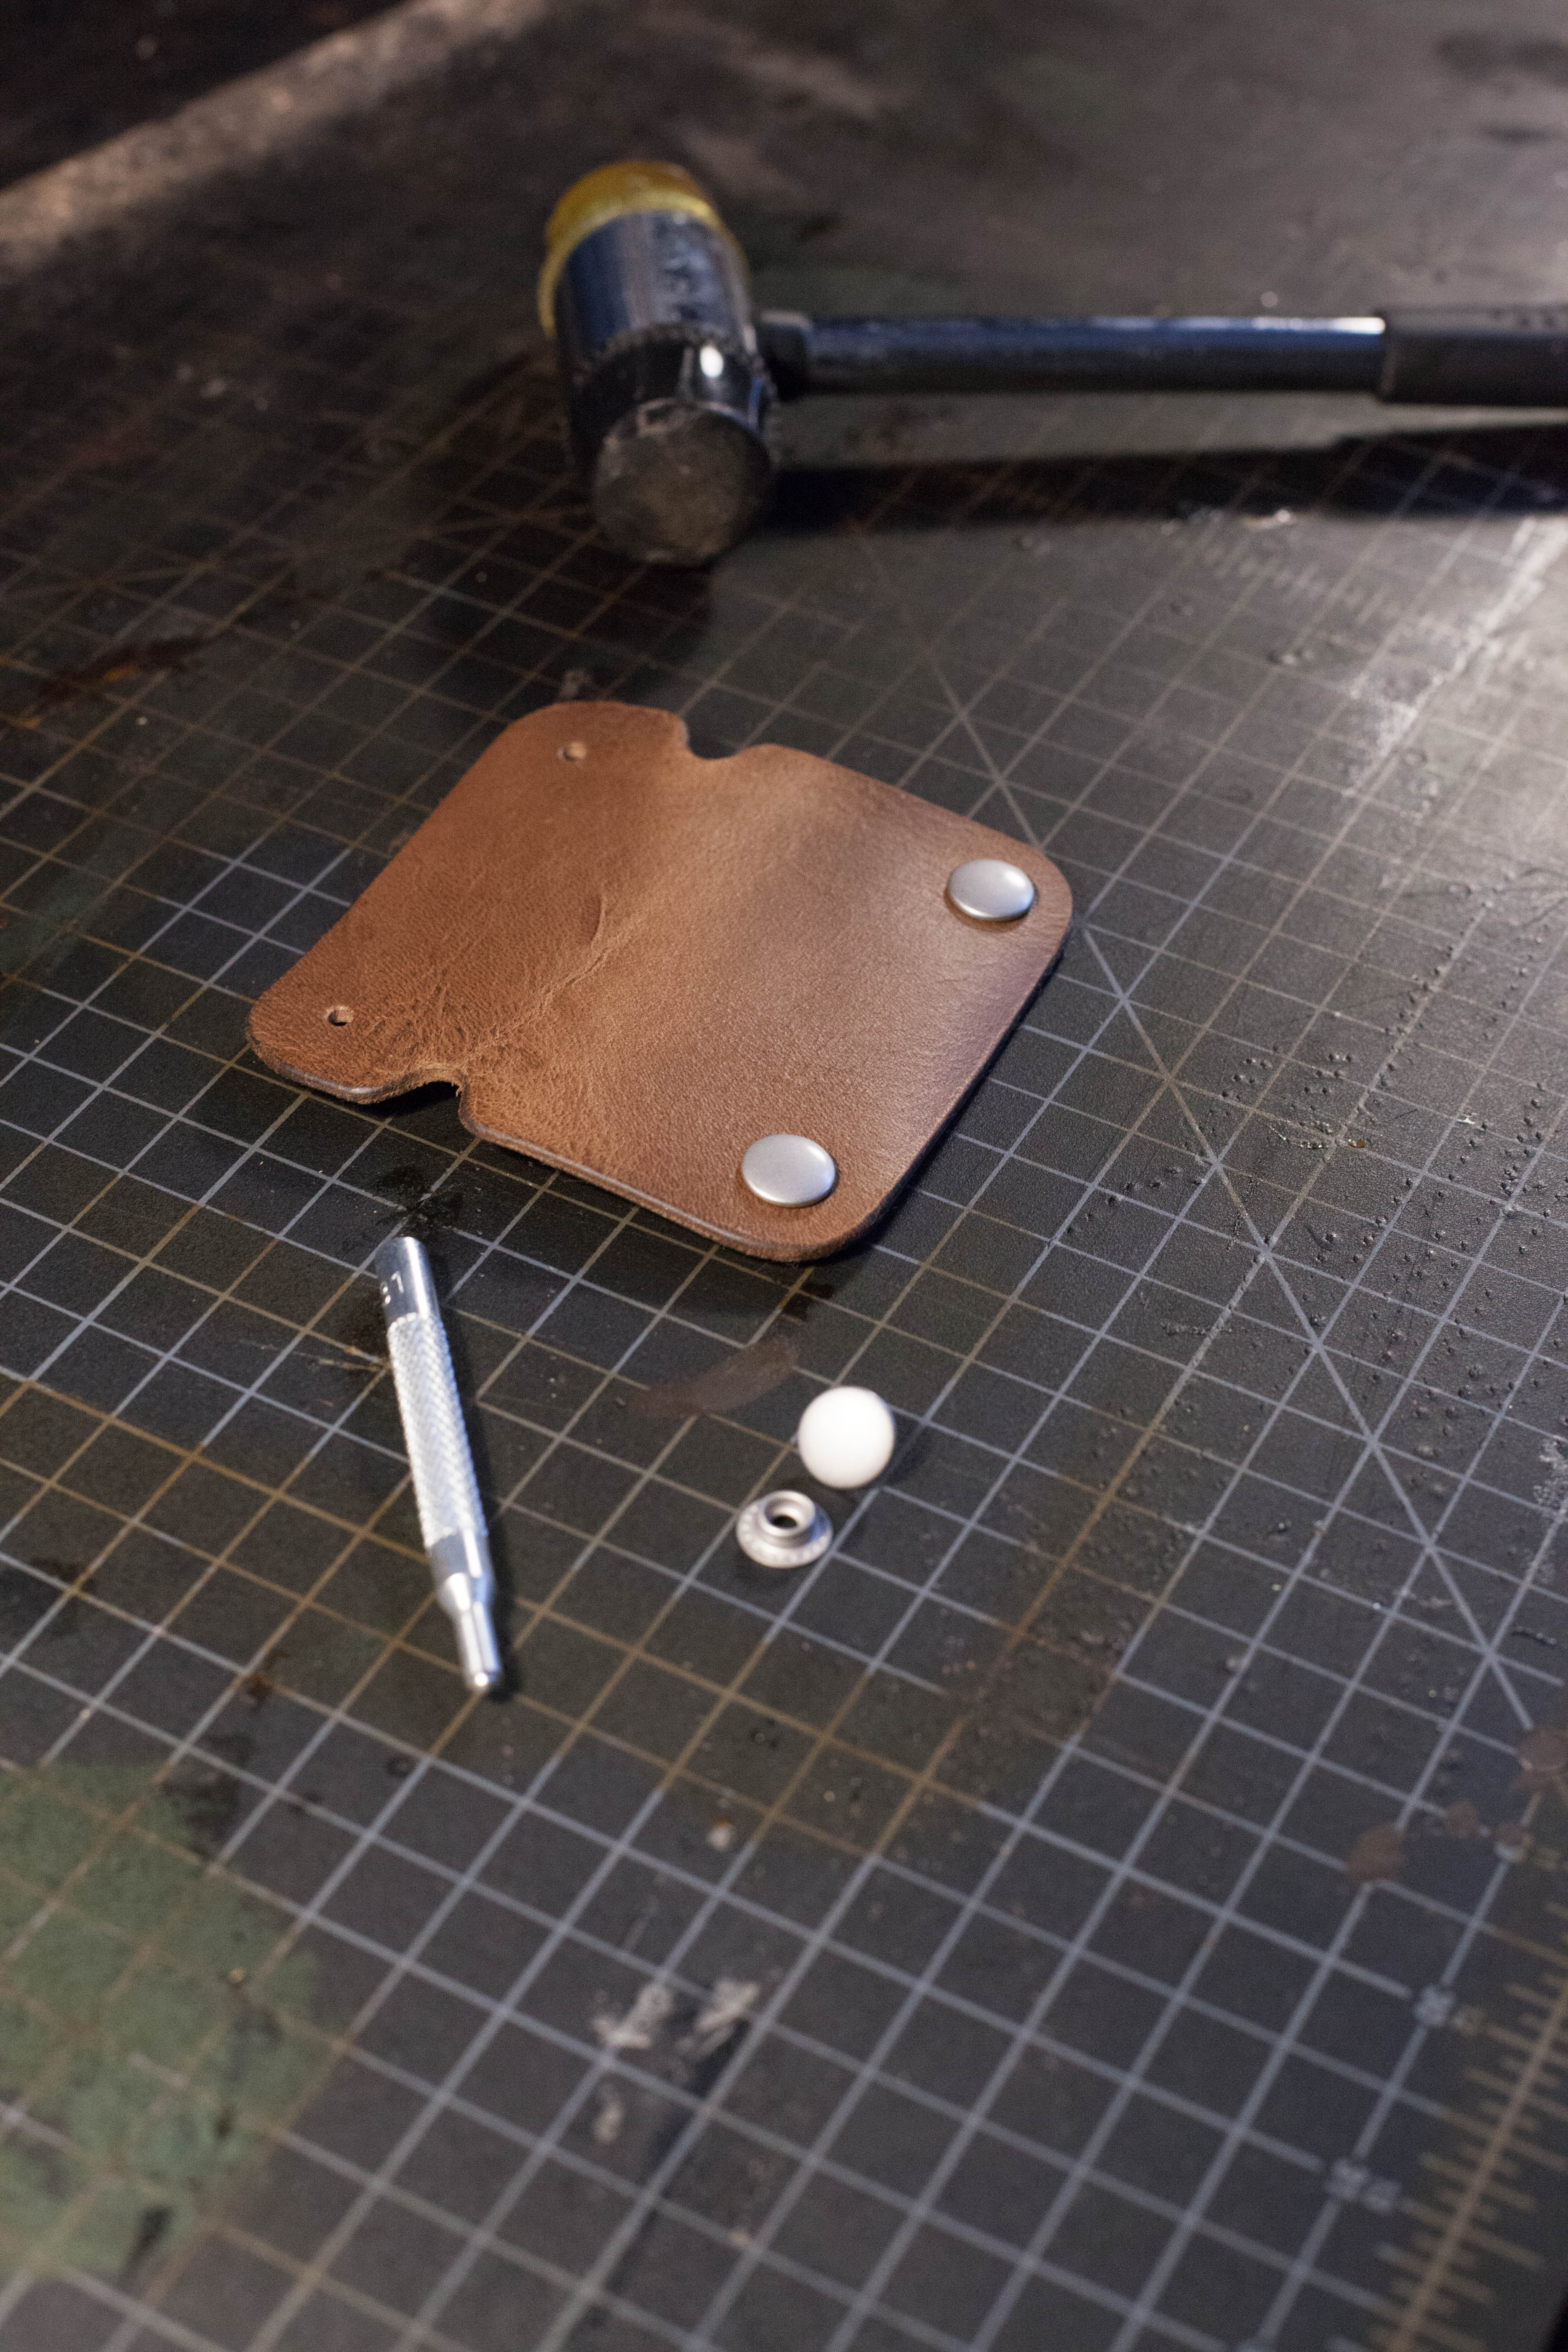
Snaps can be a little confusing the first time you use them because they have a few different pieces. In this case, you should have 3 different types: a domed cap, a male piece, and a female piece. It doesn't really matter if you start with the female or male piece. Do make sure to keep the domed caps on the outside of the project, the two female pieces on one side the project, and the two male pieces on the other.

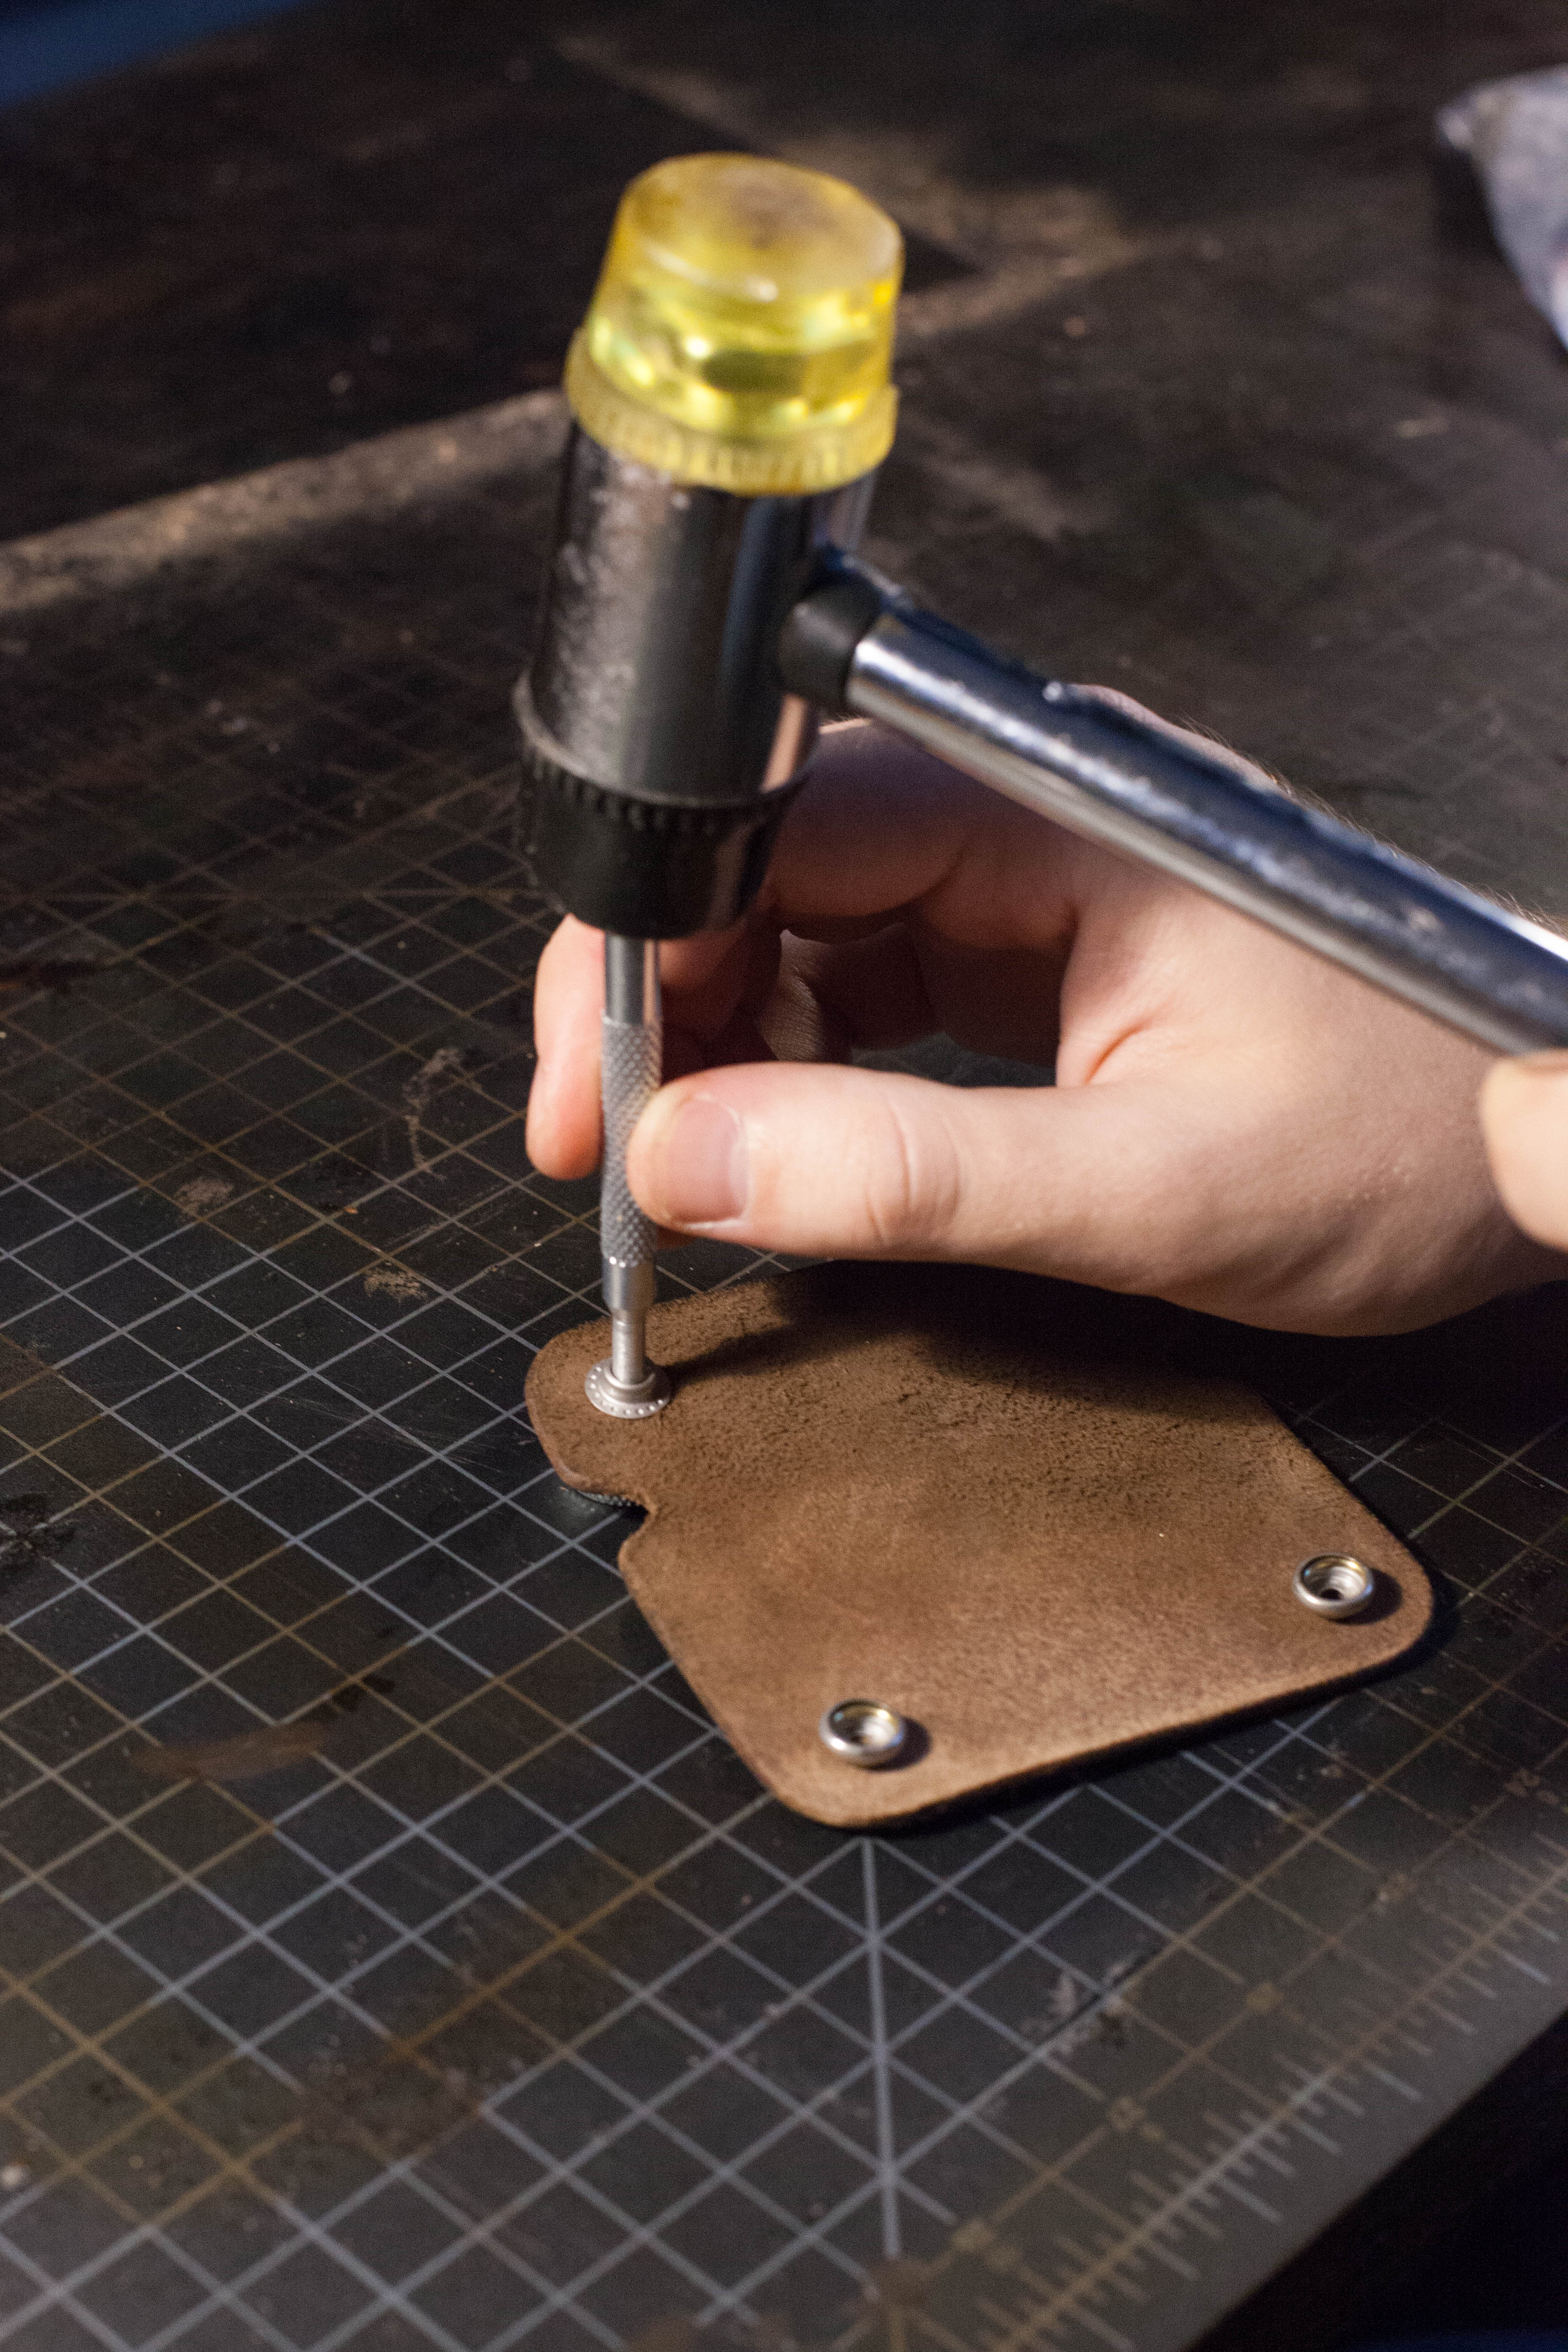
In this example I started with the female pieces. Set the domed cap onto the domed anvil and then place the leather on top with the flesh side facing down, making sure the cap goes through the hole. Then set the female piece on top and rivet into place with the rivet setter and the hammer. With the two female pieces in place do the same thing on the other side of the organizer with the male parts. Finally rivet the male piece in place and you've finished the project!


If you completed this project start to finish and it's looking sharp, there's no reason not to brag. Share a picture of your hard work with us on Instagram by tagging @manmadediy and @goldbarkleather. 


Your New Favorite Hobby: Everything You Need to Start Carving Heirloom Wooden Spoons and Utensils

$
0
0

We love a full-on major woodworking project. It's ambitious, challenging, and, once you've figured everything out, you're left with a piece of furniture that will get used everyday.

But, building furniture is also time consuming, takes up lots of space, and if you're using all hardwood construction, can be expensive to source the right materials. So, while it's lovely to learn joinery and finishing techniques, sometimes, you need a woodworking project that can be completed in a single day. Better yet, in a single sitting.  


Enter the hand carved wooden spoon. (Or ladle, spatula, saute tool, what have you...). Working small is an intimate way of learning about wood. Splitting it, shaping it, and finishing it by hand can teach you about grain, fibers, and wood structure way more than making cuts on a table saw. You can carve spoons in your workshop if you want some alone time, but because it's quiet and you're making wood chips, not fine dust, you could set up a folding chair along side your sofa while you watch a film or listen to music with your family and friends, and just sweep up when you're done.

It's also incredibly rewarding, super affordable, and, once your finished, you'll have a beautiful heirloom object and keepsake for your kitchen. They also make a killer gift for everyone, because, who doesn't use spoons?

So, DIY wooden spoon carving gets our vote for your new favorite hobby for 2017. If you haven't discovered the joys of working with wood on the small scale, you certainly should be. 

The Basic Kit

1. The Hook Knife (Crook Knife)
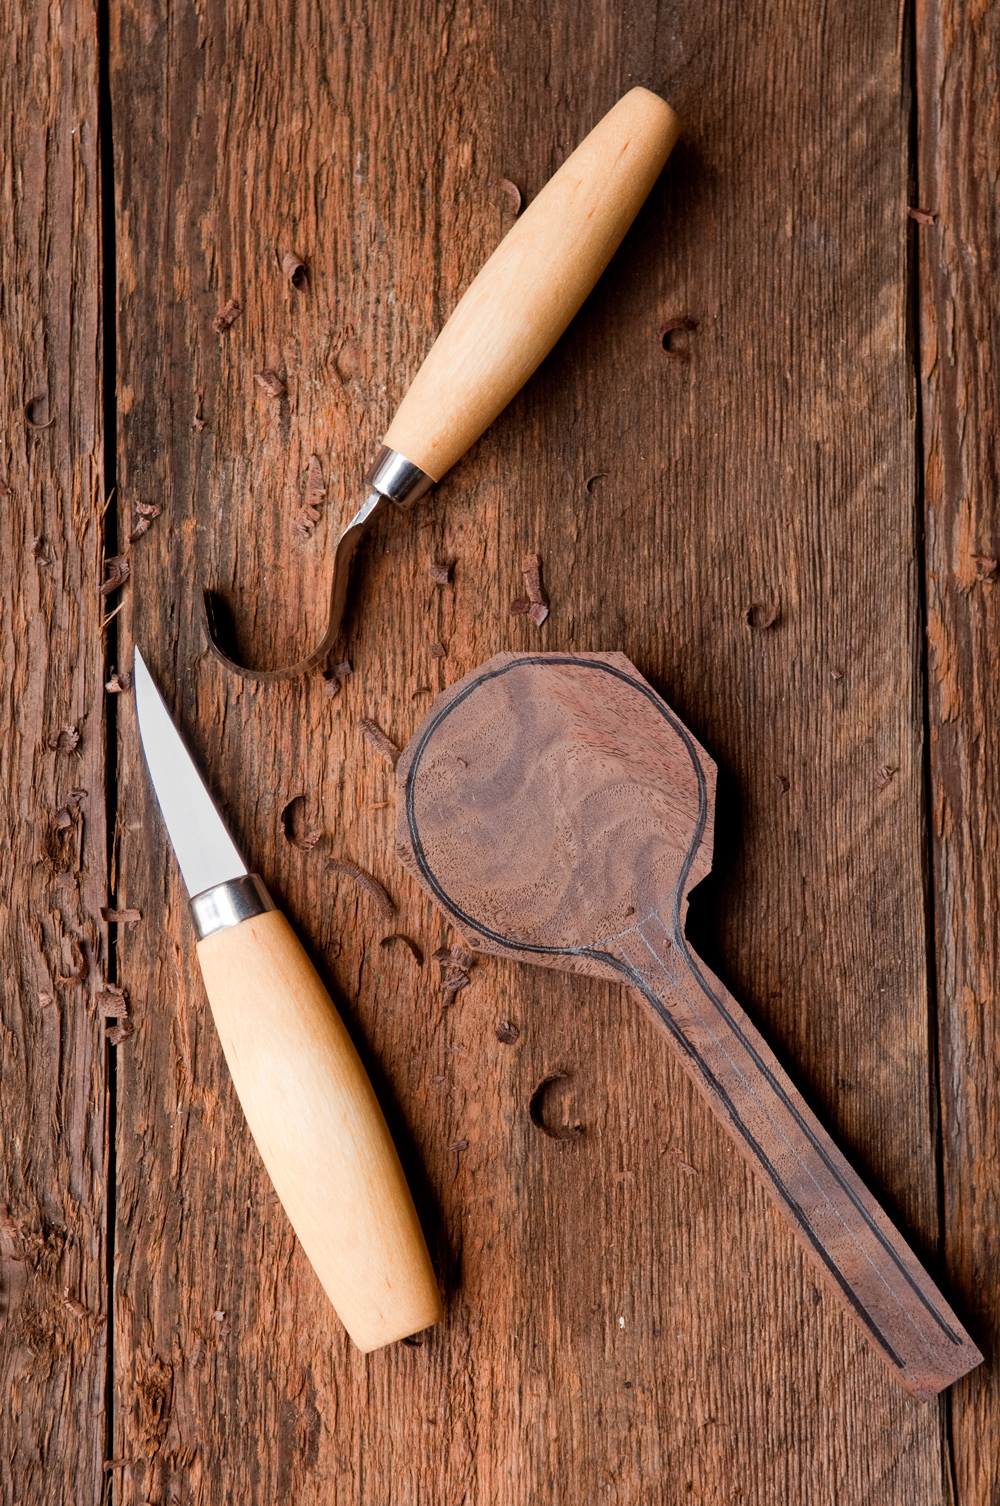
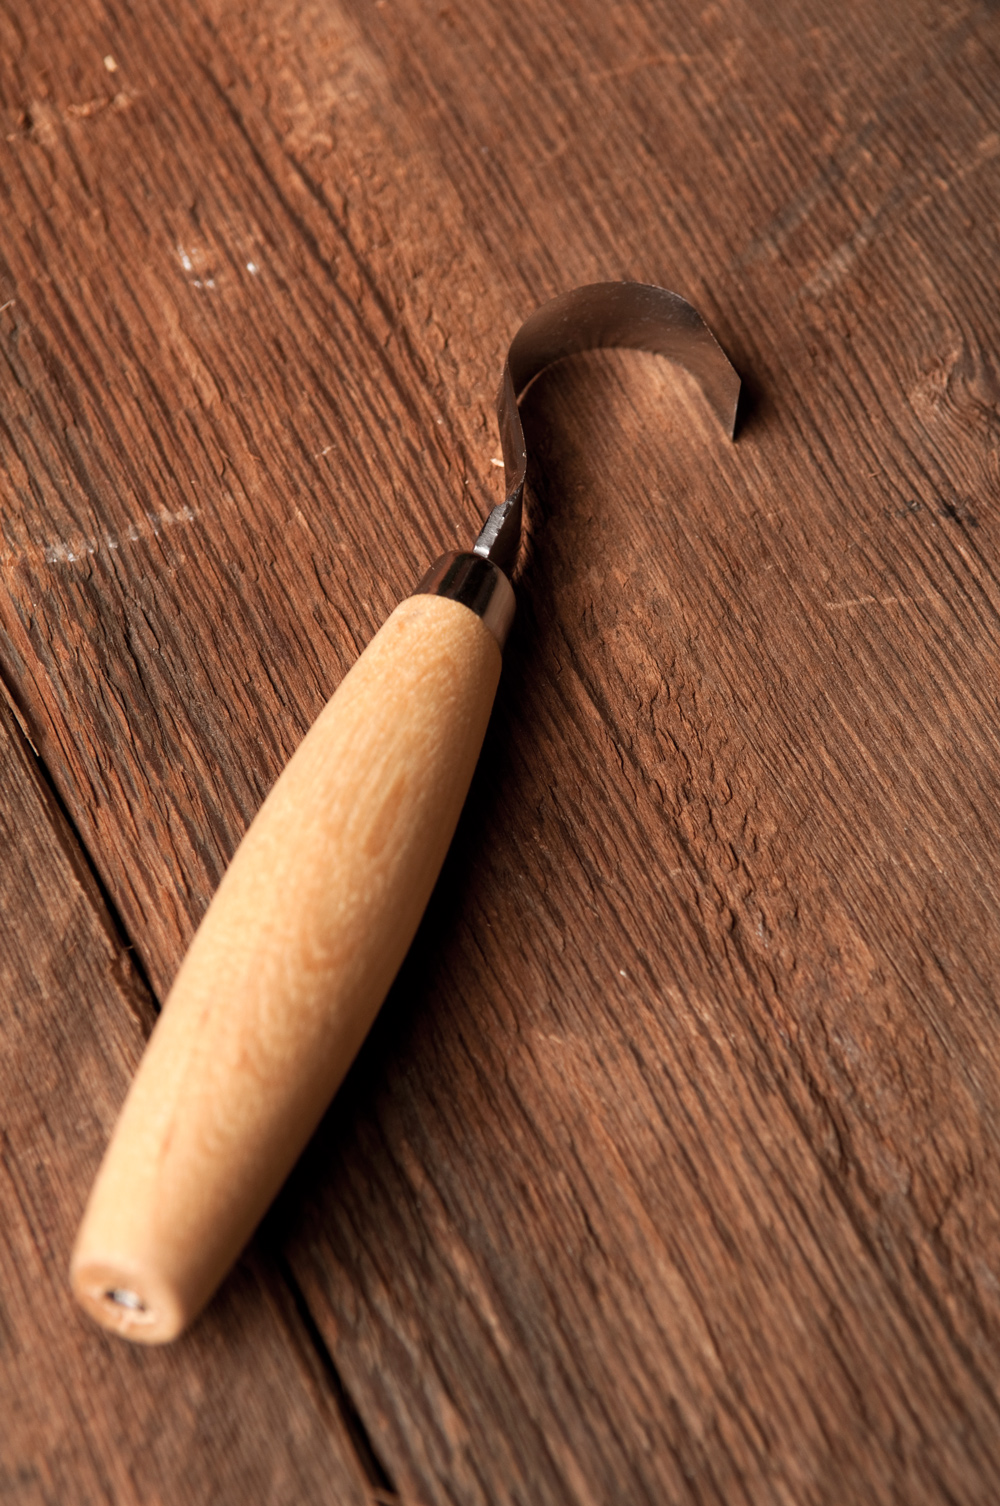
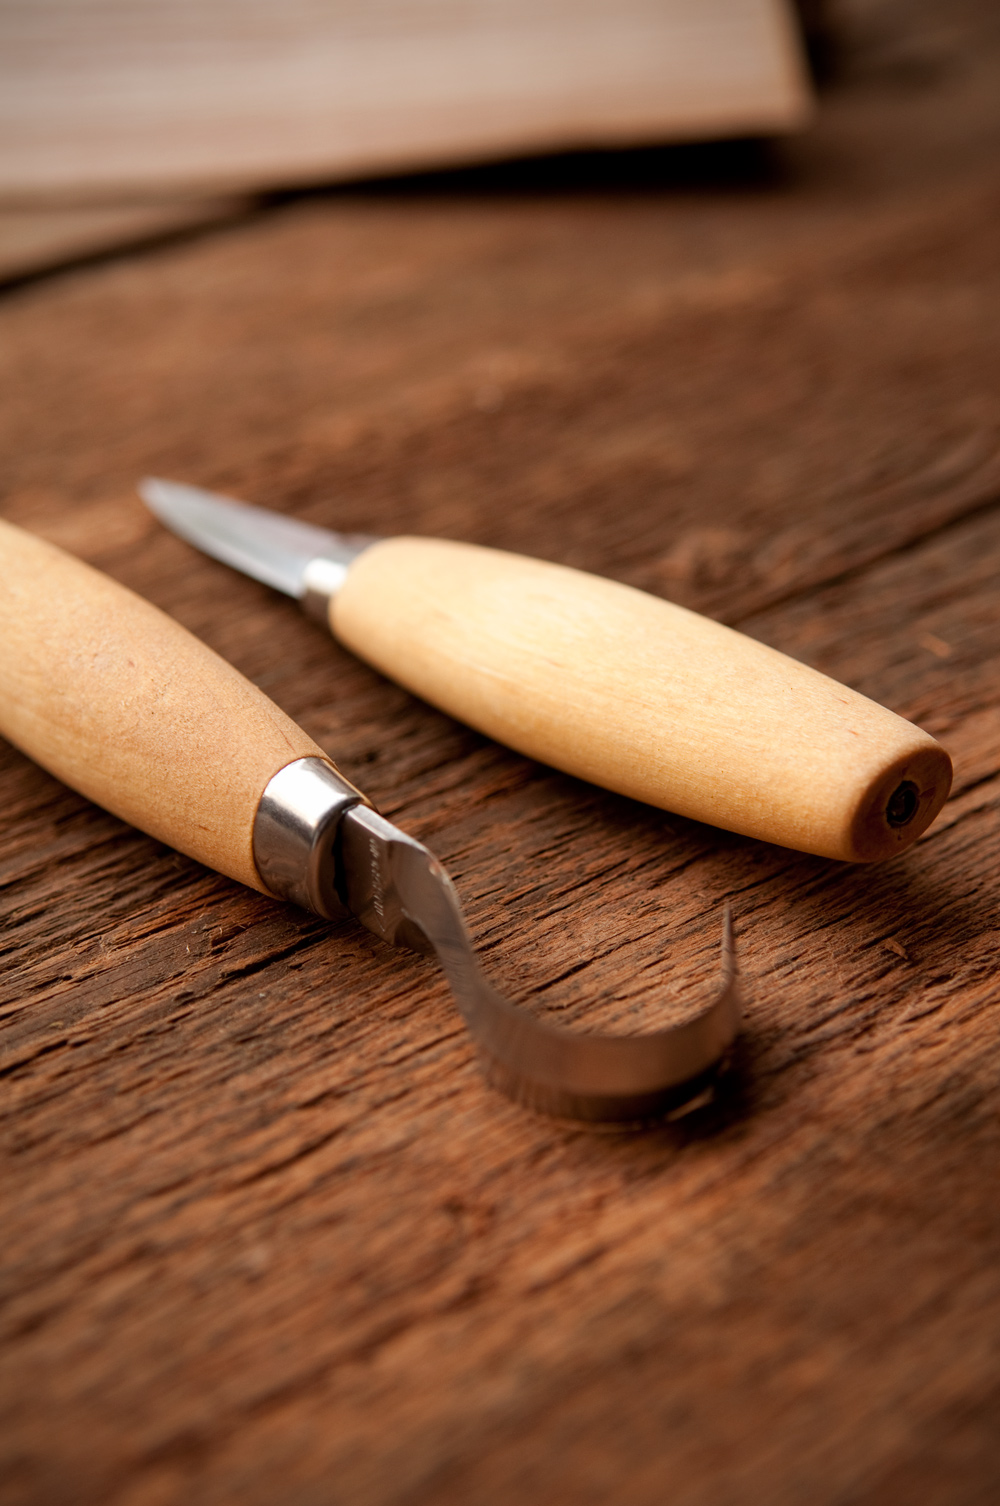
If you already own some basic woodworking tools like a band saw or jig saw, sanders, a spokeshave, or chisels and gouges, this is technically the only specialized spoon carving tool you need. Take a look at the blade, and you know both where the name comes from and what it's designed to do: cut the curved bowl that makes a spoon a spoon. You could do every other bit of shaping with your existing tools.

The hook knife is designed for carving "green" wood — relatively fresh cut wood that still has a higher moisture content and is easier to cut with this amount of leverage. The model you want is a Mora 162, which has been made in Sweden for over 100 years. Simple birch handle, hardened carbon steel blade, and, only twenty-five bucks.

ManMade Recommended: Morakniv Wood Carving 162 Hook Knife - $25.95


2. Straight Carving Knife
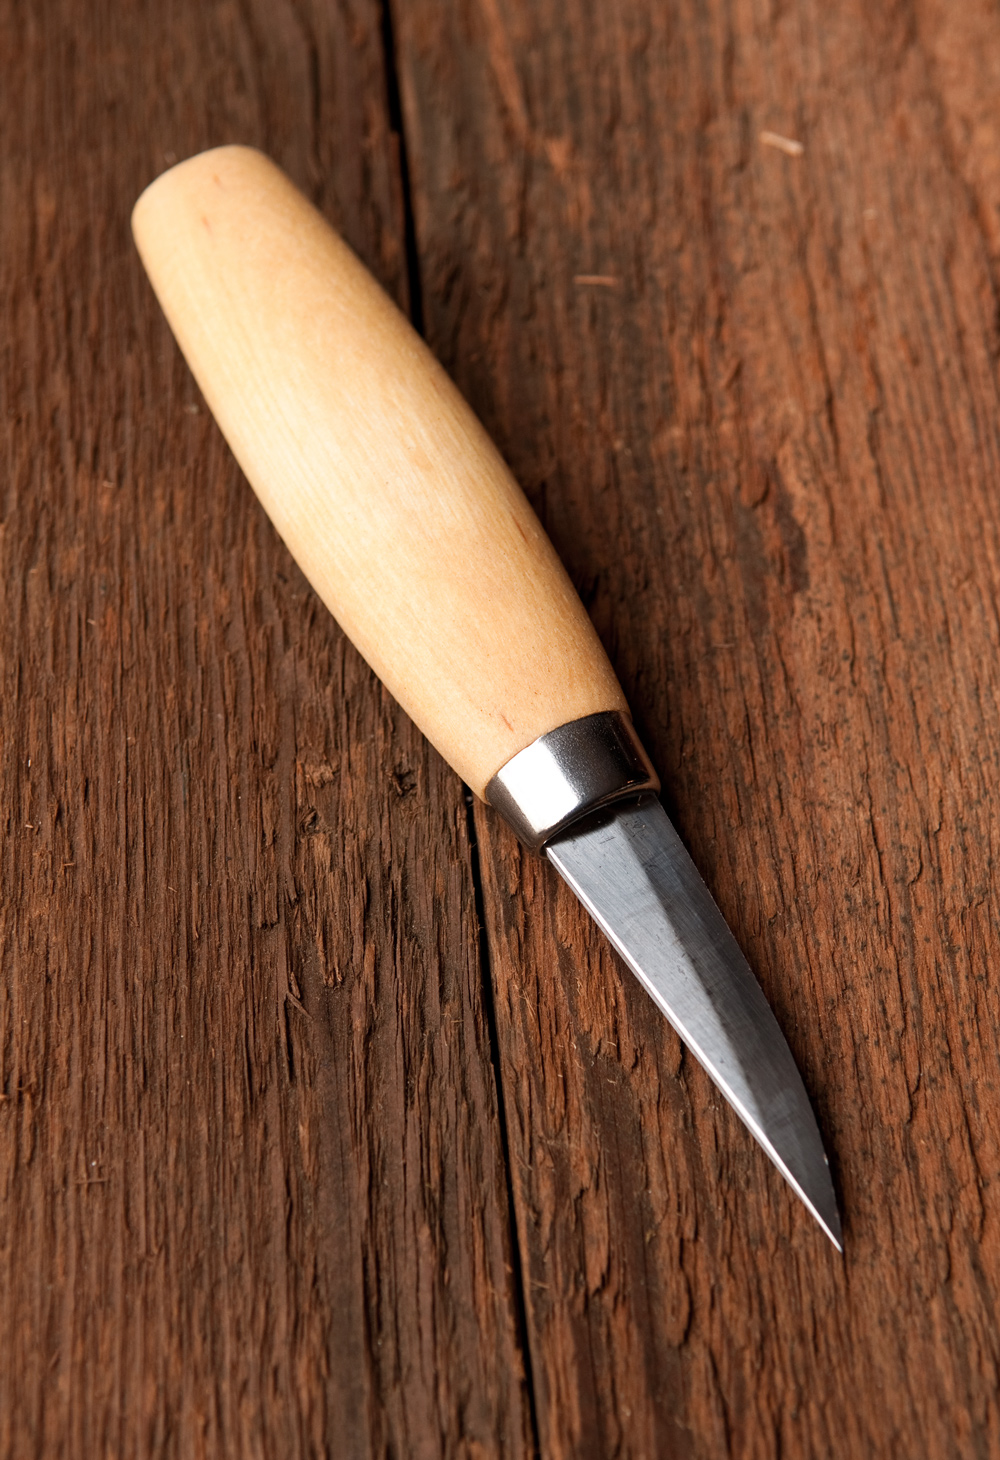
The hook knife takes care of the bowl, then its classic partner, the straight woodcarving knife, handles the rest. Again, we suggest opting for the tried-and-true Morakniv brand. The standard model here is the Mora 120. You'll understand the quality as soon as you get your hands on one. For twenty bones, it can't be beat. 

ManMade Recommended: Morakniv Wood Carving 120 Knife - $20.26


3. Hatchet 
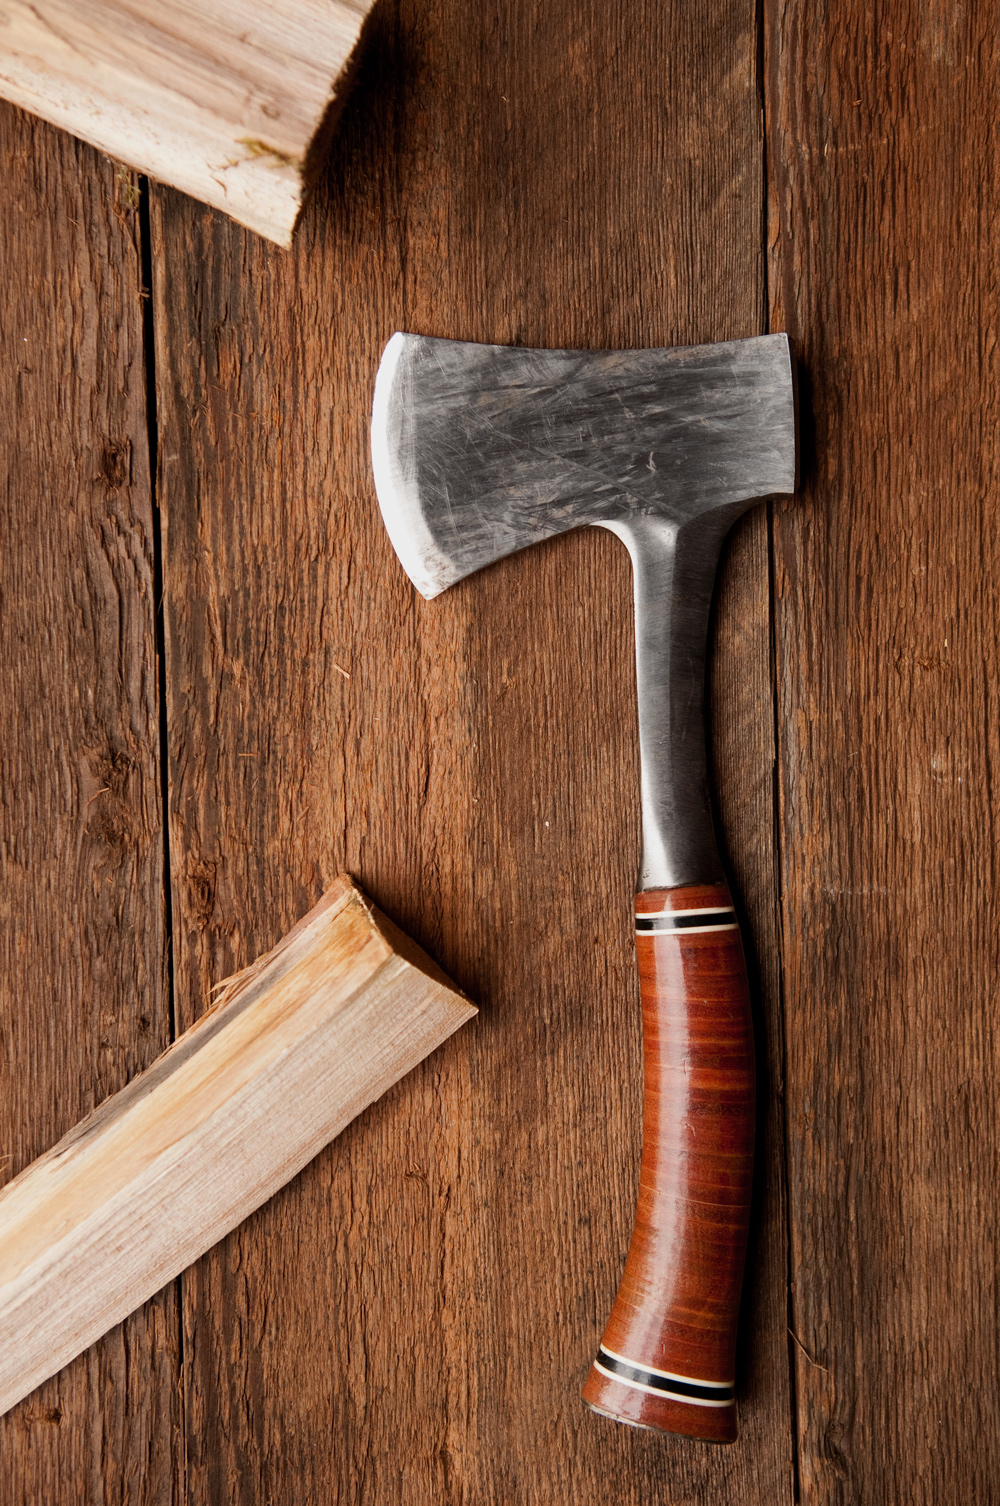
A small axe is used to split green wood. Splitting, over sawing, allows the wood to come apart naturally along its grain, making for a stronger spoon blank. When the wood breaks the way it wants to, it's more stable.

If you really get into carving knives, you'll likely want a nicer (read: more expensive) Scandinavian-style axe that will allow you to split and shape the wood with control. But if you're just getting started, the classy-looking Estwing hatchet works great for much less cash. 


For the starter kit, that's it. Three tools, some wood, and you're off. 


Advanced Tools

As your skills develop or you want to try more ambitious shapes and projects, a few additional tools can help speed up the process. These tools are better used in your shop, garage, or outside than a recliner in the living room, but you can rough your blanks out anywhere then bring them inside for a quiet night of carving. 


4. Jigsaw
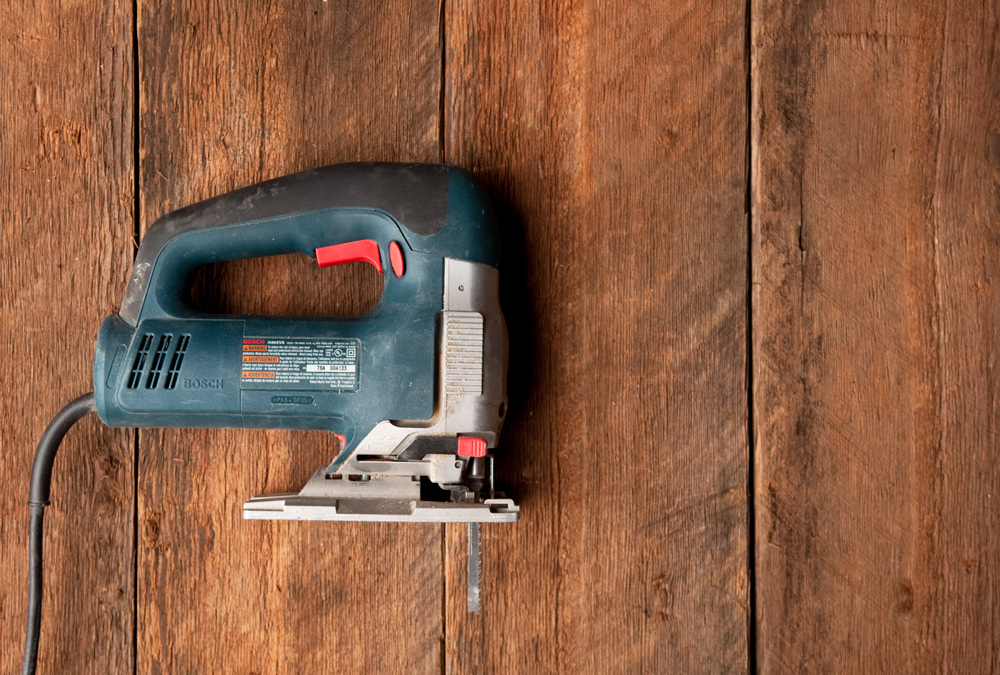
Designed for cutting curves, a jig saw is a great way to remove excess wood outside your pattern with precision. They're also extremely versatile for all sorts of craft and woodworking projects, so if you make stuff and don't own a jig saw, it's time to add it to your arsenal.  A band saw also works well, but if you own a band saw, you don't need me to tell you that. 


ManMade Recommended

5. Rasp 
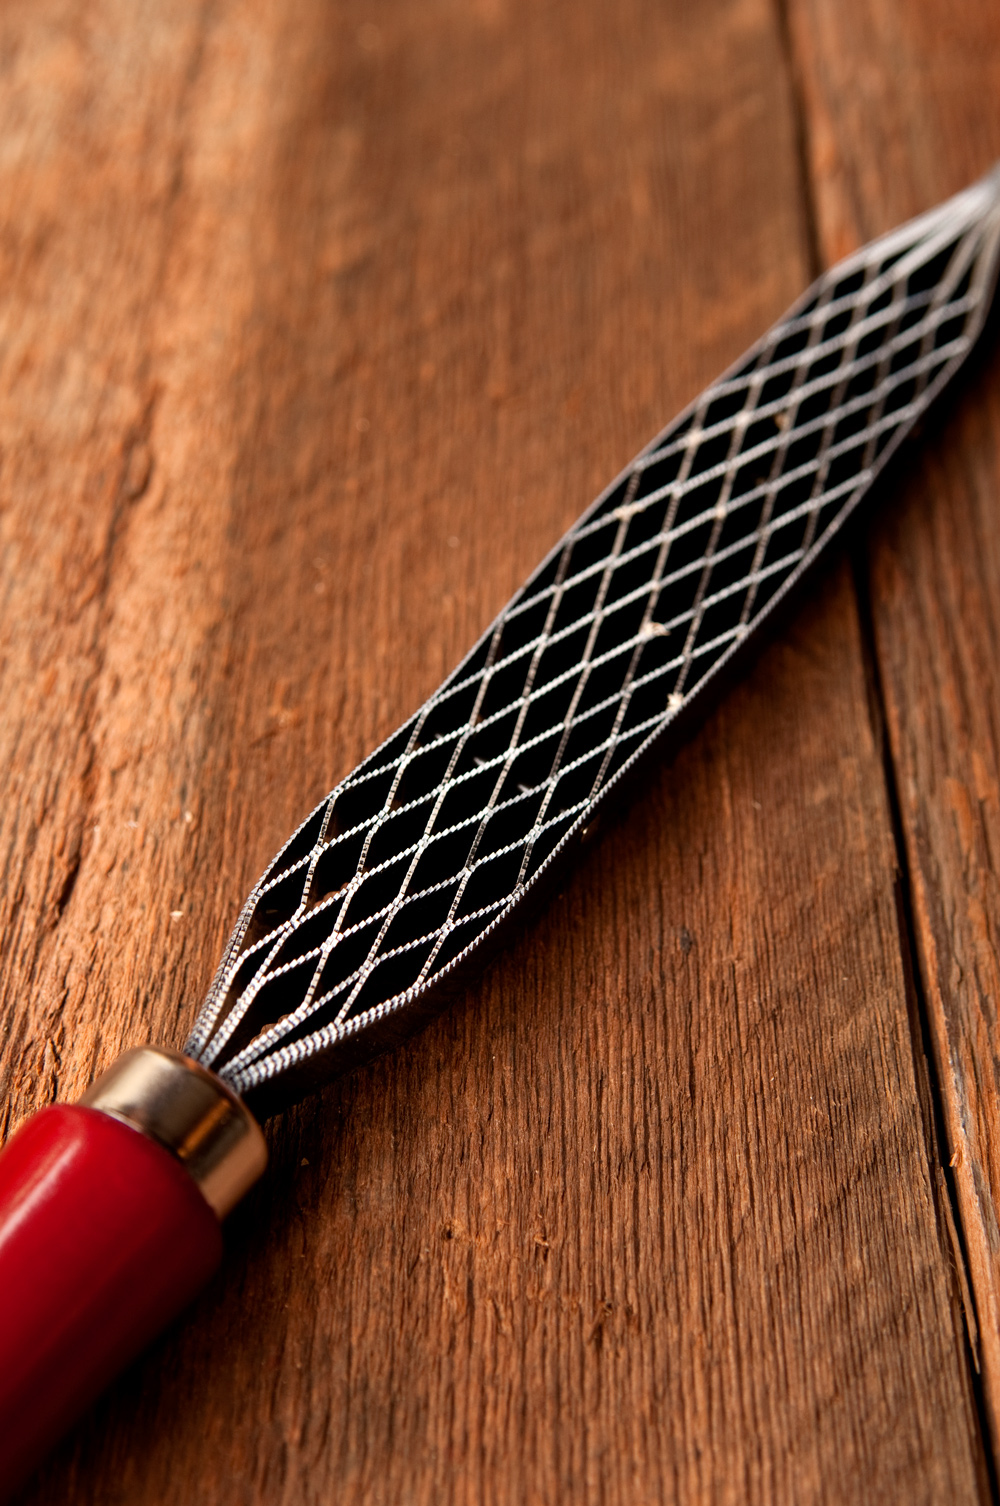
A rasp is a quick way to sculpt curves and transitions in wood. There are really nice hand-stitched rasps out there, but the most affordable option is a Japanese-style saw rasp. These have a find and coarse side that will allow you to remove a lot of material and refine your work. 

ManMade Recommended: Shinto Saw File - $16.71


6. Handscrew or Clamp 
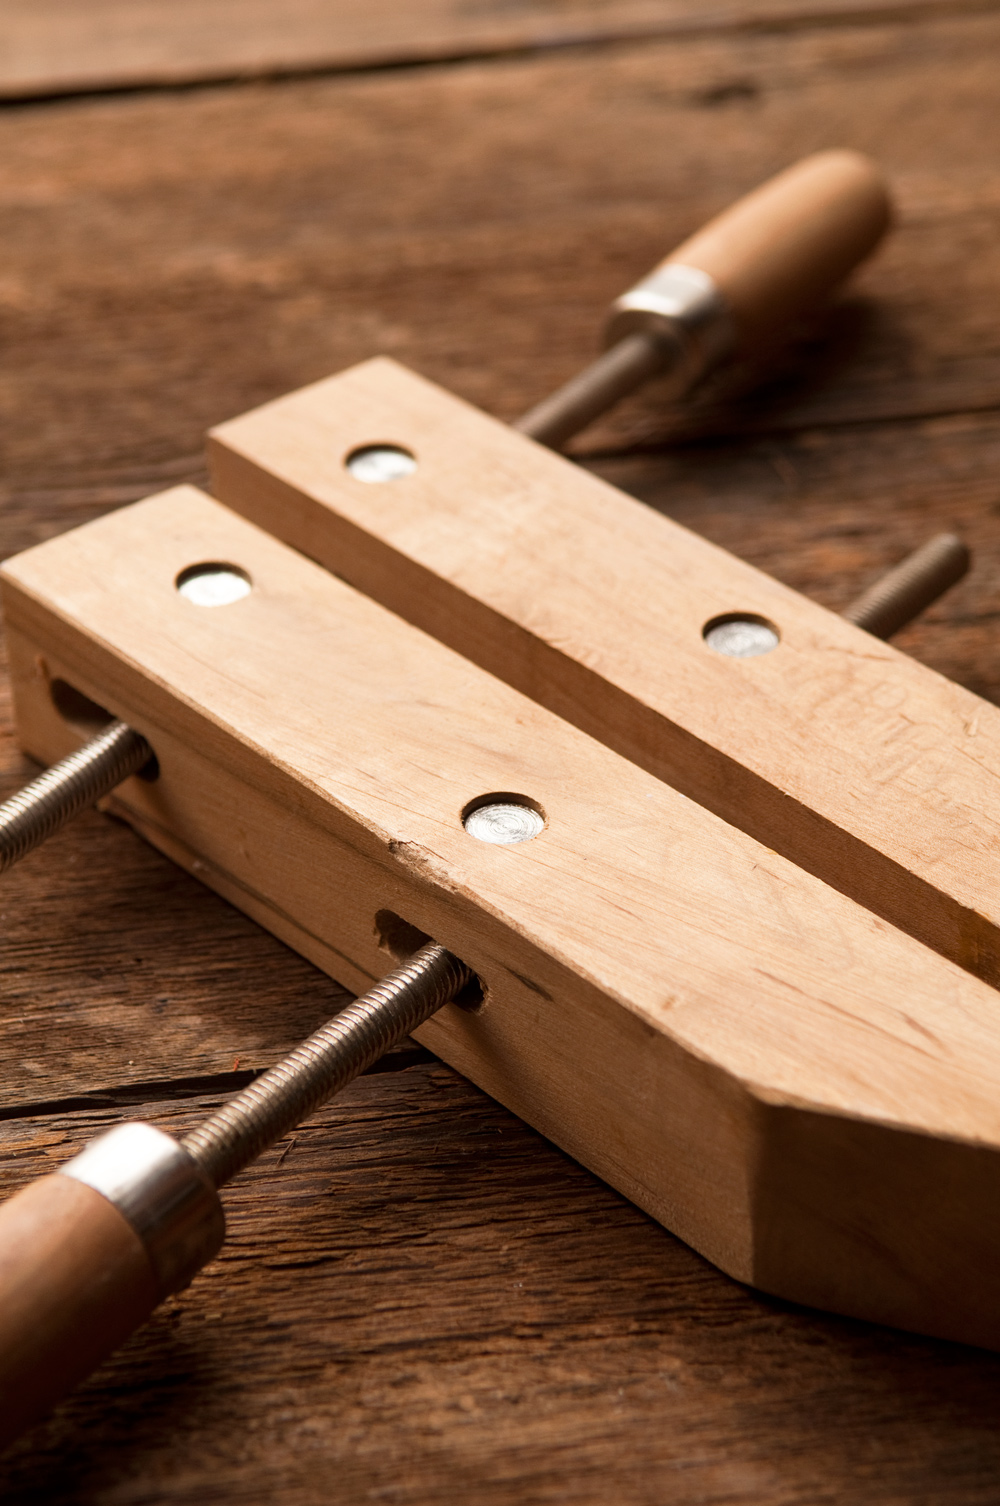
If you're using either a jig saw or rasp to shape your work, you'll need a way to hold it securely. You may already own some clamps or a bench vise, and they'll work great. If not, I recommend a wooden hand screw. It will hold the non-square shape of a spoon or spatula easily, and the wooden jaws mean that if you slip, you won't damage the cutting edge of your tool. 


7.  Sandpaper
Like any woodworking project, you're going to need it to refine and prep your work. A selection of grits from 80 - 220p will do nicely. 

You'll also need sandpaper to sharpen the unusual cutting edge of the hook knife. There, you'll want something like 600 or 800 to remove material and a honing grit of 1600.


8.  A How-to Guide
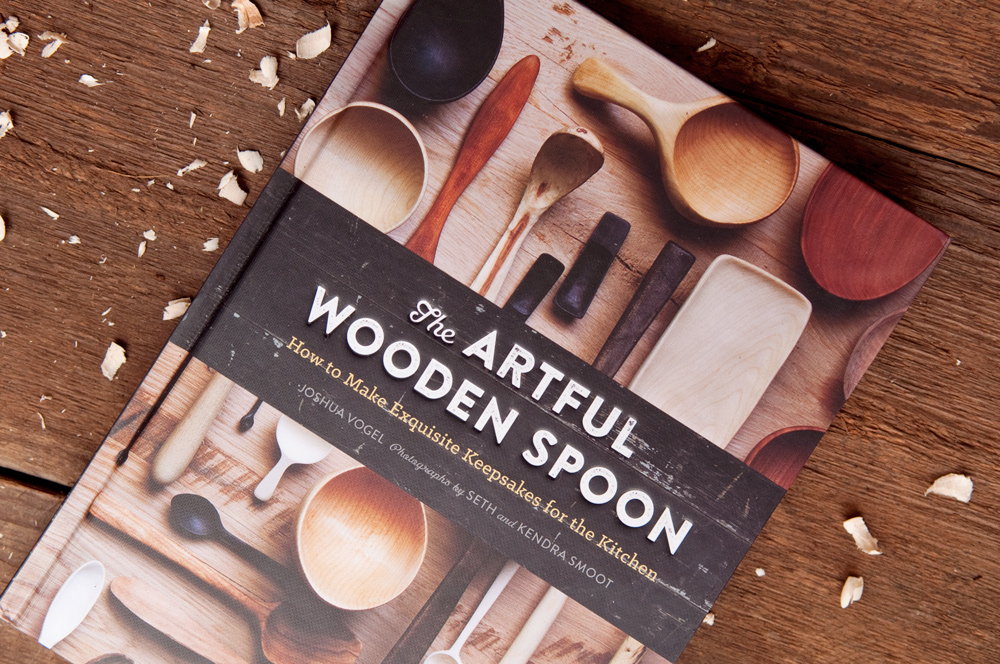
While you could learn everything you need from YouTube videos, there's something about the offline, all-analog activity of carving that seems better aligned to a good old fashioned paper book.  There are plenty out there - even older books from the library will work, since the technique and tools haven't really changed in decades. My personal favorite is this relatively new book by designer Joshua Vogel. The designs and photography in here are amazing, and while I like a classic Viking-style soup spoon, these more contemporary shapes are the pieces I'm most inspired to make. 

ManMade Recommended:The Artful Wooden Spoon by Joshua Vogel - $14.00


Convinced yet? Good. Us, too. If you're an experienced carver, we'd love to hear more from you in the comments below. Happy making!


Viewing all 2425 articles
Browse latest View live


Latest Images