Quantcast
Channel: Man Made DIY Recent Posts
Viewing all 2425 articles
Browse latest View live

5 Metalworking Youtube Channels Every DIYer Needs to Watch Right Now

$
0
0

There are some incredible craftsmen out there willing to share their hard-won experience. Metalworking is a varied field, with everything from blacksmithing to more modern welding techniques. The maker in me really likes the idea of a forge and pounding metal into something amazing so these channels are intended to highlight some serious iron-working. So with that, here are five of the best metalworkers on YouTube you should be watching if you want to learn something new.  


1. Old School Forge - Chandler Dickinson is my kind of maker. He's not afraid to troubleshoot, talk through mistakes, and share interesting techniques. That's the best way to learn in my experience, so take a look here.


2. Alec Steele - An ironworker named Steele, Alec is all kinds of interesting with bright and bold videos that show the process to make some really interesting and innovative pieces.


3. Torbjörn Åhman - The channel isn't too big yet, but there are some really interested projects that look like great learning opportunities and memorable gifts. I'm looking forward to many more videos from this awesome craftsman.


4. Rowan Taylor - Rowan makes more traditional pieces that are really interesting. Shears, auger bits, beginner's tools, and a whole lot more. 


5. Walter Sorrells - This channel is much more knife-making specific, so if that's your goal you'll find it here. There are a few videos on starting out, and plenty on ramping up that skill into something awesome.

Here's the part where you speak up and let me know your favorite channels or other resources I need to check out. I really want to get some more great sources, so please let me know!


Weekend Project: Make a DIY Mid-Century Inspired Desk and Wall Unit

$
0
0

So... I like this project. I really like it, and I'll tell you why. First, it's made entirely from off-the-shelf parts from the home center. Then, because the parts are readily available, the only tool you need to make the entire thing is a cordless drill, which is awesome. And lastly, the attention  to detail is excellent. These standard home center parts get a spray painted top coat which give them a high-end look while still remaining affordable. 

I especially like the larger plywood shelf installed at desk height for work. This is a great example of taking a standard technique (track shelving) and executing it well with some care and thought for something greater than the sum of its parts.

Get the full how-to at Old Brand New: DIY Mid-Century Desk Wall Unit


4 Life-Changing Things You Didn't Know You Needed

$
0
0

4 Life-Changing Things You Didn't Know You Needed.

There's nothing more satisfying than hearing the phrase "Where'd you get that!?" Ok, maybe it's just me, but I consider that phrase to be the apex of achievement when you've truly found a cool item. Here's a round up of 4 unique, life-improving things that I use everyday and you should too!


4 Life-Changing Things You Didn't Know You Needed.

A Fish Turner Spatula

I use this tool almost as much as my chef's knife. You'll be throwing out several kitchen utensils once you see how superior this spatula is to those plastic ones. If you use cast iron (and you should) to cook most of your food, this tool can guarantee that nothing will ever stick. It's robust yet flexible metal allows you to really scrape, flip and pick up anything that's remotely sticking to a pan. It's even sharp enough to split a panini in half and slotted to drain grease from deep fried food. It's my ultimate kitchen multi-tool. Only downside is you can't use it on non-stick. But, who needs that stuff anyway? ;)

4 Life-Changing Things You Didn't Know You Needed.

Nite Ize DoohicKey

Speaking of multi-tools, I recently picked up this tool as a replacement for my worn our carabiner on my key chain. It has so many cool features: bottle opener, box cutter, flat-head driver, 3 wrench sizes and a 2-inch measuring mark. I've used the built in ruler more than you'd think.

4 Life-Changing Things You Didn't Know You Needed.

Nerd Wax

Sweat and sunglasses don't mix. It's such a frustrating problem to always be pushing them up. Not classy. This invention is so simple and so amazing. It's am all-natural wax you apply to the bridge of your glasses to keep them from slipping down your face! My friend Don developed this idea while working in the music industry watching musicians struggle to keep their sunglasses up during outdoor shows. After a super successful Kickstarter you can find these tubes of wonder paste online! 


4 Life-Changing Things You Didn't Know You Needed.

A Catch-All Plate or Bowl

I am the worst at losing small essentials like my wallet, phone and keys. Having a catch-all plate helps keep all of those things in one place and helps me not be so forgetful. Making your own (like mine pictured above) is certainly recommended, but if you can't get around to carving your own, then you should definitely find something that is unique and memorable. Maybe a vintage family heirloom or a rustic bowl you found on a vacation. If you pick/make the right one you'll keep it for a lifetime.

Free Download: Dozens of Old Wood Type Alphabets

How to: Make a DIY Industrial Bar Cart for Under $40

$
0
0

Frustrated with unnecessarily high prices for unnecessarily flimsy discount store kitchen carts, Andrew decided to get creative and whipped up an industrial-styled bar cart.The trick is a clever repurposing of a new wheeled tool cart from discount hardware store Harbor Freight, which has stores in industrial commercial areas in every city. I don't recommend their power tools for safety and accuracy reasons, but for something like a rolling cart, they're a great solution, especially with the 25% coupon you can find everywhere. 

To give it a more finished look, add some wooden shelves, and dangle your bar tools from the handle using s-hooks.  Check out the complete how-to at Primer: Make This DIY Industrial Bar Cart for Less Than $40 


Healthy Breakfast, Made Easy: 5 Flavorful, Fitness-Friendly Smoothie Recipes to Make in the Mornings

$
0
0

Starting off the morning with something fresh and healthy sets the tone for the entire day. I've been blending my breakfast for most of the past 6 months, and it's changed my day. It's fast, easy, and tastes great. Plus, you can make the mornings hum along faster by preparing the portions ahead of time. I use single-serve sandwich bags packed with the ingredients, store them in the freezer, then just add water and blend. 

I've found about a dozen fit well in the freezer and make a quick meal on the go.

My favorite blender is the single-serve NutriBullet 900 watt. The blender cups are easy to blend then take along with just about nothing left to clean up on the way out. As far as my daily Boost, I use Vega Proteins & Greens Powder, and a scoop of Chia Seed for an extra superfood bump.


1. Berry Boost

  • 1 Cup Frozen Berries
  • 1/2 cup Spinach or Kale
  • 1 Frozen Banana
  • 1 Tbsp Chia Seeds
  • 1 Scoop Boost (Protein Powder, Vitamin Mix)
  • 1 - 1 1/2 Cup Water or Coconut Water

2. Nutty Boost

  • 1 Scoop Peanut or Almond Butter
  • 1 Frozen Banana
  • 1/2 Avocado
  • 1/2 Cup Greek Yogurt
  • 2 Tbsp Oats
  • 1 Cup Milk or Almond Milk
  • Drizzle with Honey or Maple Syrup

3. Citrus Boost

  • 2 Cups Kale
  • 1 Cup Orange Juice or 1 Peeled Orange
  • 1 Tbsp Lemon Juice
  • 1 Scoop Boost (Protein Powder, Vitamin Mix)
  • 1 - 1 1/2 Cup Water or Coconut Water

4. Mango Boost

  • 1 Cup Frozen Mango
  • 2 cups spinach
  • 1/2 Cup Baby Carrots
  • 1 Tbsp Lime Juice
  • 1 Tbsp Chia Seeds
  • 1 Scoop Boost (Protein Powder, Vitamin Mix)
  • 1 - 1 1/2 Cup Water or Coconut Water

5. Banana Boost

  • 1 Frozen Banana
  • 1/2 Avocado
  • 2 Tbsp Oats
  • 1 Tsp Ground Cinnamon
  • 1/2 Tsp Vanilla Extract
  • 1 Scoop Boost (Protein Powder, Vitamin Mix)
  • 1 Cup milk or Almond Milk

Do you have a favorite pick me up for the am hours? Tell us about it in the comments below, we're always looking for another option to get going in the morning!


How to: Make a Minimalist Wood and Leather Key Holder

$
0
0

When Erin discovered Anne Steensgaard's CatchMe keyholder online, she became instantly obsessed. Functional, beautiful, and full of organic textures and charm. Unfortunately, the piece is only sold in Boila stores, which are all located in Denmark or Sweden. 

But, she knew she couldn't rest until she had some 

adorable wooden spheres and leather tags organizing her keys, so she set out to do what any DIYer wood: she made one. 

Armed with some scrap stair tread and its built-in full bullnose profile, she sawed some kerfs, tied up some leather lacing, and mortised in some simple keyhole hangers to get everything on the wall. 

She says, 

When I'm running out of the house, my last thoughts are usually, "Where are my keys?" and/or "Where the heck is my cell phone?" I'm always wishing I had a designated place for this stuff instead of frantically retracing my steps. I'm not sure how to keep better track of my phone (anyone have tips for this?) but I knew the key problem could be solved with an entryway key holder. Now I just need to train myself to actually hang my keys there. 


Get the full how-to at NewBlooming.com: DIY Modern Wood Keyholder


Play the Long Game: Why You Should Commit Now to Commit Later

$
0
0

Let your big goals be long ones.

Don't think: "I want to write a book."

Instead think: "I am going to work on a book this year, and next year, and the year after that."

It's empowering to shift your timeframes this way, and I encourage you to try it. Here's why:

Long term goals are commitments

Short term goals are small aspirations. They're about things you want, not about the person you want to become. When you let yourself to approach something over a period of years, or even decades, you make bigger choices and commitments about who you want to be. 

Long term goals matter more

No one makes meaningless long-term goals. But trivial short term goals can easily slide into your thinking. Focusing on a much longer scale forces your objectives into a different playing field. What do you want to accomplish in twenty years? The answer to that question is always going to be interesting and meaningful.

Long terms goals are easier

I know that sounds counterintuitive. But working toward a very distant goal lets you appreciate your progress incrementally, and that's a good thing. Did you work on your novel for thirty minutes today? Great! You made a tiny bit of progress toward your big goal ... you'll get there eventually!

That's an easier (and, I'd argue, better) way to live your life than being stressed out because you didn't get another chapter done.

Craftsmanship is back in style

We live in a time of hyper-growth; startups, internet celebrities, child prodigies and quick, flashy successes.

But thankfully, there's also a movement of people who understand the value of craftsmanship. The idea that you devote yourself to a skill, an art, a craft (a goal!) for a long period ... probably the rest of your life. 

Forget about hyper-growth. Forget about unicorns and denting the universe and all that garbage. It's ok to go slow. You have time. Take a step back and think about crafting your goals, instead of grasping for them.

Ok, so, let's think about some specific examples:

Let's say you're a writer. You could be disappointed with yourself because you haven't yet found a way to write a novel, or finish a screenplay, or get published in a magazine.

The problem is, you're dealing with a short goal. Instead, what if you decided your goal was to become a masterful writer by the time you turned ... I don't know ... seventy? Yeah ... seventy. That's a long goal. But it's also one that you can make steady, relentless, incremental progress toward, every day.

That means it doesn't matter if you've published a book this year. It just matters if you've devoted yourself to your craft. You have a long way to go! Look out over those future decades and think how much time you'll get to spend becoming amazing! Will your craft develop into a book, or a screenplay, or something else? Who knows? Who cares!? But if you commit to this craft, by the time you turn seventy you're going to be a master writer, and that will be an amazing accomplishment, all by itself. The short goals will take care of themselves along the way.


Let's say you're an runner. You want to win the big race this year, but you're frustrated because you're not running fast enough, and can't find enough time to train. Short goal problems.

Instead, what if your objective was to run across the entire country, from New York to L.A., ten years from now? That's a long goal. Who cares if you win a race this year, or ever? Yes, I know running is generally about trying to win races ... but isn't it also about something bigger than that? Something more life-changing? If you think about your craft (running) as the ultimate goal (instead of something you use to accomplish other goals), you'll have something you can commit to for life. My guess is you'll win some races along the way, too. 


Let's say you're an entrepreneur. Why doesn't your business have $10 million in sales!? Why doesn't your growth chart look like a hockey stick!? Why haven't you raised a bunch of venture capital money!? You might as well give up, right, because you're not accomplishing any short goals?

Wrong. Screw that. How about working toward a long goal instead? Like building a business that will still be around thirty years from now? Like finding a sane balance between your career and family life that can play out over the next few decades?


Listen. I know this idea sounds a little crazy. We don't live in a world where it's considered OK to take it slow, one step at a time. We like to focus on concrete achievements, not the value of process itself. But you can benefit a lot from changing your perspective, and taking a longer view of what you want to accomplish.

What do you think? Am I totally off-base here, or is this a way of thinking about your objectives that makes sense? Let me know in the comments.


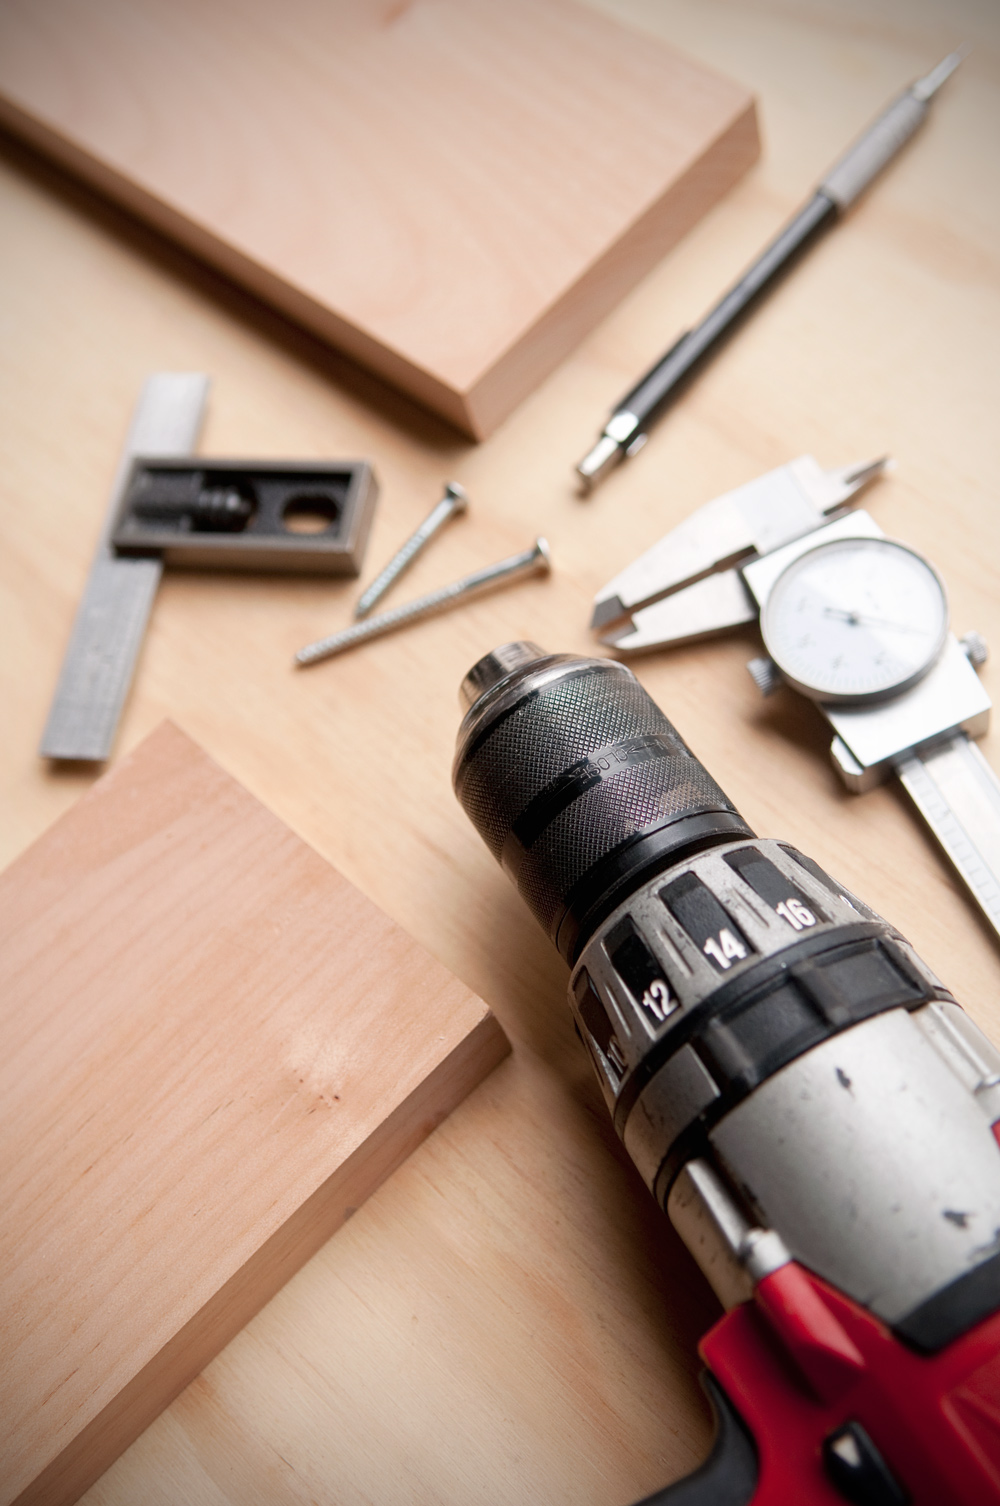
I've Been Drilling Pilot Holes Wrong My Entire Life. Here's How I Learned to Correct My Technique.

$
0
0

So, ever since I learned to use an electric drill, I've followed this rule: when joining two pieces of wood, you drill an appropriately sized pilot hole completely through the top, and down into the second. This guides the screw, and the two pieces are held together when the screw's threads grab the wood and lock everything into place. The pilot hole's size is determined by the inner diameter of the screw's body, minus the threads. Right?

Wrong.     

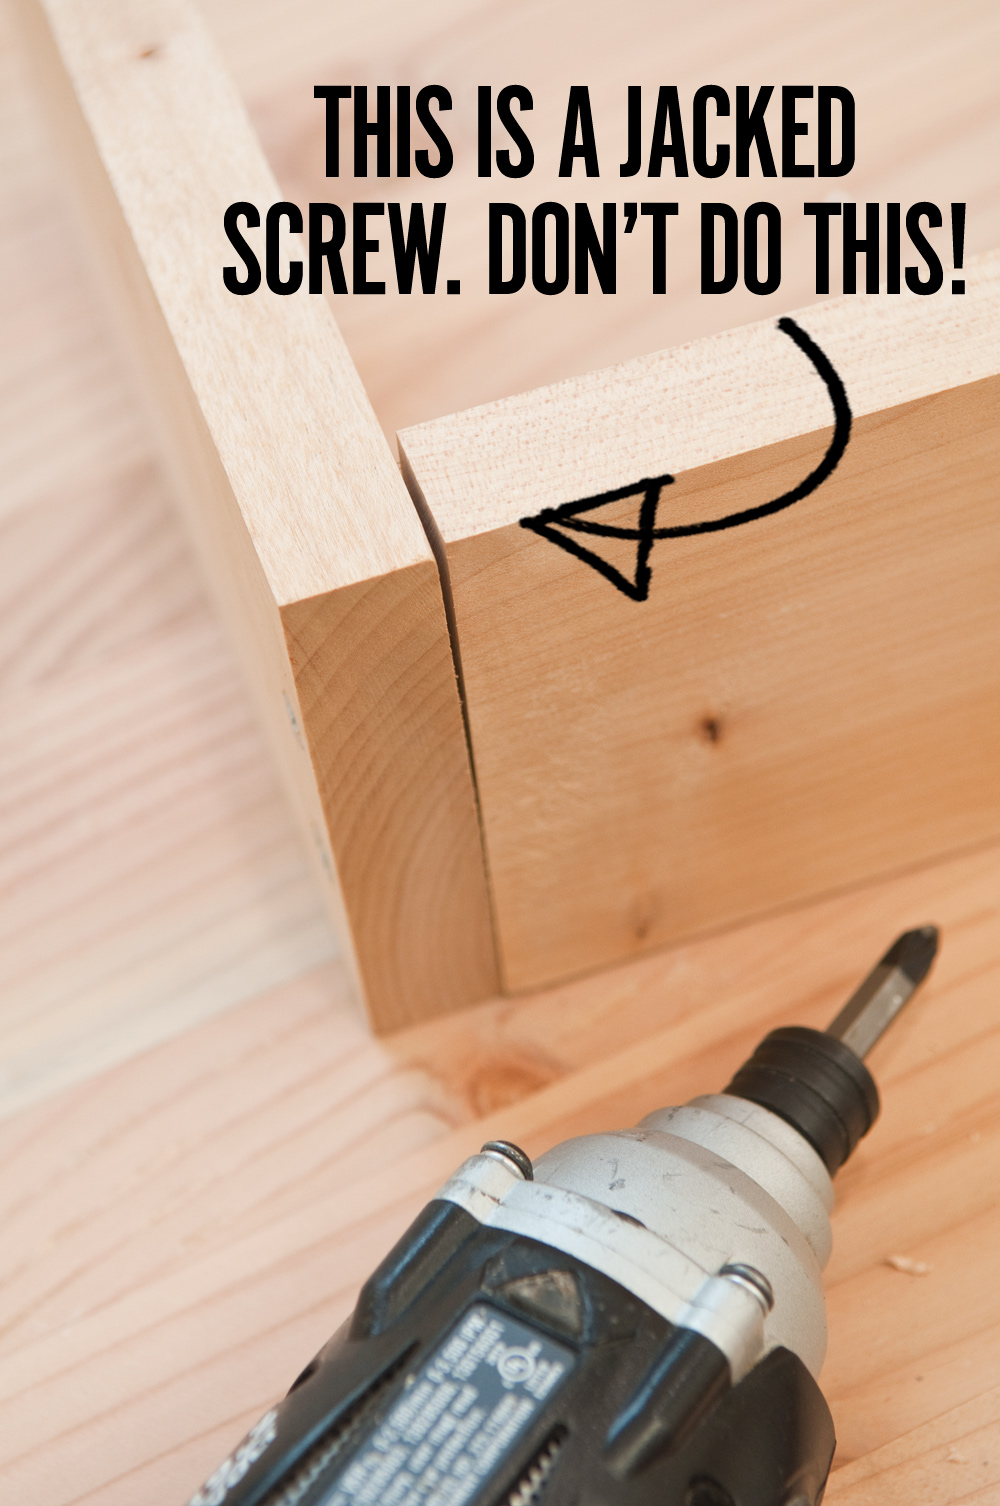
In fact, doing it this way can compromise the strength of the joint. In this approach, the threads insert themselves into the first piece, locking its position in place. Even worse, the screw can hold the two pieces apart from each other, resulting in a jacked, or bridged, screw. Which looks sloppy, and if you're trying to glue the joint together, there won't be enough pressure to allow the glue to bond the two pieces. 

My problem was a lack of understanding about how a screw joint actually works. 

It's not the threads biting into both pieces that secured everything in place. Rather, the strength of a screw joint comes from the threads pulling the screw through the bottom piece and securing the top from the pressure against the screw's head. The threads are irrelevant in the top piece; only the head matters. Think of it like a nut and bolt: the bottom piece of wood acts like the nut, drawing whatever is sandwiched between the hardware's head and the "nut" flush via the threads. 

 So, in order to permit both pieces to touch fully and allow the head to seat, the threads shouldn't dig into the wood fibers of the top piece at all.

DID YOU KNOW THIS?!?! Perhaps I'm the only one, but I suspect this is a  common misconception. So, how do you drill the appropriately sized screw holes in both pieces with one drill bit? You don't.

You use two. Well, you could use a stepped drill bit, with two diameters, or a tapered bit, but neither really gets you exactly where you need to be for truly strong joinery. If this is old news to you, then you are a better woodworker than I. If not, here's how you properly drill a pilot hole. 


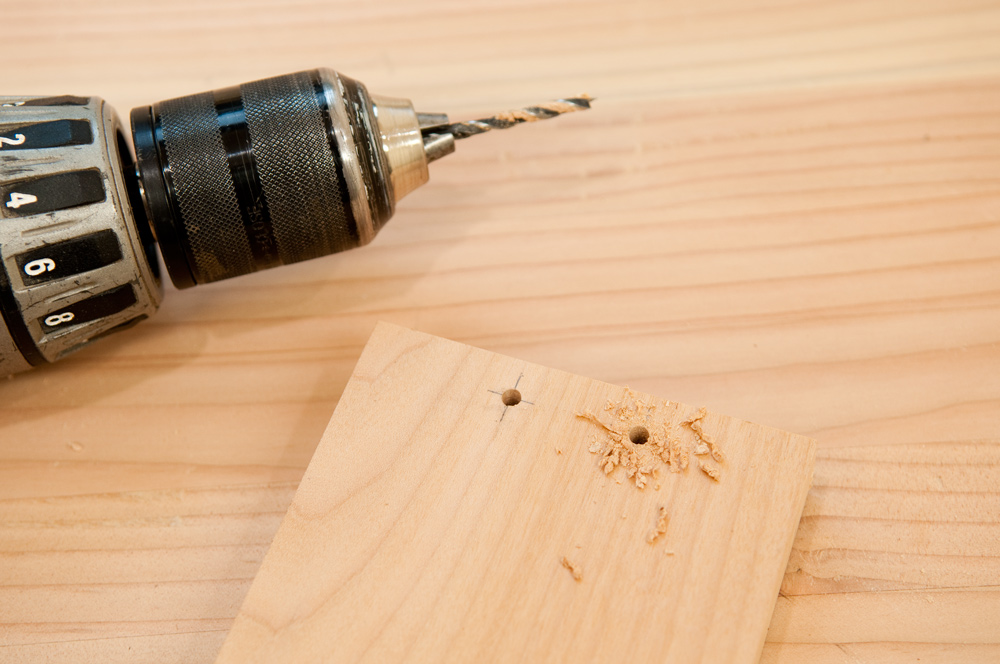
Begin by understanding this: the hole drilled through the top piece of wood isn't a pilot hole at all — it's a clearancehole. This hole completely clears the material, allowing the screw to pass through, without cutting into the wood. 


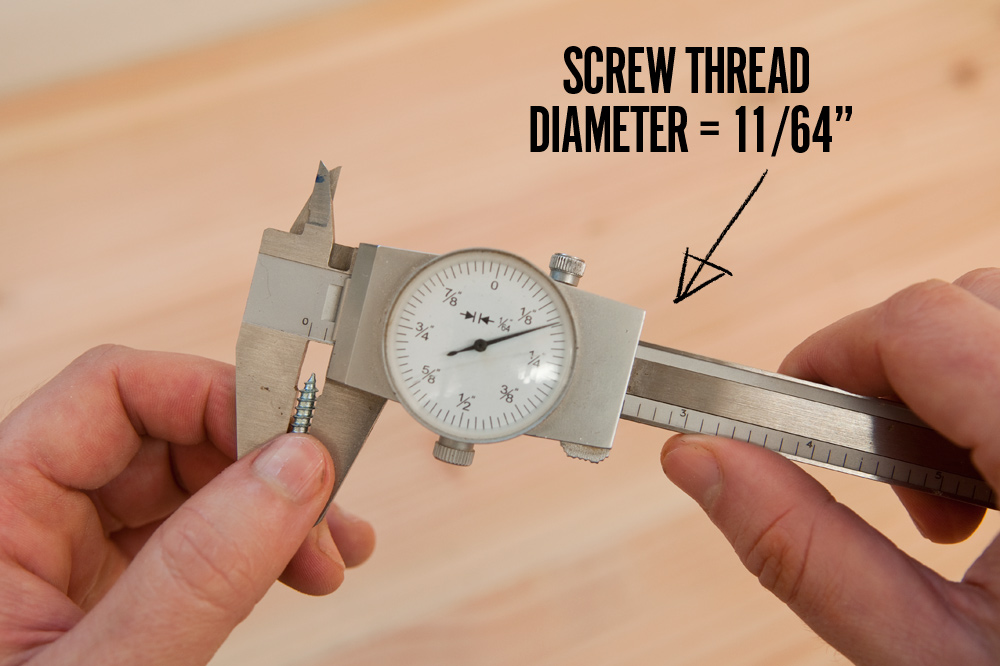
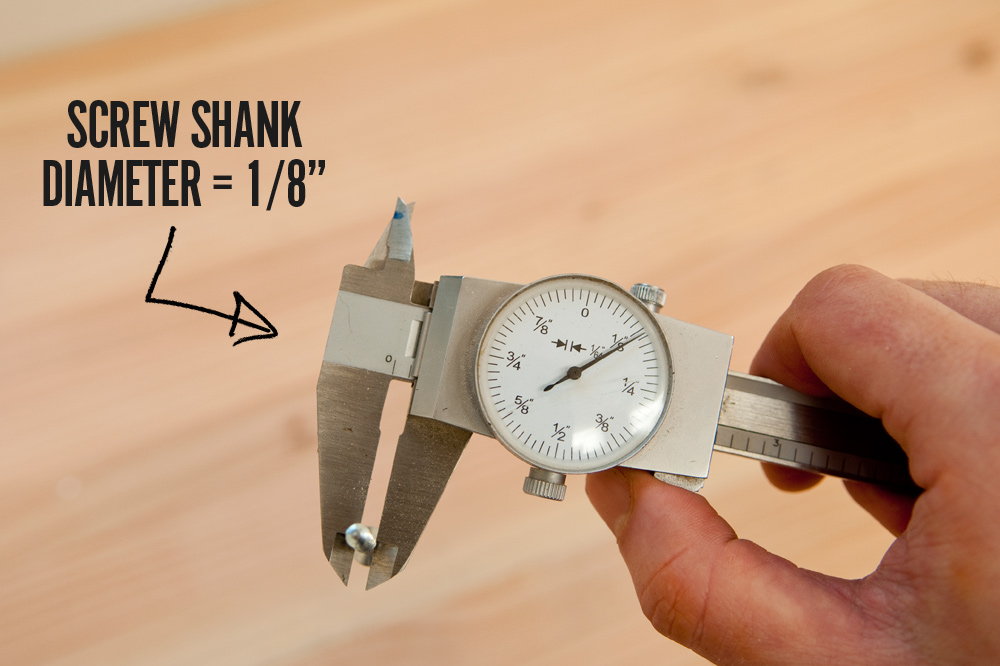
In order to do this, you first drill a hole with a bit that matches the outer diameter of the screw's threads, countersinking or counterboring where appropriate. 


Then, drill a pilot hole in the bottom piece to accept the screw's threads. This bit should match the inside shank of the drill bit (not including the threads). Since the bit is smaller, you can drill it right through the clearance hole in the top.


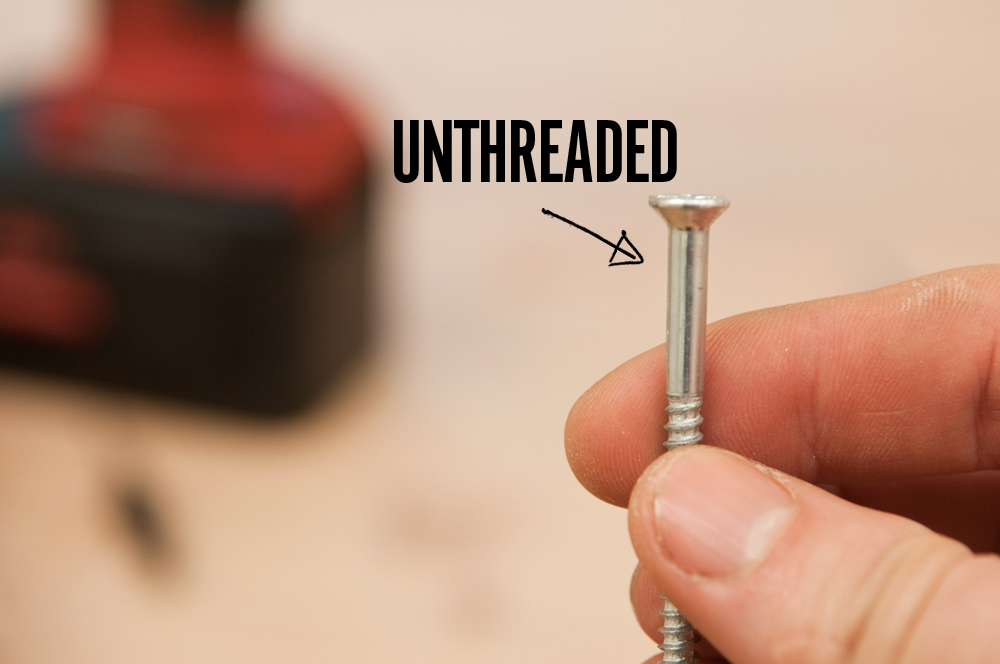
In fact, screw manufacturers know you probably won't do this each time. It's why they leave that initial bit of screw unthreaded at the top of the screw under the head.

Is it an extra step? Yes. Is it necessary when doing rough construction or banging something together in your garage? No, of course not. But when you're working on a fine project your proud of, and especially if you're using glue, it's worth the extra couple of minutes to make the strongest joinery possible and keep everything flush and clean. In fact, the clearance hole is more important than the pilot hole, so if you're only going to drill one hole and you're sure the wood won't split, you can save time and alignment hassle by skipping the pilot hole altogether. 

Now that I get how this works, I feel kinda silly for not having done this on the thousands of pilot holes I've drill over the past twenty years. But, at least I know now. 


Do you like simple woodworking and DIY tips like this? Let us know by sharing this image on Pinterest:


Beer Talk: What is a Cream Ale, and Is There Actually Cream in It?

$
0
0

Two fun facts: 1) unlike most styles, the cream ale is original to North American, born in the US in the mid 1800s; 2) the cream is, of course, an ale, but it is inspired by German lagers and "drinks" like a lager — it's light, crisp, and goes down easy. Okay, so that's what I do know; here's what I don't: what is a cream ale? And is there actually cream in it?    

Spoiler alert: no, there isn't. Cream ales are simply light American ales that have an additional fermentable sugar sources like corn or rice to lighten the body. These beers ferment faster, and therefore are easier to produce, and their lightness make them easier to market to wider consumers than traditional heavier-bodied English style ales. At least that was the goal in the 1800s.

So, why cream ale? The cream here is likely akin to "cream soda," which also features no dairy. Cream, at the time, was used to signify something rich and decadent, with a silky texture. 

To learn about the full history, check out this piece at BonAppetit.com: What Is Cream Ale (and Is There Cream in It)?


Yes, Every Man Needs A Journal. Here's Why.

$
0
0

I spent some time last week making a few DIY journals, and it made me think a bit about why I always have a stack of them filling my shelf. After looking through a few in the pile, I decided yes, they're definitely worth the effort. Here are a few reasons why.    

My journals are scattered, missing large sections of my life, and pretty messy in general. I'm not keeping the meticulous records that I always thought I should, but my personal history there, full of thoughts, struggles, challenges and accomplishments. They tell a story of what I was thinking about when I had my first kid, of the utter fear and overwhelming joy that had me sobbing in the hallway. I talk about climbing mountains, struggling with my identity, and what I want to do with my life. I find notes and sketches for some of my favorite project. It's important to me. 


Writing is a great way to organize thoughts.  Putting thoughts down on paper naturally lays out a clearer picture. If I have a lot of things on my plate, or if I'm trying to work out a plan, it's helpful to get it out of my head and set it to paper.  I can also circle back and look at when I have the time.


Looking back at achievements is healthy. You can tell a lot about where someone is going by where they've been. I'm not saying you should live in the past, but keeping a record of your goals and dreams helps remind that you're lot further than you might think. Remembering your past victories is a huge part of what will drive you on to greater things.


It helps plan for the future. Speaking of greater things, it's said that a goal is a dream with a deadline. Writing down your goals puts a deadline on it, and pushes you to make it happen. My journal is full of goals, and a huge chunk of them have checkmarks next to them.


It keeps you accountable. Staring at a list of things you want to do gives gravity to your dreams.  A list requires an answer, it inspires a response. Putting that pen to paper is a small but important step along the way.


It leaves a legacy. I hope that someday my kids or even grandkids can look back at my dusty stack of journals and get to see the man behind my accomplishments. I write them for me, but I also write them for people I haven't even met yet. Because, I believe everyone has a story to tell, but who will hear it if you're not taking notes?


So, here is my link to make your own journal today, or just pick up a few from your local bookstore. Either way, take the time to put your story to paper. A few years from now, you're going to thank me.


How To: Make Super Simple Tree Branch Magnets

$
0
0

Last summer, in the midst of the August showers, a neighboring building lost a beautiful maple tree in a major thunderstorm. It was quickly disassembled by the electric company, presumably so it wouldn't fall onto the power lines. And there it sat. For weeks.

Then, a month or so later, I heard a loud grind out of my open windows (horray for open window weather!), and spied a big truck with a wood chipper in their yard.

"Surely," I thought, "they're just gonna grind up the small stuff and use the trunk for something." But, they just kept throwing in big, beautiful chunks of pure hardwood, turning it into mulch. I immediately rushed out and asked if I could have what hadn't been chopped.

The guy was very hesitant (apparently no one had ever proposed such a crazy thing), but allowed me to escape with an armful straight limbs and branches (sadly, no trunk segments) as long as I promised not to tell anyone. So, don't repeat that.

My branches have been seasoning and drying all fall and winter, and are now ready to be turned into all kinds of fun "bring the outdoors in" projects. First up, these playful tree branch magnets which cost a mere $1.00 and some glue to make, and can be whipped up in less than 30 minutes.  

created at: 05/11/2011

Materials and Tools:

  • Fallen tree branch, 1-2" in diameter
  • Strong magnets: Mine were 8mm x 3mm, 2000 gauss [6 for $1.00!]
  • Electric drill and bits
  • Saw: pull saw, hacksaw, miter box; anything will work
  • Two-part epoxy, like JB Weld, or super strong glue

created at: 05/11/2011

1. Use the saw to cut off 1 - 1 1/2" medallions from your branch. If necessary, use a bit of sandpaper to clean things up.

created at: 05/11/2011

2. Use a drill to clear a little hole for your magnets to sit. If using the 8x3mm that I have, use a 5/16" (or 13/32" if you have one) to drill a hole 1/8" into the branch. Use a piece of painters tape to mark your depth. Note: Obviously you'll want to hold your wood still when drilling. I needed a hand to snap the photo!

created at: 05/11/2011

3. Then, just mix up the epoxy and glue them in. You might be able to use a strong glue like E6000, but my go-to for metal to wood applications is JBWeld. You'll need a glue strong enough to stand up to the magnetic force. I doubt hot glue would work, but you could try it if using weaker, ceramic magnets.

Be sure you check the polarity of your magnets before gluing them in. It's nice when they all sit the same way, so that your branches will stack and not repel each other.

4. Simply allow the epoxy to dry for at least 6 hours or overnight, and stick them up!


DIY Skills: How to Loosen a Stuck Bolt With A Blowtorch

$
0
0

We've all come across the stubborn bolt. You know the one. That bolt that needs come off, like, now, but for no visible reason, the nut won't turn. Turns out, there's a simple trick: add a bit heat and get it turning quick. Here's how I make it happen. 

This year, ManMade is part of Bernzomatic's Torch Bearers program. We're sharing some our favortie creative projects and clever ways to use a blowtorch around the house. So, far we've shared we like lighting our grill with a blow torch, walked you through the basics of simple, safe pipe soldering, and built a simple DIY copper pourover coffee stand

Why does this happen?

The problem with a rusted bolt is that the spaces between the threads get clogged with minerals and oxidized metal. Trying to turn the nut around these stuck joints can result in stripping, which transforms a simple task into a real pain in the ... bolt.

That's where a bit of heat comes in handy. Metal expands slightly when heated, so warming up the nut a bit makes it ever-so-slightly larger, loosening the hold enough that it will be able to break free. It's important to keep in mind what you're heating here, make sure it's only the nut, if possible – or the female threads, and not the bolt's male threads. 

Here are the steps:

Look around. We all get tunnel vision on these types of things, so it's easy to overlook things like paint or wires that might get ruined if they get heated up. Use a bit of heat shield or sheet metal if you need to protect something.

Prep the bolt. Use a wire brush to clean off the nut, and add some lubricant to help the process. A few squirts should do it; put it on and let it sit for about 15 minutes. Also, work in a well ventilated area or set up a fan to help flush out any gas from the heating process.

Think safe. You might be under a vehicle or in a tight spot, so always wear gloves, eyewear, and protective (non-flammable) clothing for your arms and neck if necessary.

Heat it up. Light up the torch and heat the bolt slowly, without getting the threads too warm in the process. It's not important to get them red-hot, just consistently warm around the outside. At this point, tap the bolt a few times with a hammer to help break it loose. 


Unscrew and move along. For some extremely stuck bolts, it may take a few heat and tapping rounds to fully break it loose, but I've never had this method fail me.


So, there's my trick to tackling stuck bolts in the shop. Do you have any shop tricks we should know about? Let us know.


This blog post was sponsored by Bernzomatic. Thanks for supporting the brands that support ManMade. 

A Pocketful of the Good Stuff: How to Choose the Perfect Hip Flask

$
0
0

A good flask isn't an essential piece of gear, but it's pretty close. I toss a flask in my pack to share around the campfire, or to toast the top of a mountain. Trim, compact, and classic, the hip flask is also a great way to bring a little of your own along to make sure those drinks are always on point. 

A few things to consider when picking a flask is durability, portability, and convenience. I usually opt for the stainless steel version because it tends to hold up longer. As far as portability, go for something slim and long, that will fit in a pocket much better than the short and fat versions. With convenience in mind, look for a wide mouth and grab a small funnel for easy filling. If you're a germaphobe, there are kits with a few shot glasses that help you share with friends without taking a nip off the same top. But really, it's a flask, and alcohol kills germs.


ManMade Recommended:

Credit: Stanley

The Stanley Adventure Hip Flask ($30) - It looks like your grandpa's old thermos, and it holds up to the abuse just as well. If you plan on keeping it with you on those rough adventures, this is a good choice. Comes with a few shot glasses so you can share, or not.

Credit: Tourbon


Leather Wrapped Stainless Steel Flask ($30) -Something simple but with a bit of insulation is nice to slip into a hip pocket. The outside leather keeps it a bit more protected and looks good too. This option makes more sense with a suit than a pair of trekking pants. 

Credit: Vapur


Vapur Collapsable Flask ($7) - This simple plastic container folds down flat once it's empty, so you don't have to carry a bulky container. Great for backpacking, it's cheap enough to grab a few and really not care if it comes up missing after a long weekend in the woods. Also works particularly well for your kid's soccer games. Not that we'd know anything about that. 


As far as what to fill it with?  Take a look at our round-up of the best whiskey under $40 for a few great ideas.

Hey Dads: Here's What to do With Your Kids this Weekend

$
0
0

What to do with your kids this weekend. Just BE with them.

Let's start here: I hope a lot of you don't need to read this. I could be wrong, but I assume that, because you're ManMade readers, you already know what it takes to devote some quality time to your kids, and you know how important it is.

That said, this is how I feel about it, and at the risk of sounding preachy, I want to share my thoughts:

Get up on Saturday morning, early. Don't start by checking e-mail, don't start by watching Premier League highlights. Pack a few snacks and some water in a backpack. Scramble up some eggs and make toast. Feed your kids breakfast and then put them in the car.

Drive somewhere. It doesn't matter where. Anywhere new, or different. A park, a little town nearby, downtown, another neighborhood. Don't have a plan. Just get out and start moving around with them. Let your kids decide where to go. Literally: say "Which way should we walk?" and then go wherever they say.

When you get to a junction, let them decided which way to turn. When they see something interesting, stop and examine it. Or go into a shop they notice, or climb a tree.When they get hungry, stop for a snack. Sit on a bench, or a log, or the side of the road.

I can see this is starting to sound a little ridiculous, but I promise you it works. Just go out into the world without a plan or destination, and let your kids take the lead.

I'll wager you'll end up loving this outing more than anything else you've done with your kids. I know it sounds boring. But it's not. The world – even the seemingly uninteresting parts – is full of stuff to explore and examine, and kids are unbelievably well-suited to do that. They have the incredible advantage of being about to take an interest in almost anything. They just need an adult who will get out of the way and let them do their thing.

The funny thing is, preschool teachers already know this is one of the best ways for an adult to interact with a child. My son's teachers take him and his classmates on a walk around the neighborhood every morning. Sometimes I see them, as I'm driving to work, just climbing around on a retaining wall or standing in a group of bushes, or running up and down some steps.

Now. My kids happen to be pretty young (eight and four), so this technique works really well with them. I've been doing it with since they were even younger, so I know it also works with toddlers. I'm not sure how it would apply to older kids, but my guess is (with a couple of tweaks), it would be just as effective (or more!).

I think the main reason why this works is that adults are too results-oriented, while kids have a much easier time delighting in process. Here's an example:

Last night while my wife was baking a desert, my kids decided they wanted to 'cook' too. For them, that meant cutting up limes, squeezing and grating them into bowls of water, and then mixing in sugar, flour, and cinnamon. Obviously, they weren't too concerned about the result; they just revel in the process: using the micro-plane grater, the juicer, a knife, feeling the texture of the watered-down flour, measuring out teaspoons of sugar. All the steps that, for an adult, are usually just the boring intermediate requirements to actually making something you might want to eat. For them, that stuff is the good stuff. That's what they enjoy most.

The lime-flour-cinnamon-ade they ended up with wasn't very delicious, and their 'cooking' was, objectively, a complete failure, but that didn't bother them in the least.

The same kind of logic applies to my weekend outing advice. It doesn't really matter where you're going (what you're 'cooking'). The result is incidental. The process is infinitely more interesting, if you give it a chance to evolve into something out of nothing.

So this weekend, try something new. Don't spend your precious family time whisking the kids from one activity to another, from one destination to the next. Instead, hold their hands and let them lead you into a world of their imagining, where nothing matters more than the thing thing you're doing right now, and no one has any idea where you might end up.

Just, maybe, don't let them pack the lunch.


Weekend Project: How to Make a Custom Knife from Scratch

$
0
0

Kitchen knives, pocket knives, craft knives....a creative guy who likes to make stuff simply has to cut things up on the regular. Here's the ManMade list of the nine knives every man should own, but if you're interested in crafting your own from raw materials, it's actual relatively straightforward and requires fewer tools than you might think.    created at: 01/10/2014

Phil Reilly walks you through the steps towards creating an entire knife from scratch. The blade is cut from a sheet of steel with a hacksaw, the handle formed from a block of walnut...everything but the brass bolster and hardware is DIYed. 

Phil says, 

I love to design and make things – it’s my passion! One day at work by boss showed me a picture of a kitchen knife he made completely from scratch and after that, I knew I had to make one. He said it was “one of the most rewarding things you can make!” – He was most definitely correct!
I had such an enjoyable time making this knife that I felt I should share it with you guys and hopefully persuade some of you to have a go yourself! Be warned, that this process is time consuming (took me about a month of on and off work)! However if you put the time in, you will most definitely see the reward!

Rewarding, indeed. Get the entire how-to at Instructables - How to make a knife


Drink a Tree: How to Make Pine, Spruce, or Fir Needle Syrup

$
0
0

During spring time, pine, fir, and other evergreen trees grow by producing new tips at the end of each branch. The new growth is a lighter, vibrant green, and you can (and should) eat it. The tips have a wonderful citrus-y, woodsy flavor that tastes awesome in all kinds of sautes, seafood, and roasted dishes. But the easiest way to preserve their flavor is steep them gently in a syrup, which will last in your fridge for weeks. 

created at: 05/21/2015 To gather the tips, look for the light-colored new shoots on established trees. You want the ones that are less than an inch long and very soft. Taste them to make sure they're still fresh enough - older ones will taste too resinous, like cleaning supplies. They should have a pronounced but enjoyable citrus peel flavor, similar to a hoppy beer. 


created at: 05/21/2015

These are from a Douglas Fir, and the color difference is obvious. Pick from around the tree in multiple places so you don't stunt the growth of the tree. If the tips taste too astringent and unpleasant, head to a higher elevation if you can. There can be many weeks worth of difference between growth, and you can pick these well into July. 


Once you've foraged your tips, bring them home and make the syrup immediately to get the most flavor possible. It only takes five minutes to assemble, so you can mix things up even after a long day hiking. 

created at: 05/21/2015

1. Gather you fir, pine, or spruce tips. You might try hemlock or cedar, but they have a much more intense flavor. Taste before harvesting. 

2. The magic ratio here is simple: equal parts tips, sugar, and water. Here, I used 1 cup of each. You can try a 2:1 ratio of sugar to water, which will make the syrup last longer in the fridge, but the final product will end up twice as sweet for the same amount of evergreen flavor. Your choice.

3. Bring the sugar and water to a boil, then turn off the heat. Stir in the pine or fir tips.

4. Cover the pot and let it steep at room temperature overnight, or for at least 8 hours. 

5. Strain the syrup to remove the needles and store in a jar or bottle.

6. Mix it up, and enjoy!


created at: 05/21/2015

To use the syrup, try mixing it with club soda, or in one of these recipes:

Coniferous Collins

  • 1 oz. spruce or fir syrup
  • 3/4 oz. fresh lemon juice
  • 2 oz. London dry gin
  • Club soda

Stir the first three ingredients together in a tall glass. Fill the glass with ice, and top with club soda. 

The Lumberland (pictured at top)

  • 2 oz. rye or bourbon whiskey
  • 1 oz. pine, spruce, or fir syrup
  • 5 dashes orange bitters
  • 2 pieces lemon peel

Muddle one piece lemon piece in a glass, and add syrup, bitters, and whiskey. Top with ice, then twist final lemon peel over the glass and rub along the outside rim and garnish.


Enjoy!

7 Things I'm Totally Obsessed with This Month (March 2017 Edition)

$
0
0
Photo: Oscars.org

These are thoughts, the artwork, the news stories, the tools, the food, the conversations, and whatever else we just can't get out of our heads this month.  


The Film Trilogy: The Decline of Western Civilization I-IIIby Penelope Spheeris 

I've been trying to see these movies for almost twenty years. Well, at least the first one. But they were super difficult to find before the recent (2015) box set release from Shout! Factory. In sum: worth the wait. 

The first Declinetakes a look at the on-stage antics and off-stage bleakness of first wave punk rock bands from Southern California: Circle Jerks, The Germs, Fear, X, Black Flag... etc. It's important work, and totally new at the time. Having grown up seeing these things with the inheritors of the tradition, it certainly didn't have the impact on me it must have on its original audience in 1981, but a fascinating work of history, nonetheless.

The second film is obviously more satirical, and explores the hair metal scene of the late 80s, contrasting big hard rock stars like Ozzy Osbourne, Lemmy from Motorhead, Paul Stanley and Gene Simmons, Aerosmith, with the young, trying-to-make-it bands like London, Odin, and Seduce. Remember them? Me either. The scene with the guy from W.A.S.P. in the swimming pool is the obvious standout. 

Photo: Oscars.org

But it's the third installment, which just got it's first actual home video release in the 2015 edition, that brings everything together and makes me glad I took the time to watch all three of these, in order, on consecutive days. Here, Spheeris uses her punk rock credentials from the first Decline and subsequent narrative feature Suburbia to gain access and trust to a new generation of "gutterpunks" - the mohawked and facial tattooed youth of L.A. in the late 90s. They are each homeless, legitimately nihilistic, and hopelessly alcoholic. None of them expect to be alive five years in the future. As a completion to the trilogy, it's able to explore real anarchy, not just the fashionable Sex Pistols version of it, and the true community that emerges in the absence of traditional order. I don't want to give too much away, but you have to watch this. Watch them all. If you must, skip the second one, but the last one is a can't-miss, even twenty years later. 


The newspiece: The existing spider population could eat every single human being on earth in a year

Fact: Spiders eat more than the collective biomass of the entire homo sapien species every year. So, all the spiders could eat all of us, and still be hungry. Learn more at the Washington Post. 


The snack: Pickled jalapeños en escabeche. 

This aren't even nearly as good as homemade, but I can't stop buying and eating Embasa Mexican-style pickled jalapeños and carrots. It must be the addictive quality of hot food. I eat one, and don't ever register that I've gone back to the fridge and eaten seven more. Two Fridays ago, I managed to polish off a whole can in under an hour. Pro tip: get two cans jalapeños and one can of the carrots and combine, tossing the additional carrot liquid and storing them in the spicier chile brine. 


Photo: Tim O'Brien

The DVD-by-Mail Service: DVD.Netflix.com

I'm sure you, like me, gave up on actual Netflix discs years ago. But at the beginning of the year, I was looking for some key things I couldn't find streaming or at the library, I signed up for a free trial, and I'm back into it. Here's why: there are things I want to see that you just can't find anywhere else other than physical media. Older things, smaller things, things produced without parent distribution companies to negotiate digital rights. One-disc-at-a-time Netflix cost $8.00 a month. That's the price of two rented movies on iTunes or Amazon, and less than one full-priced show at the cinemaplex. And, due to the release schedule of smaller films, they often already have things that are still in theaters, or that your city hasn't even gotten yet. Even if you only watch 1-2 things a week, it's a great value. I'm not going to keep it forever, but I'm going to burn through my existing queue of stuff, and feel like it was worth every penny. 

The song: "My Baby's Coming Back to Me" by Jarvis Cocker. 

This one. Over and over. The guy just nails it. The texture, the arrangement, the melody, everything is exactly as it should be. A true master of his craft. 


The book: Mountaineering: Freedom Of The Hills, 8th Edition 

I've skimmed through this book dozens of times, but in preparation for my first technical summit of Mt. Hood (11,250′) this summer, I decided to go through the whole thing, cover to cover. And? It's fantastic. Certainly one of the best in its class, and even if you're not interested in climbing mountains, it makes a great primer for backpacking, camping, extended hikes, and other outdoor adventures. 


Photo: UntitledTV.com

The TV Show: Shameless (US), Seasons 1-6 on Netflix

I caught a killer flu this month, and still haven't totally recovered. I couldn't look at a computer, couldn't concentrate enough to read, and needed something to pass the time between coughing fits. I somewhat randomly decided to give this a try, and I'm totally sold. Here's why I love it: it's a show about family, but not as an abstract value of togetherness or the thing you turn to when times are tough. It's about the actual one-on-one relationships between people who share their lives together, and who make decisions not to uphold some intangible virtue, but because they actually care about each other. Good stuff. 


What are you totally obsessed with this month? Tell us all about it in the comments below. 

These Are the Current Contents of My Pockets. What Do You Carry Every Day?

$
0
0

Yesterday afternoon, I was putting a load of laundry together, and I took out all of the various bits and items from all my pockets before placing my clothing in the basket. By the time I'd doubled checked everything for errant tubes of lip balm and bonus dollar bills, I had a pile sitting on my dresser that, when I looked down, simply ignited this thought in me: 

Yep, there's all my stuff.     

I don't require a lot of daily use items. I'm not a tactical guy, really, and I work from home, so it's not essential to always having everything I could possibly need on me at all times. But, when you think about, the stuff we keep in our pockets are probably the things we touch and use more than any other item in our lives. No, they're not as iconic as my favorite electric guitar, or more indispensable than my camera, or as fun to maintain as my road bike or to use as a sharp chisel, but these are the things I interact with more than anything else I own, except maybe my pillow. 

So, I laid them out on my workbench and I snapped a quick pic to share what's made the cut, with the hope that you'll do the same. What do you keep on you as part of your everyday carry?

Clockwise from top left:

1. Wallet: Danner tri-fold (not currently listed on their website). I love this thing. Well-made, the right side, with just enough features. You can read the story of when I bought it here. My only dislike is the ID pocket is a bit too shallow, and my driver's license is never completely secured in there. 

2. Headphones: Panasonic RPTCM125K ear buds. I've spoken before about my love for these things. I don't think you can do any better for less than $15. I have three pair in various places in my life, and will buy more when I need to.

3. Watch: Timex Weekender. This is as simple as watches get. Right now, the only watch I own is $20 Weekender I bought six years ago. I've thought about something fancier, but with all the stuff I do with my hands, something pricey doesn't really make sense for me. I keep saying I'm going to buy additional straps for this, but I still have just the one. Maybe saying I'll do it in this post means I actually will. Maybe. 

4. Pocket Notebook: Scout Books. I quite like these, and like my wallet, they're made right here in Portland. They fit in both front and back pants pockets, and aren't too big for the inside pocket of a jacket. I use my phone for notes that I want to reference, but I like paper for ideas and communicating with others on the spot. 

5. Pocket knife: Kershaw CryoAlso from an Oregon-based company, this is the perfect everyday knife for me.  It has everything I need, and nothing I don't. I can open and close it with one hand, and I love its satisfying locking mechanism. It's clip is solid, and it's the right size for fiddling with when I need something to do with my hands. I've honed the blade twice in the three years of owning it, and the steel seems to hold an edge excellently. Highly recommended. 


6. Pen:  Uchida Le Pen. If I could replace every pen in my house with a Le Pen, I would. They're simply the right tool for every single job. They write on almost anything as well as a Sharpie, yet can make thin sketchy lines when asked. I mainly stick with black and red, but I like keeping a multipack around for color coded projects. Love 'em.

7. Pencil: Pentel Graphgear PG525 .5mm. A pencil that's fine enough for woodworking, but strong enough that it can actually draw on wood and not snap. I've had this single version of this for seven years; it's made it through three moves on both sides of the country. That I haven't lost it yet confirms how much I want it in my life. I paid like $8.00 for it years ago at an art supply store.  Now that I see I can buy them for $3.33 I'm sorta tempted to get a dozen of them, but I'm pretty attached to the idea that I haven't lost this one yet, and I don't want to usurp it. Maybe when it finally gets misplaced, I'll buy in bulk. Until then, this is my guy. 

8. Phone: iPhone 6.  I don't really care about phone specs and latest models. I buy one, and I use it until I inevitably smash the screen (once), or planned obsolescence takes over and it stops functioning (twice). I'm actually not totally sure what the latest iPhone model is. (It's a 7s, right?) My phone is basically just a $x00 podcast machine and Instagram checker, so I'll never get one without a dedicated headphone jack. Adapters are just more things to break or lose. Having a camera on me at all times is cool. Once or twice a month, it takes or makes actual phone calls. Or not. 

9. Keys: Currently on my key ring: house key, bike lock key, car key, car key fob, scooter key, Night Ize Doohickey. If I could have fewer, I would. 

10. Wedding Ring:I bought mine on Amazon. It's titanium, super hard, looks better once it got all scratched up, and cost $11.00. When I'm not wearing it I keep it around my watch band so I don't lose it. I should remember to wear it more often.


So... that's what's in my pockets most days. What's in yours?


Essential Skills: How to Cook the Best Steak of Your Life

$
0
0

Here's the thing about beef: it's expensive. And it should be; it's a part of a huge, expensive-to-raise animal. So, when you've invested in a high-quality piece of meat, especially a nice thick one, you don't want to screw it up. This recipe is the only way I cook it, partially because it's so darned easy, but mostly because it's the best steak I've ever tasted. Here's how to do it.  

First, a few words about the cut. Get a good one. For the purpose of this recipe, anything will work, just make sure it's at least 1 1/2" to 2" thick. I get my meat from a local butcher shop, so I know it's fresh and cut exactly how I like it. Make friends with your butcher if you can; they are a wealth of knowledge and will set you up with the best cut every time.


Now, on to the  . . . meat of this recipe.

Ingredients

  • Cut of Steak (1 1/2"-2" thick)
  • 1 tsp coarse salt, or more, per steak
  • 1 Tbsp neutral oil (canola, grapeseed, or something with a high smoke point)
  • 1 tsp course ground pepper
  • 2 cloves garlic
  • 1 sprig rosemary or thyme
  • 2 Tbsp butter
The Steps

1. Prep the meat - First, salt it thoroughly. It's good if you can do this at least an hour before cooking, and it's best if you can do it three days in advance. When it's time to cook, take it out of the fridge for an hour and help it come to room temperature. This relaxes the muscle fibers and prevents sticking to the pan. Just before cooking, brush or rub on then sprinkle each side with pepper. Preheat the oven to 375 degrees.

2. Prep the skillet - Heat up an oven-safe skillet and add a thin layer of oil. Wait until it just starts to smoke.

3. Sear the meat - Carefully lay the meat on the hot skillet. Make sure not to splash oil onto your skin or clothes. Sear the surface for two to three minutes. As soon as it hits the pan, press down on the center of the meat so the fibers don't seize up and brown only the edges. Then, flip only once and sear the other side.

4. Add the flavor - Add the sprig of rosemary or thyme, butter, and crushed garlic cloves to the skillet and mix around to coat the meat. Tilt the pan, allow the flavored butter to accumulate, and use a spoon to baste the meat, better browning the surface

5. Finish it off in the oven - Once you're happy with the crust, move the skillet to the heated oven, and let it cook for 5-7 minutes for rare, 7-10 minutes for medium, and about 12 minutes for well-done (please don't do well-done to your meat, it's not nice). Use a thermometer to guide you, and take it out when it's five degrees below your target temperature.

6. Let it rest - It's best to rest the meat for about 5 minutes in foil to let the juices redistribute and finish cooking. While it rests, I saute' mushrooms or onions in the brown skillet juices to make sure I get all the flavor onto my plate.

That's it. The secret to an exceptional steak, every single time.


Viewing all 2425 articles
Browse latest View live


Latest Images