Here's the kind peer-reviewed scientific study and journal article that we can all get behind: how to make your whiskey taste better. This year, scholars Björn C. G. Karlsson & Ran Friedman took a look at the molecular makeup of whiksey, and specifically, how dilution with water affects the presence of flavorful compounds that make the sipping experience even more enjoyable.
Published in journal Scientific Reports, the research focused on three main components of whiskey, specifically Scotch, who spell it whiksy with no extra "e": water, ethanol (alcohol), and guaiacol, an aromatic compound that helps give whisky it's smoky, peaty, pleasantly spicy grain flavor. According to the study, "Whisky is distilled to around 70% alcohol by volume (vol-%) then diluted to about 40 vol-%, and often drunk after further slight dilution to enhance its taste." So the pair sought to find out how dilution by water, lowering the ethanol percentage and ABV, affected the aromatic guaiacol molecules.
Turns out, the ethanol and water don't always mix super well. The ethanol tends to push the guaiacol down to the bottom, trapping the molecules inside the glass, instead of letting them reach your nose. But by diluting the whisky, and changing the ABV, you bring the ethanol to the surface, allow the aromatic compounds to become air-born. So, the water concentration allows the ethanol to present itself further at the surface of the liquid, and then the guaiacol molecules interact with the air, and thereby your smell and taste sensors.
So, drink it on the rocks if you must (we don't), but in every case, you should at add a few drops of water to maximize your glass. Whisky is usually bottled around 40-45%, but according to the study, adding water to bring the ABV closer to 30% gives you the highest amount of aersolized guaiacol, and therefore the most flavor.
Of course, this is still all a computer simulation, but the researchers have backed up what the anecdotal evidence has said for centuries: whisky simply tastes better with a splash of water.
And all that is true. But, it's not the "knot" I employ most often. Because the reality is, most of us don't handle rope on a daily basis. We do, however, in the age of smartphones and podcasts and the entire history of recorded music available at your fingertips, engage with another long, stringy thing that needs to be dealt with on the regular: your headphones.
Or ear buds. Or ear phones. Or whatever you call those wired transducers that deliver all that sweet, sweet audio to your brain. And because you take them with your everywhere, they regularly get knotted and tangled up in your pocket or bag.
This is completely unnecessary. Because there's a five-second "knot" that can completely eliminate this problem, and it doesn't take any longer than other storage methods. So, now, I present to you, the actual most useful knot in the world.
Begin by making the ASL "I love you" sign with one hand. Place the plug end of your headphones under your middle and ring fingers.
With your othe hand, start wrapping the cord around your pointed fingers, crossing in the middle after each wrap. So, the cord will wrap around each finger from the same direction. It's a figure 8, not a loop.
Continue wrapping until you reach the ear bud parts. It doesn't need to be tight; you're just using your fingers as a form to create each loop.
Then, pinch the cables where they connect in the center, and remove the whole thing from your fingers.
Then, just wrap the plug end around the center a few times to make a simple bow.
DONE!
Seriously, it works and they never get tangled. This what it looks like after four hours in my jeans pocket. I guess I could lie and tell you that, but I'm not :) This is the first pic I took in this series.
It takes maybe two seconds longer than just rolling them up in a loop, and once you commit it to muscle memory, it becomes second nature. Moving on.
When I built out my basement shop space last fall/winter, there remained a couple of unfinished spots that I knew I'd need to deal with. Case in point: this obscure glass window. (This half of the shop was intended to be a bathroom, and this would have sat right over the tub.)
Last week, I got a new, very large, very heavy stationary woodworking machine (more on that soon), which I'd planned to store right along this wall. So, I figured if I didn't trim it out now, I'd never do it, and it'd look exactly the same in twenty years.
So, I got to work. And it was kind of a disaster.
Now, before we begin, I can admit: I'm a detail-oriented person. I like to do this once and do them well. You might call me a perfectionist. I don't, but you may and it won't hurt my feelings.
But I'm aware that this point of view often makes things take a long time. And I'm working on ways to bring more "good enough" approaches into my life, so I can be more productive. Like this window - it's a workshop, after all, and I'm probably going to put lumber racks on this wall and cover part of it. No one but me and my closest friends will ever even go in this room.
Great, I said. I'll just cover up the raw parts, keep it simple, paint it and move on.
And that was my mistake.
The truth is: I have no idea what the original installer intended for this window. Whether he meant to wrap the corners in drywall, or build out sashes and sills. None of the blocking and dimensions really make any sense for standard materials.
So, I began by taking measurements and going to the home improvement store. I'm not great at drywall, but I'm a pretty good woodworker, and I have the tools to trim it out in wood, then paint it. I planned to fill the top and bottom with construction lumber, cover the sides in one-by stock, caulk, paint, and done.
First, there was this filler piece between the two windows, that I knew I'd have make notches for in the top and bottom. That sounded complicated, so I just removed it, cut it flush with the tops and bottoms, and screwed it back in.
The gap between the top and bottom was just under 1". Of course, they don't really sell 1" thick wood - it's all 1 1/2" or 3/4" So I bough a 2x6 and planed it down to the appropriate thickness.
Then I trimmed it to length and width, and put it in place...
...using construction adhesive and 16-gauge finish nails to keep things in place.
For the sides, I trimmed some 1x3s on the table saw to match the depth of the inset.
I caulked all the gaps with waterproof basement caulk. And here, things started to go wrong. I forgot to buy the paintable stuff, and clear silicone caulk not only doesn't like to be painted, it repels the paint like it's covered in holy water. In fact, if I ever need a resist and don't want to get paint on something, I might employ silicone caulk, because it's that good at it.
So, I used the caulk and wall patcher and a bit of sandable wood filler to try to flush things up as best as possible, and got painting.
And it looked horrible. I didn't think it'd be seamless, but I wasn't expecting it to be this bad. I mean...THIS IS WHY THEY INVENTED TRIM AND MOLDING. The entire western tradition exists to cover up these transition points. I'd avoided trim because I wanted the walls to be flat as possible so I could add lumber racks and have everything flush against the long wall. Plus, it's so close to the ceiling and the corner, I knew the standard widths wouldn't fit.
But, seriously, this is terrible, and not just for a perfectionist. Plus, with the silicone caulk repelling paint left and right, it wasn't going to work, and so it was time to fix it.
So, I went back to Home Depot for a third time, and bought some simple Shaker trim that matches the doors in the room and the Craftsman bungalow vibe in the rest of our house. Of course, this requires a window sill that protrudes out from the trim, which I hadn't built into the first design. So the best I could do was surround the window with a rectangle of trim, and just pretend it had a sill.
To make it fit, I needed to cut off the tiny protruding pieces from the lowest blocking. A pull saw made it quite simple, and allowed me to avoid cutting into the drywall.
Then, I placed the trim around the window, cutting the top piece narrower at the table saw. I glued and nailed it in, and filled all the holes.
Then, I used PAINTABLE caulk to fill the gaps and got brushing. Thankfully, everything in the shop is the same white color, so I didn't have to be super careful.
And here's the after. It's not the standard way of doing this, and the paint got pretty gloppy with all those edges and coats, but...it looks way better than it did a week ago.
So, I'm trying not to take this as a lesson learned towards not honoring my perfectionism. But, in this case, "good enough" wasn't, and — why do something at all if you're not going to be happy with it? I'll keep working on my expectations, but I know myself well enough that I will see it everyday, and I need to feel good about it. Cause, it's not really about what others think, but whether or not I'm inspired to create in this workspace. And, apparently, proper window trim is part of that.
These are thoughts, the artwork, the news stories, the tools, the food, the conversations, and whatever else we just can't get out of our heads this month.
1. The Astronomical Event: The 2017 Solar Eclipse
A lot of people are talking about this today. Consider me among them. My house is only 45 minutes from the "path of totality," which means two things - 1) the epicenter of the event, with planning, was extremely physically close and accessible and/or 2) what I would have seen from my front yard is 99.3% of the real deal. Is that good enough?
In most situations, I'd say — yeah, 99.3% is pretty darn close. And you can avoid the crowds, the hassles, and the traffic jams. But, in this case, that .7% made all the difference.
So, we headed out on Sunday, to Madras, Oregon, the premier place identified by experts to see the eclipse. (Dead center in the path of totality, and the least chance of clouds or other weather to obscure the sky.)
... Madras, where NASA itself decided to host its event.
... Madras, where teams of scientists from all over the the world set up their equipment to monitor the event.
... Madras, which is accessible only by two-lane mountain pass state routes that were guaranteed to clog with traffic.
I'll share the details with you if you want. Email me. Yes, it was crowded, but not unbearably. Yes, I stood in line for an hour and fifteen minutes to use the filthiest portable bathroom I've ever been in. Yes, the traffic on the way out was truly ridiculous. (We did arrive there with no problems). Yes, the volunteers running the thing had no idea what they were doing. Yes, my neck still hurts from spending the night in the car.
But — and I have no other way of saying it — it was completely amazing and totally worth every, dust-covered second. The people there became a real community, they helped each other out, they bonded, they shared their supplies, telescopes, and food and water. That bathroom line led to completely enjoyable 1:15-long conversations with folks from all over the west. And. the. moon. covered. up. the. sun. entirely. for. more. than. two. minutes.
It came. Just like they said it would. The light was insane. The shadows unreal. I stared directly at the sun at 10:20 in the morning, and it was among the most beautiful things I've ever seen.
The older I get, the more I struggle with the calculus about going to big, crowded events. Is that concert really worth $50 a ticket, plus fees? Do I really want to stand on my feet for six hours through two opening bands and not have the headliners start until after 11:00pm, meaning I don't get to bed until at least one or two on a work night?
But, when I go. I never regret it. I don't remember the traffic jams. I remember the event that I signed up to see. The eclipse reminded me that when I say yes, I always find it worth it.
Here's my take on Billy Bragg before listening to this: I like him. He's really important to a certain lineage of roots music that I'm particularly interested in. I'm glad he's out there. He's had a thirty-plus year career and I'm familiar with some of his song, but I certainly haven't heard most of his catalog.
Here's my take on Billy Bragg after listening to this: Billy Bragg is the most fascinating, well-spoken musician of all time, and I should listen to him non-stop.
I exaggerate, but just a bit. The truth is: it's a great forty-five minute conversation. Bragg is incredibly evocative with his language, but always approachable and easy to listen to. Terry Gross is obviously charmed by him. She's at her best when she lets her guard down a bit and allows herself to become a bit giddy.
Worth a listen, even if your not a huge fan of either Fresh Air or Billy Bragg. It's simply great audio, period.
3. The Film: Beatriz at Dinner
This one truly blew me away. It's one of the most interesting movies I've seen this year.
Not a single line of dialog in this movie is wasted. There's so much control present in the filmmaking here. Everything is intentional, purposeful, and contributes to the desired tone. Every actor delivers every single word exactly the way they should. Hayek and Lithgow get the biggest gems, but both Connie Britton and Amy Landecker manage to pull up both a creepy/disgusting and yet sympathetic vibe that totally blew me away.
The reviews seem to think it's "pretty good," though users don't seem to give it as high praise of the critics. It might be because it was released the same year as "Get Out" They're great companion pieces, for sure.
Maybe it's because I've seen all of Miguel Arteta's previous movies, and liked them. Maybe I think Mike White is a particularly interesting screenwriter. Maybe it's because I was on a really nice date night with my wife, on our first evening out alone after having had house guests for nearly a month. It might have even been the two especially good Oregon beers I sipped during the run time. But I really, really loved this as a piece of filmmaking, and an avenue for serious performers to be great. I think you should see it too.
Honorable mention: I watched Nocturnal Animals last night. I think it's pretty solid, and worth a watch. It's streaming now on HBO if you have access.
This is the dish I have been craving all summer. I made it early in the season, and many times since, and I'm certain it will become a go-to when having friends over for a grill night.
It's from a local Portland restaurant, that I have not been to. Tragically, the building that housed it experienced an electrical fire a riff a few weeks after opening.
The recipe on Alabama-style barbecue chicken, meaning it comes with a white, mayo-based sauce. That might sounds crazy, but it amazing as it caramelizes and blackens over high heat at the last minute. (Mayo, is, basically just oil and eggs, so not really that nuts.) I've made some adjustments to make it simpler to prepare on the regular in smaller batches. I'll use whatever fruitwood or hickory smoking woods I have on hand. I don't always do the Fresno pepper sauce, though I do like it, and sometimes I'll just brine or use a simpler rub to make it happen faster.
But - it's good stuff, and anyone who eats meat will love this, we promise. Throw in a couple extra thighs or leg quarters to make sure you have plenty of leftovers to go with the sauce.
Here's Hit Parade from Chris Molanphy is my podcast of summer: it's the exact right length. It gives you only as much details as you need to dig deep and understand what's happening, and spares you unnecessary details.
What is it? It's a look at music chart history, and an exploration of the cultural context that surround pop music hits: four, so far.
It's a bit hard to find. Technically, I think it lives in Slate's Culture Gabfest feed once a month, but it doesn't show up in my SlatePlus version, so I have to remember to look for it and manually track it down. It's worth it, but the info here is good enough to warrant its own URL.
Here are the episodes so far. Please start in order, even though you don't think you can listen to forty minutes on UB40. You can.
I love summer. Like, a lot. But when the weather starts to crisp and the days shorten a bit, I'll be plenty okay. I have my fall traditions, but the one I'm looking forward to the most is my annual indulgence bottle of whiskey purchase.
I actually don't spend much on liquor. People always think I'm some connesieur, but I think I really just have an interest in learning and opportunity to write about it for my job. I do like higher end stuff, but I really don't drink enough to justify the spending. I have a few sub $25 staples that I keep around, and that's usually it.
But each October, I do treat myself to one $80 or $100 bottle to enjoy as the leaves change and the craziness of the holidays hit. This graphic on Vinepair totally helps me understand why I like what I do. You better believe I'll be consulting it before I bust out the credit card. (Considering that Talisker 18...but it goes for $165 here. Maybe I should see if I can find a glass first. Anyone have any experience with it?)
7. The Good for You Habit: Stretching
I'm hesitant to give any sort of medical advice here, but I do want to share: this month, I have visited the chiropractor for the first time. I wanted to learn proper stretching technique to tackle specific issues, and its completely changed my life. I had no idea how few of my muscles I was using to support my back, and how limited the two activities I do most - road biking and working at a desk - keep me cramped up from the top of my head to the base of my feet.
If you've never been, and your health insurance will make it affordable, I really do encourage you to try it. It's not just about cracking and adjusting, it's about learning lifestyle changes to keep you flexible for as long into life as possible. I'm sold.
For the last couple of years, I've been mostly set on woodworking tools. I've been collecting my large, stationary machines for nearly ten years now, and although I do plan to upgrade a few of them, I've been able to accomplish most of what I've set out to do with a little creativity and patience.
The one standard machine that's been missing from my shop is: the jointer. I knew I didn't want to buy a tiny benchtop machine, or even a too-small 6" model. I told myself I'd wait until I was in my "forever" shop, then get the machine I wanted; one I could use for the rest of my life.
Once we bought our house last year, I started a Craigslist alert, and painfully watched every listing from ubiqituous Harbor Freight tools to overpriced secondhand things from people who have no idea that what things are actually worth.
Over the last eighteen months, only a few 8" models even came up for sale. The woodworking community in my town snatched them up as soon as they were listed, and so I waited. And waited.
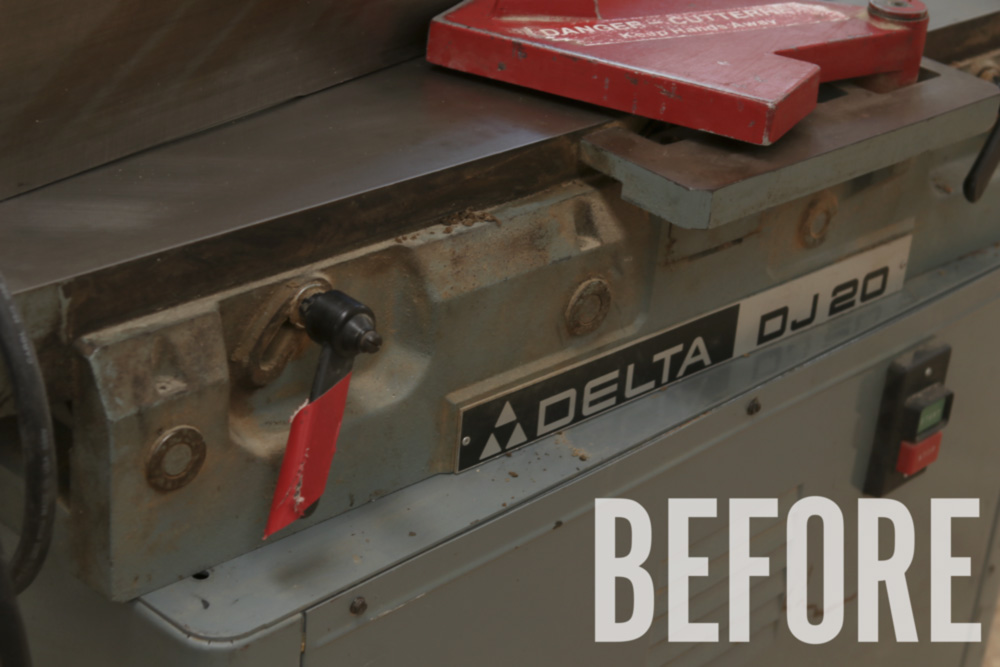
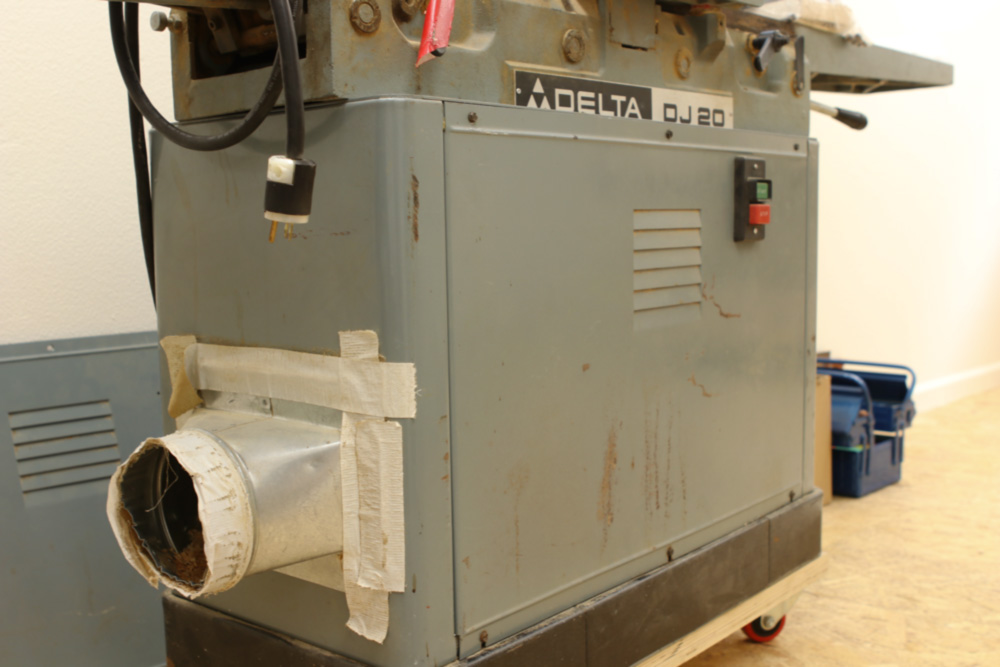
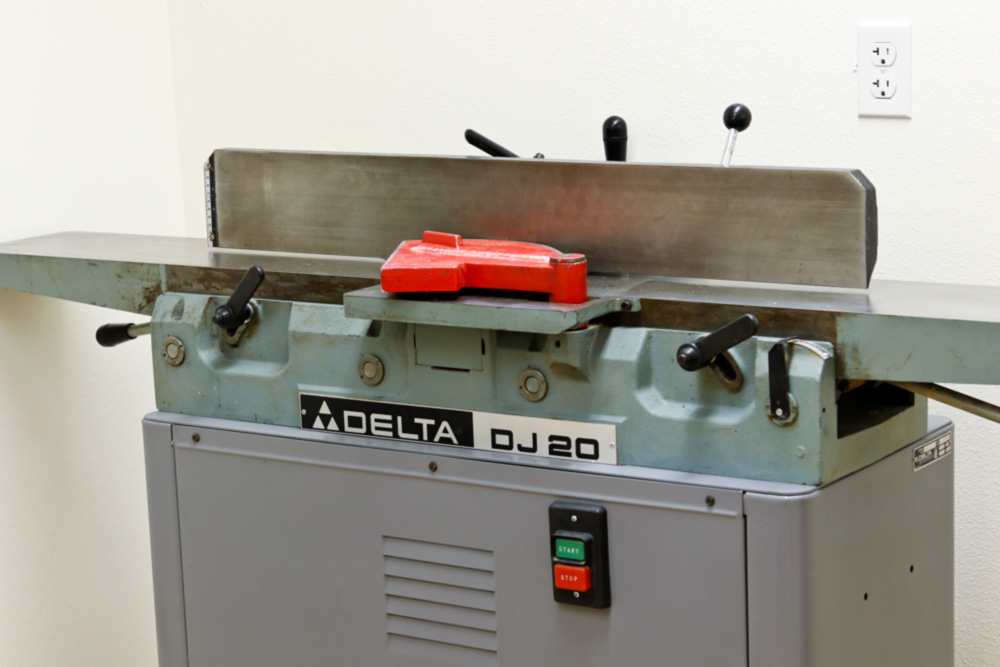
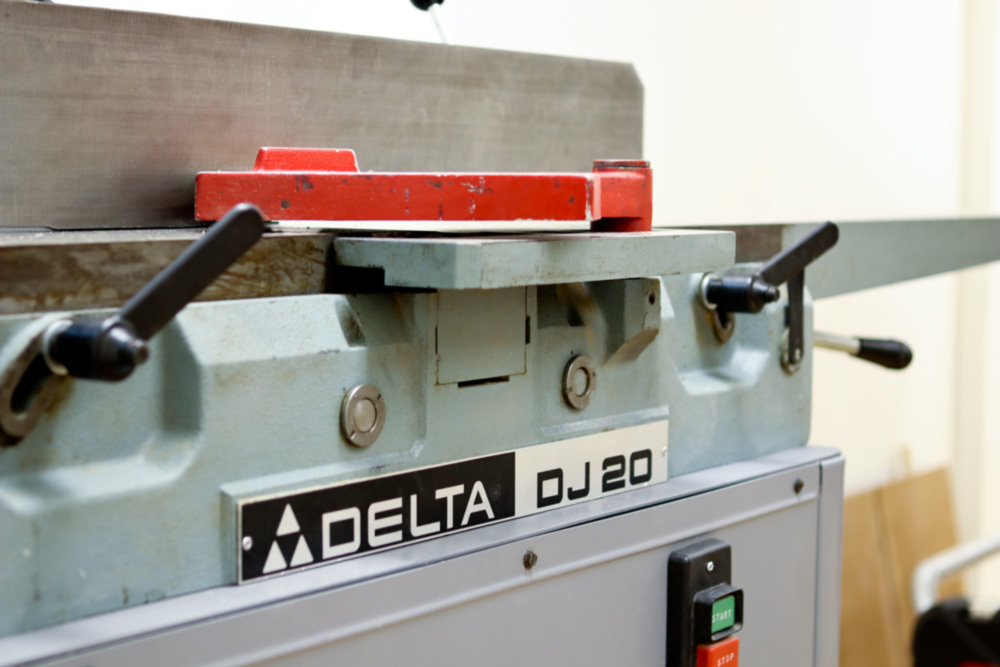
And then - enter this Delta DJ20. Built in the 80s when machines were machines. Complete with parallelogram beds, dead flat and coplaner tables, and an awesome fence, this was being offered at less than the price than the new Grizzly it's based on, plus no shipping, no assembly or degreasing, and it came with a mobile base.
I made my offer, went to check it out, and - boom! - I'm now the owner of a vintage 8" Delta jointer.
I even managed to get it into my basement with the help of the guy I bought it from, which saved on renting a truck and paying movers to help me get the 400+ lb. tool down the stairs.
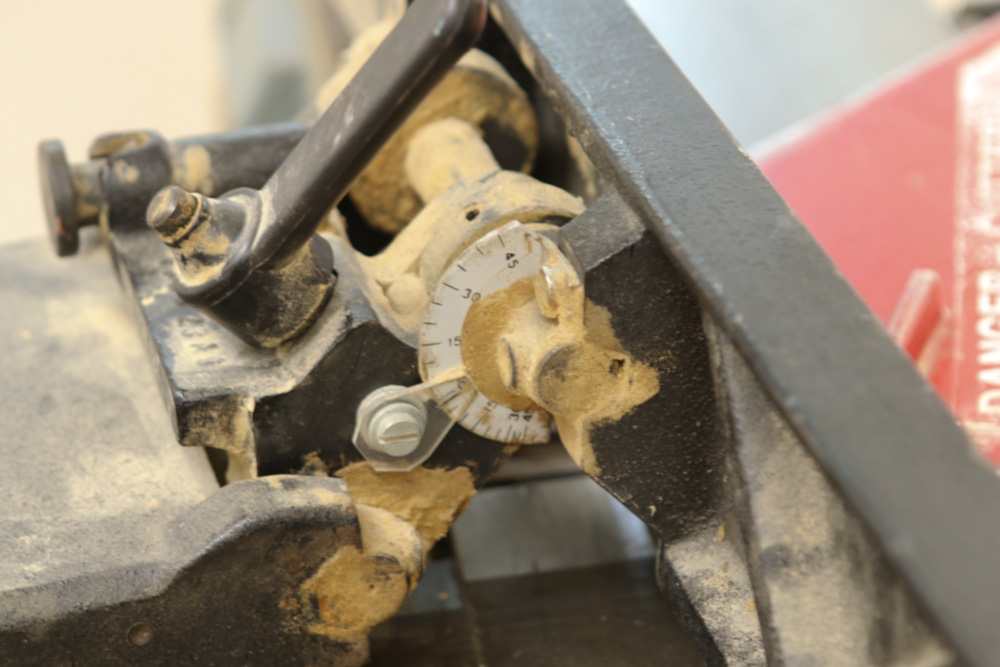
So, before I put it into place, I wanted to give the machine a onceover. I knew if I didn't work on it now while it was partially disassembled, I'd never do it. The machine itself was fine, but exhibited thirty years of wear and tear. The base was a little banged up, but nothing a day of work wouldn't fix.
Random Before Pics: Rust, Sawdust, and Cleaning Required
Cleaning Up the Jointer
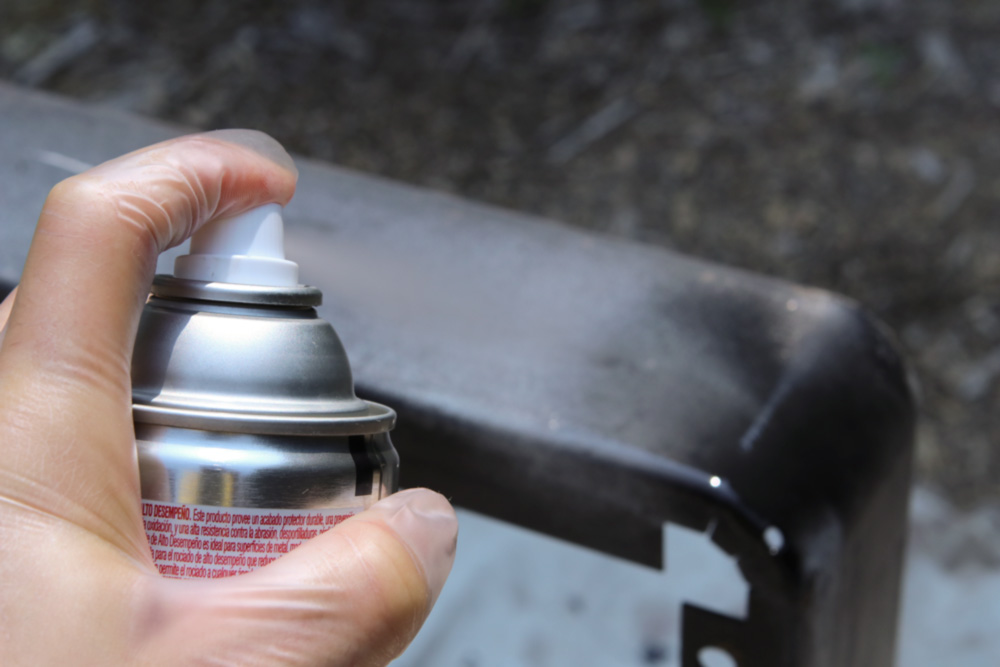
I managed to get the machine itself onto some heavy-duty sawhorses, and worked on it in the shop. Ideally, I would have painted it if I could have, but there's no way I'm spray painting several coats indoors. So I settled on cleaning up the jointer as best I could, and taking the base outside (which weighs 1/4 of what the top does), and painting it in the open air.
I began with a thorough vacuuming to remove any loose dust and debris.
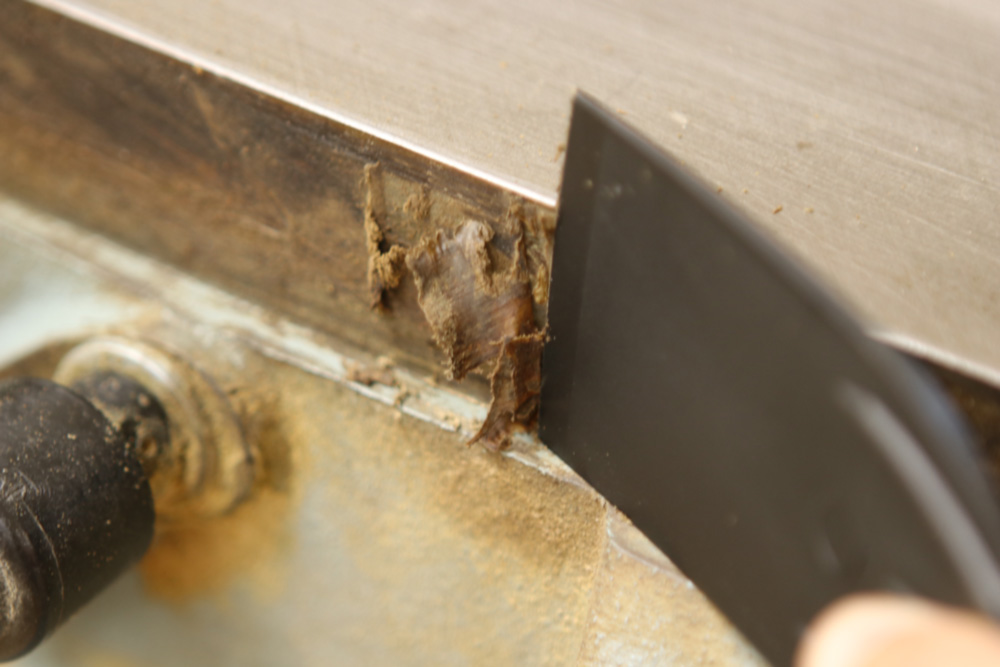
A plastic putty knife proved to be the best tool to remove the caked-on, sawdust impregnated grease and crud. I needed to re-bevel it several times with my belt sander to keep the edge sharp.
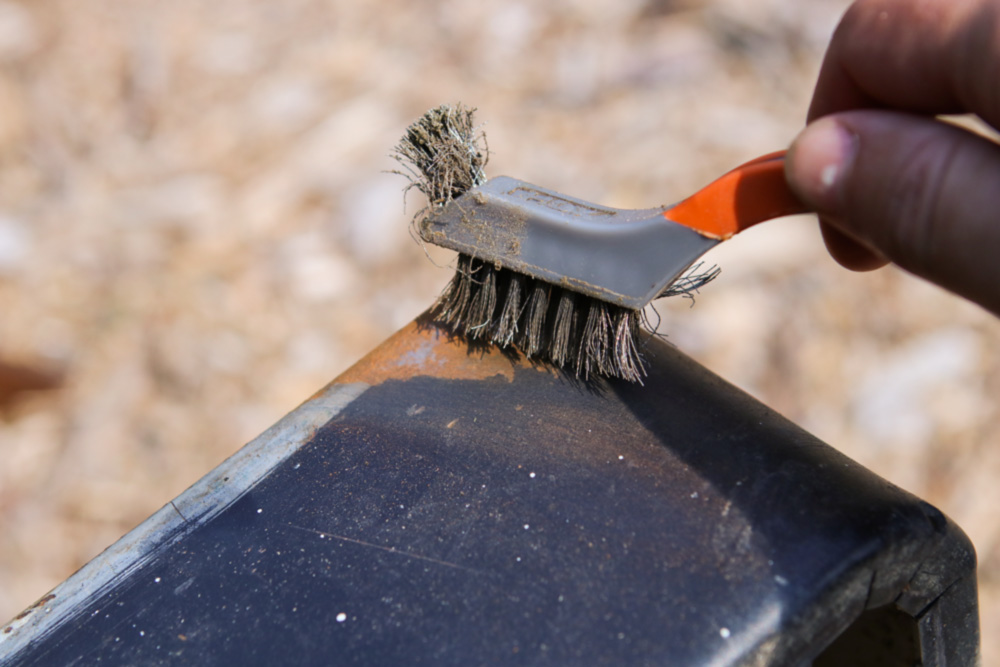
I worked the cast iron body with a brass wire brush, which was firm enough to remove the dirt but not harsh enough to take off the paint.
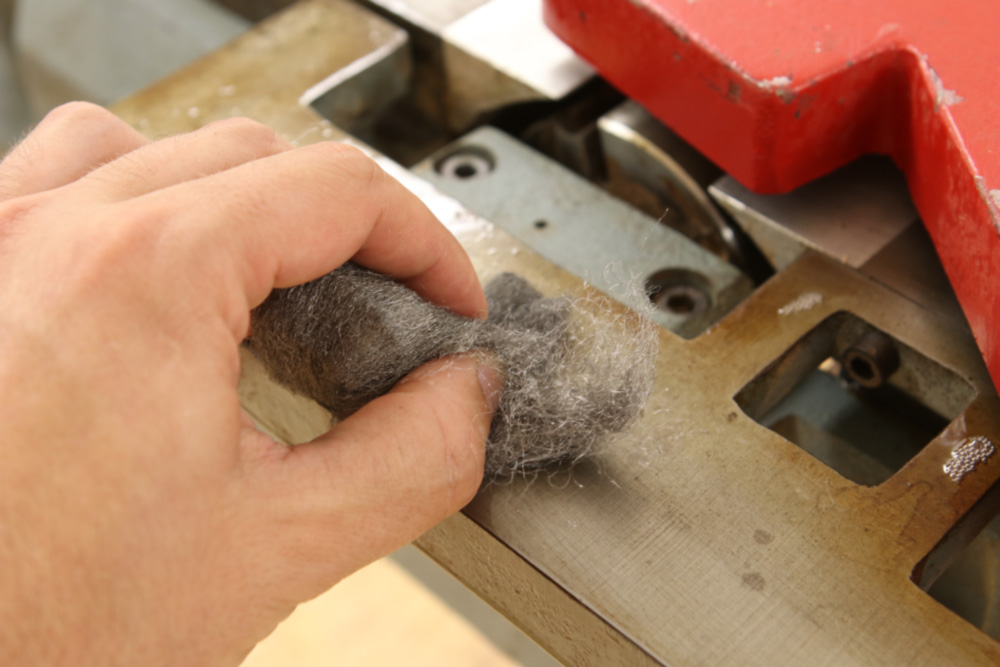
The beds looked great, but the fence and part of the cutterhead assembly had a bit of rust. I used some steel wool and WD40 to work the light stuff...
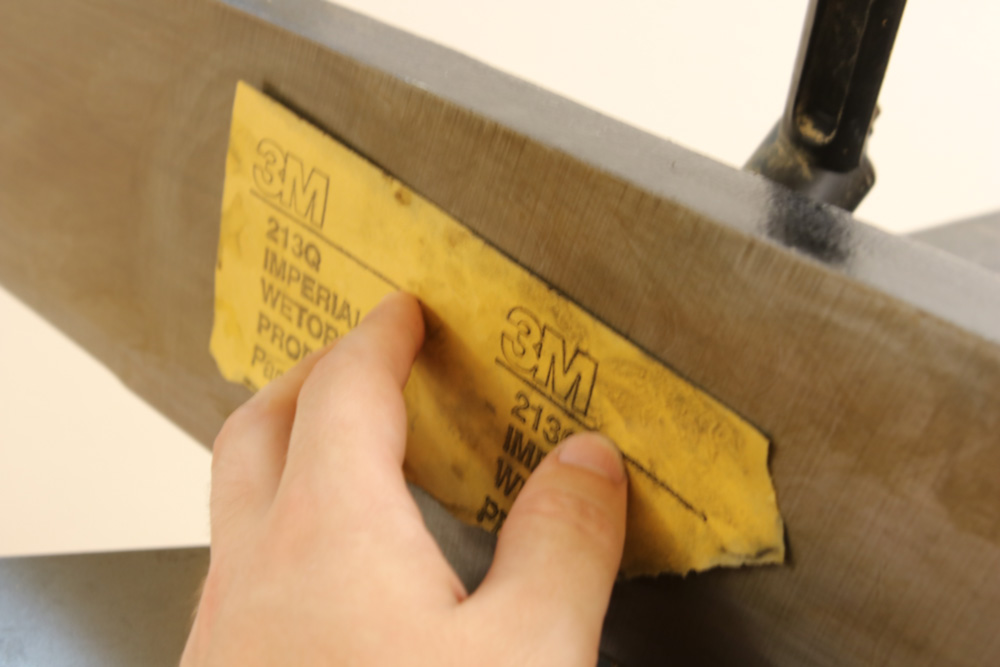
... and some 400 grit wet/dry sandpaper lubricated with oil to take off the heavier oxidation. I regreased and oiled everything and allowed it to penetrate overnight.
Reworking the Base
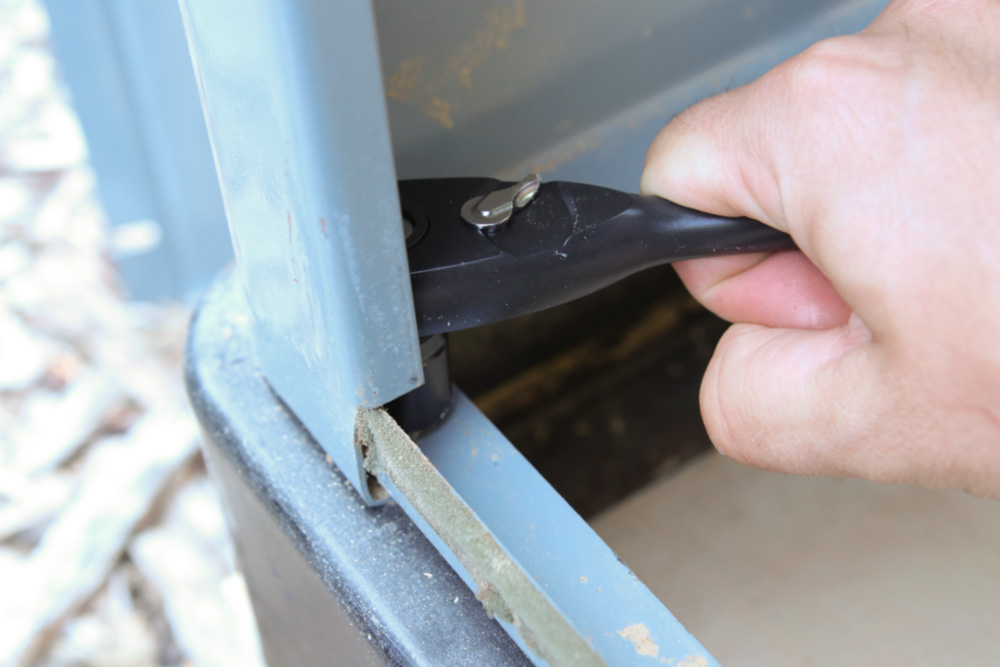
The next morning, I took the base into my side yard and broke it down as far as I could go.
I removed the previous owner's mobile base, and then took off the steel stand (gray) from the jointer's base (black).
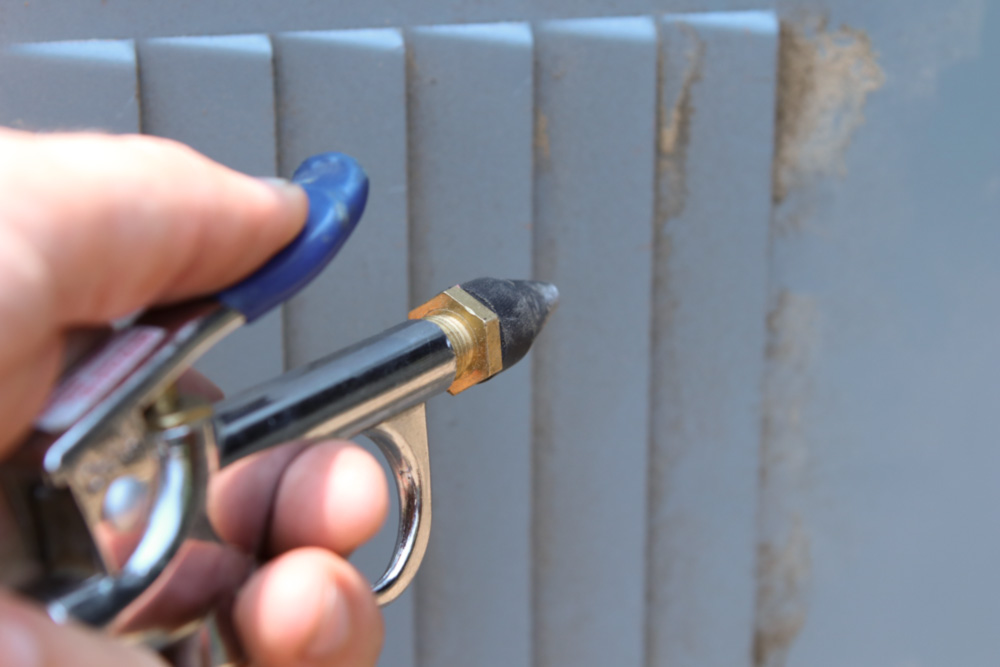
Wearing a respirator and eye protection, I blew off as much dust as possible with compressed air.
I worked the rust with wire brushes and sandpaper. Where the rust had eaten away at the paint, I feathered in the edges for a smooth transition. I roughed up the surface a bit with 180 grit paper to help the paint to stick.
Then, I taped and bagged off the motor and switches, and started painting.
I used a flat black for the base, and Rustoleum's medium machine gray for the stand. I really like the vintage-y blue color of the original tool — it's very high school shop class — but this was the closest match I can make. Delta does sell some replacement paint, but it's expensive, would take a few weeks to ship, and I don't have an HVLP sprayer to apply it. This was the best I could do with rattle cans. It does make the base and the jointer different colors, but they were actually already somewhat different. Either because the base had be repainted already, or the paint aged different on the cast iron vs. the steel sheet metal. Whichever, I don't mind the two-tone look, and I think the overall effort was definitely worth it. Anything I do now makes the tool last longer for the future.
I applied five-six light coats, using about 1 3/4 cans for the whole thing.
After it dried, I took all the pieces back down into the shop.
Putting it All Back Together
I replaced the foam tape that helps keep the sawdust inside with a bit of weather stripping from the home center. I should have taken this off before I painted, but lessons learned.
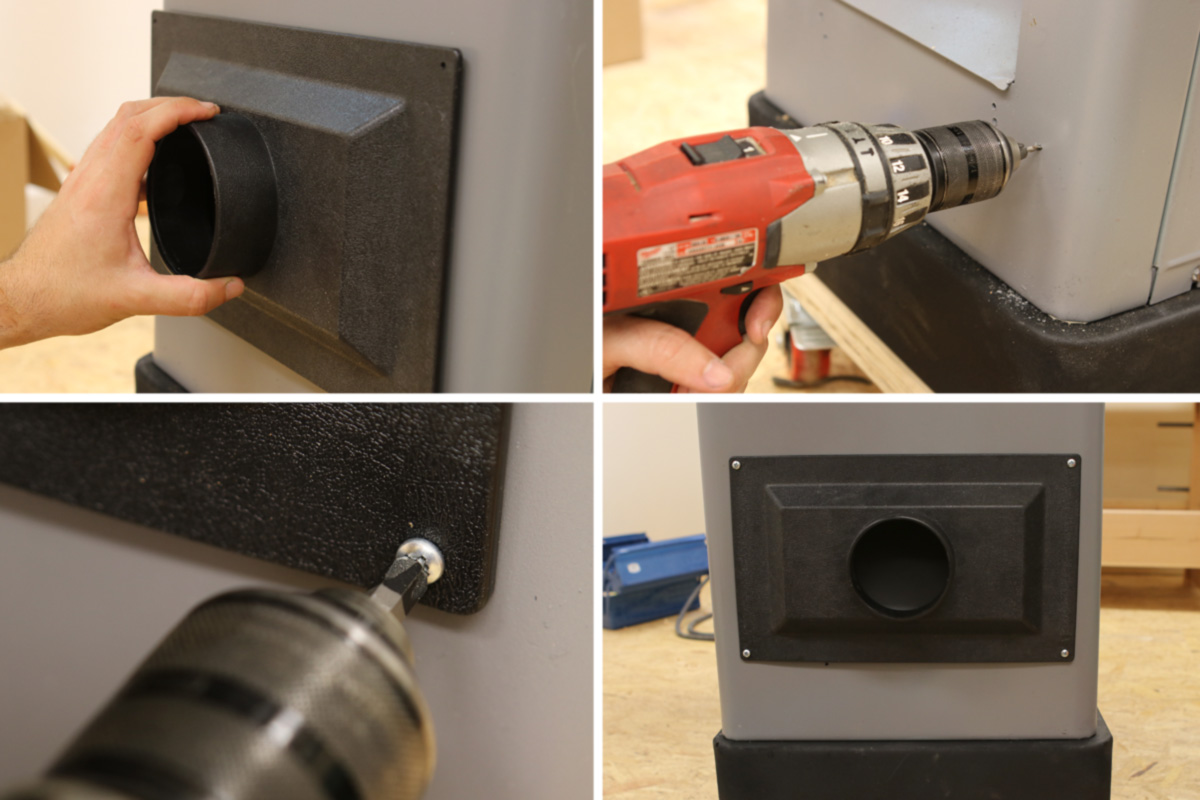
I then attached a new dust collection hood. The old one was pretty banged up, and had a 6" port. I keep a 4" port and hose on my collector as my "standard" and then adapt from there. Place, drill, more foam tape, machine screws, attach.
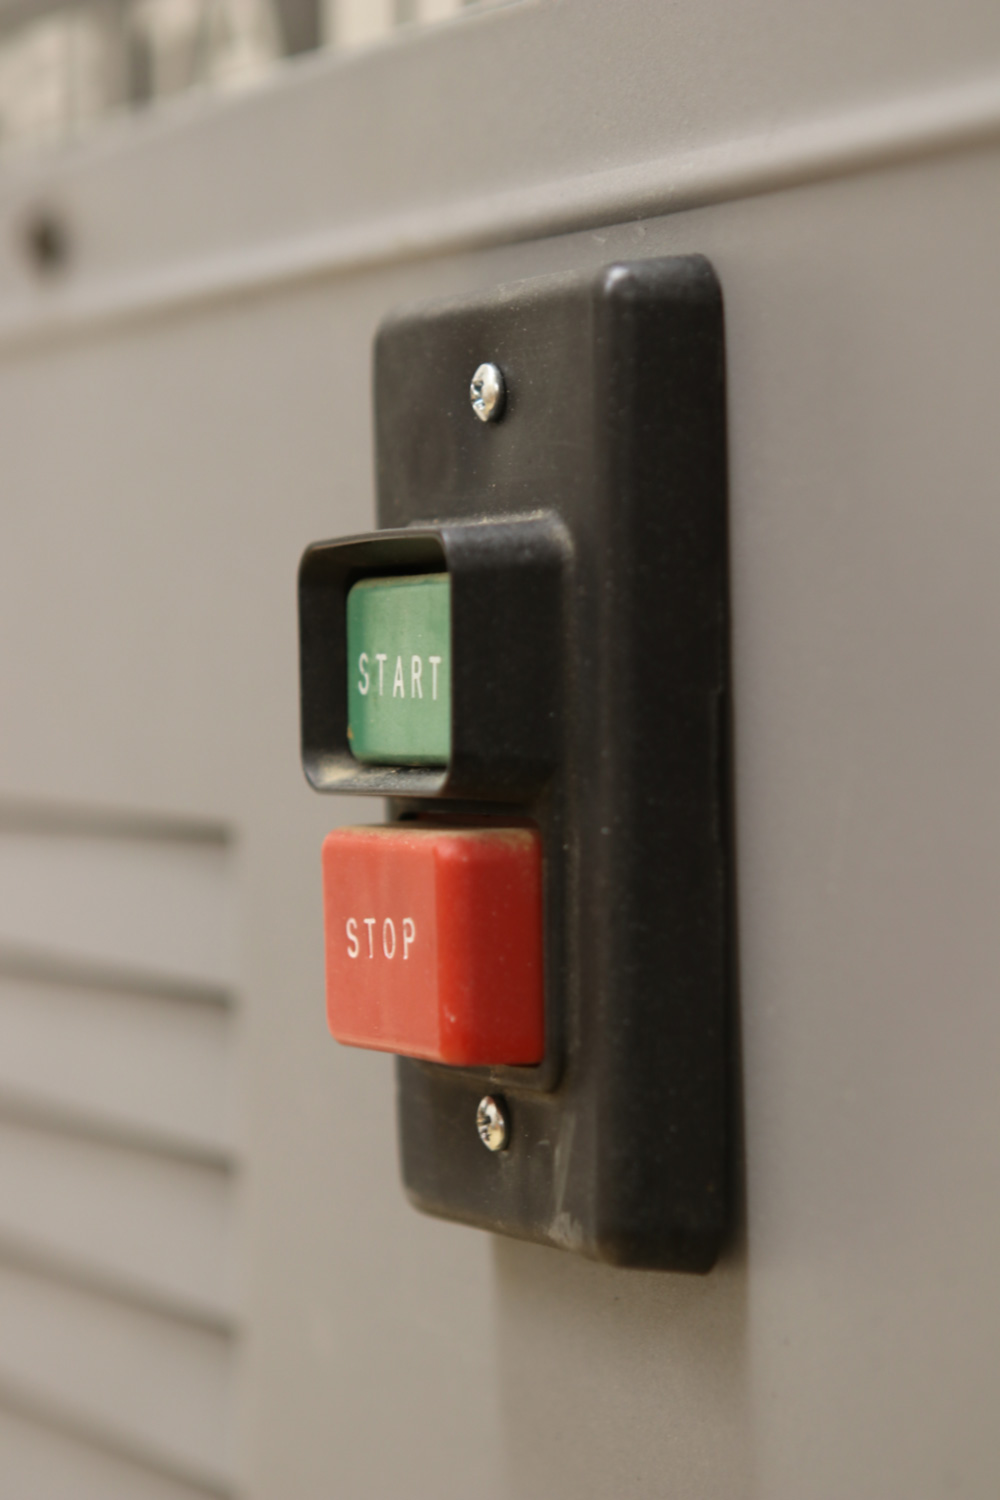
Putting the power switch back on was the final step, and literally the hardest thing I had to do on the whole project. The old hardware was broken, and required a crazy bolt - coupler - threaded rod - spacer - nut - panel - junction box combo I just couldn't recreate. So, I worked with the guy at my neighborhood hardware store to come up with a solution. With all the moving parts, it took me nearly forty-five minutes to reattach, and three trips to the hardware store. No fooling.
I replaced the belt, squared the fence, adjusted the tension, and...
DONE!
Here it is in it's new permanent home. Right now, it's nestled in a corner along the wall where the 220v circuit is, under the new window. This will work fine for shorter stuff. There's a door right next to the outfeed table, so I can roll it forward and joint longer stock right through the opening.
Now... all I have to do is learn how to use it. #Safely.
Have you ever had to cook dinner at a friend's kitchen only to find out they don't even own a cutting board? Not only have I had that happen for me, I've noticed this kind of thing happening in my friend's workshops. It's easy to get caught up in making things and overlook some essential tools that can really help you get things done right. I thought I'd share a few tools I use almost every time I work on a new project. Some of these are almost laughable, but I guarantee some of you are going to read through these 6 tools and think to yourself, "Oh yeah, I need one of those."
1. A Pocket Multi-Tool
I love my Leatherman Wingman. It has pliers, knives, screwdrivers, and my favorite, a package cutting hook. I could go on and on about why you should have one of these, but the main reason is it's a small product with a many uses. I keep in my my pocket everyday. You never know when you're going to need to pull a MacGyver!
Not only can you use this tool to make sure things are level and plumb, its machined-flat edge makes a fantastic guide rail for your circular saw. You can also use this tool to check for straight cuts on the board edges. I have levels sizes ranging from 1-6 feet that I use on a regular basis.
Man, I love this tool. Some brands claim this thing can do 17 different things and I believe it! It can scrape off old debris, pry open paint cans, cut old rags, clean off paint rollers pull out small nails, chisel out caulk and more! I keep it hanging above my work station so I can grab it whenever I need it, which is often.
I use this tool to get straight lines for most of my DIY projects. It has a flat lip on one end that will sit against an edge so you can transfer 90 and 45 degree lines to a surface. It also can help you find square in corners of boxes and frames. When you go to purchase one, inspect the edges for bumps or dips. It's important that these edges are clean to make sure you always have perfect lines.
I love these pencils because they're flat. That means they won't roll off your workbench! This shape also allows you to make really fat lines, or rotate it 90 degrees and you can make really sharp, thin lines. To make a really sharp point, I rub flat sides on a sheet of sandpaper. These pencils are also engineered to hold up when you're making lines on rough surfaces.
This product may be a no-brainer, but when you have a small shop like mine, hauling out the ShopVac for simple dust cleanup can be a pain. I use this hand broom every day to clean off my work surfaces and gently dust off my tools. Not to mention, I like to work quietly on some projects and vacuums can be so loud!
Lately, I've been on a quest to find better breakfast foods. Without getting into much personal, and overbearing, health details, most breakfast foods just aren't all that great for you. Whether it's a pile of dried wheat or a sugary toaster pastry, grabbing something good on the go can be so dang hard! Well, no more! Kolache to the rescue!
I might be obsessed with these little guys. There's a great cafe here in Nashville that makes these, and it's not uncommon for me to grab one every Sunday. The kolach originates from the Czech Republic in the form of a sweet, fruit-filled pastry that can be found on most breakfast tables. In America, you can find their new origins in Texas as a spicy, smoked sausage and cheese filled dough. These are the ones we're going to focus on for your next breakfast! In honor of Breakfast Week here on ManMade, let's make some!
Recipe
1/2 ounce of Instant Yeast
1/2 c of warm water
1/2 c of butter
1/4 c of sugar
2 egg yolks
2/3 Cup of whole milk (make sure it's whole)
1.5 teaspoons of salt
4 cups of flour (can sub half with whole wheat)
1 package of diced fully-cooked smoked sausages
8 ounces of shredded cheese
1 sliced jalapeño
1. Make The Dough
Bloom the yeast by mixing it with the warm water. Set aside for 15-20 minutes.
Next, using a whisk or mixer cream together the butter and sugar.
Add salt, egg yolks, water/yeast mixture and milk.
Once everything is incorporated, add flour until it's a sticky dough ball.
Once it's formed into a ball, cover and let double in size for 1-2 hours. I like to let my dough mature in the fridge for a couple of days. This develops the flavor you might find in sourdough or a good pizza dough.
2. Make the Balls
When you're ready to make the kolache, preheat your oven to 425 degrees. After the dough has risen, pinch off and roll golfball sized balls. Set them on a greased tray to let rise again for another 30-45 minutes.
3. Fill them!
Roll out each ball into a small disk. Set it in the palm of your hand and fill it with a small helping of diced sausages, a teaspoon of cheese and a slice of jalapeño (if you like it spicy!). At this point, you can practically fill them with anything you want! I've used scrambled eggs and bacon, pepperoni and parmesan and breakfast sausage and cheese. The possibilities are up to you!
Once you've put your fillings in your palm, pinch up all the ends to make it look like a small pouch. Set the ball on your baking sheet seam side down.
Be sure to signify which ones have jalapeños in them. You don't want that to be a surprise one morning! I placed a small slice on the top.
4. Bake!
Brush each kolach with melted butter and stick in a 425 degree oven for 8-10 minutes.
5. Eat!
If you can keep yourself from eating every one of these you can place the rest in a storage container and put them in the fridge for breakfast the next day. Now you're set up for an entire week of breakfasts!
You know the ones. Those classic, advice-supplying stock phrases that might be from Shakespeare but could be a religious text and/or folk wisdom, yet we all seem to absorb nonetheless. Those simple, stock phrases that are always shared by well-meaning people in sometimes appropriate, but often in irrelevant situations that don't actually apply.
But, I suspect that we all have a few of these things that actually do make sense to us. True, "a penny saved is a penny earned," doesn't really resonate with or motivate me. But I know it's a code that many people honestly organize their lives around. Nor do I agree that you should "never go to bed angry." In my experience, nothing gets truly resolved when you're both worn out; and sometimes, eight hours of rest is exactly what you need for both of you to realize you got triggered, but you still love each other and the new day is a fresh start. In my view, the better aphorism should be "never have a hard conversation after 9:00pm," because, seriously, no one is at their best when you're exhausted.
But there are a few of these sayings – some old chestnuts and some a bit more contemporary – that I really do say to myself often, and they work for me. So, these are the ones I keep around, and perhaps they'll be helpful to you, too. I'd love to hear which ones motivate you as well.
1. "If You Can Do Something in One Minute or Less, Do it Now"
Hands down, this has been the best thing to carry with me. If it were more poetic, I'd tattoo it on my arm so I'd see it every day.
The reason is: this is not my natural state of being. I can be a distracted person, I tend to get everything out at once, use it, make piles, and then put it away again. I tend to hold off on things until I can address them all at once and put myself in the right headspace.
But my real, lived-in experience is: seeing all those things throughout the day weighs on me heavily. Knowing they're out there makes it seem like I have so much more on my plate than I actually do. I actually often extend this to two minutes, and, when I remember and actually put it into practice, I feel so much more organized, my house is cleaner, and I'm way more productive.
2. "There's No Accounting for Taste"
I am someone with strong opinions about things. I really love the things I love, whether it be music, literature, home decor, or a plate of food. And because I'm an active consumer, I have, in the past, confused the possibility of connection for what kind of stuff that person likes.
That is dumb. That is what children do. I am not defined by my taste in music, so the people I spend time with shouldn't be either. Yes, it's nice when you and your partner enjoy the same bands so you can listen to them on a road trip, but the truth is: people like what they like. Some people actually believe The Rolling Stones are a more important to the history of pop music The Beatles. No matter how wrong I think they are, they have their reasons, and it can make for interesting conversation.
Rather than holding folks to your own aesthetic standards, and criticizing their choices, find out why they're drawn to the things they love. It's much better to trust someone to make a good decision and respect their choices, rather that know they'll just make the same decision you would. People with different opinions than you make for better friends.
Different strokes for different folks. That's what makes the world go round.
3. The Key to Happiness is Liking What You Have, Not Liking What You Don't
I wish this one was a little more succinct and fun to say. In some ways, it reflects a few the basic tenets of Buddhism summed up in the Four Noble Truths. (I do not identify as a Buddhist, but there's some really smart and true stuff in the tradition.) When you spend all your time craving things that aren't in your life, you can't possibly appreciate the things that are. This is true in my life from relationships to woodworking tools to free time to natural abilities and electric guitars.
"Comparison is the thief of joy" sums up the same idea, though it tends to apply to other people rather than what I really struggle with: comparing my current self to some future, idealized version of myself that has a bunch of other/new things.
But seriously, craving stuff you don't have really does lead to suffering.
4. Anything Worth Doing is Worth Doing Well
This may be a crutch of my own struggles with perfectionism, but I think it's more about feeling accomplished. When you set a goal or take on a project, it's an opportunity to learn, to practice, to hone a craft, and to, hopefully, positively affect the lives of others. But it's also an opportunity to set a goal and complete it. That feels great, no matter who you are. Half-assing something leaves you half as satisfied.
5. Start where you are. Use what you have. Do what you can. - Arthur Ashe
It's much better to do anything than to do nothing...or worse, sit around and wait for things to be exactly right before you begin. Just dig in.
6. Don't Drink Your Calories
I don't know where this one originated, but I think it's really smart advice. I'm grateful that I'm of a relatively average build, and as long as I eat healthfully and exercise regularly, I can maintain a reasonable weight for my age.
This idea really does help me accomplish that. Drinking anything but water does not make me feel full. Of course, I do drink plenty of things besides water. But if I can avoided unneeded calories by drinking black coffee without sweeteners, having club soda instead of a soft drink, and not keeping fruit juice in the house, then it really does make it that much easier. If I want fruit or vegetables, I'll eat them, because then I get the benefit of the fiber as well. This notion also helps me keep my alcohol servings in check, too. Beside ethanol and all the flavor, those things are made of sugar. That's how fermentation works.
The other health-related one I try to keep in mind is: "it's okay to go to bed a little hungry." It's true, you'll be fine.
7. Don't Look a Gift Horse in the Mouth
A gift, in its essence, is a bid for intimacy from someone who cares about you. Whether its an invitation to spend time together, a well-meaning attempt to offer support, or an actual physical object someone wants think you'll like, take it and love it. It doesn't matter if you like it, or if its the perfect one. Gifts are not chances for people to show how much they know you, and or love you, or to give you something you didn't know you needed.
Gifts are opportunities to connect with the person that gave it to you. And nothing interrupts that connection like assessing whether the giver got it exactly right.
Which classic idioms actually ring true for you? Please post your favorites in the comments below.
Okay, begin witty caption contest for this rugged DIY speaker system...now! "You can play your explosively good music?" "For use only when you really need to blast your tunes?" "Only plays songs that charted number one with a bullet?" "Solder up this stereo, soldier?"
Even if you're not someone known for shopping your local army surplus store or own anything else ammo-related, this fun and effective project might be worth trying, just to learn about the basics of bulding a powered speaker/amplification system into an existing structure. If olive drab just doesn't do it for you, apply the parts list/wiring technique to anything you can think of!
Executing a well-designed project doesn't always have to involve high-end materials, elegant shapes, and complicated techniques. Sometimes, the most affordable wood will do, and to bring it together: just a little math.
This quick-and-simple DIY decor project reads like much more than the sum of its parts. It's really just some 1x2s, cut to 30° on each end, and glued together. By staggering the joints, the sides form a perfect equilateral triangle. Hang 'em up, and go.
Remember to rest, even when things are going great.
It's easy to crave time away when you're in a rut, in need of a refresh, or looking for some inspiration. But, right now, I'm actually in a pretty good space.
That doesn't mean there aren't unperceived benefits to stepping away. So, for the rest of this week and next, ManMade is going on vacation.
I'm pretty pumped. I especially like traveling this time of year. Waiting to head out when school is in back in session means the crowds have lightened significantly. But it's also a special time of year. I feel the transition of the seasons: when we leave, it's summer, and when we return, it's autumn.
My wife and I are headed to British Columbia, an easy drive from Portland. I'm especially excited because it will be a mix our usual outdoorsy stuff and an urban vacation, spending a significant amount of time in the cities of both Vancouver and Victory. Plus, #ferries.
So, take it easy, ManMakers. Enjoy the last dregs of summer. I'll see you soon.
This is the time of year when no one's ever quite sure what's best to wear on any given day. The nights are cool, but the days are still warm, especially in the sun, but then a breeze or the clouds hit and everything changes. Multiple layers are usually overkill, but the sandals are gone, and some flexibility is certainly required to not only look the season, but the feel prepared for the day.
Make it happen with these five summer-to-fall transition essentials.
1. Heavy-duty cotton chinos - These fall (get it?) between your workaday denim and a full on pair of wool trousers. When its cool, they're warm, and when it's warm, they'll still breathe. The cotton twill doesn't help much in a fall drizzle, but either do your jeans (they're made of cotton too), and the warm, earth-y colors match the season. These are basically what have been colloquially come to be known as "khakis" but the color options extend much beyond desert explorer.
2. A denim jacket - I'll admit that I've never been able to pull one of these off, but I still want to try. The weight and rugged texture here is perfect for fall. If you, like me, tend to give off a Vinnie Barbarino vibe, a canvas or duck cloth coat in the same cut and styling serves the same texture. Check out this ManMade guest post for ideas for getups that work: 5 Ways to Wear and Layer Denim Jackets for Fall
3. Long-sleeve henley - The shirt of fall Saturdays. It is, basically, a polo without a collar, so treat it as such. Wear it on its own with jeans, and push the sleeves up if you get too warm. Try placing the front behind your belt buckle for a semi-tucked in look, which can really dress things up. Or, build it into your layering system, try one over or under an oxford cloth button down for a little collegiate sporting look, which works well for bigger guys or athletic builds.
4. Leather shoes or boots - No, don't jump from canvas sneakers or boat shoes to snow boots, but do realize that fall often brings unexpected weather, and you want your feet to stay warm and dry without overheating. Try heavier leather brogues, dessert boots, or work-style boots and wear with jeans or chinos. And to treat them for the season, check out our ManMade guide toCare for and Protect Your Leather Boots and Shoes. For a great boot option at several price points, check out the ManMade's Fall Boot Roundup: 5 Stylish Pairs for Any Budget.
5. Plaid button-down - It's not that plaid goes away in the spring and summer, but fall is the time for embracing the full-on Scottish Tartans, not just the small checks of warmer weather. Whether you go flannel, twill, or poplin depends on the day, but we say every fall should start with a new plaid shirt. Or three.
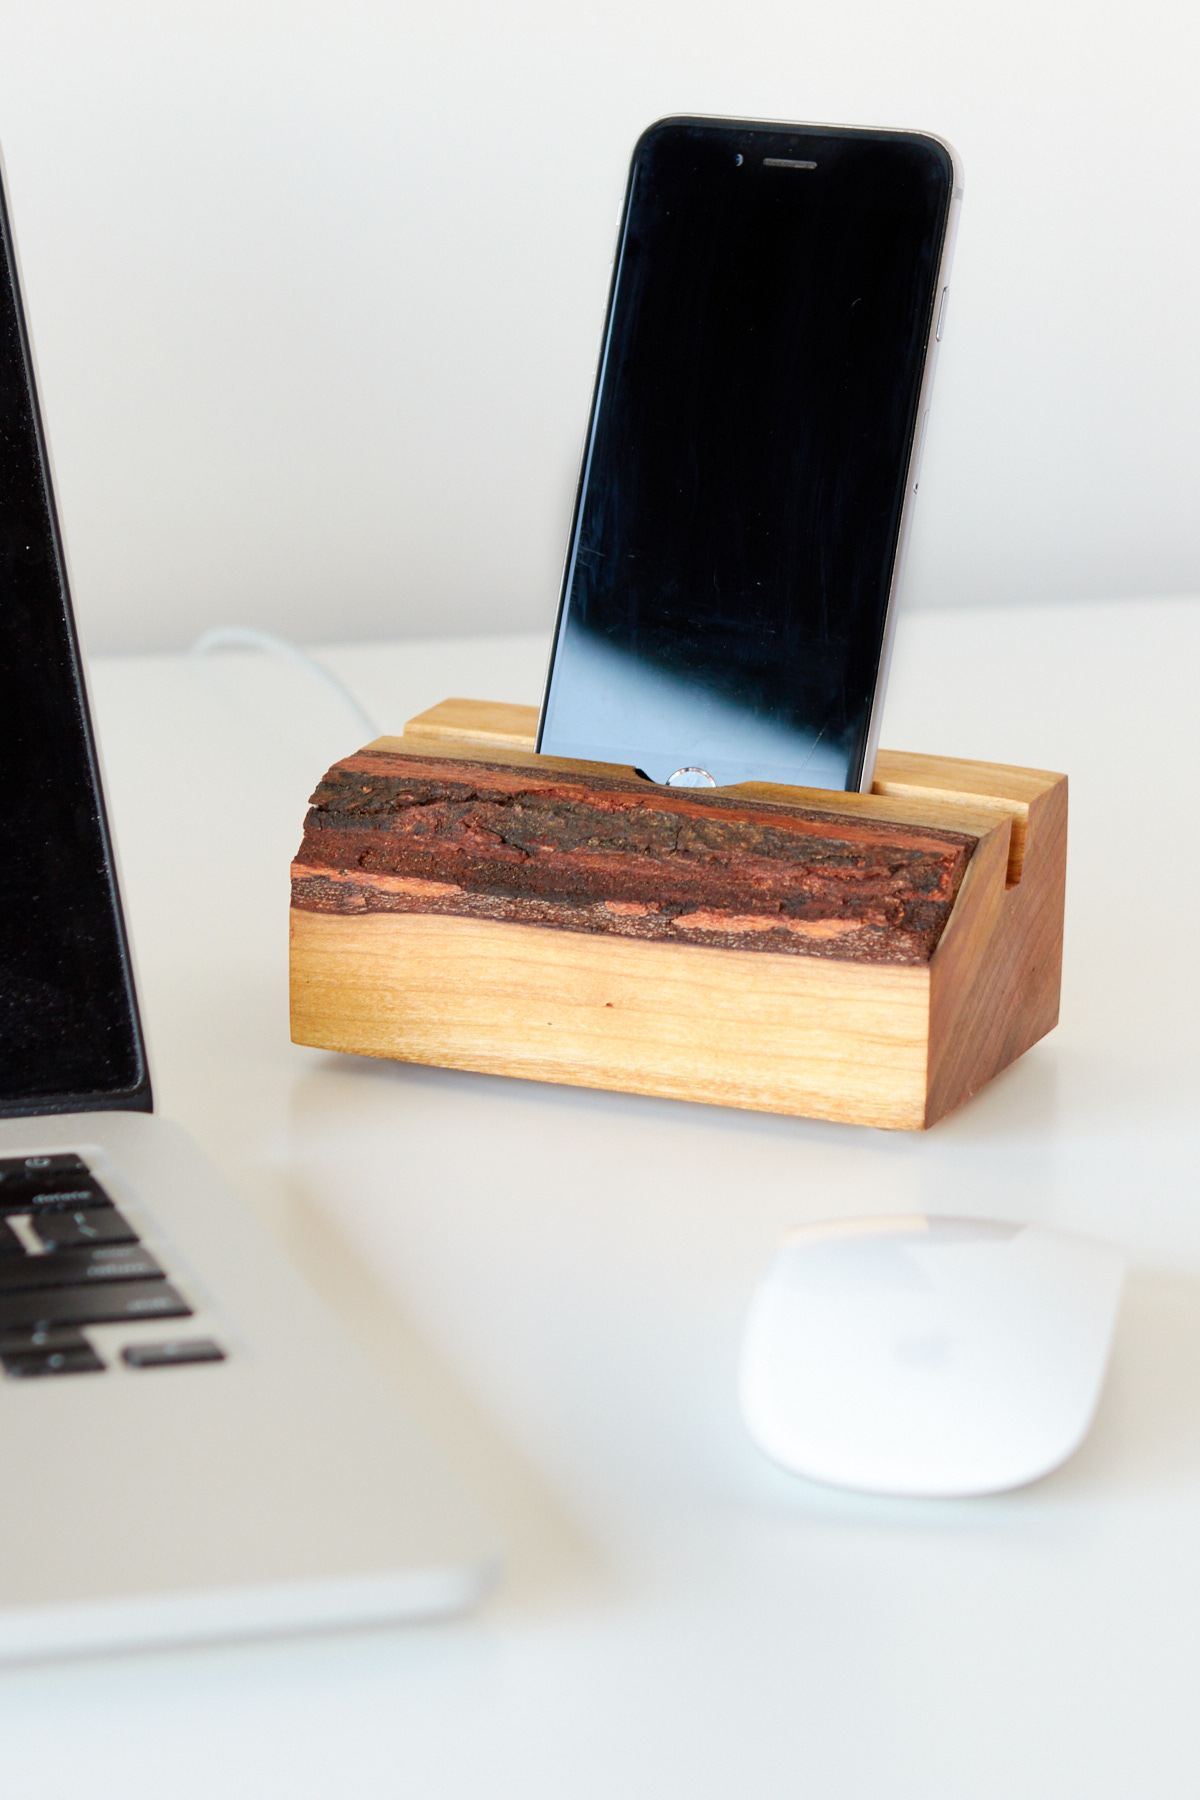
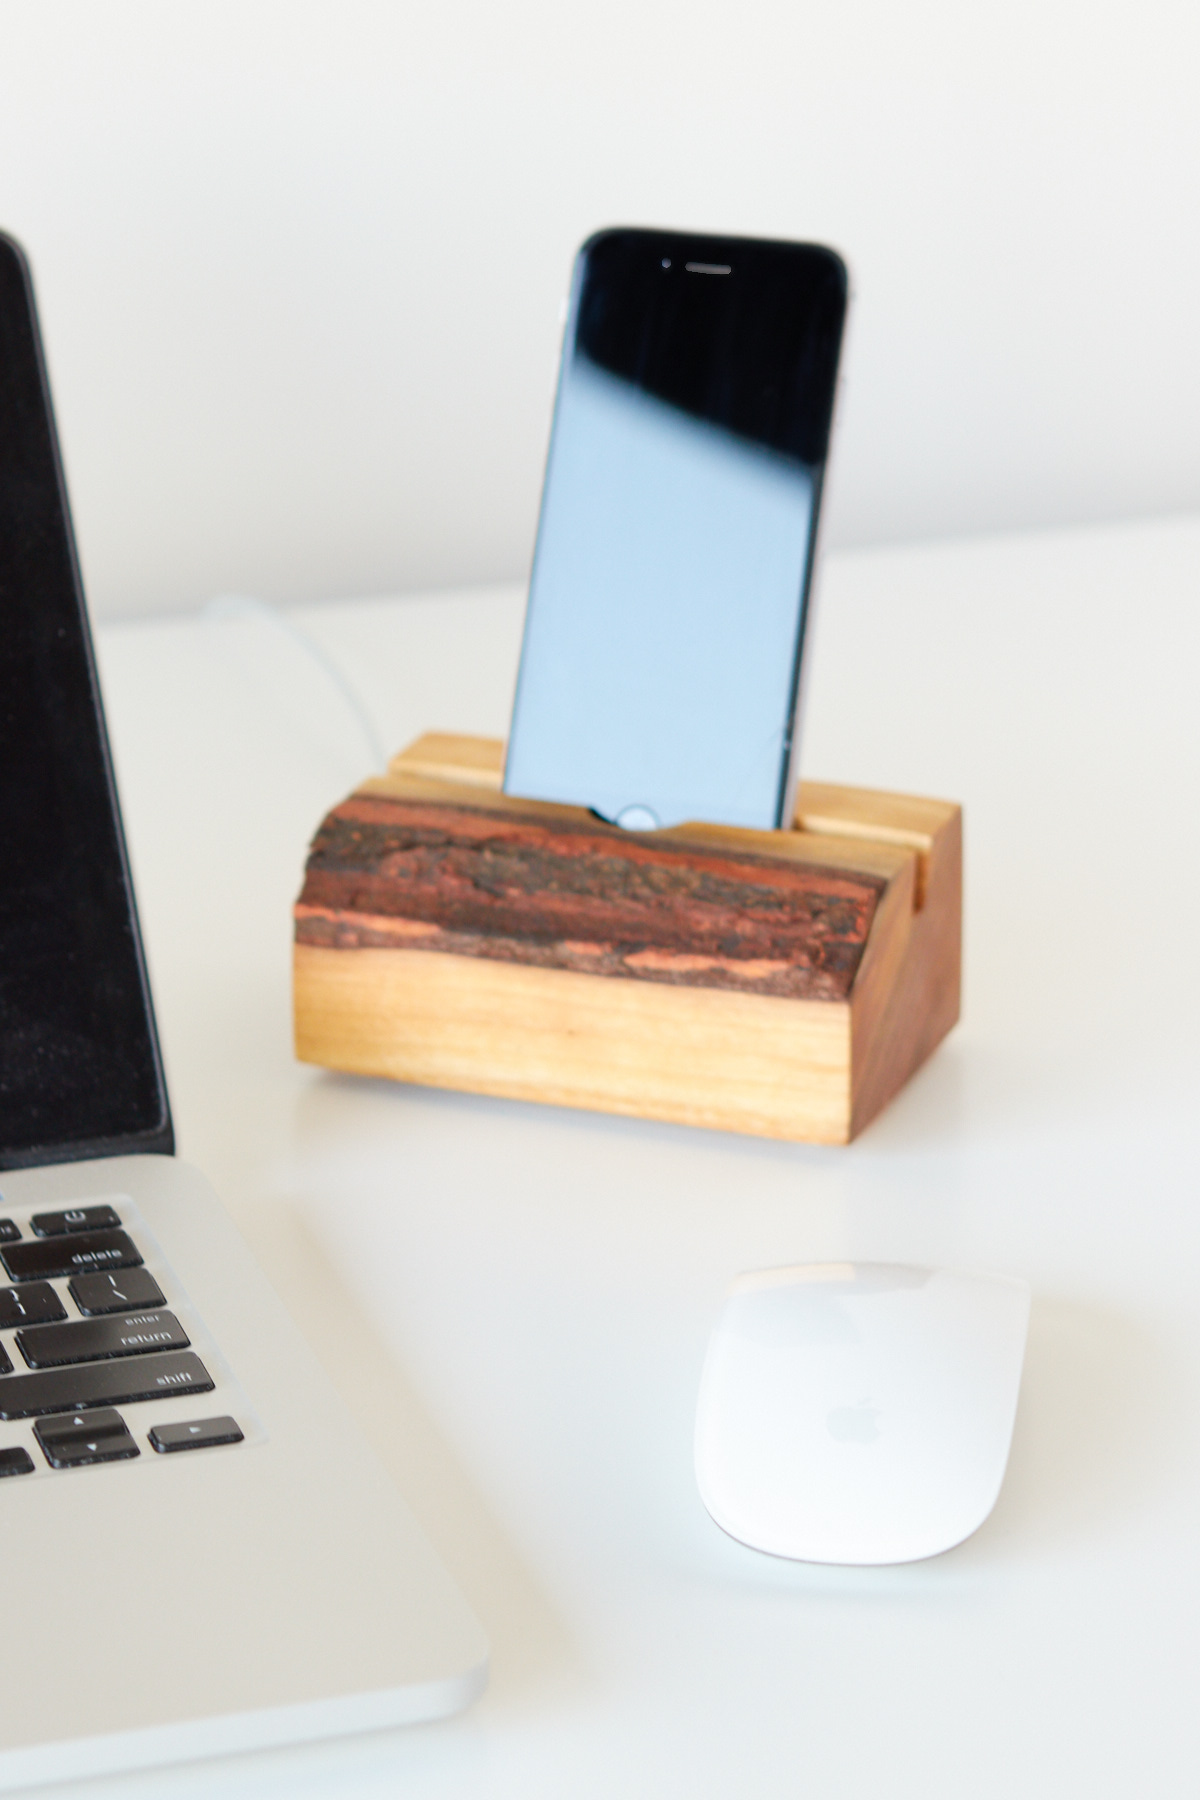
I love the idea of combining modern technology with natural textures. I keep my tablet in a case made from an old linen-covered notebook, and my sleek and shiny DSLR in a worn brown leather bag. So, I wanted to make a simple place to house my smartphone, while warming it up a bit. I went with the most natural thing I could think of: a big slab of forest tree.
I like this design for a DIY wooden smartphone charging station because it fits the charging cable nicely, but it isn't stuck in place, so you can remove and use it elsewhere without the stand.
Enough talk! Let's make one!
DIYZ® is THE DIY app for getting detailed step-by-step project instructions and how-to videos that can help you complete your home repair or renovation without having to hire a professional handyman or contractor!
Tools & Materials:
Wood slab, at least 1 1/2” thick and 3" long
Table saw with flat-bottomed blade
Long, thick scrap of wood to use as miter gauge extension fence
Clamps
Cordless drill
Forstner bits - ⅜” and ⅞”
Self-adhesive rubber bumpers
Smartphone charging cable
Oil finish (we used Danish Oil)
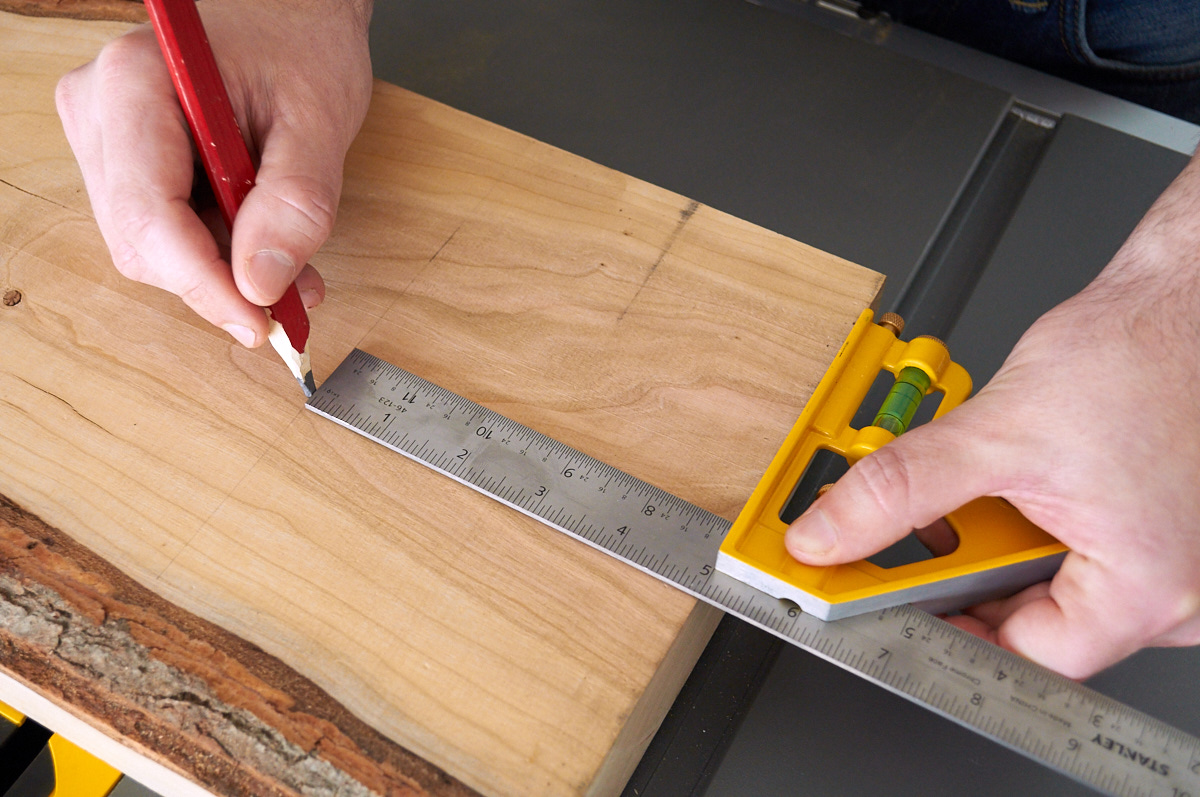
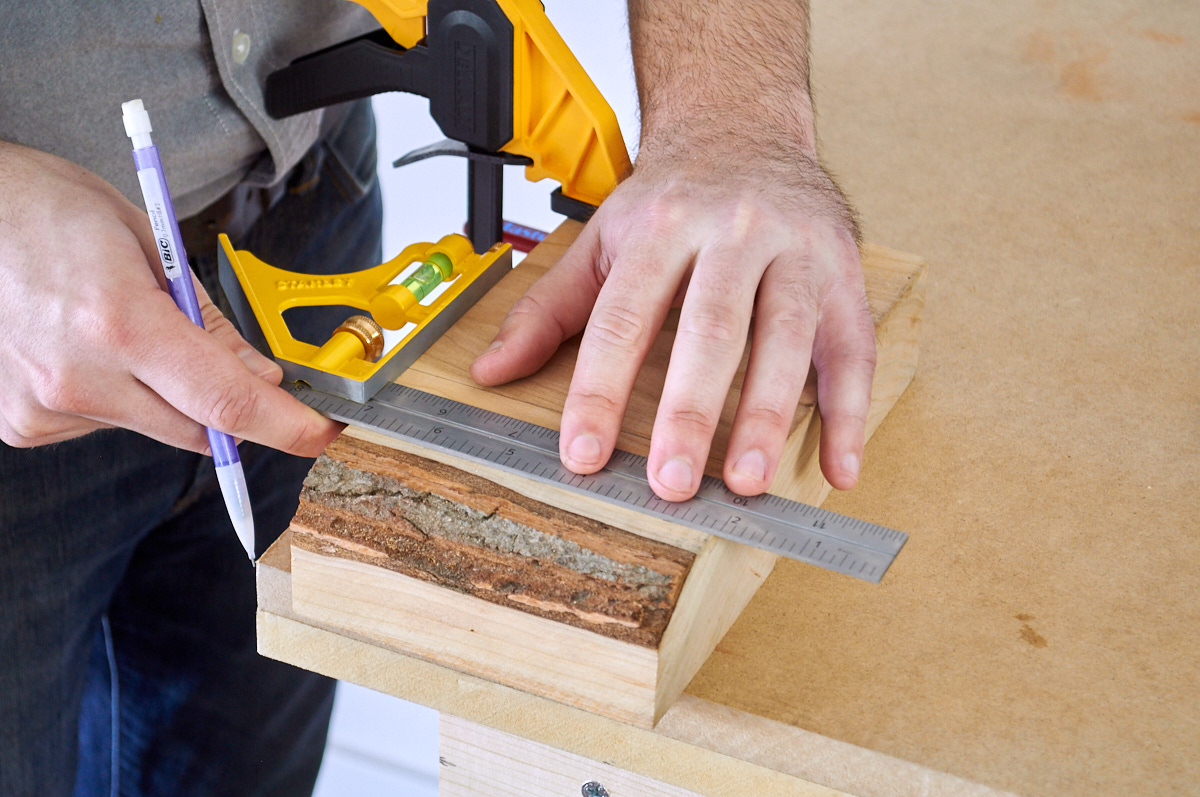
Step 1. Select a wood for your project. Choose something that's at least 1 ½ "thick and a piece that’s beefy enough to support a phone while charging. We're using a piece of 8/4 live-edge cherry. Crosscut your wood around 5", or slightly wider than your phone.
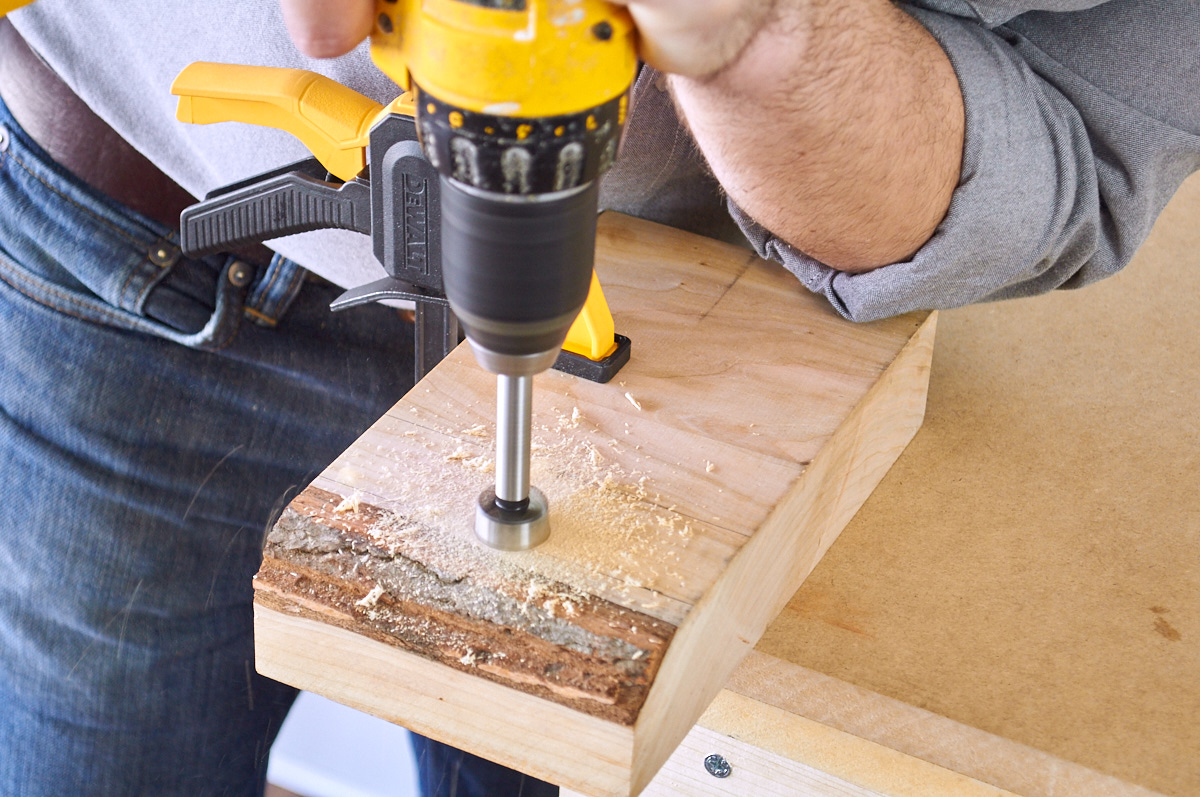
Step 2. Next, draw a line across the center of the width of the wood. This will eventually line up with your charging cable jack in your phone. Then, mark 1 ½ inches back from the front edge. Use this cross-hatch as your center point to drill a stopped hole with the 7/8" Forstner bit, 1" deep. This will become the thumb hole for your charging station.
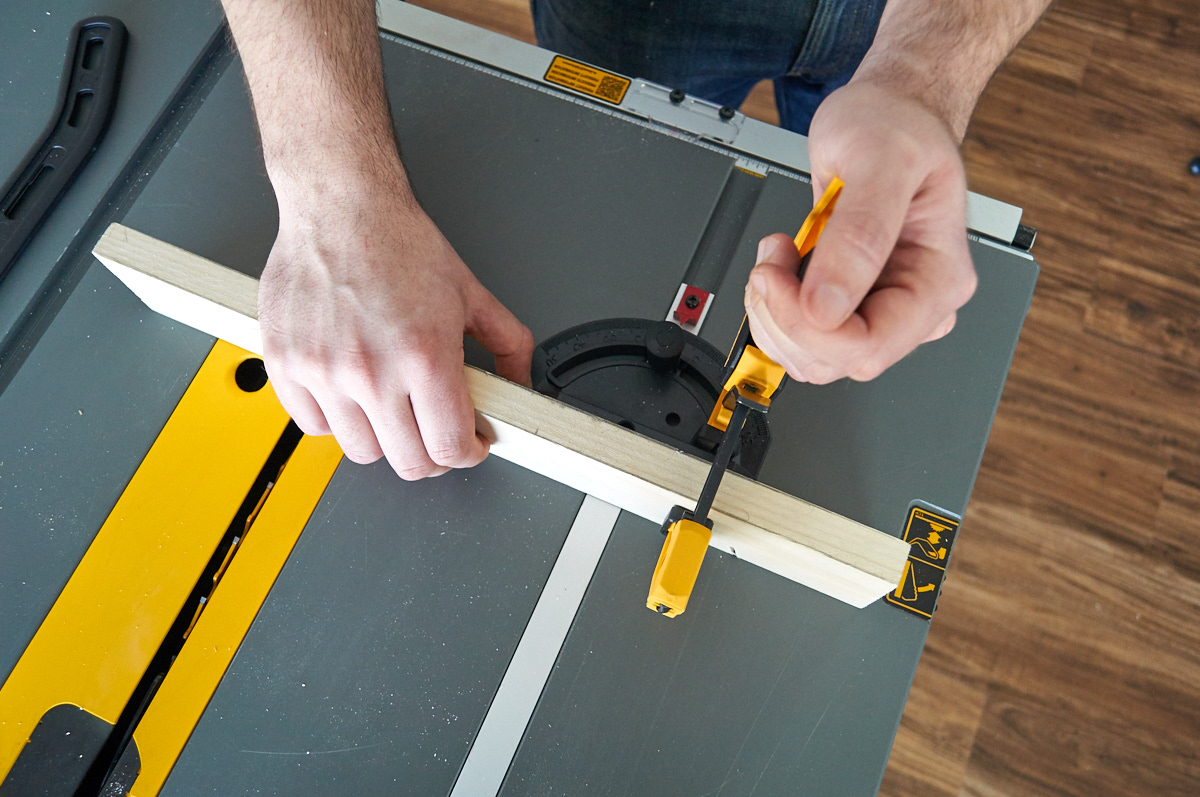
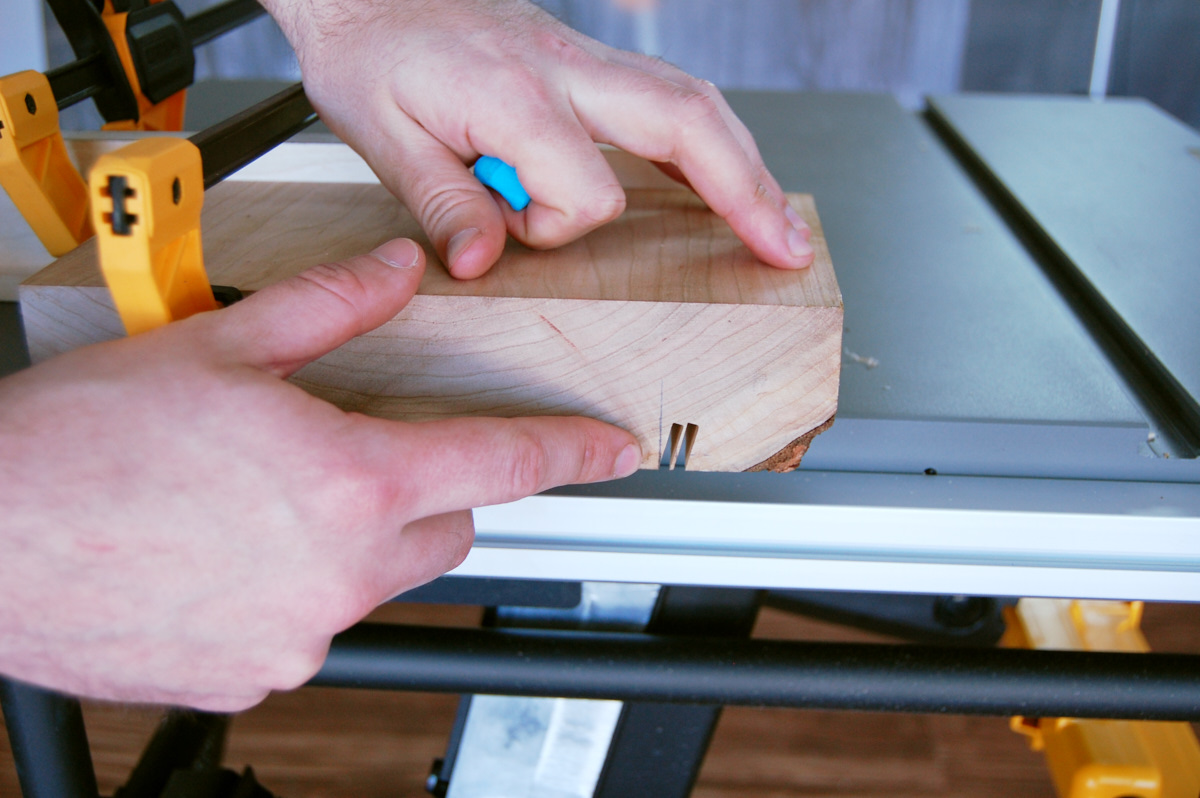
Step 3. Unplug your table saw, and load up a table saw blade with a flat-bottomed tooth pattern. Tilt the blade to 15° and replace the throat plate.
Clamp or screw a long piece of scrap wood to your table saw's miter gauge. This will allow you to accurately make a series of cuts into the wood, while keeping your hands safely away from the blade.
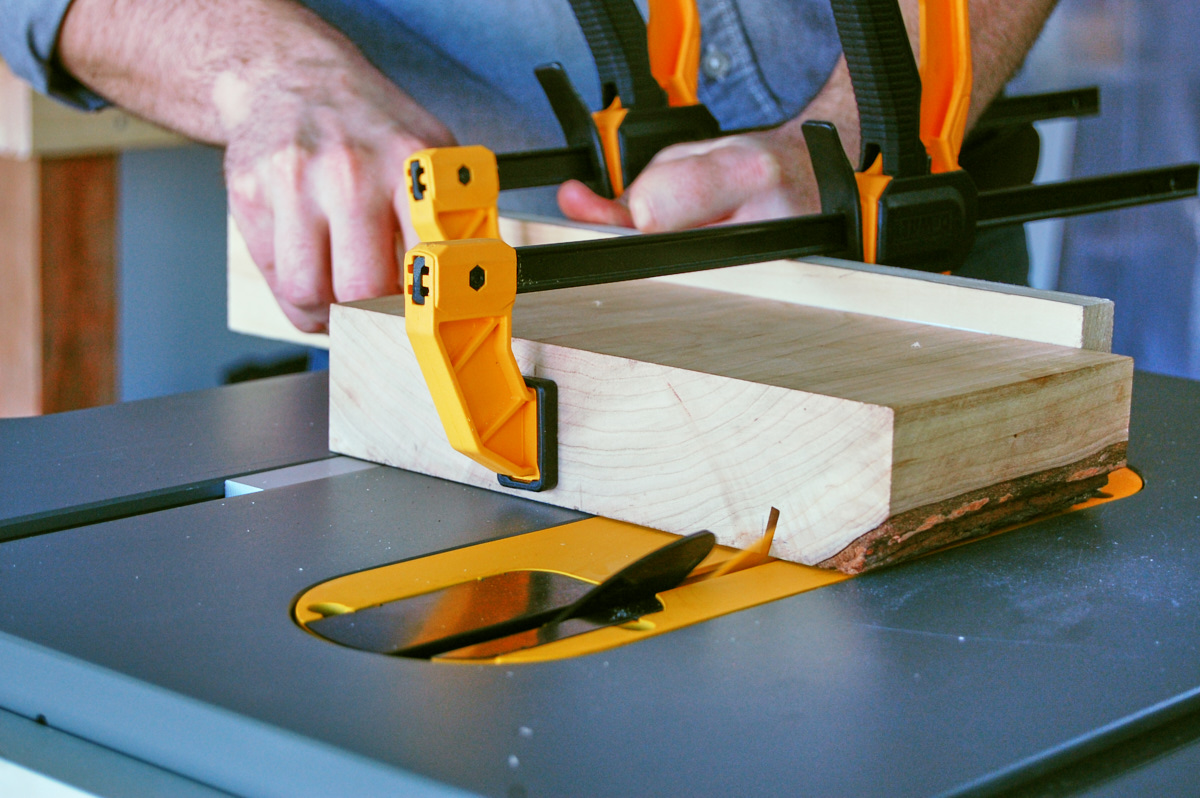
Step 4. Clamp your charging station to the wooden miter gauge extension. Set the blade height so it cuts 1" deep into the wood, matching the depth of the thumb hole. Carefully make an angled pass one inch deep, aligning the cut to the center of the hole you drilled in Step 2.
Adjust the position of the work-piece along the fence and make another angled cut, aligned to the back of the thumb hole. Then, make several repeated passes and clear out the remaining waste. Before moving on, ensure this slot is wide enough to hold your device.
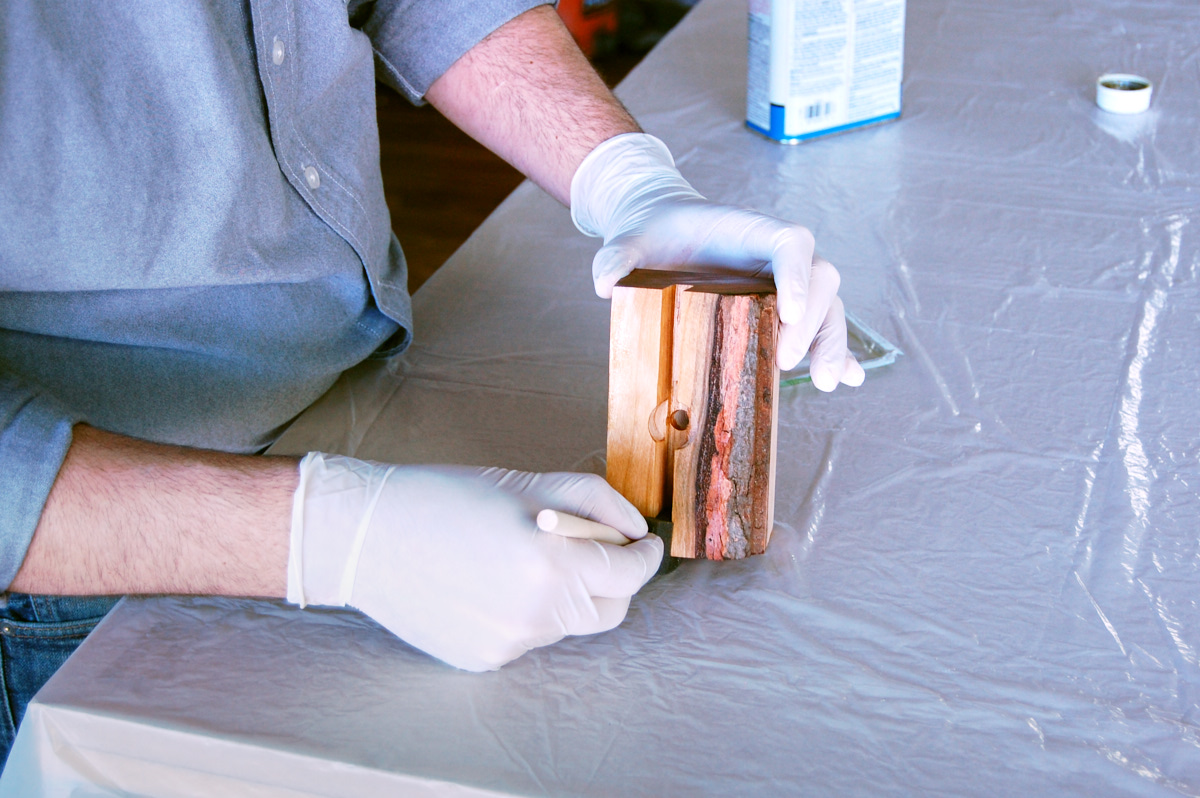
Step 5. Chuck a 3/8" bit into your drill, and place it in the angled slot, matching the 15° angle. With a scrap piece underneath, drill a hole through the slot through the bottom of your wood. This will allow you to insert the Lighting or Micro USB end of your charging cable.
Step 6. Depending on the size of your workpiece, you may want to trim it for a more proportionate look. We cut ours to 3" deep.
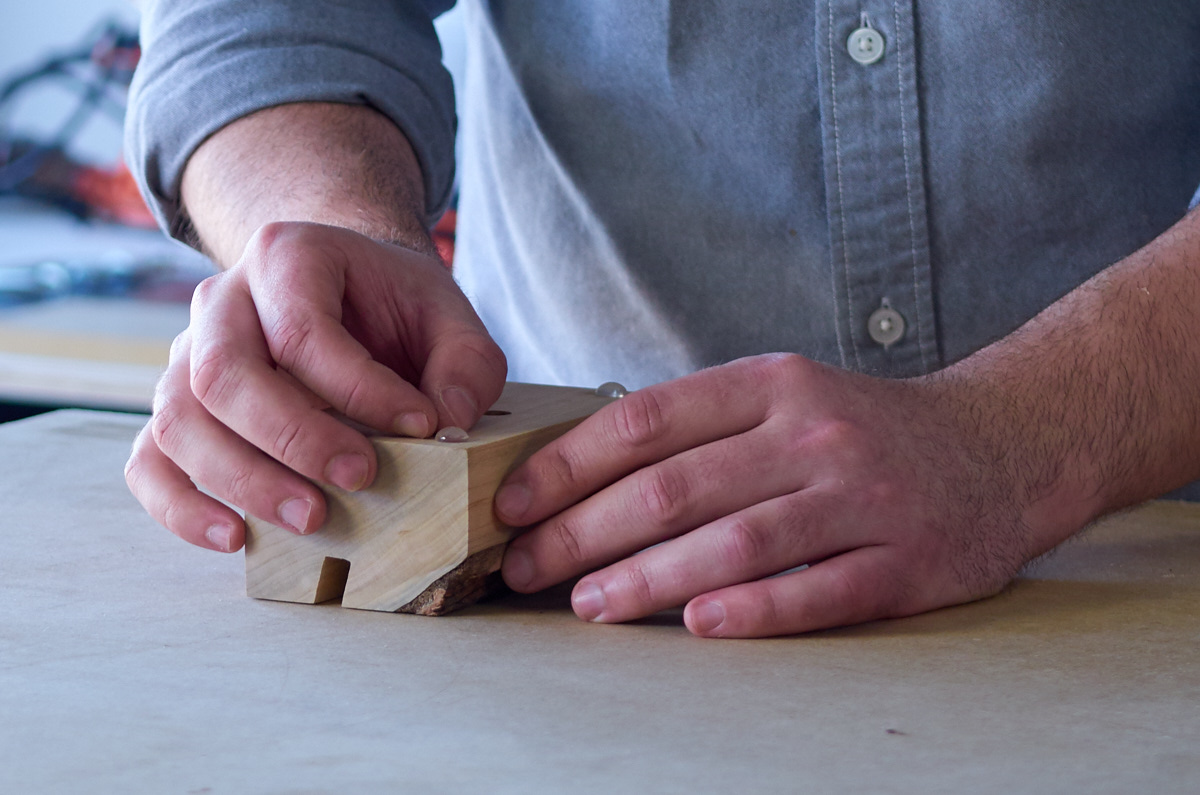
Step 7. Sand the entire piece up through 220 grit, and finish with Danish oil, following the manufacturer's directions. After allowing your project to cure, add 4 rubber feet to the bottom. This allows you to raise the charging station up a bit, so the cable can slide underneath without any wobble.
Boom! You're done. Check out how sweet this thing looks:
This post is sponsored by DIYZ, but all opinions are mine alone. Thanks for supporting the brands that make ManMade possible.
A well organized shop is a productive shop. But we all know that as our skills and interests grow and change and our projects vary, its nice to be able to switch out grab-able tools and organization systems to meet the needs of what we're currently working on.
Linn from Darbin Orvar definitely understood the benefit of a flexible system, so she sought to fill up an open space above an auxilary bench with a row of french cleats. This allows her to house all her tools and clamps and accessories on the same mounting system, providing complete interchangeability for however she wants to position things. It's like pegboard, but stronger and much more flexible.
One of my favorite cocktail mixers is the spicy ginger beer, used for the summer favorite "Moscow Mule", or evening sipper, the "Dark and Stormy." But I've had enough of the spendy, over-sweetened bottles from the supermarket, so I figured: it's time to make our own. Here are three ways to make an extremely tasty version happen at home. With an affinity for making things, it should be no surprise that I love mixed drinks. There are hundreds of combinations that fit just about any palate, from spicy to sweet, and sparkling light to syrupy dark. With just a handful of spirits and a few mixers, everyone in the room can find something they love.
1. Ginger Beer Concentrate - This is by far the easiest way to make your own Ginger Beer at home. This version is reduced to a syrup that is mixed with carbonated water for that zip of ginger without the wait. If you're in need of a batch of ginger beer in a hurry, this can be completed and pouring in about an hour.
Ingredients - (makes about 32oz of concentrate)
1 1/2 cup ginger root
1/2 cup sugar, dissolved in 1/2 cup hot water (simple syrup)
1 cup fresh lime juice
3 cups filtered water
2 tsp aromatic cocktail bitters (floral or spicy)
club soda for xixing
Flip top glass bottles for storage
Start out by roughly peeling the ginger skin off the fresh roots, then cutting it up into rough chunks. Add the ginger and 1 cup of the water into a food processor or blender and blend for about 2 minutes until fully chopped.
Transfer the ginger into a mesh bag or fine sieve and squeeze the pulp over a bowl until most of the water has been squeezed into the bowl. Transfer the ginger pulp back into the processor or blender add 1 cup of water and blend again for about 1 minute. Transfer the ginger again to the mesh and repeat once more until all three cups of the water have been pressed through the ginger pulp, discard the ginger.
Add the simple syrup, lime and bitters and mix well. Transfer the mixture to sealed containers (16oz flip tops) and keep refrigerated for up to a month.
To use, mix 3 oz Ginger Beer Concentrate with 6-7 oz club soda for a great tasting Ginger Beer.
2. Cold-Pressed Ginger Beer -Like the above recipe, this one involves pressing water through the ginger pulp for a smooth, sweet taste without much of the over-the-top spice. Using yeast to ferment give the fizz without the aid of club soda/sparkling water, but it takes a bit more time and preparation. Expect this brew to be ready in about 3-4 days.
Ingredients - (makes about 64oz)
1 1/2 cup ginger root
3/4 cup sugar, dissolved in 3/4 cup hot water (simple syrup)
1 cup fresh lemon juice
6 cups filtered water
4 tsp aromatic cocktail bitters (floral or spicy)
2 tsp Cuvee Champagne yeast (available at a brewing supply store)
1x 64oz Mason jar with lid (optional bubbler)
4x 16oz bottles with flip top
Start out by roughly peeling the ginger skin off the fresh roots, then cutting it up into rough chunks. Add the ginger and 1 cup of the water into a food processor or blender and blend for about 2 minutes until fully chopped.
Transfer the ginger into a mesh bag or fine sieve and squeeze the pulp over a bowl until most of the water has been squeezed into the bowl. Transfer the ginger pulp back into the processor or blender add 1 cup of water and blend again for about 1 minute. Transfer the ginger again to the mesh and repeat once more until three cups of the water have been pressed through the ginger pulp, discard the ginger.
Meanwhile, warm 1 cup of water to about 75 degrees, and gently sprinkle in the yeast. Set aside and let hydrate for about 5 minutes.
Incorporate the yeast mix, simple syrup, lemon juice, and bitters, then mix well. Add two final cups of water and mix gently before transferring to a large 64oz container. Either have a lid with bubbler attached to relieve the pressure, or "burp" the bottles at least daily to avoid explosion from pressure.
After 2 days, transfer the ginger beer to 16oz bottles and store in refrigerator after 6-8 hours at room temperature. This will stop the yeast activity and keep from building up too much pressure. Use within about a month, and use caution when opening.
3. Boiling Water Extraction Ginger Beer -Unlike the first two recipes, this method boils the ginger to really extract out the spicy flavors. Using yeast to ferment give the fizz without the aid of club soda/sparkling water, but it takes a bit more time and preparation. Expect this brew to be ready in about 3-4 days.
Ingredients - (makes about 64oz)
2 cups ginger root
3/4 cup sugar, dissolved in 3/4 cup hot water (simple syrup)
1 cup lemon juice, fresh
6 cups filtered water
4 tsp aromatic cocktail bitters (floral or spicy)
2 tsp Cuvee Champagne yeast (available at a brewing store)
1x 64oz Mason jar with lid (optional bubbler)
4x 16oz bottles with flip top
Start out by roughly peeling the ginger skin off the fresh roots, then cutting it up into rough chunks. Add the ginger and 1 cup of the water into a food processor or blender and blend for about 2 minutes until fully chopped.
Add the ginger and 4 cups of water to a large saucepan and bring to boil for 5 minutes. Turn the heat to low and add lemon juice and simple syrup. Simmer for 10 minutes, then turn off the heat and let the mixture cool.
Meanwhile, warm 1 cup of water to about 75 degrees, and gently sprinkle in the yeast. Set aside and let hydrate for about 5 minutes.
Once the ginger mixture has cooled below 75 degrees, add the yeast mix, and bitters, then mix well. Add the one final cup of water and mix gently before transferring to a large 64oz container. Either have a lid with bubbler attached to relieve the pressure, or "burp" the bottles at least daily to avoid explosion from pressure.
After 2 days, transfer the ginger beer to 16oz bottles and store in refrigerator after 6-8 hours at room temperature. This will stop the yeast activity and keep from building up too much pressure. Use within about a month, and use caution when opening.
With those options on how to make your own ginger beer, there is really no reason you can't do it yourself. So take an afternoon and a bit of ginger and get your home bartending skills bumped up a notch with handcrafted mixers.
In summer, light breathable cotton works wonders to keep you cool, but as fall and winter weather approaches, it's time to turn to more heavy duty fabrics to keep the wind and water out - wool, leather, synthetics, and canvas. While canvas can be made of cotton or linen as well, its heavy-duty plain woven texture makes it much more suitable for the changing weather. And you can turn any canvas piece - a jacket, a pair of pants, a hat, a bag, whatever - into some seriously weather resistant with a simple dressing of wax.
Taylor Stitch, a San Francisco-based outfitter who creates canvas outerwear, offer this helpful video about adding a wax dressing to an existing garment. The process is pretty simple, and they provide plenty of tips for getting the dressing into key areas, like seams and pockets, where water can seep in.
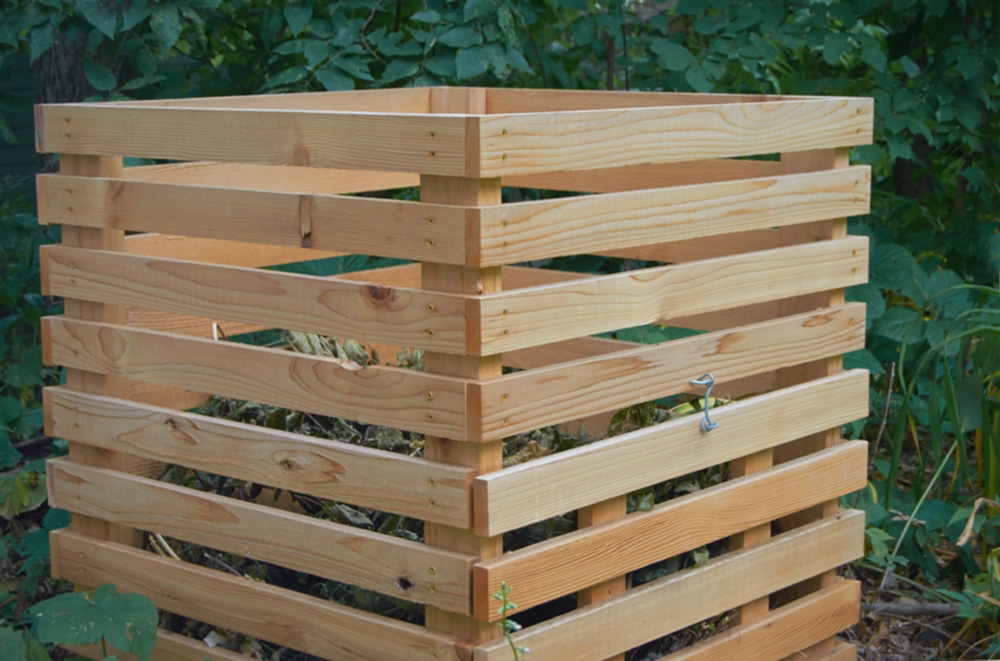
Composting. Maybe you've heard of it? It's kind of a thing. It's no longer the sole purview of hippies, weirdos, and 7th-grade science teachers Composting has gone mainstream, and that's a good thing. Don't worry, we're sure your 7th grade science teacher will find another weird hobby to call their own.
Anyway, if you've been looking to get into composting, but don't love the look of boring, plastic composting bins, then this is the post for you. We're going to make an elegant, functional, totally-not-weird-looking compost bin. And we're going to have fun doing it! Pay attention, because at the end of class there will be a quiz! Oh, wait, no, that's something else. Let's get started!
We teamed up with our friends at the DIYZ app for this and several other projects this year. DIYZ gives you access home improvement and DIY instructional videos right on your phone; it's cool!
DIYZ is THE DIY app for getting detailed step-by-step project instructions and how-to videos that can help you complete your home repair or renovation without having to hire a professional handyman or contractor!
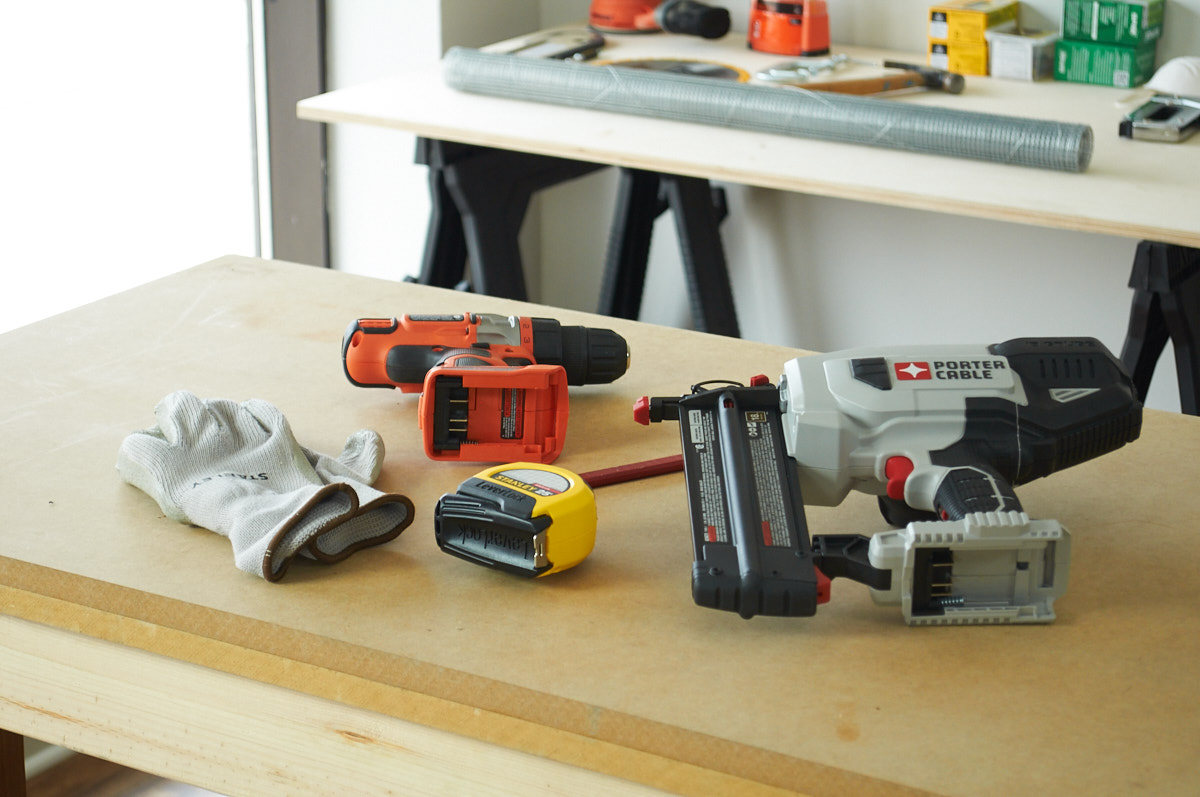
Tools and Materials:
Dimensional cedar or redwood lumber:
Two 2x4s, 8' long
Twelve 1x3s, 8' long
Galvanized screws, #8 x 1 1/4”
Galvanized screws, #10 x 4”
Galvanized hinges
Hook & eye latch
Miter saw
Cordless drill and drill bits
Brad nailer (optional)
#2 Phillips screwdriver
Tape measure
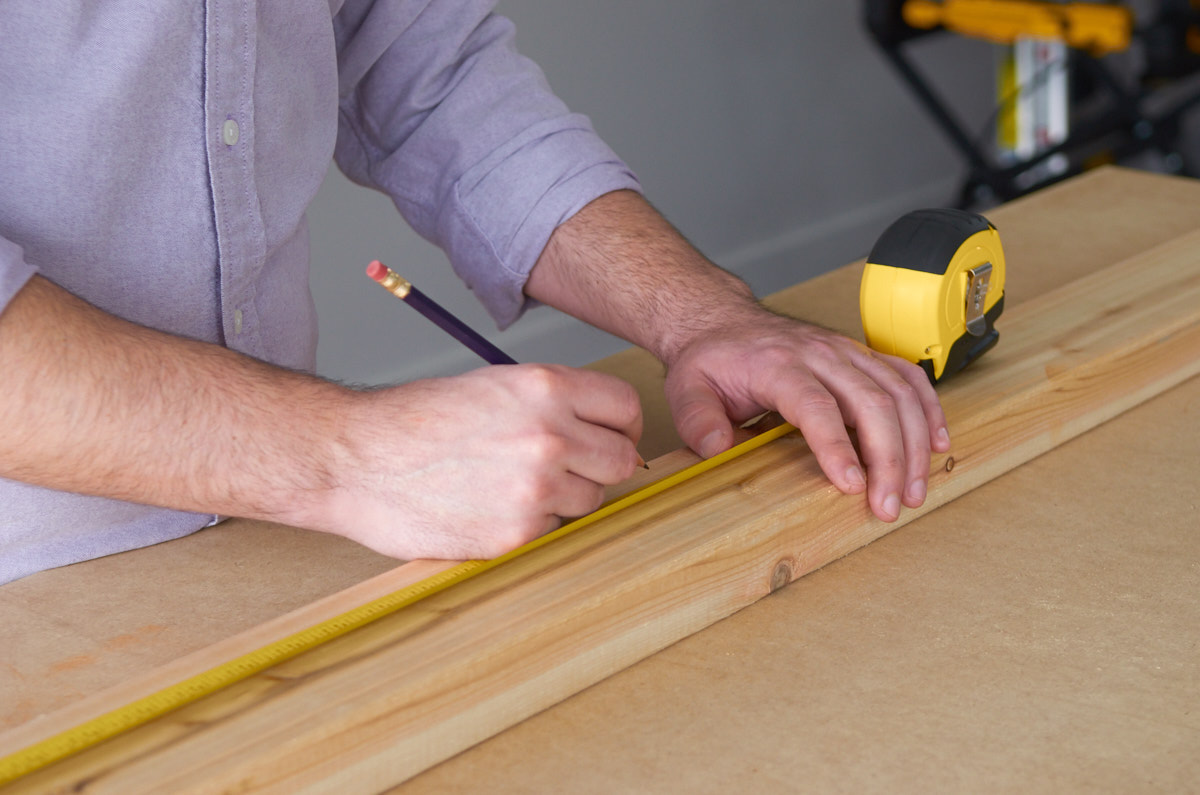
Step 1: Cut your parts
Grab your tape measure, pencil, and a crosscut saw, and mark and cut all parts to length.
From the 2x4s:
Cut four pieces at 32 1/2”
(vertical supports)
Cut one at 27"
(cross support at the base)
From the 1x3s"
Cut eighteen pieces at 31”
(front & back slats)
Cut eighteen pieces at 29 1/4”
(side slats)
Cut two pieces at 13 1/4”
(door brackets)
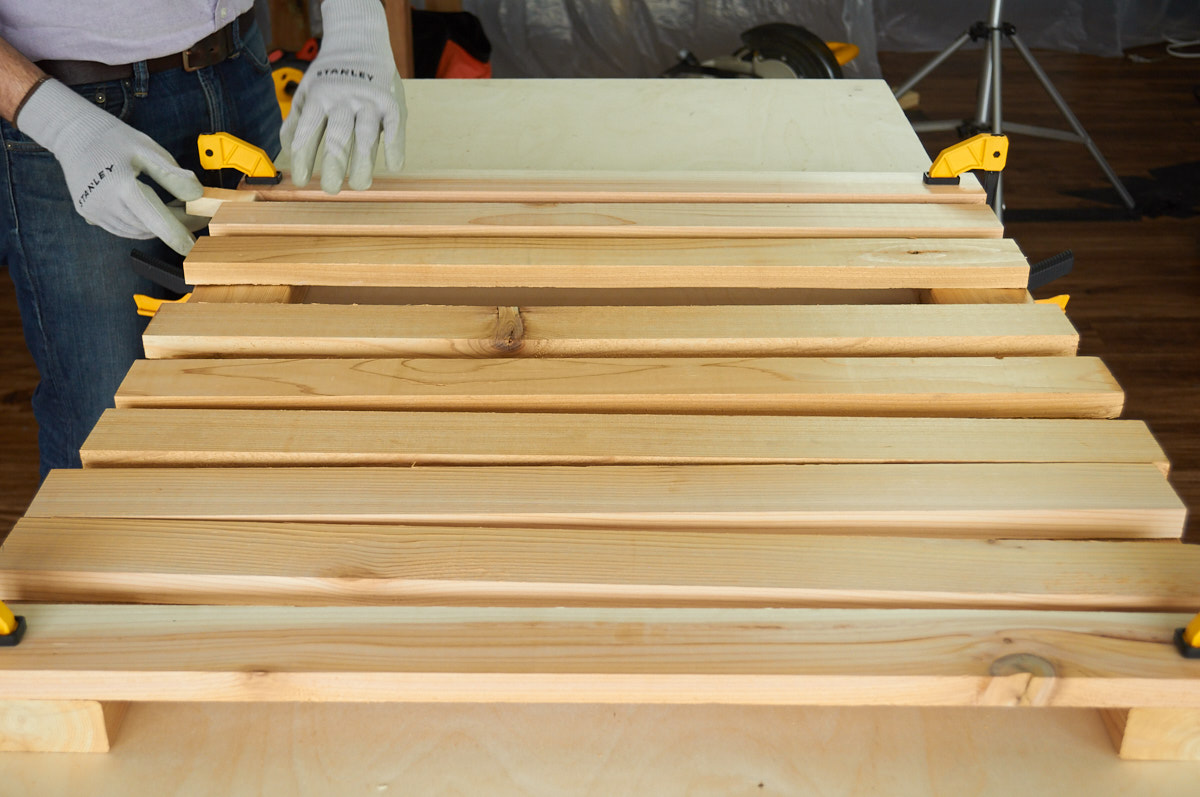
Step 2: Assemble the sides
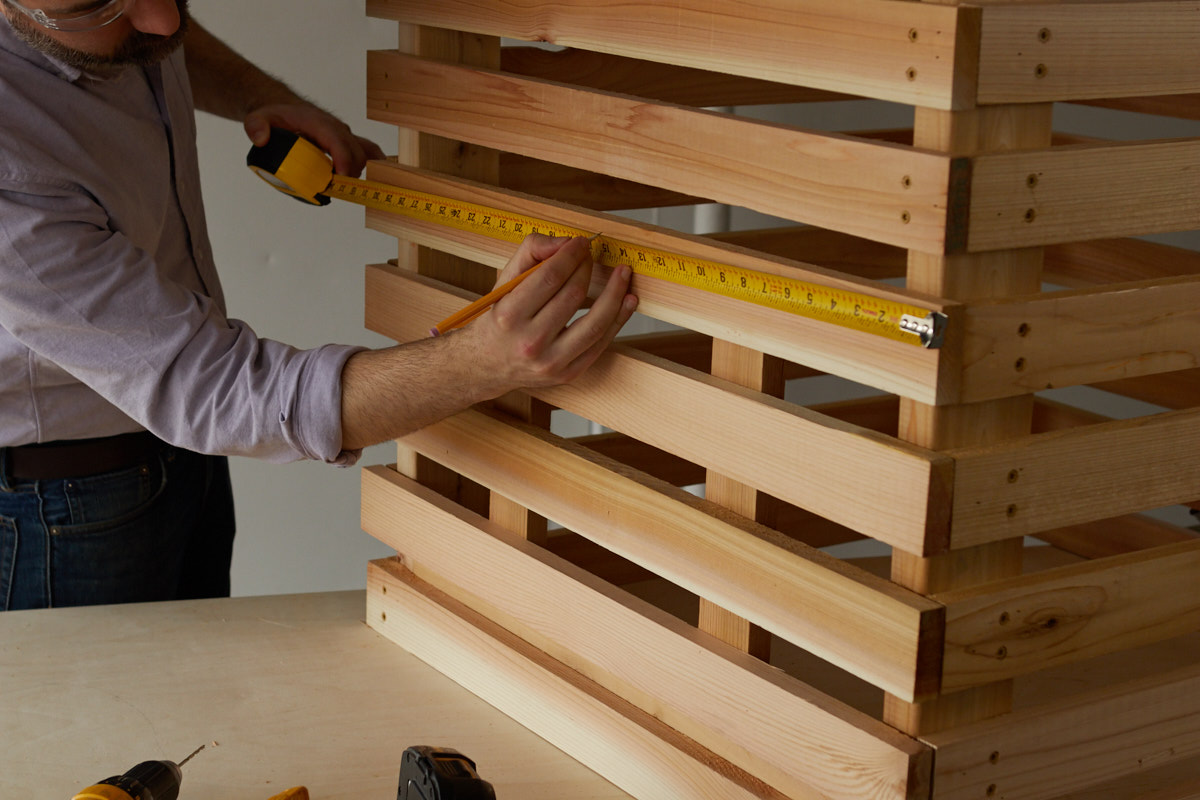
Lay two of your vertical supports flat on your work surface. Take nine of your side slats (29 1/4") and place one flush with the top, and one flush with the bottom. Then, evenly space the remaining slats along the height. A spacer block can help (ours was about 1 1/4"), but don't be too exacting. Your eyes are your best tool here.
If you have a brad nailer, use it to tack the slats into place. If not, clamps can help a lot. Now mark your pilot hole locations. Make two points on each end of each slat, 2 1/2” from the outside, and one 3/4” from the top, and 3/4" from the bottom. Drill a pilot hole at each mark using a #8 countersink bit. Attach the slats using the 1¼” galvanized screws.
Repeat the process for the second side.
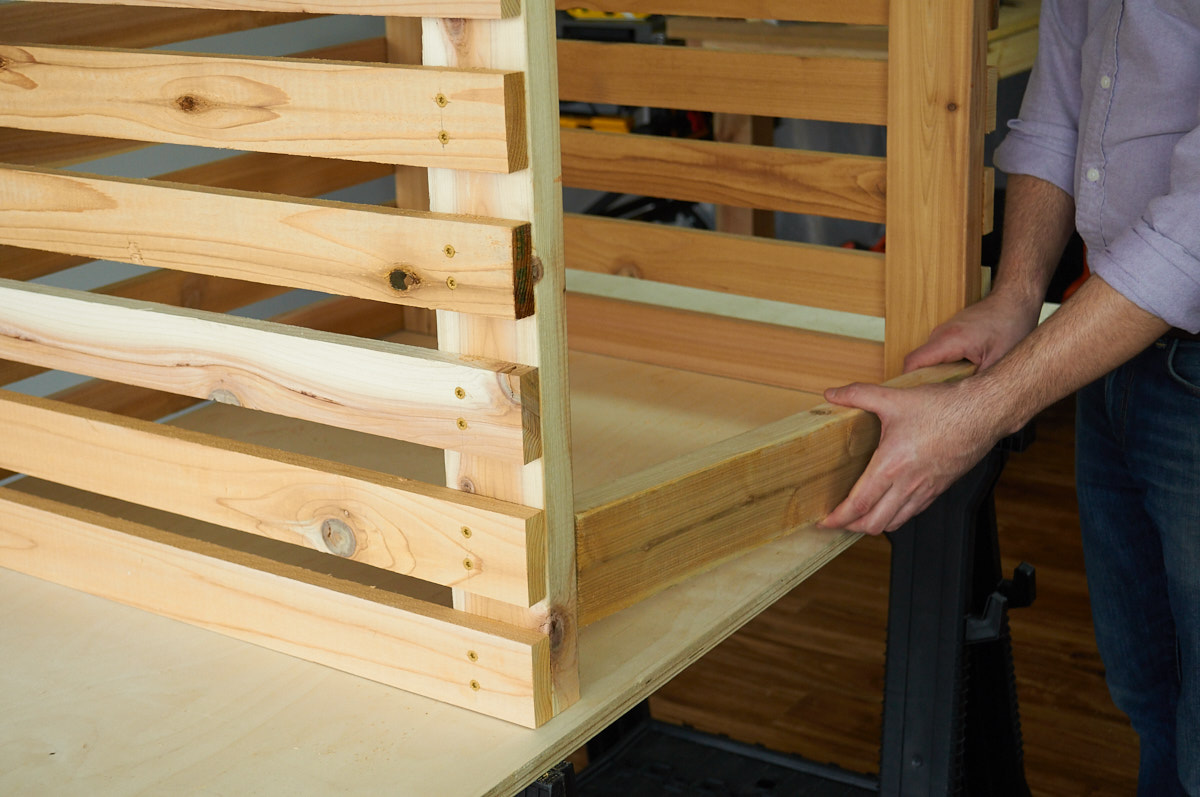
Step 3: Add the back
With the sides assembled, we'll connect them via the back slats. Stand the sides up on end, and prep nine of your 31" slats. Using the spacing on your sides as a guide, attach the back slats one at a time. They will be flush with the face of the side slats, covering the end grain. Nail them into place, then mark and drill two countersunk pilot holes on each end of each slat, following the process in step two. Attach the slats with galvanized screws.
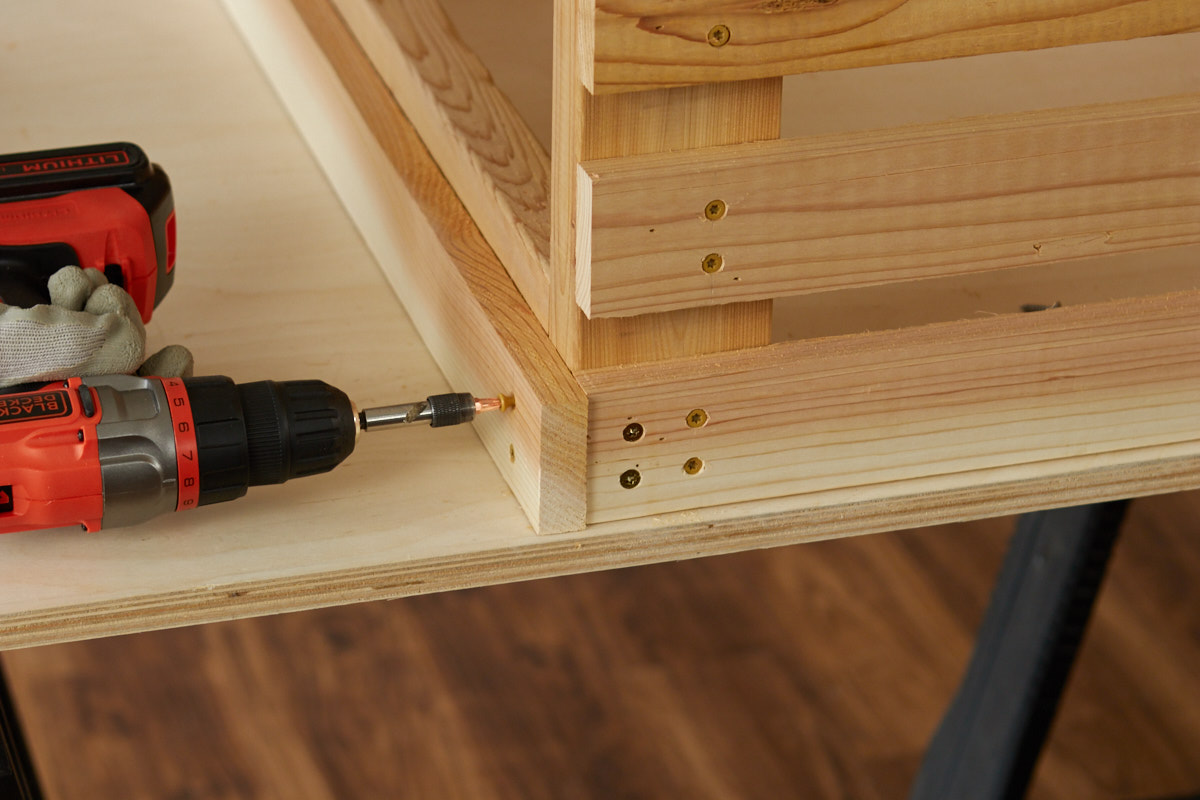
Step 4: Install the bottom cross support
Take your final piece of 2x4, 27" long, and lay it in between the two vertical members of the front. You'll probably have to wedge it in there. That's a good thing; it should bring the whole frame into square.
Drill pilot holes through the slat, the vertical support, and into the end grain of the cross beam using a #8 countersink bit. Then attach the cross beam using 4” galvanized screws.
Then, add a slat to the cross support, flush with the bottom.
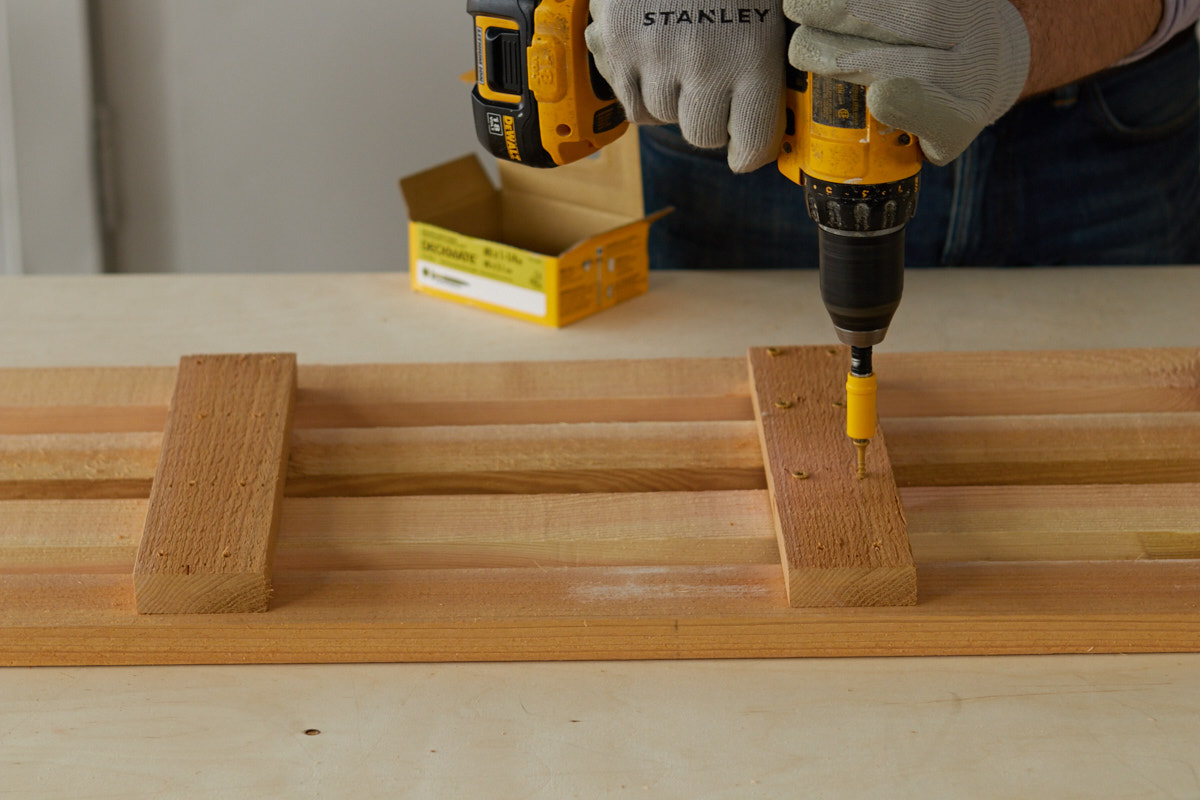
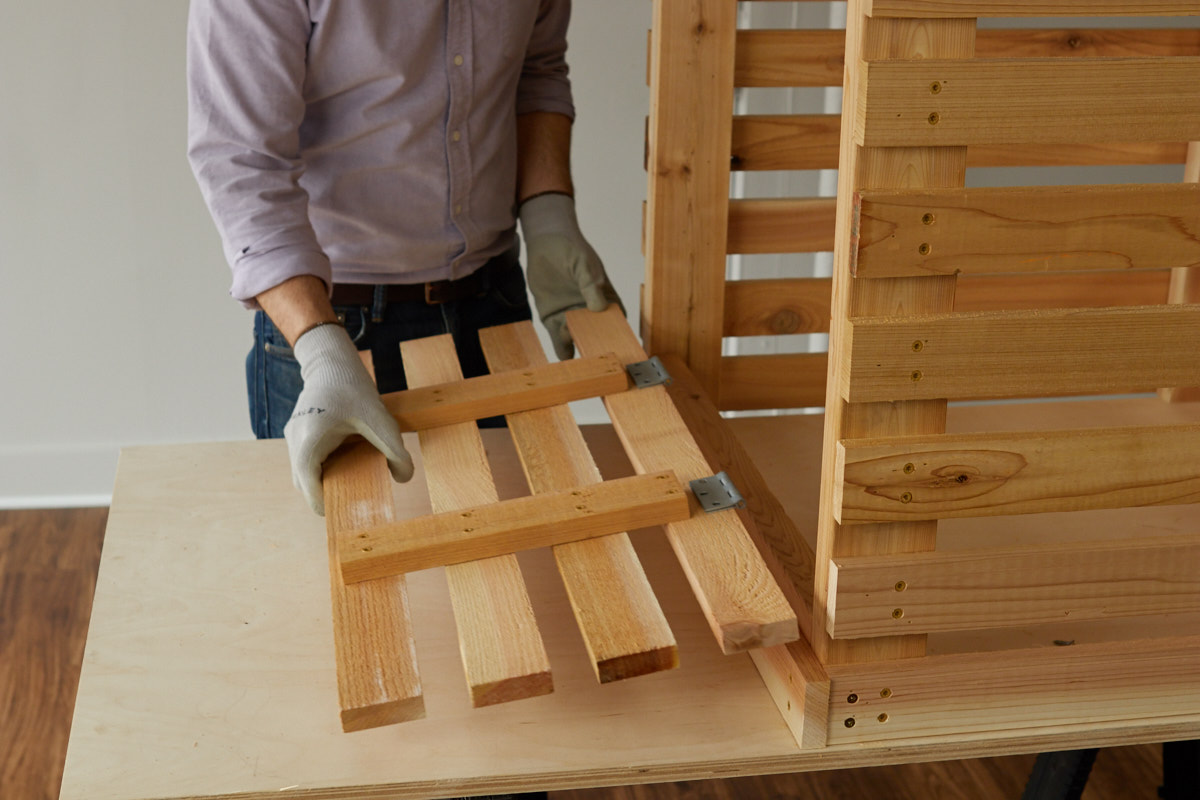
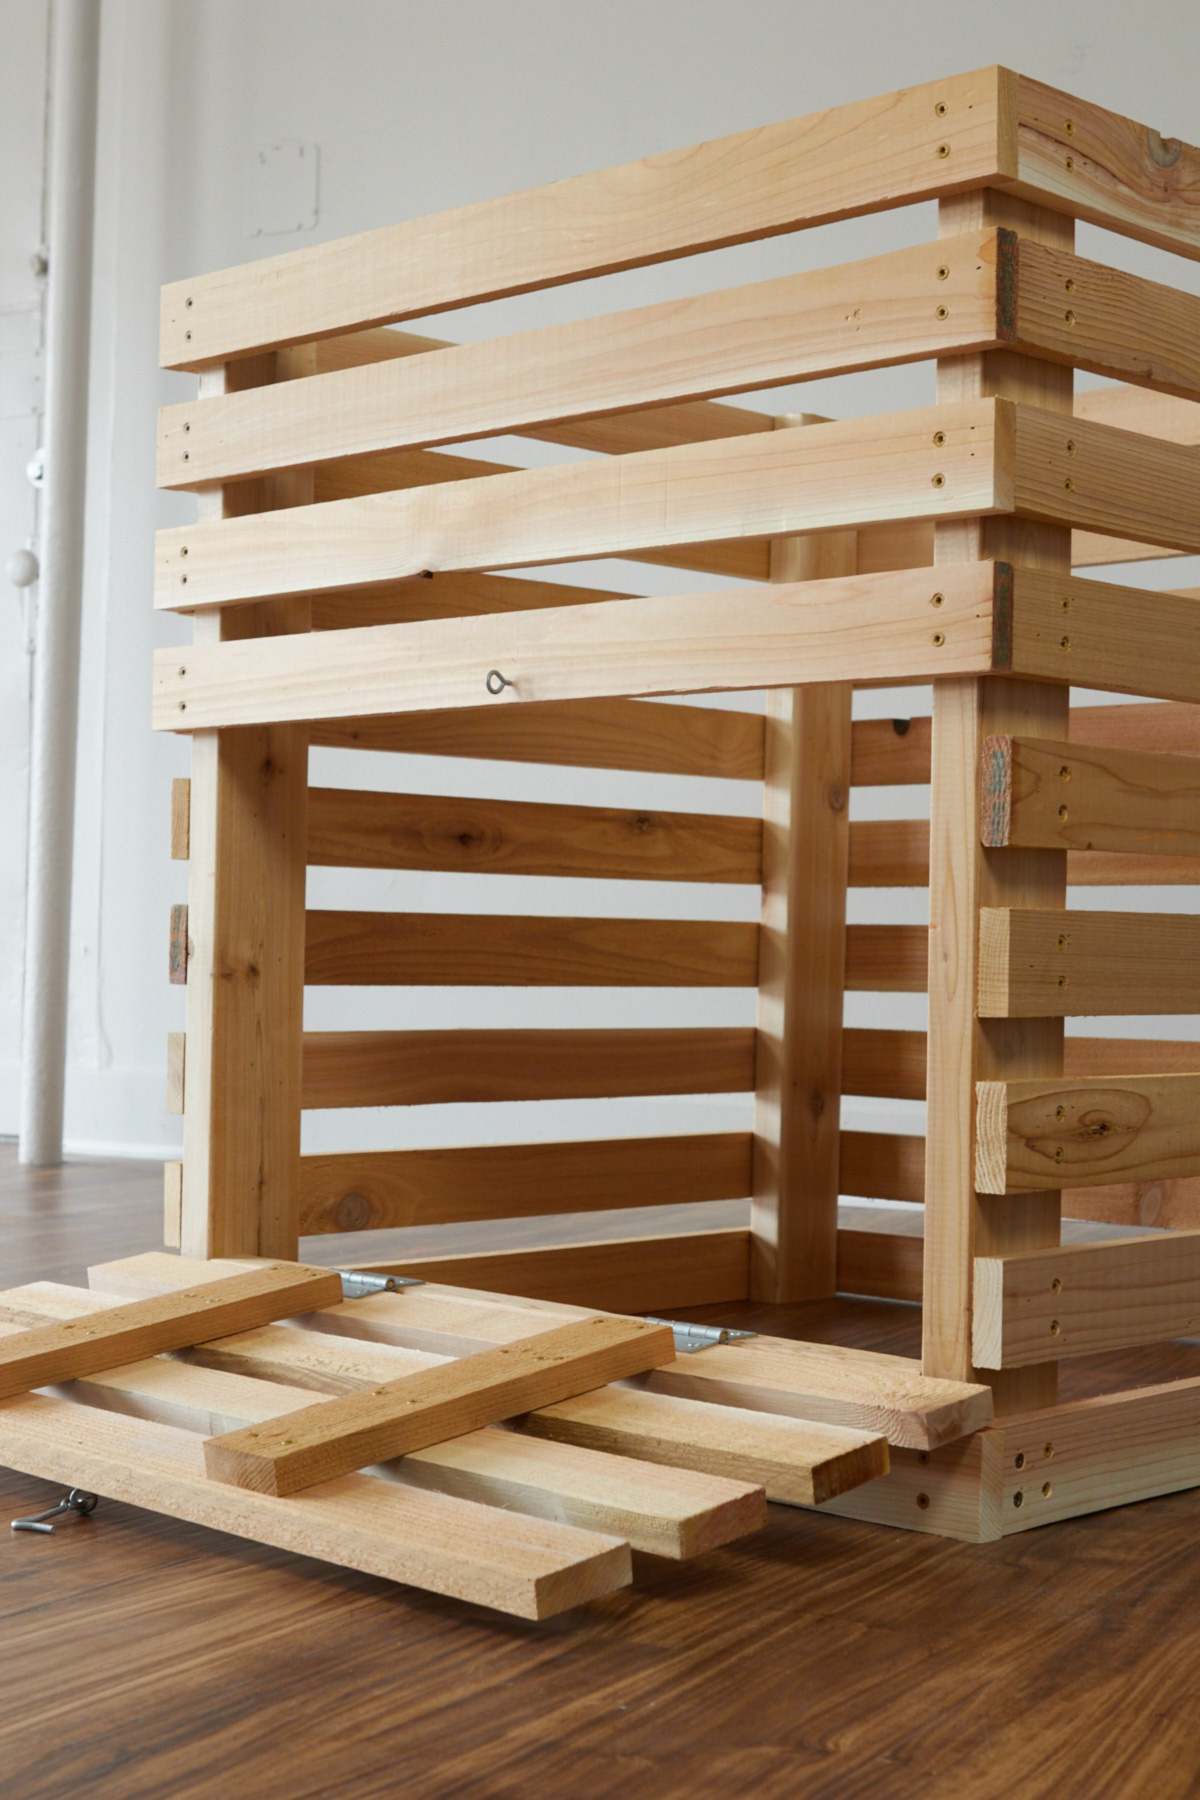
Step 5: Assemble the door
Okay, now let's build the door. This gets added to the bottom, so you can access the compost that has broken down further inside the pile — the really good stuff.
Lay out four front slats, with the same spacing as the rest of your project. Then, place the two door brackets across the slats. Tack into place, then secure the bracket into each slat with two screws per slat (sixteen in total).
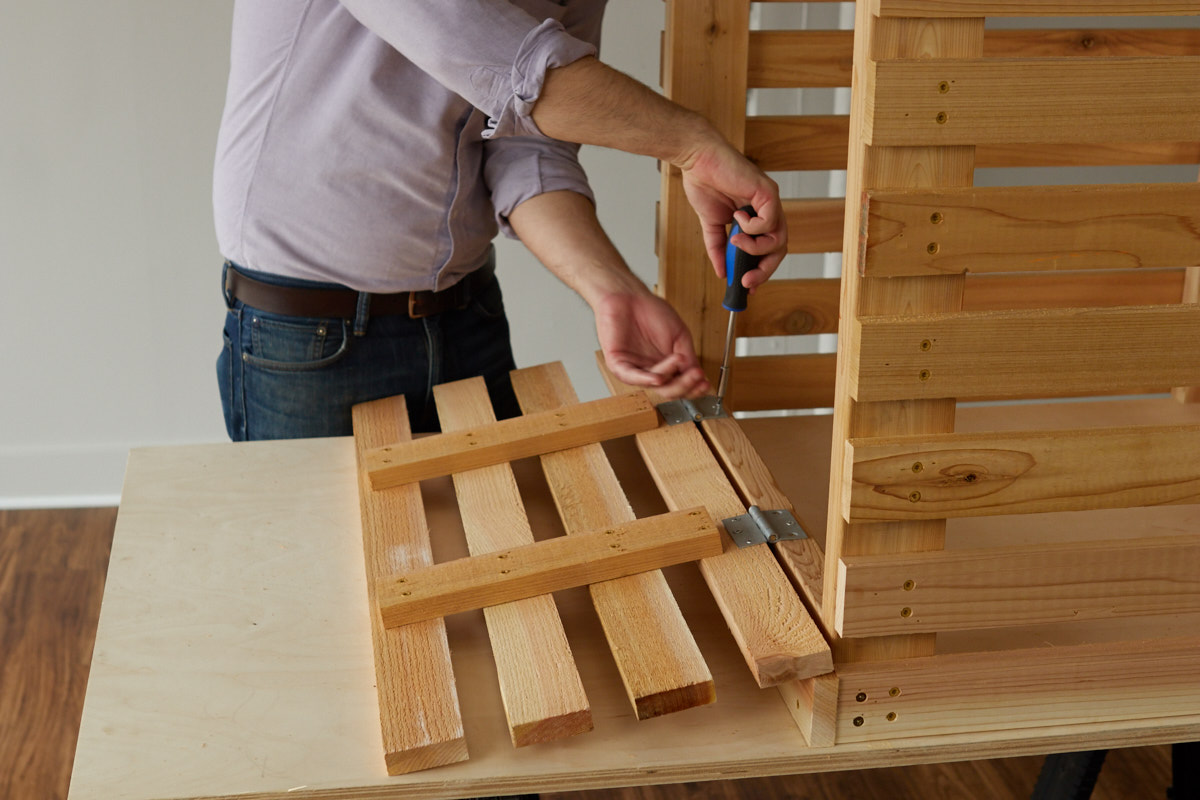
Step 6: Attach the hinges to the door
Place the two galvanized hinges, spaced the same as the vertical door brackets, onto the bottom slat of the door. Mark the location of the screws, drill pilot holes, and attach using the provided hardware.
Step 7: Attach the door to the cross support.
Place the door with the remaining hinge plate on the 2x4 cross support. Space the hinges so the bottom slat of the door lines up with the second slat of the sides. Mark, drill, and attach with screws.
Step 9: Finish the slats
Screw on the remaining slats in the top four positions on the front.
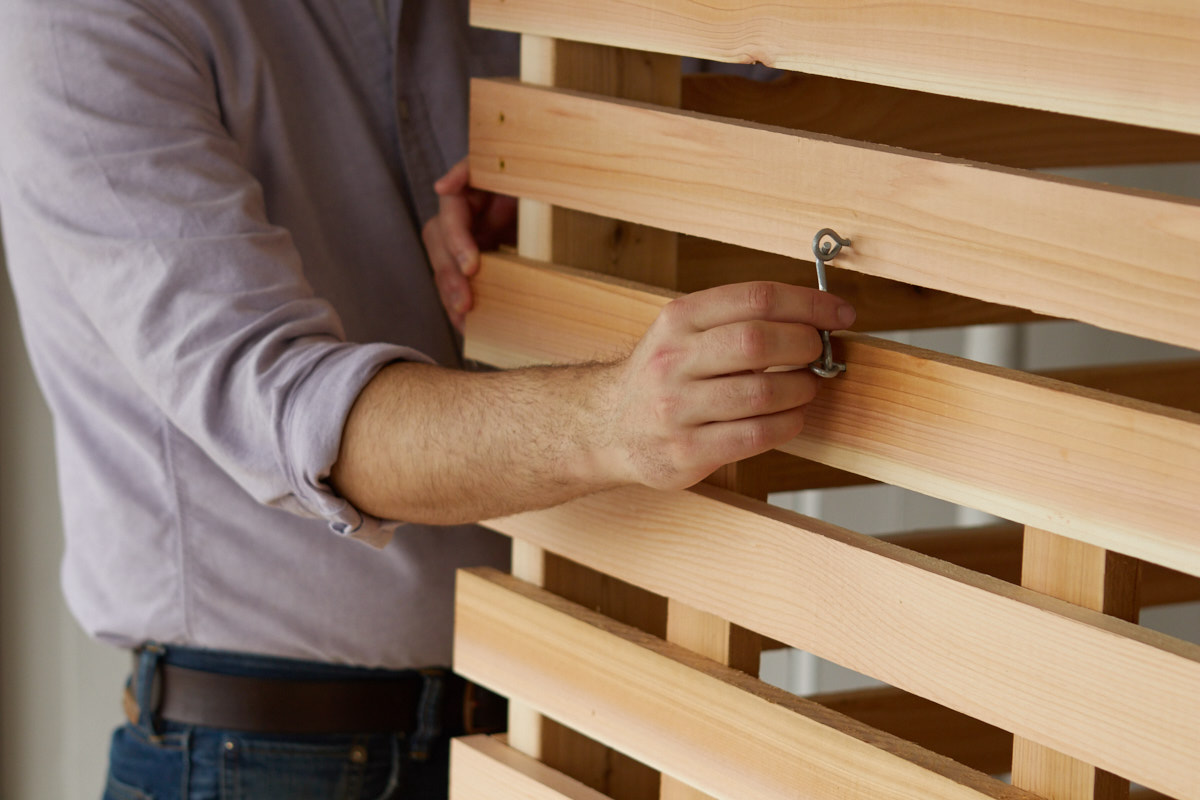
Step 10: Add the door latch
With the door in its closed position, mark the center point of the top door slat (the center slat across the whole face). Using your hook and eye latch as a guide, lay out your attachment points for each side of the fastener.
Drill matching pilot holes, then screw the latch into place.
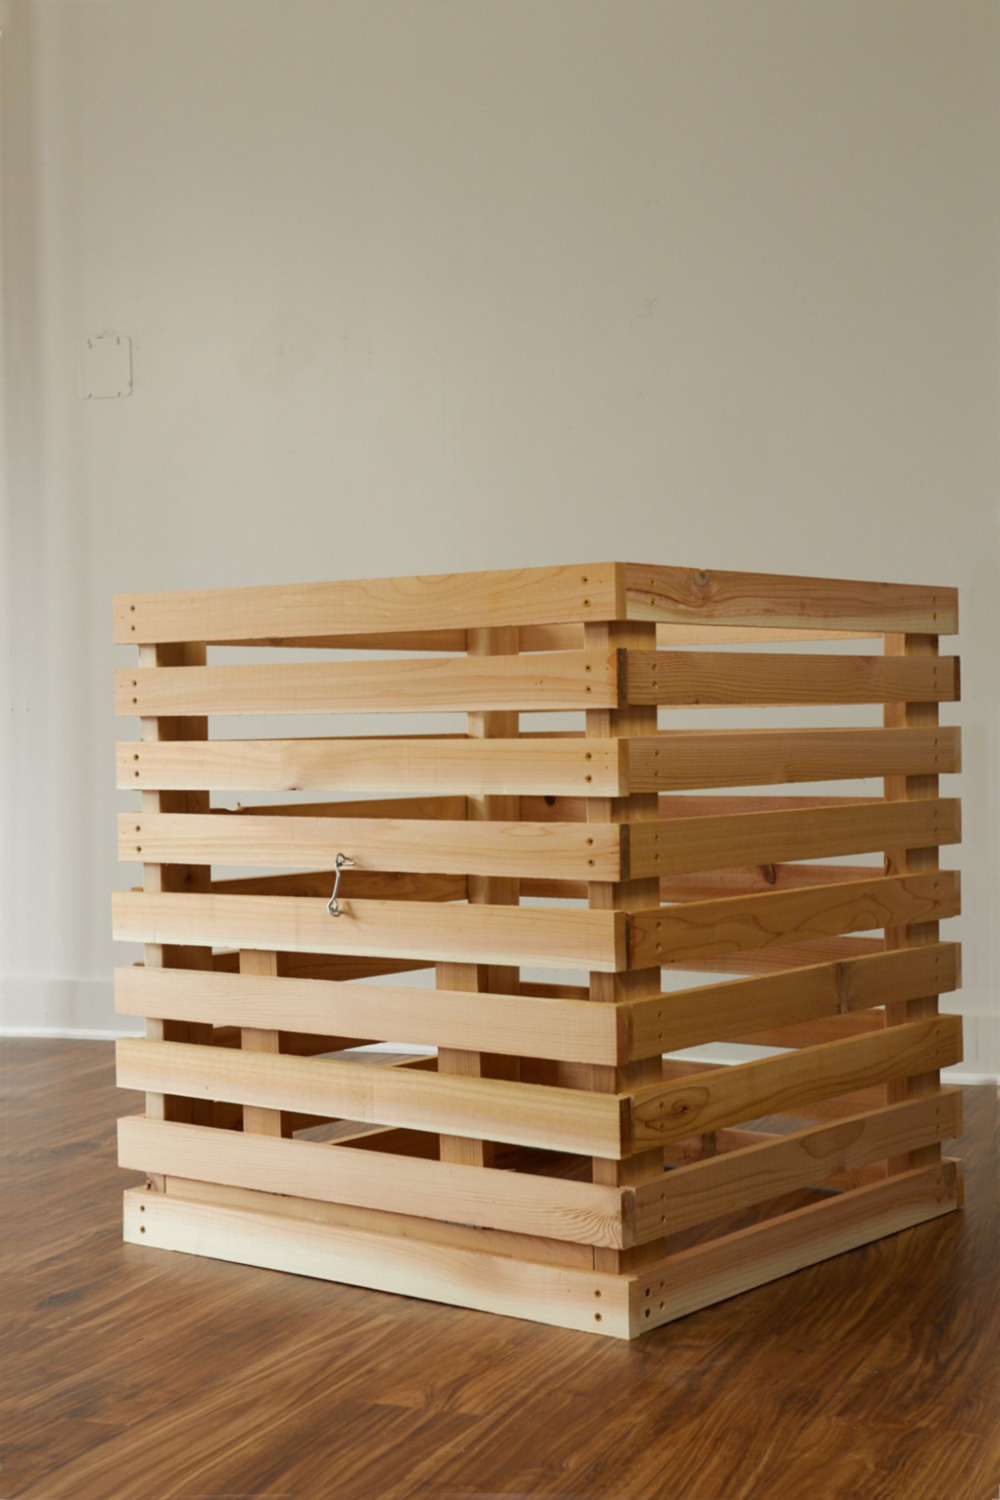
Now your compost bin is ready to go out in the yard. The cedar is naturally water and weather resistant, so you don't have to worry about it rotting. You can fill this up with yard clippings, leaves, and even kitchen scraps. The bottom door makes it easy to unload the composted material for use on your garden, flowerbeds, or lawn.
Hey! Guess what? This is a sponsored post on behalf of DIYZ, but all opinions are very much my own. We think DIYZ is a great app for helping people get projects done right, and we thank you for supporting the brands that make ManMade possible.
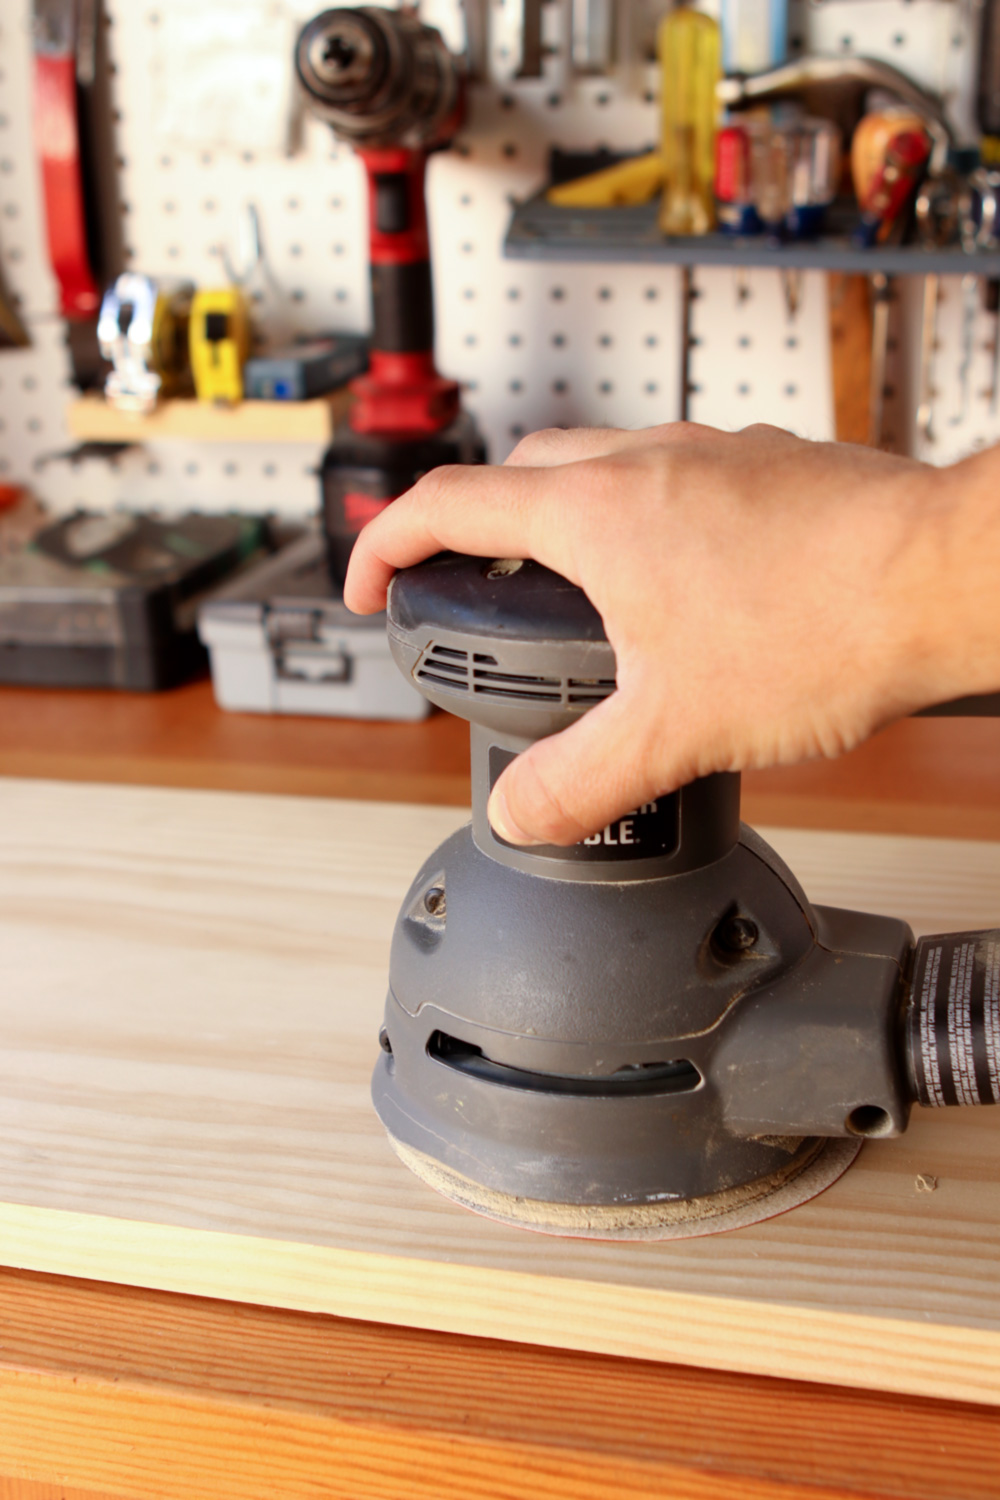
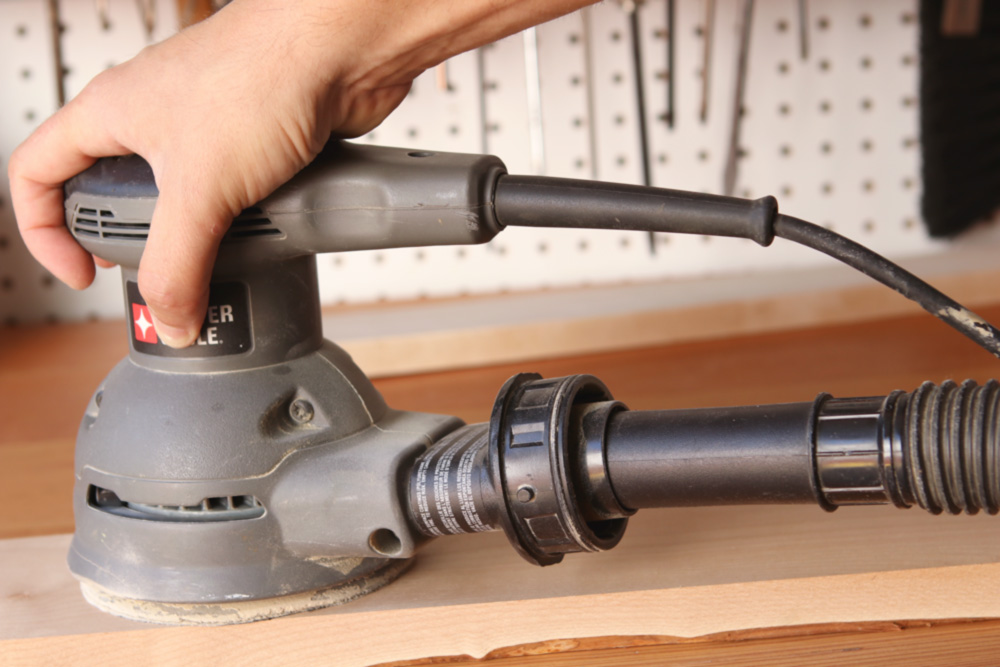
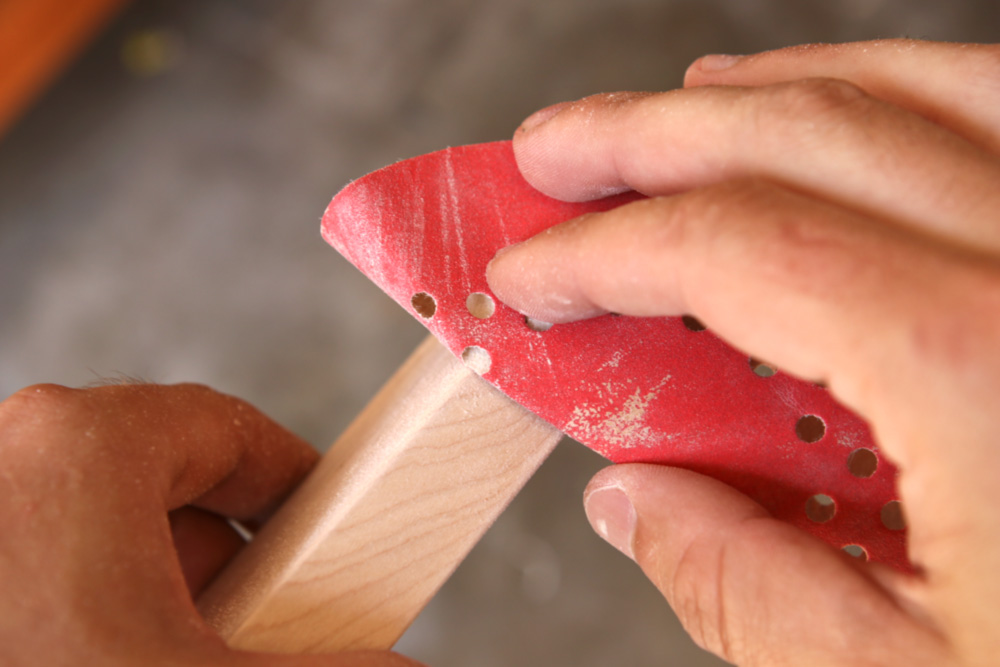
The random-orbit sander is one of the first tools any maker or DIYer should own. In fact, I can't think of another powered tool that I use more, on nearly every project involving wood. The design is simple, and right there in the name - they move, in a random circular pattern, to sand wood.
A huge improvement over its predecessor, the pad or orbital sander, these guys use special shaped sandpaper disc to get your project smooth fast and with minimum swirl marks. Well, at least faster than sanding by hand, and with much less energy. But with great power comes great...opportunity to mess things up. These wondertools work, but there are several tendencies and missteps that can be totally avoided with just a little knowhow.
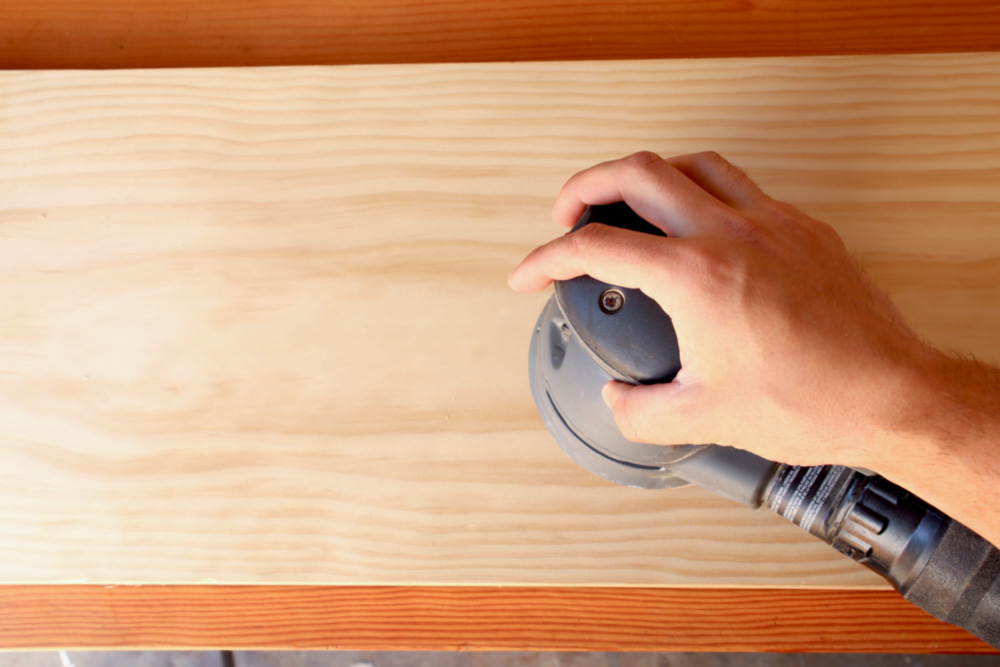
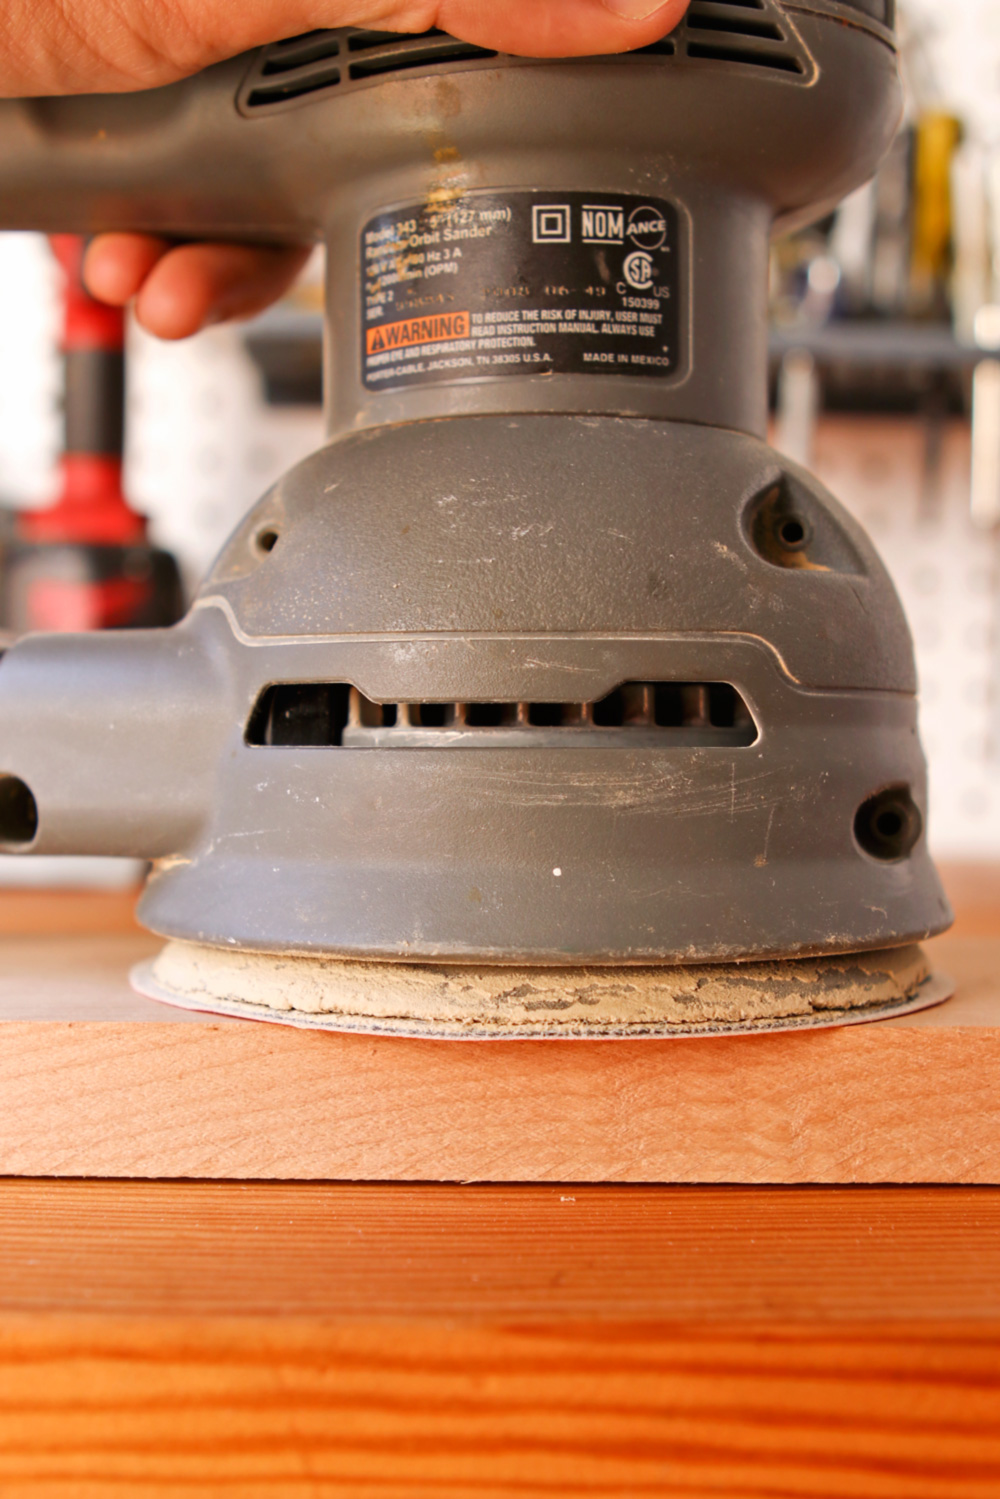
1. Slow Down.
If you're accustomed to hand sanding or using a belt sander where you constantly keep things moving, this one can take a bit of a perspective shift to wrap your head around. But - random orbit sanders are designed to be used extremely slowly. Not quite a snail's pace ...but perhaps an ant's.
So, what's the ideal speed? About ten to twelve seconds per linear foot. About an inch per second. Really? Really.
This feels incredibly slow and tedious, and, admittedly, it is. But that's what it takes to let the random oscillations do what they're designed to do. This is the best way to reduce swirl patterns on the surface, and get a uniformly smooth surface.
2. Don't Press Down.
You do not need to add any pressure to the tool to make it cut properly. Don't bear down, even the slightest bit. The weight of the tool and your hand is enough to get the results you want. In fact, pressing down can bog the motor, slowing down the process and harming the quality of your surface. Just let the paper do the work.
3. Use a Vacuum. Every. Single. Time.
Connecting the tool to a shop vacuum not only cuts down on airborne dust in your workspace, it can actually help improve your random-orbit sander's efficiency. By keeping the suction going, you reduce the layer of dust that sits in between the wood and the paper. This allows the grits to be constantly in contact with your project, not the dust that you just removed. That means you can work faster, and get to smooth quicker.
4. Don't tilt your sander. Ever.
We've all done this, and we've all regretted it. I get it. When you see a high spot or a burn mark, it's natural to want to angle that sander a bit and bear down on the problem area to get it gone fast.
Avoid the temptation.Random-orbit sanders are designed to do one thing: make a flat plane uniformly smooth. (Or, technically, since the sandpaper is an abrasive, uniformly rough). Anything else, and you're just asking for a forehead slap. Don't do it.
Instead, use hand sanding or, if you have one, a hand plane to tackle inconsistencies. It doesn't take any longer, and your work will be divot free.
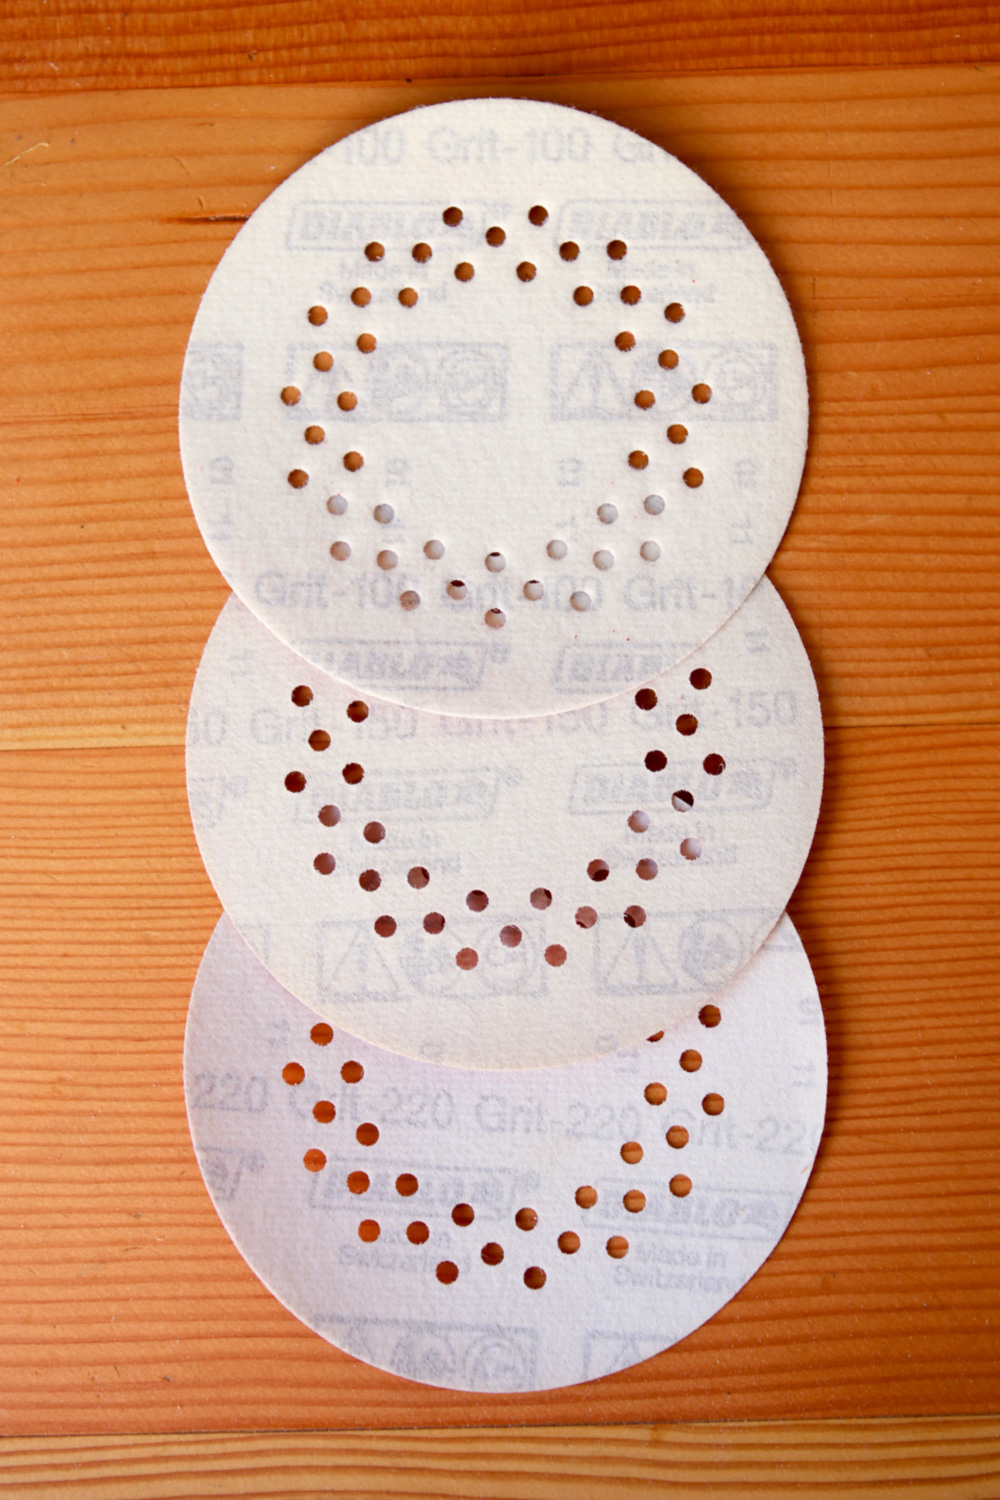
5. Use a variety of grits, but not all of them.
Sandpaper grits are designed to be used as a team, where each progressive grit removes the scratch pattern from the last one. This means you can't just toss on a super fine grit disc and get a finish quality surface without working your way up.
But you don't need to go all the way through 80-100-120-150-180-220-320. Buy your sanding disks in 100, 150, and 220. You can use the medium 100 for quicker stock removal, and the finer grits to prep the surface for finish.
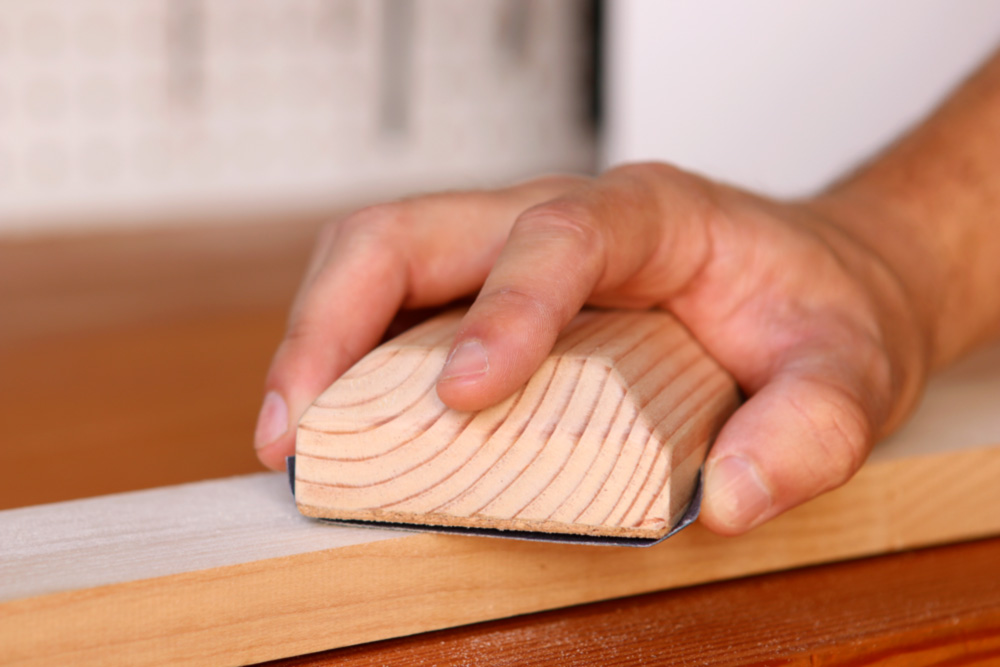
6. Always finish with sanding by hand.
You're never going to get a finish-quality surface with a sanding machine, at least on most hardwoods. Random-orbit sanders leave subtle swirl marks that can appear under finish even if you follow all the steps above.
7. Don't ask too much, or too little, from your sanding discs.
Sanding discs aren't cheap, but they cost less than nearly everything else in the shop. They're not precious, and certainly cost less than the wood used to make the project. Therefore, don't expect them to do more than they can. Once they've stopped cutting and have filled with dust, take them off the sander and replace. The time you spend moving sandpaper around that doesn't work anymore is much more valuable than the couple of dimes that a sanding disc costs. The good news is: you'll know when they're done. The results will start to speak for themselves.
Of course, you shouldn't toss them immediately. They'll have a second life for targeted sanding project, such as sanding curves and rounded surfaces by hand, and they especially work well on projects turning the lathe. I keep a pile around and use them whenever I don't have a sheet of paper already torn up, and I find they're often all I need for little tasks.
The random-orbit sander is an essential tool, even for the hand-tool only woodworker, and with a little care, it'll produce excellent results and save you the workout and hand cramps.
What are your favorite tips for using sanding machines? Please share in the comments below.
I can't say I can recall the ingredients on a basic can of shaving cream. It's pungent smell and pearly white appearance can only make one wonder if you're putting healthy chemicals on your face. Lucky for you, controlling what you put on your face is as easy as this recipe for your own jar of shaving cream.
Typical shaving cream can have soaps and other chemicals that dry out your face–hence the occasional need for aftershave. With this recipe you may find you will not need any kind of moisturizer when you're finished due to the natural properties of the oils (coconut, shea and almond) in the cream.
The best part about this recipe is your ability to customize the scent to your liking. Rosemary and mint is a fantastic idea, I'd also consider patchouli or lavender and cedarwood if you're looking for a scent that reminds you of the great outdoors, smoky camp fires and beards—oh wait—maybe not the beards thing if you're using shaving cream.
This weekend, I made a mess. A cover-the-entire-room-in-tiny-little-scraps-of-paper and a get-out-every-marker-and-cutting-tool kinda mess. It's still on the floor, on my office chair, on the main work table, on the computer desk, on my cutting mat, and its trail has seeped into the hallway. See, I've always been the kinda of maker that gets all the requisite tools and materials out so they'll be at hand, makes a huge batch of clutter until I've figured out what the project actually requires, then keeps making a big old mess until finished, after which I'll do a big sweep and scrub everything clean until the next project comes along.
I am not, as you can tell, following these guidelines by Erin Roberts for staying organized in the midst of a project. She says, "There's nothing quite like the feeling of looking up at the completion of a project and realizing that a once perfectly tidy room has been destroyed by some sort of crafting whirlwind. I am usually that whirlwind. I think a lot of us are usually that whirlwind. I've put together a few tips to help us all stay clean and organized during future projects. It certainly makes crafting more fun when it doesn't involve massive cleanup at the end!"
I'm certainly that whirlwind, but I totally planning on taking this completely reasonable, actionable ideas to heart. Next time. I've got to clean up first.


 Then, just wrap the plug end around the center a few times to make a simple bow.


 The gap between the top and bottom was just under 1". Of course, they don't really sell 1" thick wood - it's all 1 1/2" or 3/4" So I bough a 2x6 and planed it down to the appropriate thickness.
 ...using construction adhesive and 16-gauge finish nails to keep things in place.


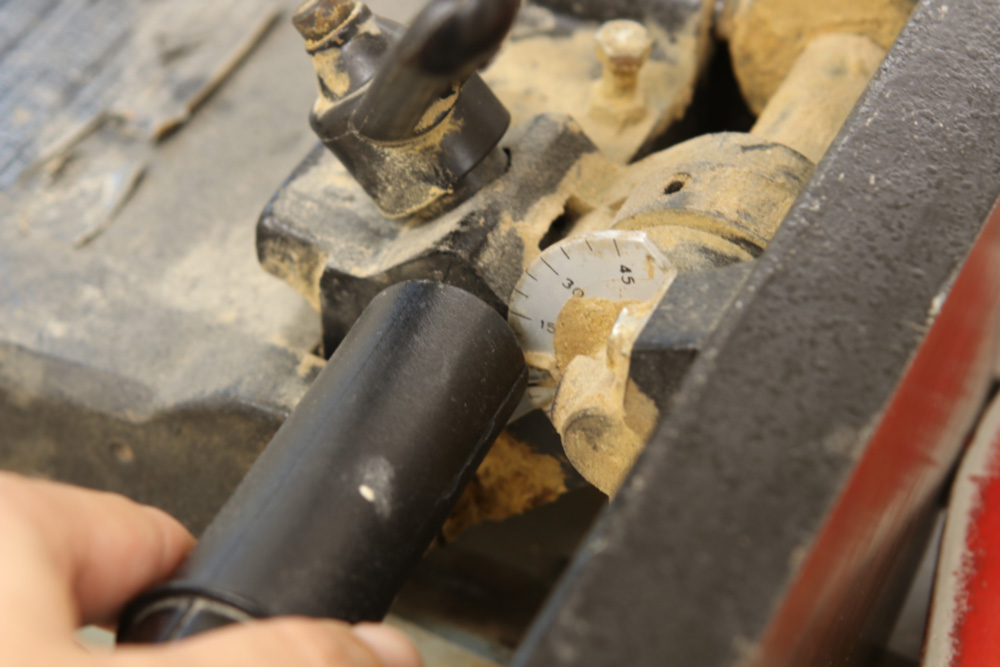
 A plastic putty knife proved to be the best tool to remove the caked-on, sawdust impregnated grease and crud. I needed to re-bevel it several times with my belt sander to keep the edge sharp.
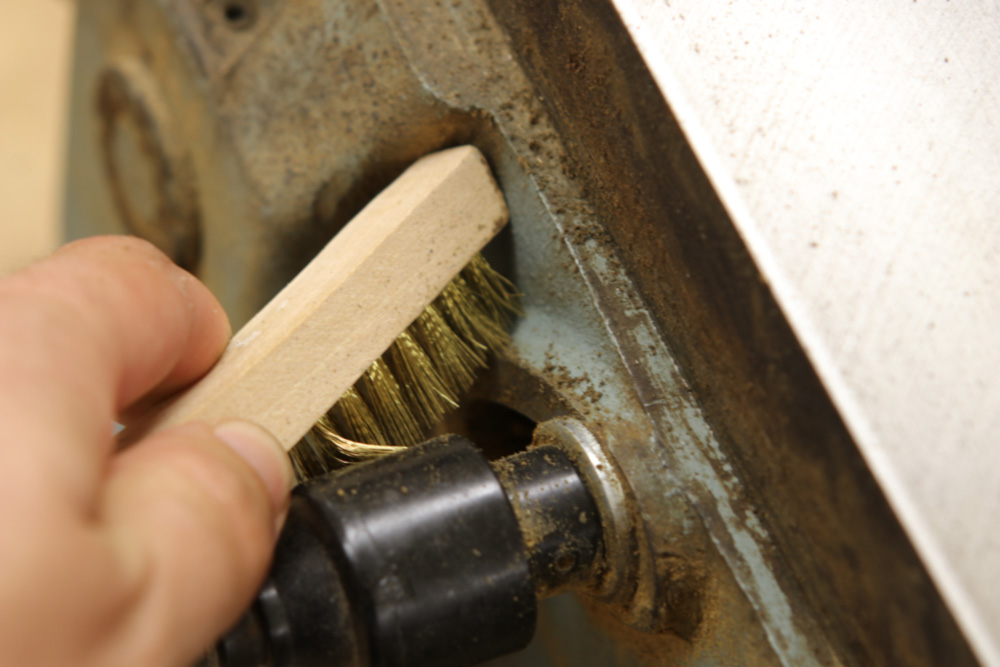
 ... and some 400 grit wet/dry sandpaper lubricated with oil to take off the heavier oxidation. I regreased and oiled everything and allowed it to penetrate overnight.
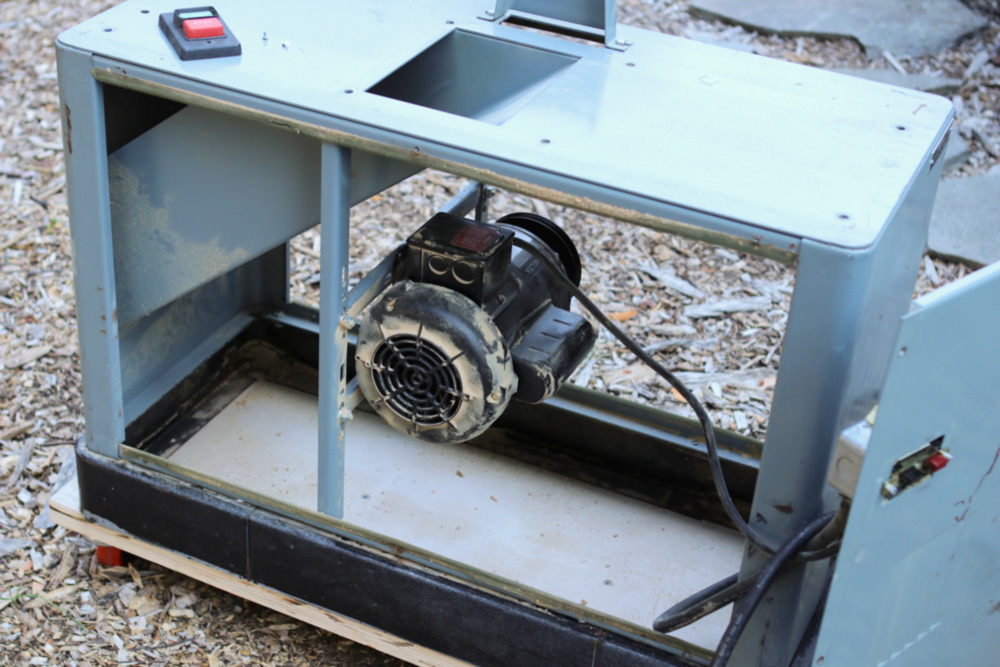
 Then, I taped and bagged off the motor and switches, and started painting.
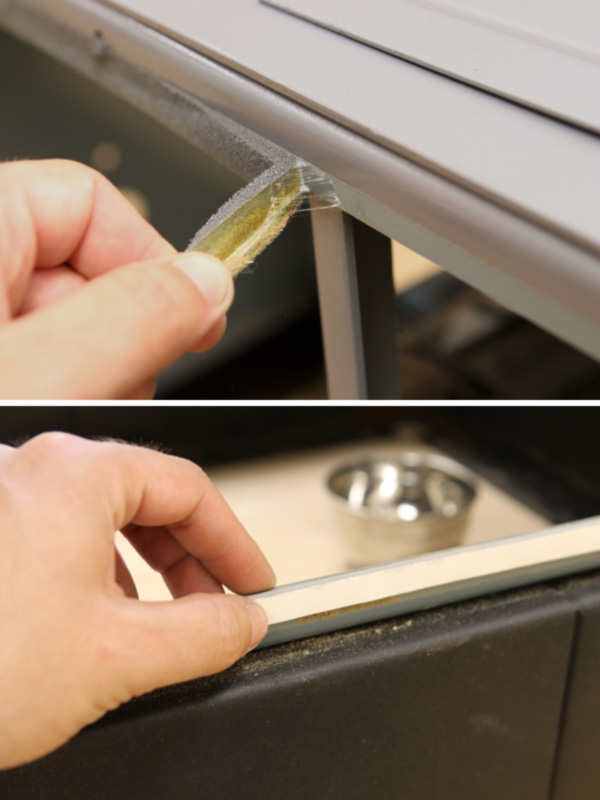


 Adjust the position of the work-piece along the fence and make another angled cut, aligned to the back of the thumb hole. Then, make several repeated passes and clear out the remaining waste. Before moving on, ensure this slot is wide enough to hold your device.


 A well organized shop is a productive shop. But we all know that as our skills and interests grow and change and our projects vary, its nice to be able to switch out grab-able tools and organization systems to meet the needs of what we're currently working on.


 Step 2: Assemble the sides
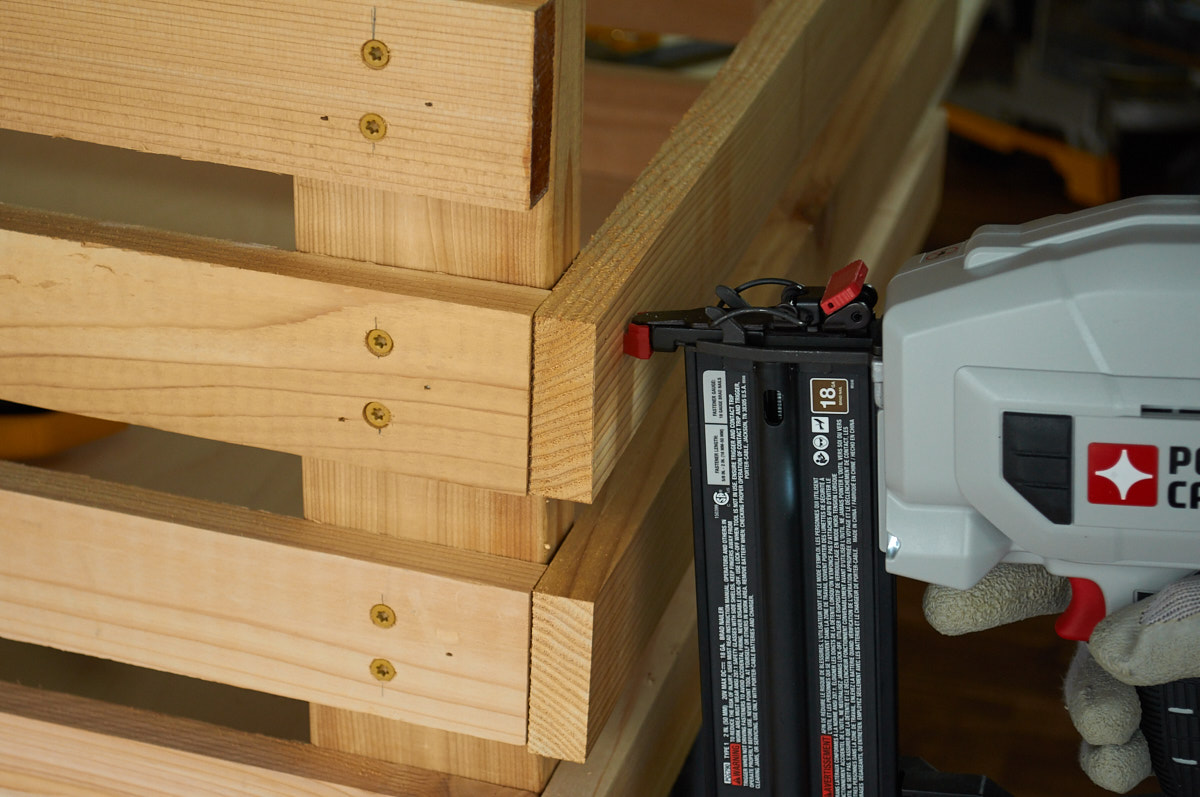


 This weekend, I made a mess. A cover-the-entire-room-in-tiny-little-scraps-of-paper and a get-out-every-marker-and-cutting-tool kinda mess. It's still on the floor, on my office chair, on the main work table, on the computer desk, on my cutting mat, and its trail has seeped into the hallway. See, I've always been the kinda of maker that gets all the requisite tools and materials out so they'll be at hand, makes a huge batch of clutter until I've figured out what the project actually requires, then keeps making a big old mess until finished, after which I'll do a big sweep and scrub everything clean until the next project comes along.


