Quantcast
Channel: Man Made DIY Recent Posts
Viewing all 2425 articles
Browse latest View live

Keeping Warm: 5 Masculine Blankets Worth the Investment

$
0
0

created at: 02/21/2013

I have no shame in saying it: I think blankets are great. If that's not manly, I don't care. Being cold is stupid, and being stupid definitely isn't manly either. I work from home, in a city that gets quite cold in the winter, and there's absolutely no reason to heat the whole house when it's only occupied by me, crunched up with my laptop. But you know what else I like? Picnics. And not freezing in case I have car trouble in the winter, or when I go camping. And snuggling up with my wife. (And pretending my urban townhome is a mountain cabin retreat...but, you know, personal preference). The common factor: blankets. So, I like 'em.   I also believe - like many things - it's worth investing in a nice one that will last you for decades, repel odors, dirt and other aspects of aging, and will never go out of style. So, here are five high-quality blankets that are masculine, have timeless styling, and just look like the kind of blanket a guy should have. Since they're an essential part of the winter edition of "10 Things Every Man Should Own," here are five that are worth the investment: 

1. Classic olive drab military blanket - $21.02 These guys have been made for hundreds of years, and they'll continue to be made for hundreds more. This affordable option is 70% wool and 30% "reprocessed" materials, likely acrylic, but that's more natural material than lots of the bedding out there. Plus at little more than two $20s, you can't lose. This one is nice and thin, and would fit well into a backpack or rolled up and stashed somewhere for emergencies. Plus, it's quite large, and would make a great source for cutting up to make sewing and other projects. Certainly cheaper than felt from the fabric store, and likely a higher quality.


created at: 02/21/2013

2. Faribault Foot Soldier - $250 Faribault has been making this blanket to the same specifications since 1917, but likely dates as far back as 1897. This 100% wool option was "originally designed to accommodate the widely varying temperatures of Cadet sleeping quarters, the 'double cloth' construction of this blanket results in a warm, heavy, yet breathable product." Shown here in a varsity-like maroon with stripe, but it's available in military green, grey, and cream. 

3. Old Hickory Wool Buffalo Throw Blanket by Pendleton - $160 I doubt I'll ever be able to pull off a lumberjack plaid in a shirt or jacket, but the classic red/black Pendleton might do the trick. "The ultimate bunk room blanket. Big, bold colors give attitude to this rugged yet refined blanket. It's a lofty yet down-to-earth statement for loft, lodge, cabin or kids' bunk room.


4. Woolrich Civil War Calvary Blanket - $109.00  Woolrich made the Civil War blanket and supplied it to troops from 1861-65. The current blanket is made from wool fabric bolts Woolrich mills for recreationist groups and movie studios for authenticity. The navy brings just a bit of color over an olive or grey, but is subtle enough to drape over a sofa or easy chair. 


5. Pendleton Yakima Camp Blanket - $119.00 86% Wool and 14% cotton keeps these camp blankets natural. "Camp blankets were first designed to meet the rigorous demands of the wild and untamed Pacific Northwest and were a favorite of the early sheepherders in the Northwest. Today, these warm and hardy blankets offer outstanding service and rugged styling that will provide years of warmth and comfort." I'll have one in each color.


[Top Image: Faribault Foot Solider Grey with Stripe]
This ManMade post was originally published in February 2013. We're resharing now cause it's definitely blanket season. 


Fact: This Early 20th Century Swedish Tool Chest is Super Cool

$
0
0

Get ready to grab a bucket for all that drool...   This Swedish tool chest from the early 1900s just recently sold at auction for a healthy sum. The lack of rust and the quality of the edges on the cutting tools seems to indicate most of the hand tools had been used regularly until recently. (Or, I guess, the sellers really knew what they were doing...)

What's most interesting about the chest, besides its attractive layout and the very cool wood burl that makes up the tool handles, is the way the chest's carcass itself is put together. 


Christopher Schwarz notes on his Popular Woodworking blog, 

The way the box is put together with screws and beadboard [is fascinating]. The ends of the chest are framed – perhaps with mortise-and-tenon joints. But the majority of the chest is built by layering pieces on top of one another and screwing them together. Also clever is the lid with the hinged doors. After studying the photos it looks like the left door is shut first and locked in place with sliding locks. Then you close the right door (there’s a dust seal on its front) and lock that to the other door with a wooden catch. 


Check out all of Chris's comments and find a link to the original auction at: Boarded Scandinavian Tool Chest – Too Cool  [PopularWoodworking.com] 


How to Wax Canvas Fabric

$
0
0

You've probably seen common menswear or outdoor items made from "waxed canvas" in your favorite Etsy shops or outfitter sites. It's a traditional means of making fabric weather-resistant, allowing your goods to repel water rather than just soak things in, and dates to hundreds of years before the advent of Gore-Tex and other DWR materials.  

But you don't just head to the fabric store and pick up a bolt of waxed canvas. Instead,  you take an existing canvas product like a hat or a bag, or sew your own from scratch using new canvas (commonly called "duck cloth" in fabric shops), and then you wax it. 

Sara from Radiant Home Studio has the full breakdown of the process. She sewed her husband a new bag from scratch (read all about that effort here), and then treated it with a product called Otter Wax for a durable, water-resistant coating. 


Check out the technique from Sara here: How to Wax Canvas Fabric [RadiantHomeStudio.com]  


ManMade Essential Toolbox: If You Don't Have a Proper Set of Marking and Layout Tools, Now's the Time to Get One

$
0
0

Marking Gauge
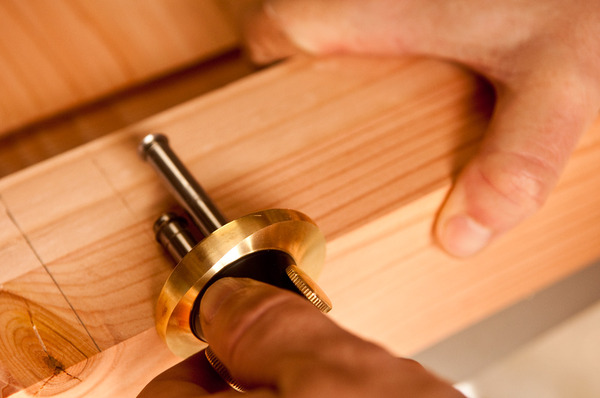
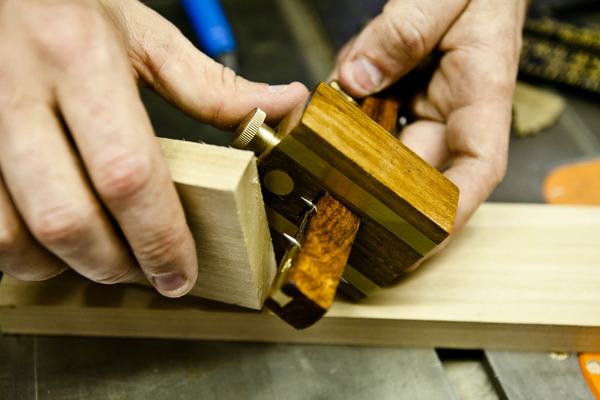
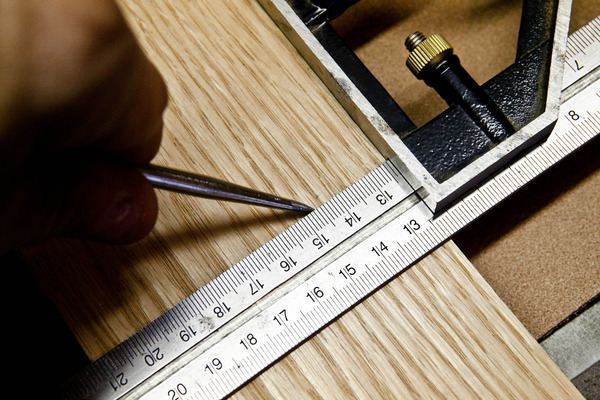
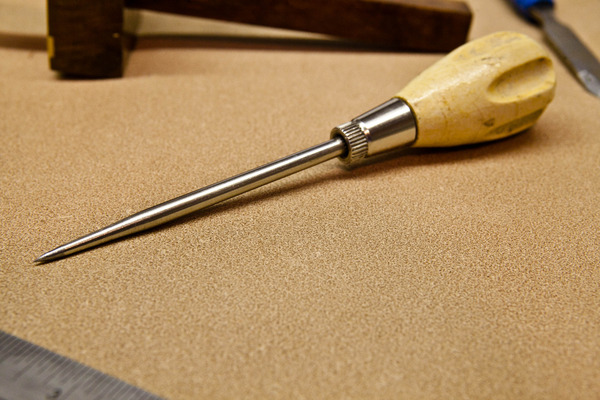
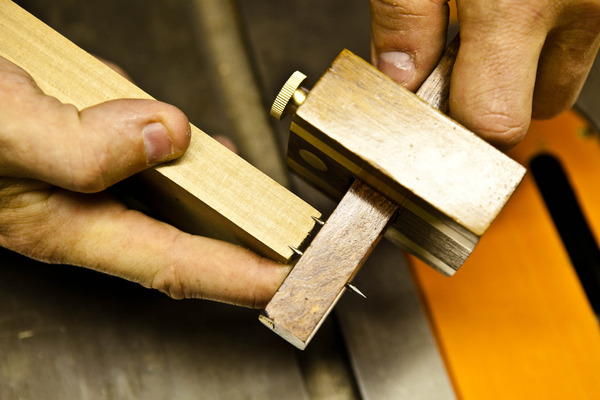
So you’ve figured out what you want to build, bought all the wood, and have a fresh cup of coffee in hand. Now it’s time to start marking lines and making some sawdust and shavings. When it comes to accurate fits and great looking pieces, it’s essential to have quality marking tools.   When I first started out working with wood, I was using a wide, stocky carpenter’s pencil. That 1/8” lead line was easy to see, but really didn’t provide the accuracy to make a 1/32” precision cut. After a while I moved to mechanical pencils with the much thinner line, but it was prone to breaking and so I finally landed on knives for a clean, crisp line that could be relied upon for a tight fitting cut when it came time to put it all together. Knives are used to “strike” a line, which means making a very small surface score along the ruler or edge. This thin line doesn’t show up as a black mark on the surface, but still provides a very accurate cut reference. My first blade was an exacto-knife, but I’ve graduated to a bit heftier and dedicated marking tools. Here are a few of what I consider my essential tools for making my marks in the shop.


marking Knife


First, a word about marking tools that use blades (knives, awls, cutting gauges, etc) instead of ink or graphite. The slicing of the wood does two things: first, it creates a cut starting line in which you can rest a chisel, drill bit, etc, which helps to prevent to tool from wandering from your mark. Secondly, it severs the wood fiber at the point where it will be worked, like with a saw, which prevents grain tearout. Win/win. 

created at: 11/04/2015

1. Marking Knife (Striking Knife) – This short thick blade is flat on one side to ride right against the ruler for a razor-sharp line that is accurate beyond 1/32”. The beveled sharp edge is thick enough that the grain of the wood doesn’t cause wander of the line, and holds a nice sharp edge well. I made one a few years ago, but there are plenty available online that look a lot prettier than mine. Grab one of these (or a few because they’re not too spendy), and you’ll never go back to that pencil again.

ManMade Recommended:


Scratch Awl

2. Scratch Awl (Ice Pick) – One of my favorite YouTube personalities is Jimmy Diresta. That guy uses his ice pick/ scratch awl for just about every job in a huge variety of ways. This versatile tool is small enough to be stashed in an apron, and still produces clean strike lines every time. The store-bought versions are a bit thicker than something you can make on your own, but it’s still a tool worth making room for in your workshop.

You might also consider a birdcage awl, which has a square shank and cutting point. This style actually slices the wood fibers, rather than just compressing them into a dent. 

ManMade Recommended:


created at: 11/04/2015

3. Marking Gauge - Reach for one of these guys any time you want to scribe a line parallel to an edge. Just butt the fence squarely along the side, and press down for an even depth. More complicated gauges, like the one pictured here, have two cutters that allow you to scribe mortise lines.

Marking Gauge

4. Mortising Gauge – This tool is used to transfer measurements onto a piece to lay out mortise holes for mortise and tenon joinery.  This type of joint is extremely strong, durable, and once mastered can really be an exceptional accent on a nice piece of furniture. There are a few types of gauges, the traditional slide gauge that is made up on a center post with a marking pin, a sliding pin and a sliding edge guide. The guide is pushed up and locked on the edge of the piece, while the sliding pin references one edge of the inner tenon opposite the fixed pin. This can then be moved over to the mortise piece and a set of lines can be scribed for a match fit. A second type of mortise gauge uses a center rod with a rolling edge blade at one end, and a metal guide that moves along the center rod. This type is similar but more accurate in general because the rolling edge blade doesn’t catch on the grain of the wood. The down side is that you must scribe one side of the tenon, and then the other because there is a single blade instead of the two pins, but overall the accuracy is improved with the rod design.

ManMade Recommended:

The best marking tools in the world won’t help if you don’t use them correctly, so here are a few tips on making sure your measurements are accurate, easy to see, and turn out great:Marking with a Scratch Awl

  • Use the same tool for the whole project. While the tools may look alike, variations in measurement can exist between rulers, tapes due to age, construction, or just use. It’s best to stick with a single tape for the job to be sure all measurements match up.
  • Scribe directly on the piece instead of transferring a measurement. That step between measurement and marking is where a lot of numbers get mixed up. It’s always best to directly transfer a line if possible.
  • Measure twice, cut once. This is my motto, but not always my practice in the shop; and I regret it more often than I’d like to admit. When the wood gets expensive, there’s always time to double check that line before you start slicing.
  • Sneak up on a cut. You can always take just a bit more off a cut, but once it’s too short there really isn’t much that can be done. When in doubt, cut a bit long and then sneak up with small cuts to the final measurements. One way to take just a feather width off on a miter saw, is to pull the blade down (without turning it on) and butt the piece up against it, slightly deflecting the blade as you do. Then return it to the upright position, turn on and make your cut. That slight deflection will equal about 1/32” or so. On the table saw, the fence is held down by a friction lock, raise the lock about ½ up so it is still locked down and a solid tap on either side will deflect it about 1/32” – 1/46” depending on how well it’s tuned. Be sure it stays squared up.


Scratch Awl

Most of the time, you won't need to measure to the 1/64" on a piece, but just for practice, try to get every cut to fit perfectly. That way, once you really need it to fit right you'll  have the skill to get it done.


The Science of Facial Hair

$
0
0

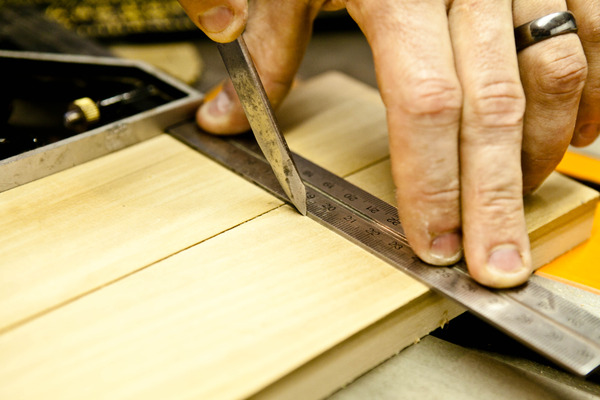
It’s the official first week of No-Shave-November, Novembeard, etc. and I imagine a lot of us are hitting that grind full-on. Beyond the manly feeling a hearty beard can bring, have you ever considered the social benefits/cost of sporting the scruff? The Science of Facial Hair dissects the social aspects of having a beard and its implication in the workplace and dating market, as well as the personal benefits/costs.   

Did you know for example that while the ideally desired beard to clean-shaven ratio from women varies drastically from woman to woman, studies indicate that generally most attractive beard length is what they call the “10 Day Growth,” i.e. long enough to prove that you’re packing enough testosterone to bring out a full beard, but short enough to still seem sociable and approachable.

A lot of the studies here may seem like no-brainers but I was quite surprised by a number of them including one that showed that men who knowingly wore fake beards rated themselves as more assertive and dominant since their brains neurologically registered the visual (that they also knew was fake) that made them feel more “manly.”

Check out the full article here and let us know if this any of these findings affect your facial hair decisions!

Closer Look: An Interview With Hand and Eye Letterpress

$
0
0

A generation or two back, everything we read was printed with individual letters, hand picked and positioned in a tray by a patient and highly experienced printer. Hand Eye LetterpressYou've definitely seen many things printed by letterpress, but perhaps never understood or really appreciated the skill and effort it took to place row upon row of small letter blocks and hand ink the plates for pressing. 

The fine folks at MerchantandMakers had a chance to sit down with Phil Abel, founder of Hand and Eye Letterpress to talk about the finer points of printing by hand and what makes it such a timeless art.

Holding a Printing Plate Rack

While most of the time I'm consuming my media via a LCD screen, there is still something special about the smell and feel of ink on paper. It's the feeling I get walking into the library, or looking thorough one of my reference books handed down from my grandfather. It's something tangible, and thoughtful, and it still has a place in this world; albeit small but always important.

Read the whole article here.

Make This: DIY Electric Camp Lantern

$
0
0

created at: 10/19/2014

Autumn is the perfect time of year for camping, pumpkins, crunchy leaves and hurricane lamps. Ok, maybe it's just me, but I love these lamps. They bring a certain sense of camp-like nostalgia to my heart and I have a couple around the house.    There's nothing new about using oil lamps in your home. However, it didn't seem like the safest option these days. So, I recently had the idea to retrofit one with a cool Edison vintage bulb. Here's a fairly easy tutorial on turning your own oil lamp into a beautiful electric lamp.   

I originally set out to build this project thinking it would take me forever. To my surprise and your benefit, this entire task, from start to finish will take you less than an hour and cost less than $30 (if you buy a brand new lamp). 

Here's what you'll need:

  • Outdoor Hurricane Lamp. I got this one from Amazon.
  • Vintage-style T-6 Bulb Get it here.
  • Tin snips or a Dremel with a metal cutting bit
  • Candelabra socket with a threaded bushing and wires attached
  • 6 feet of electric wire (or however long you might want)
  • Electrical tape
  • Wire cutters and strippers
  • Male plug kit
  • 2 wire twist caps
  • Pliers
  • Drill and drill bits
  • Phillips screwdriver

If you plan on using an old hurricane lamp, please make sure there is no fuel residue inside the tank. I recommend avoiding used lamps all together. Electricity and fuel fumes don't mix. I used a brand new lantern for this project to avoid a surprise fire in my shop.

created at: 10/19/2014

First, remove the cap that holds the wick above the oil well. This particular brand has one that removes with a twist.

created at: 10/19/2014

Using pliers, remove the shaft in the middle of the bracket. This removes the wick dial. 

created at: 10/19/2014

Using a Dremel with a cutting bit or tin snips, remove the cross bar to create an opening to house the socket. Sand and bend any protruding pieces that might cut you.

created at: 10/19/2014

Slip the socket through the hole and twist on the threaded bushing. I had to wrap some electrical tape around the socket to help it with tighter in the opening.

created at: 10/19/2014

Insert the socket back over the well and place the glass base back on top. Using a marker, make a line where the wick guard should be cut to reveal the socket and free up space for the bulb. Use tin snips or a Dremel to cut at the line. Be sure to sand and smooth out the cut so you don't hurt yourself.

created at: 10/19/2014

created at: 10/19/2014

created at: 10/19/2014

Now you can drill a hole with a bit that's large enough to fit a wire through. I would love to have found a rubber bushing to go in the opening. If you are really crafty, I'd recommend putting one over the opening. Doing so will prolong the life of the wire.

created at: 10/19/2014

Fish your line through and tie a knot to keep it from slipping back out. Then, strip the ends with wire strippers.

created at: 10/19/2014

Twist the two sets of wires together and stuff everything back into the oil well. 

created at: 10/19/2014

I grabbed an easy plug kit at the store and followed the instructions for attaching the wires.

created at: 10/19/2014

What's a good lamp without an on/off switch. I picked up this switch at the store too. You have to cut one of the lines and fit it snuggly in this space. There are vampire teeth (technical term) that bite into the cut line and the switch uses that feature to cut the circuit. 

created at: 10/19/2014

Screw in your lightbulb of choice and place the glass back on and you're finished! Now all you're missing is a tent! 

The Best Turntable for Every Budget

$
0
0

created at: 11/09/2015


The digital library and streaming services are great for checking out new stuff, singles, and the mighty, might playlist, but the only real option worth pursuing if you're interested in building a music library is one of recording's oldest formats: the vinyl record.    

Albums, LPs, and 7" are even more available than they were ten or twenty years ago, and the deep back catalogs makes it a great option to get ahold of the classics. Of course, if you're going to play them, you'll need some sort of amplifier and speaker system, perhaps a preamp, and, of course, a turntable. 

I like this roundup from Cool Material, which shares options from under $100 to $2500. (Oh, and $650,000+ but that one's not really available). Of course, if you're just getting started, you'll be mostly interested in the first couple options at the bottom end of the spectrum, any of which should suit you just fine. 

The Best Turntable for Every Budget [CoolMaterial.com]


Groomed For Fall: How To Upgrade That Morning Prep Routine

$
0
0

Grooming ProductsAs we move into the cooler weather, it's time to take a hard look at your daily groom and throw out those empties for something a bit better.  There are places in life to save a few dimes but when it comes to your morning prep, go ahead and spring for the right stuff. Not the expensive stuff, but the best picks for you and your needs.

A few days ago, I was prepping for a trip. There's nothing like packing to help decide what is essential, and what just takes up space. I pulled out 8 almost empty tubes and bottles of old grooming products, a few old razor bodies, dull blades, and  way too many hotel freebies. Looking at those, and the other products on my counter, I decided it was time for a fall overhaul to get me well groomed heading into the cooler weather. Here are a few products you need:

1. A New Razor. I switched it up this fall with a New Safety Razor. This single blade is housed in a hefty head that cuts smoothly and uses really cheap blades. It wasn't that I was unhappy with my multi-blade setup, I've used Harry's for the past 2 years, and I really have almost nothing but good to say about their customer service and products. (Note, they changed the rubber on their blades about 6 months ago and not for the better). It was simply time to switch it up.

Get: 


2. A New Shaving Cream. This rich, creamy lather leaves my face feeling fresh and just a bit tingly. It also has enough oil to really lubricate that blade for a shave without pulled hairs or razor burn. Using it with a great Badger Hair brush really ups the lather. No more gels. 

Get: Proraso Shaving Soap Eucalyptus & Menthol $10

razor

3. A Great Badger Hair Brush. I've been using a soft, warm badger hair brush for a few years now and it really is the most amazing upgrade to your shaving routine. The fibers lather up the cream, and spread it for an even coat that holds the hairs up and softens them for a smooth cut. I've never tried synthetic bristles, because why would you?

Get:


4. A Manly Face Lotion. I'd always been pretty verbal about the fact that I despised lotions. I'd rather suffer through flaking, cracked skin than slather on some greasy, fragrance laced cream. But, there's nothing masculine about dry, itchy skin.But nobody wants to see your dried out mug. If using lotion threatens your masculinity, then you might want to reflect a little more about what makes you a man. So, let's all, together,  bite the bullet and find a clean, lightly scented face lotion/aftershave to fend of the world. Look for something in a manly bottle and don't be afraid to spend a bit more. It'll last. 

Get: Every Man Jack Post-Shave Face Lotion $9

5. Bar Soap. Getting clean should be an undertaking if you're out there living a life worth waking up for. Tackle it properly with a bar of soap designed for the task. I've used plenty of chemical laced, brightly colored liquids and gels, but I just seem to gravitate back to the traditional block of natural soap because it just feels right. Oh, and use a washcloth. Slick soap and wet skin just moves stuff around. The grit of the washcloth helps remove the crud and dead skin. 

Get: Triumph and Disaster A+R Soap $15


created at: 11/09/2015

6. Tea Tree Shampoo. For as long as my hair decides to stick around, I'm going to enjoy the daily pick-up of tea tree and peppermint shampoo. It leaves the scalp feeling cool and fresh, without a heavy chemical fragrance because it has essential oils instead of synthetic additives.

Get: Proper Tea Tree and Peppermint Shampoo $20

7. Eye Therapy. Believe it or not, we all have trouble chasing those z's sometimes. But you don't have to look like you spent all night rolling around and staring at the ceiling with a bit of this eye-specific cream designed to get those black circles to lighten up. While it won't help you catch up on your rest, you will look better and that's something.

Get: Lab Series Rescue Eye $35

8. Heavy Duty Tweezers. Just cause your DNA put a hair there doesn't mean it should stay. That's all that needs to be said about that. 

Get: Revlon Slant Tip Tweezers $7.00 for two

created at: 11/09/2015

While there are always a few extra products to make the day a bit easier to start, it's also about the daily routines the help make the day great. Check out 9 tips for jumpstarting your morning and improving productivity.

Make It: DIY Sofa Table With Outlets

$
0
0

PlugsI'm always looking for a place to set my glass when I'm sitting at the couch. Build this simple table with outlets that fits between the wall and the sofa so you can keep your drink close, and no more digging around behind the couch to plug in your laptop.One of the most annoying problems in my house is ending up with a wet lap because I couldn't find a good spot to set down my drink. This simple sofa table is a convenient way to get some extra space, and throw in a few outlets to charge your electronics at the same time. (Note: don't DIY electrical unless you know what you're doing. Their advice in this realm is a bit shoddy).

The design of the table is pretty straightforward, especially since most of it is hidden behind the couch. So construction and assembly should be a weekend morning project with some time for the stain to dry.

Unfinished

So if you're tired of climbing over the couch to plug something in, or just don't want a lap full of iced tea once again this project is something you should toss onto that DIY to-do list.Finished Table

Here is a link to the full project write-up with more pictures and detailed instructions.

DIY Gift Idea: How to Make Her a Simple + Elegant Hardwood Necklace

$
0
0

Handmade Olive Wood Necklace for Valentines

Fellas, it's that time of year! And by "that time," we mean: time to start thinking about getting a head start on your handmade gifts for the season. Skip the lines and the nonsense and get your hands to work on this elegant, modern necklace that is sure to stun your special someone.    

What you'll need

  • A small piece of exotic hardwood
  • Saw: bandsaw or coping saw
  • Wipe-on poly finish
  • "Antique brass" necklace chain cut to 21" in length
  • 2 jewelry jump rings
  • Brass jewelry clasp
  • 1/16th drill bit
  • Sandpaper Sheets ranging from 80-1600 grit
  • Needle nose pliers


created at: 02/08/2015

I picked up a packet of pen blanks from a wood crafting store. This is some super cool Bethlehem olive wood. I love the color and contrast it has. It reminded me of a blonde tortoise shell. When looking for a piece, you'll want something that has some closely packed swirls and colors since you'll be cutting out a small piece for the jewelry.


Handmade Olive Wood Necklace for Valentines

 I started by milling a 1/8" thick piece from the blank. To make sure that I got the perfect piece, I milled the entire piece into several strips. I have a bandsaw, but you could easily use a coping saw for this. 

Handmade Olive Wood Necklace for Valentines

After looking at all my cuts, I think I'll go with the second one from the left. Look at all that swirling! 


Handmade Olive Wood Necklace for Valentines

I have a sanding station with an 80 grit paper. This thing can really tear out some wood. So, I'm going to use it to sand my chosen piece down from 1" to 1/4". I went with the sander because my bandsaw has a mind of its own and this sander can allow me to sand down to the perfect size and shape.

A piece of sandpaper attached to a flat piece of glass or plexi with spray adhesive would work well here.


Handmade Olive Wood Necklace for Valentines

Once it's been sanded to the right width, I used a small pull saw to cut it to length. 


Handmade Olive Wood Necklace for Valentines

Minimize drill tear-out by attaching a piece of tape to the back of your jewelry and set it on a block of waste wood to stabilize your piece.


Handmade Olive Wood Necklace for Valentines

Now for some meticulous sanding! Start with 80 grit and work your way up to 1600. I taped each piece of sand paper to the table to make it easier to sand.

Handmade Olive Wood Necklace for Valentines

When the wood is super smooth it's time to coat it with poly. I recommend at least 2 coats. Sand with 1600 grit in between each application.

If you prefer a mirror finish, you can use automotive polishing compound to buff out a really nice shine.

Handmade Olive Wood Necklace for Valentines

Gather all the jewelry making supplies you have laying around. Or, if you're like me, you have to go out and buy everything because you've never made jewelry. Assemble everything like you'd imagine. Attach the link rings to the holes on the wood piece. Then, attach the chain to the links. At the halfway mark, cut the chain and attach the clasps.

Finally, give your piece a final polish and put it in a jewelry box and you'll be ready to amaze!

Handmade Olive Wood Necklace for Valentines

Note: You'll notice a difference in the cover image piece and the final piece. After my wife tried it on she said it was a little too thick. So I sanded it down from 1/2" to 1/4". 


How to: Make a DIY Barbecue Mop from Scratch

$
0
0

If you've ever watched an old school pitmaster, or read a single book or recipe on slow smoking and barbecue technique, you're no doubt familiar with "the mop." It's a flavorful combo of liquids that gets regularly added during a slow cook to help aid smoke absorption and the creation of a great bark.

Some will add the mop with a spray bottle, but the mop, the liquid ingredient, comes, of course, from its application - an actual mop.    

A mop is pretty simple design, and you can easily whip one up yourself with materials you probably already have: heavy cotton string and a stick. Dowel rods are nice, but if you don't have one on hand, just grab a fallen tree branch and get to smoking. 

Ashley from Apartment Therapy has the whole how-to. Of course, you can buy a BBQ mop inexpensively, but this is a cool technique to keep in mind if yours gets too messy to reuse, or you don't have one ready to go next time you want to get smoking or grilling. Like say, come Thanksgiving morning and that turkey is just waiting for it. 

Make a DIY Barbecue Mop [ApartmentTherapy.com]


Check It Out: Read the 1st Issue of "Fine Woodworking" Magazine for Free

$
0
0

created at: 11/11/2015

Fine Woodworking magazine is celebrating its 40th anniversary this fall, and is sharing all kinds of cool stuff from its archives. Like... re-sharing its first issue ever, from Winter 1975, when it looked much, much different than it does today.   Sorta. I mean, one of my favorite things about woodworking is that the craft is sorta already established. The best tools for the job have been know for nearly a century, with many designs, such as hand planes, chisels, backsaws, have been around for millenia. Sure, there are technological advances like flesh-sensing table saw blades and helical cutterheads and rotatable carbide-insert turning tools, but really, not much has changed in the last forty years.

created at: 11/11/2015

There are some cool articles and pieces by established legends like George Nakashima and James Krenov, and an interesting piece about the coming availability of a new-to-the-amateur market product called birch plywood. (Heads up: every piece of quality-grade plywood you've probably ever used is birch. It's all they sell at the home improvement store.) Oh, and the logo, with its dovetail details and cool type, remains virtually identical. Nice. 

Definitely worth a flip through. And congrats to Fine Woodworking. Keep up the great (wood)work. 

See all the fun at FineWoodworking.com/40Years

Poor Man's Pappy: How to "Make" Your Own Pappy Van Winkle Bourbon... No Waiting List Required

$
0
0

If you know anything about bourbon, you've no doubt heard the fables of Pappy Van Winkle, one of the most hard-to-find and sought-after bottles on the market. It's become the stuff of legend, perhaps better known for its rarity than its flavor. Or, if reports are to be believed, perhaps not. People say it's pretty amazing.   But if you do know anything about bourbon, you also know that almost all the bourbons available on liquor store shelves come from the same ten or so basic recipes, or mashbills, and that the variety comes from how and where they're aged. So, you can easily get the same bulk liquid spirit that becomes Pappy, but has been aged differently.

Here's how it works. Pappy Van Winkle is made at the Buffalo Trace distillery, and is made from their wheated mashbill. A little further down the family tree from Pappy is Buffalo Trace's other wheated bourbons, including several bottled under the W.L. Weller name, and these are what you can hack. 

Blake from the Bourbonr blog offers a recipe that combines two varieties of Weller bourbons and a bit of limestone spring water that, apparently, comes very, very, very close to the 107-proof Pappy 15-year. 

Does it work? I don't know, I haven't tried it. But I haven't tried Pappy either, and the opportunity to see what the fuss is about by mixing two sub $25 bottles sounds like a worthwhile experiment to me. No matter what happens, I'll end up with 1.5 liters of really good bourbon that's makes a daily sip into something special. Works for me.

Pappy Van Winkle Alternative [Bourbonr.com]


How Bread Actually Works...Or, How to Bake Bread Like the Pros Do It

$
0
0

created at: 11/08/2015You’ve heard it said that baking is a science and cooking is an art, but the science behind baking something as simple as bread is such a mind-boggling stream of interconnected processes all working together to finish in one harmonious piece, it makes you question the adage. Whether you’re a baking novice or a seasoned veteran, this quasi-narrative baking expose from Andrew Sean Greer is great piece of writing on the science of baking.   

The inquiry Greer conducts is done in conjunction with this mother (a professor of food chemistry) and Chad Robertson, a famous San Franciscan baker, making for great conversation and background information. I worked casually at a small, family-owned French bakery in high school but this was my first real intro into the fascinating world that something as simple as baking bread can hold.

Let me know what you think and feel free to share links to your favorite bread recipes.


ManMade Essential Toolbox: A Hammer Is Not Enough - A Guide to Other Must-Have Mallets and Striking Tools

$
0
0

Each week in 2015, ManMade is sharing our picks for the essential tools we think every creative guy and DIYer needs. We've selected useful, long-lasting tools to help you accomplish a variety of projects, solve problems, and live a hands-on lifestyle that allows you to interact with and make the things you use every day. 

Drilling HammerWhile it's great when pieces fit nice and tight, sometimes you need a bit more . . . persuasion. Enter the mallet. A mallet is generally larger than a traditional framing hammer, and adds a bit of heft right where it's needed. Plus a mallet's striking surface usually isn't metal, which allows you to knock-together pieces or strike wooden-handled chisels without damaging them. Remember, the rule is: metal strikes metal, wood strikes wood. (Or plastic and rubber). Dead Blow Mallet1. Dead Blow Hammer (pictured on left): The head of this wooden or plastic mallet has a hollow space, filled partially with loose weight (sand, lead pellets, metal pieces). This allows for the momentum of the material inside to be transferred to the head with less swinging force. The way it works, is that the weight moves to the far side of the head on the down stroke, then on impact it pushes forward thanks to momentum. Visualize a double tap, with the first being the head striking the surface, and then the weight of the material inside of the head catching up for a second strong tap.

ManMade Recommended:


Mallet

2. Rubber Mallet - For surfaces that you don't want to damage with a metal head, the rubber mallet is the perfect alternative. Usually a strong and large head, this non-marking hammer is gentle but forceful when the workpiece can't be damaged while forcing a joint home. I reach for this mallet on my wood projects if a dry fit joint gets stuck or I need just a bit more power to fully seat a stubborn fit.

ManMade Recommended:


3. Wooden Mallet - This mallet is made from hardwood, and is used for working with chisels or carving tools. There are hundreds of designs, including bowed or round heads to put the hitting force exactly where it's needed. Using a wooden mallet with a chisel helps to extend the life of the chisels and cuts down on the chance of slivers of metal flying into your eyes from the bottom tang. While not as durable or forceful as a metal head, if you have to use more than the power of a wooden mallet with chisels it's about time to get them sharpened up. Here's a link to make your own from scraps you probably have in your shop already.

ManMade Recommended:


Drilling Hammer

4. Drilling Hammer (Small Sledge) - I've had a few trusty drilling hammers in my shop for a while now, and they're pulled out for a very dedicated purpose - destruction. I love how well even my 3lbs  hammer can pound something into a pile of dust; or help loosen a stuck bolt. This brute force tool is exactly what you'll reach for when you need something to move and you don't particularly care about the condition of it afterwards.

ManMade Recommended:


created at: 11/08/2015

Here are a few complimentary tools I use with my striking tools

Lastly, here are a few tips when working with Mallets and Hammers:

  • When pounding on things, always wear safety glasses. It's amazing how much force a splinter, nail, or shard of something will carry when it is sent flying from a hammer blow.
  • Use a sacrificial scrap when working with pieces that just can't be damaged like the threads on a bolt or a finished piece of wood. Pounding on the scrap gives an added layer of protection.
  • Always know where your other hand is. Hitting a finger (or wrist) with a hammer is one of the worst pains you'll experience (short of losing a digit) in the shop (we've all seen the cartoons), and a bruised fingernail lasts for six months, minimum. Keep your hands as far as possible from the head of that hammer, and use clamps or pliers as supports when possible.

Now go ahead and get yourself some burly persuasion tools for those projects where a bit more heft is just what you need.

See also: The 3 Hammers Every Man Should Own


Try This Simple Trick Anytime Your Lay Out Cuts or Marks on Your Woodworking Projects

$
0
0

created at: 11/12/2015

Over the weekend, I was working in the garage when I found myself in a familiar position. I needed to transfer a pencil line from one face of a piece of stock to the one around its corner. Sounds simple enough to do with a square, but I've had this problem before. Sighting the line isn't accurate enough, and a traditional try or combination square isn't of much help here. Here's why:    

created at: 11/12/2015

Layout and measuring squares all have two faces that are set 90° to the blade. This is great because it allows you to flip the tool and butt it up against any edge, and it allows you to use the inside corner of the tool to check for square. But it means that the square doesn't have a single, straight line that can turn a corner. The fence of the square obscures the mark you need to transfer the line.

The solution? 

created at: 11/12/2015

Check your combination square case. In it, you'll find the center finder attachment, which I'll admit to having used exactly 0 times since I bought this square seven years ago. (I have a special Robert Larson center finder plate I use all the time. It is amazing and only costs $7.00.) But, unattached to the rule, the center finder attachment is the perfect tool for transferring marks from face to face. A perfectly square inside edge, and two co-planer outside edges to register your mark. 


created at: 11/12/2015

So, scribe your line, place the center finder against it, and boom - a fence to guide your pencil exactly 90° around the corner. Done and done. 


How to: Buy A Motorcycle (For Real)

$
0
0

Most men I know like motorcycles, at least in the abstract. My friends and I often talk about which bikes we want and in what order, all to varying degrees of seriousness since none of us actually own any bikes (I did briefly have a motorcycle license though, which I felt was a step in the right direction). However if you’re interested in pursuing the prospective-first-motorcycle-purchase conversation a little further, GQ’s Everything You Need To Know About Buying A Motorcycle is the place to start.   
created at: 11/08/2015Get the skinny on the actual price of a start-up bike from the initial costs (usually between $5,000 and $10,000) to your inevitable insurance hike to the continued cost of equipment and maintenance. Then there’s also the personal protective gear to consider, and this guide gives you a great lens into what you should really be looking for. I actually found it most insightful when it came to what the average aspiring motorcycle owner should look for in a first motorcycle in terms of horsepower, handling, size, etc.

Check out the guide here.

The Best Cross-Country Craft Beer Road Trip, Routed Algorithmically

$
0
0

It goes without saying that drinking and driving don’t mix. But how about cross-country driving and hitting up the best craft breweries in the same area all in one go? Not a bad plan, but how would you decide which breweries are worth you time (there are currently over 4,000 craft breweries in America)? 

Enter: The Top Brewery Road Trip, Routed Algorithmically.  

The good, kind people at FlowingData took the information from RateBeer’s list of top craft breweries in America and compiled them by location so you can be sure to hit up all the iconic breweries in any central or out of the way locale. Plan a weekend getaway, a full summer adventure, or just keep the map on hand so you’ll know where to stop next time you’re hunting for a quality brew on the road.

Check out the map here and let us know what you think of how it ranks your area.

How to: Make a Super Simple DIY Wreath Trio in Under 30 Minutes

$
0
0

created at: 11/16/2015

Okay. It's official. The sugarplum fairies have struck, and once again, the holiday season is back. And I'm looking for ways to embrace the spirit. 

What's more festive than hanging a classic wreath on your door? Hanging three wreaths on your door. So, I teamed up with Home Depot for this simple, less-than-30-minute wreath trio using easy-to-find materials. 

created at: 11/16/2015

Oh! And get this

If you want to learn to make your own, you can sign for this free DIY Workshop at your local Home Depot. It's available at Home Depot locations all across the U.S., and it doesn't cost a cent to learn. 

The DIY Wreath Trio workshop takes place this Saturday, November 21, 2015 from 10:00 - 11:30AM. You can find more details and register at the Home Depot Workshops page. I, Chris Gardner from ManMade, will be teaching the workshop in Portland, OR at the Beaverton Home Depot (Store #4018 4401 SW 110th Ave). If you're in the area, this is an awesome opportunity for me to meet and collaborate with ManMade readers, and I've love to hang out with you and be merry together. 

SIGN UP HERE!

created at: 11/16/2015


Tools and Materials: 

  • 3x holiday wreaths - we used these lighted, decorated options from The Home Depot
  • Aluminum hobby wire
  • Cutting pliers
  • Scissors or shop shears
  • Needlenose pliers
  • Electric drill
  • Wreath hanger
  • Assorted ribbon, ornaments, baubles, etc (optional)

created at: 11/16/20151. I'm much more of a natural cranberries and pinecones kinda of Christmas guy than the big red bow type. So, I was happy to find these Winslow wreaths that fit the bill perfectly. When you're looking for wreaths, find versions that have a nice balance of materials. You can always move or reorder the decorations. Here, we snipped off the big flat green silk leaves for a more streamlined look. 

created at: 11/16/2015

2. To attach the wreaths together, use a doubled-up twist of aluminum wire. The twist will help things stay flat, and won't take on any kinks or angles in the soft aluminum. To create the twist cut a looooooong length of wire (like 8 feet), and fold it down its middle. Attach the folded edge to a fixed point (or have someone hold it), and place the two ends in a drill chuck. Then, let the drill spin slowly to achieve a nice, even twist. 

created at: 11/16/2015

3. Begin by wrapping the edge of the twisted wire around the wreath's metal armature...

created at: 11/16/2015

...then, wrap it around two full times... 

created at: 11/16/2015

...and then pinch the wrap inside the jaws of some needlenose pliers. The multiple wraps helps the wreath to hang straight down, or at the angle of your choosing, not the wire's. Leave the wire just a little loose, so gravity will help find the natural resting place at the bottom of the arc. 

created at: 11/16/2015

Then, just repeat the process on the second wreath, and again for the third. Easy. Done in less time than it takes to watch A Charlie Brown Christmas.


created at: 11/16/2015

Remember, if you want to learn to build your own, head to the Home Depot DIY Workshops page to sign up. If you're in Portland, I'll see you on Saturday!


SIGN UP HERE!

created at: 11/16/2015


created at: 03/31/2015
Thanks to Home Depot for sponsoring this post and making ManMade a partner for the 2015 DIY Workshop series. Thank you for supporting the brands that make ManMade possible.


Viewing all 2425 articles
Browse latest View live


Latest Images