Quantcast
Channel: Man Made DIY Recent Posts
Viewing all 2425 articles
Browse latest View live

Art Is More Than You See: Please Touch The Art

$
0
0

We're used to evaluating art on what we can see. While there are plenty of pieces where touching is not encouraged, here's an example of what happens when an artist moves beyond sight to texture. Take a look.   Anyone who has taken a child to a museum knows that most art inspires touch. The tactile feel is one of the most important experiences we have to learn from. Here's a great video on one artist who is creating works that feel as great as they look.

So, the next time you see a great piece of art, take a chance and touch it. You might be inspired, or just kicked out of the gallery, but either way you'll have an experience.


How to: Make a Japanese Kiridashi Utility Knife

$
0
0

created at: 05/15/2016The Kiridashi knife, known for its simplicity in design and general utility can be a work of art all on its own. And frankly so can the video documenting the process. Watch the silent and curious process video from Miller Knives and learn how to make your own Kiridashi utility knife from a single piece of 1085 high carbon steel...

Traditionally Kiridashi knives are used by school children for cutting paper and bamboo for art projects as well as by adults for pruning bonsai trees and whittling projects. I honestly was very taken in by the video and quite shocked when the end result was as impressive as it was. 

Old Fence, New Life: How to Upgrade that Ratty Fence

$
0
0

Original Fence
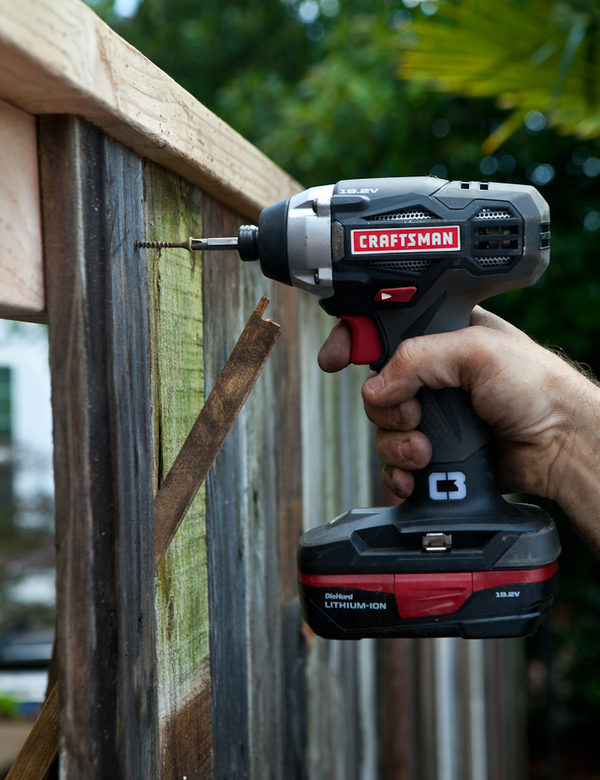
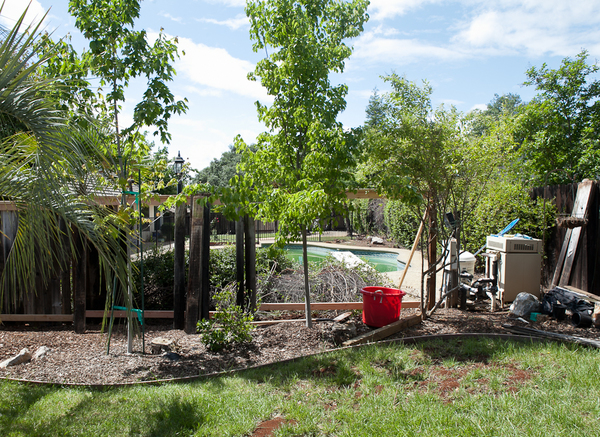
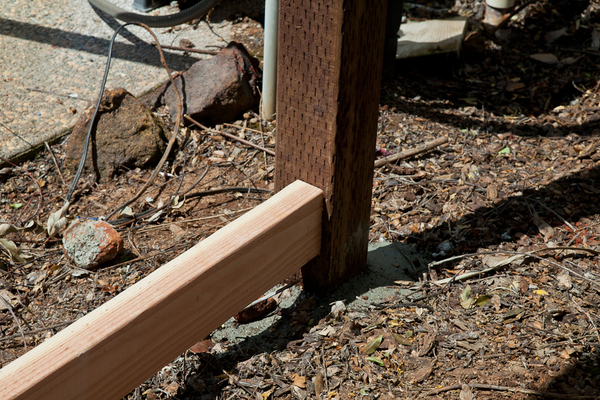
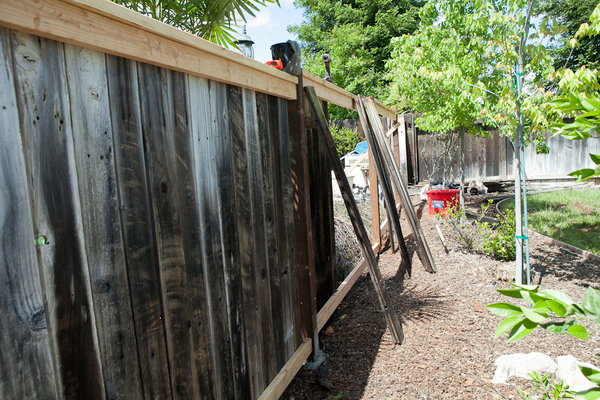
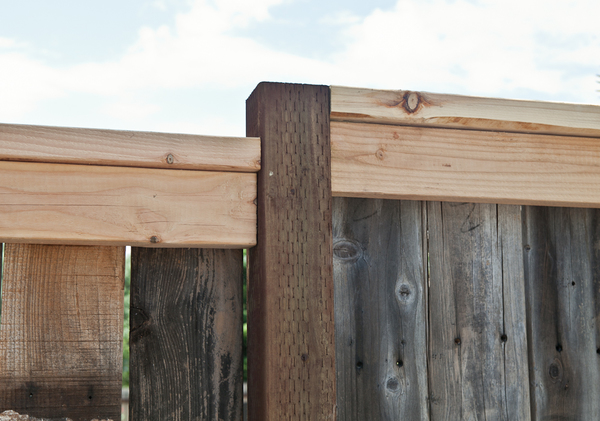
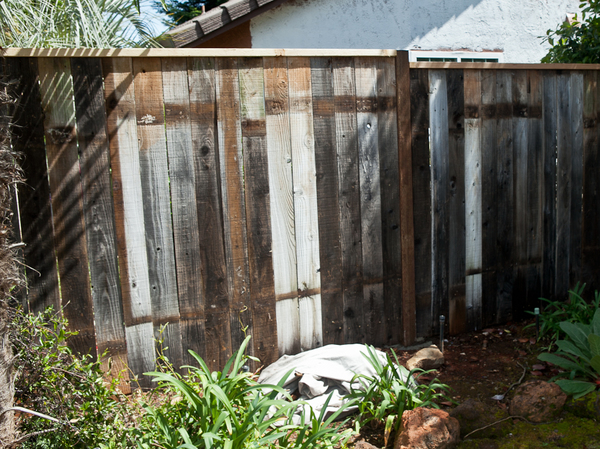
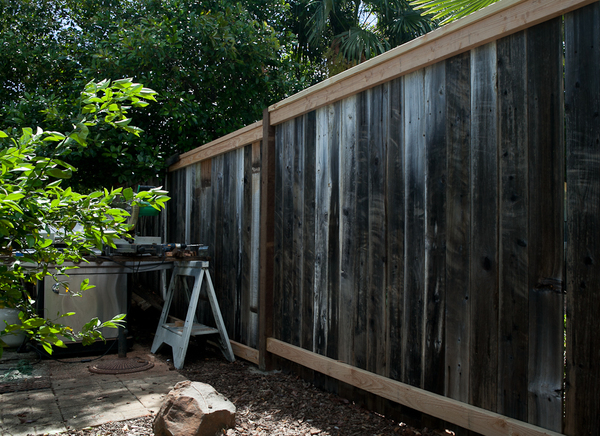
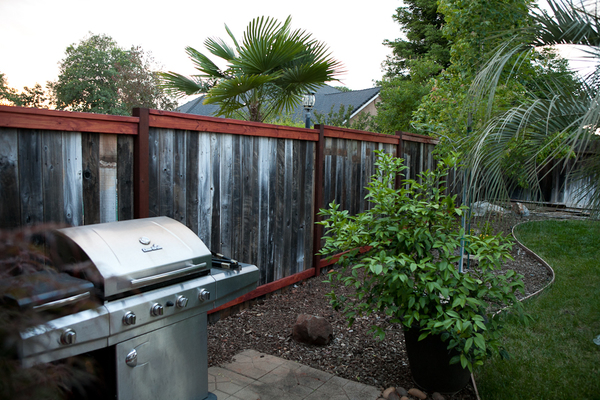
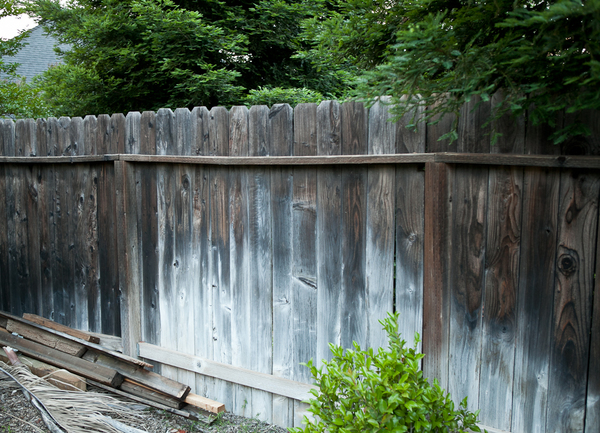
Fences are useful for many reasons, first, they keep the neighbor's dog from leaving surprises on your patio, they also keep their unkempt backyard from being your primary view. While it's generally a cheap, somewhat ugly row of dogeared wood, it doesn't have to be. Here's a simple way to upgrade that fence without breaking the bank.   It's an inevitable cycle when you own a home that the fence is going to need some TLC every few years. There's also a pretty good chance you've put it off for a few years now. When a section of our fence blew down in a wind storm last month, we actually ignored it for a good three weeks before finally gearing up and replacing it.

The problem with replacing a portion of a fence, is that it looks way too new and polished compared to the older section. This means either springing for an entire new fence which takes plenty of time and money most of us don't have lying around, or being content with a brand new section next to that weathered grey stuff.Original

I didn't like either of those options, so I sprung for something a bit more creative. Fashioning a new frame with treated posts and crossbeams, but using the original fence boards kept the overall look but polished it up well. And the total cost? About $30 per 8 foot section.


Craftsman Impact Driver


Here are the tools I used: 

1. Makita 10 Inch Miter Saw $140

2. Craftsman 19.2 Volt Drill/Impact Driver Set $150

3. Kreg Pockethole Jig $110

4. Dewalt Torpedo Level $30

5. Post Hole Digger $35

Materials (for each 8' of fence):

1. Treated Wood 4x4 post (8')

2. 1 #40lbs sack post hole concrete

3. 3 2x4 boards (8')

Steps:Remove Boards

1. Remove Old Boards (Carefully) - The first step is to remove the old boards on the fence and stack them carefully for re-use. This is the time to remove all old nails or screws, and to separate any boards damaged beyond re-purposing. Because of the new design, there are a few extra boards, so don't worry about losing a couple.

2. Cut-Off Old Posts - The old posts are likely rotted out and in the way. I cut them out with a chainsaw, but any saw and some patience will get them out. Cut them off at ground level and out of the way. Note: cutting treated wood is a hazard, use a mask and avoid prolonged contact with the sawdust.

3. Lay Out New Fence - The new fence layout is an important step. Using a string, stretch a tight line from one end to the other. This should be straight and level as a reference point for post installation. Once the string is in, measure out posts every 8 feet on center. This ensures all cross boards will fit tightly with just a bit of trimming.Post Holes

4. Dig Post Holes and Install - I dug all post holes 26in deep, adding 2in of gravel to the bottom to allow for drainage. The post won't sit level in the hole without support, so I add two side supports as braces until it is level and plumb against the guide string. Mix the post hole concrete in a bucket and add to hole after placing the post, and double check that the post is still level and plumb.Support Posts

5. Add Support Boards - Cut the boards to length to tightly span the gap between posts. Then, using a pocket hole jig (or alternately metal support brackets), drill the boards and attach to the posts. Because of the slight slope, I stepped each section about 6in higher than the previous section.Top Fence Joint

6. Add Finish To The Fence - This is a great time to add exterior finish to the fence. I used a red-tinted finish and protector I had left over from a redwood deck project last year. I didn't do that first, and immediately regretted not taking the opportunity when I could before the boards were in the way.Fence Boards

Above is one side of the fence, and below is the other, there really isn't a bad side here.Other Side

6. Finish With Old Fence Boards - This is where the new fence gets a set of old boards. I installed all of the boards with the dog-ears down, and trimmed off when I could. The key with re-claimed boards is to keep similar colors and weather marks close together or completely separate for a clean look.Finished Fence

While the fence blends well with the rest of the surrounding original sections, it still turned out clean and a major upgrade to the yard.


Please Stop Making Margaritas Wrong - Here's How to Do It Right, Just in Time for Summer

$
0
0

How to make a really good margarita.

Have you hit 90 degrees yet where you live? We have (yep - 92 on May 6 in Minneapolis, crazy), and I loved it. After months of snow and cold and slush and sweaters, I absolutely revel in the warmth. Maybe later in the summer I'll be crouched down inside next to the air conditioner, but not now. Right now, when it's warm out, I want to soak my bones in it. 

Summer warmth

The warm weather also means a change in the beverage seasons. Out with the heavy, comforting drinks of winter, and in with the light, bright, refreshing stuff. As part of our series of posts celebrating tequila (one, two), we've teamed up with Olmeca Altos to show you how to perfect the perfect drink for summer: the margarita.

Perfecting the Margarita

Olmeca Altos, if you haven't heard of it, is one of our favorite tequila brands. It's one of the only tequila brands in the world that still uses the ancient Tahona wheel as part of the process to crush their hand-picked, roasted agave. Altos Plata is fruity and bright, and bottled right after distillation, which makes it a good pick for use in a margarita. 

Olmeca Altos Plata tequila margarita

Like many iconic drinks, the origins of the margarita are murky. Was it invented in 1938 in Tijuana for a spirit-allergic Broadway dancer, or at Hussong's Cantina in 1941 for Margarita Henkel, the German ambassador's daughter? Or is the margarita just a remake of a previously popular prohibition-era American drink called the 'Daisy'? 

Pick whichever story you like. The important facts are the same: a margarita is an amazingly delicious, hugely popular mixed drink made with 7 parts tequila, 4 parts Cointreau, and 3 parts fresh lime juice, serve on ice, blended, or straight, and optionally in a salt-rimmed glass. 

The sad truth is this: most margaritas suffer abuse at the hands of lazy, careless mixologists. If you've ever found yourself stirring some low-grade tequila into a slurry of 'sour' mixer, you know what I mean. Let's not doom the classic margarita to be the drink of cheap all-inclusive vacation resorts. Here are some rules you can follow:

1. Always use fresh lime juice. Look at the ingredients on that margarita mix bottle (I did this morning), and you'll be sad. Corn syrup? Yellow #5? Acesulfame potassium? Uh .... yeah ... how about we just grab a bag of limes instead.

2. Use good tequila. Well, that's obvious, right? But seriously, how many times have you heard people say "I don't like tequila" when what they really mean is "I don't like crappy tequila"? We like the Altos Plata for margaritas, because of its straightforward taste and pure, agave flavor. It's bright and bracing and can hold up to the other flavors. When you're mixing your tequila with strong, bright flavors like lime and pineapple, there's no need to use an aged spirit. 

3. Proportions proportions proportions. I said it above, but the classic margarita follows a 7:4:3 ratio (tequila:Cointreau/Triple Sec/lime juice). Like any drink, you can play with the flavors to please your palate. But start from that foundation. 

4. Taste your lime juice before mixing your first drink. Limes vary widely in flavor, and if you have a really aggressive, acidic batch, you may want to adjust your proportions accordingly. 

5. Shake it.  You want this drink really cold, and nicely oxygenated. If you can shake it and then strain out the ice, you'll get the purest flavor, but it's not absolutely necessary. 

6. The margarita is a great crowd cocktail. You can mix up a pitcher and leave it in the fridge to get really cold (don't add ice or it'll get watered down.


Two recipes to try

Today we're sharing two updated (and slightly unorthodox) versions of the classic margarita: Tommy's Margarita, and a hibiscus tea, pineapple, chili margarita we're calling the ... well, I don't know what to call it. Maybe you guys can chime in with suggestions.

Anyway, find yourself a sunny spot to bask in, mix up one of these drinks, and enjoy:

Tommy's Margarita

Tommy's Margarita with Altos Plata tequila

Ingredients:

  • 2 parts Olmeca Altos Plata tequila
  • 1 part Fresh lime juice
  • 1/2 part Agave nectar
  • Crushed or cracked ice

Technique:

Coat the rim of the glass with salt; roll the glass instead of dipping it in salt for a more even coating. Combine all the ingredients over ice and stir briskly. 

Margarita recipe


The Margarita That Needs a Better Name than 'Chili-Pineapple Hibiscus Tea Margarita'

Hibiscus tea, chili & pineapple and margarita

Ingredients:

  • 2 parts Olmeca Altos Plata tequila
  • 1 part fresh lime juide
  • 1/2 part hibiscus (jamaica) tea
  • Tajin chili powder
  • Pineapple
  • Crushed or cracked ice

Technique:

Shake the tequila, lime juice, hibiscus tea and shake with lots of ice to get it well-blended. Shaking also introduces oxygen into the mix, making the drink feel lighter. Pour it into a salt-rimmed glass (it doesn't have to be a margarita glass ... Mason jars work great for a crowd, and they're cheap), and garnish with a chili-dusted wedge of pineapple. It's a drink and snack in one!

Altos Plata margarita drink


Enjoy your beverages responsibly! If it's raining where you live right now, and a margarita's not in the forecast, here are some more tasty images you can enjoy with your eyeballs:

Margarita pitcher for a crowd

Hibiscus margarita

Margarita recipe


This post is sponsored by Olmeca Altos Tequila, but all opinions are mine alone. Thanks for supporting the brands that support ManMade. 

Engineer This: An Actual Snowball's Chance in Hell

$
0
0

Molten Snowball 
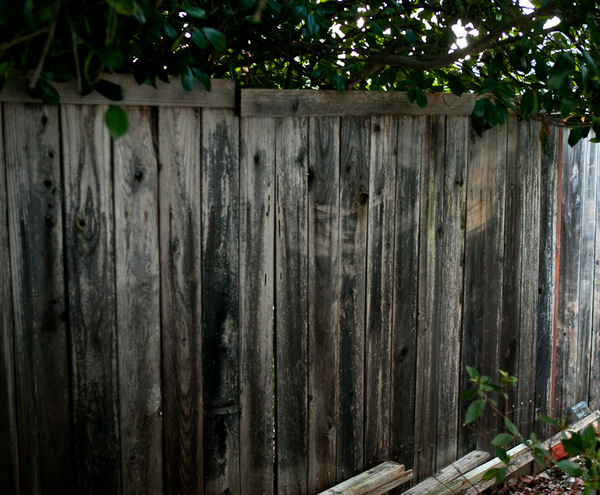
There isn't a day in western life that goes by without something from GE's massive engineering activities making life easier for us all. So when I saw this video about their experiment to preserve a snowball in hell, I just had to see it. You should too.   Although it's a bit serious for the subject, the video is a great example of today's engineering capabilities in a fun way that we can all see for ourselves. Taking a snowball and submerging it (protected of course) in molten metal is a fun way to see how far technology has come.

So the standard disclaimer: Do not try this at home. But of course, if you have the ability to achieve 2000 degree molten metal in your home, I'm pretty sure you can safely handle this experiment.

How to: Build a Classic Wood-Handled Straight Razor from Scratch

$
0
0

Maker and designer Nick provides this awesomely detailed tutorial to create a custom, traditional straight razor from scratch. And by from scratch, we mean from. scratch. This build process includes everything from grinding shaping, and sharpening the blade, crafting the wood handle, and even creating custom hardware that allows the razor to pivot while staying balanced. 

Something of this quality would cost in the hundreds of dollars, so Nick decided he'd have a go at making his own. He says,

A couple of years back a neighbour of mine told me he had bought a cut-throat razor. At the time I was busy making knives so it sparked my interest...I asked to look at the razor and if he could tell me all he knew about it... The razor was quite nice. I marveled at its simplicity and beauty. I thought to myself I have to make one!

I joined a razor forum and asked a few questions but was met with basically 'It's not an easy road and involves a fair bit of research.' I didn't think it would be very hard to make one, so I came across a little arrogant in my response even though it was not my intent. 'I don't think it would be that hard to grind one!' They knew a bit about razors, I did not...

But, he eventually figured everything out, and the results are simple and spectacular. 

You can read through the entire process at Nick's Instructable, and watch more in the video below: 

How to: Build a Custom Rolling Tool Cabinet

$
0
0

created at: 05/23/2016 Rare is the craftsperson who couldn't use just a littlemore workspace. Maybe not more square footage (though I'd certainly take some), but perhaps more work surfaces to spread out projects, or some more storage to keep track of all the bits and pieces that come along with any technique.

Building this custom tool cabinet will certainly help. It adds a lot of vertical storage and organization for tools and parts, plus it's built into an old handtruck or wheel and axle combo. So you can nix your current bins and put your tools in here, build another worksurface in its place, then wheel your tools around in between to work on things with ease. Plus, it's built with standard and easy-to-find materials like "3/4" and 1/2" thick plywood, 1/4" thick MDF, ... and common hardware." Love it. 


I like the use of the "one good face" plywood; it keeps the outside looking sharp, while the inside has more a pronounced "shop grade" flat sawn softwood look, which keeps everything nice and affordable. 

Get the full how-to from the Lee Valley newsletter: Build a Rolling Tool Tote

How to: Make a Smoke Bomb Cocktail

$
0
0

created at: 05/15/2016
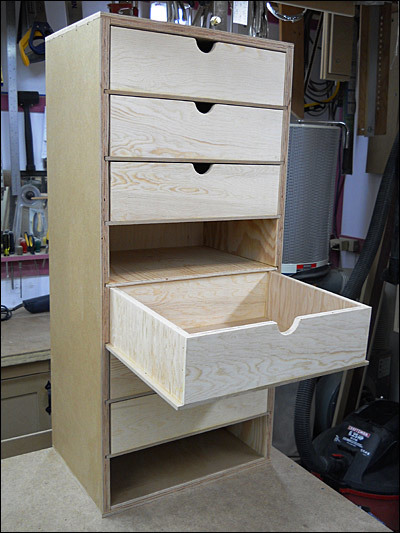
You've heard of smokey flavored cocktails before... but how about a smoke bomb cocktail that actually explodes? Well not actually explodes, but with a flourishing crack to the ice cube mold from a tiny hammer or utensil, billowing smoke will pour out into the rest of your Black Manhattan (or other smokey drink of choice)...   

created at: 05/15/2016 The idea comes from the mind of Chemistry Cocktail and requires a little bit of work, but not too much that you couldn't successfully pull it off while hosting a dinner party. Check out the video below for instructions or take a look at the Cocktail Chemistry website for the more unique recipes and ideas. 

Let us know what you think!


Eight Things You Probably Didn't Know You Could Stream On Spotify

$
0
0

Spotify has completely revolutionized my music-listening experience. Their browsing feature and Discover Weekly playlist has made into a much hipper dude and generally increased my quality of life, no joke. However it was only recently that I discovered a whole host of new Spotify streamable options, turning the widening gyre all over again.   

I first discovered all the amazing Shakespearean plays and speecheson record and then quickly went down a whole rabbit hole of vintage radio dramas and presidential speeches. 

From there I got lost in Beat Poetry and then on to A Noam Chompsky Chronology, but there's so much more! You can even take introductory language learning courses now too.

Check out some of the other hip insights from Lifehacker.com and please let me know what non-musical Spotify things you're into that I should check out! 

Get Ready for Summer: How to Calibrate Your Grill Thermometer in Time for Barbecue Season

$
0
0

created at: 05/24/2016

Turning out perfectly grilled foods in your own backyard requires balancing two important variables: time and temperature. Too hot, and the food gets overly blackened and burnt before it's cooked through. Too short, and the surfaces don't have enough time to caramelize, brown, and develop that characteristic charred flavor that makes grilling worth the effort in the first place.

A solid grill thermometer can help, but here's the bad news: standard bi-metal dial thermometers, the kind present in almost all backyard grills and smokers, can be off by as much as 75° F in either direction. Which, if you're going for low and slow cooked flavors of barbecue, is enough to totally ruin your meal and your day. Here's how to fix it. 

First, a note: obviously, there are a wide variety of thermometer types in a wide variety of grills. All might not be adjustable in the same way, or adjustable at all, but if yours is made by one of the larger manufacturers, it's likely designed to be calibrated. Give it a shot!

created at: 05/24/2016

1. Open the lid and remove the thermometer entirely. Yours might be attached with a spring clamp, a threaded rod and nut, or even attached with Phillips-headed bolts. 

created at: 05/24/2016

2. Check out your thermometer, and look on the back for a piece of hardware, likely a thin hex nut. Grab a wrench, either adjustable or an open-ended or combination wrench that fits. (Mine happened to be 16mm). And when we say "wrench," we meant it. Do NOT use pliers, Vise Grips, or Channellocks; they're too coarse for this work, and you can damage the hardware and possibly ruin your thermometer. 

created at: 05/24/2016

3. Now, we need a consistent source of temperature to gauge the reading. On a smaller, instant-read thermometer (like one designed to temp meats from 0-200°F), you can use a glass full of ice water, stirred well, which will be as close to 32°F/0° C as you can get. Since a grill thermometer has no reason to read that low, we'll look at the other end of the spectrum: boiling water.

At sea level, water boils at 212°F or 100° C. I'm only at 73 ft above sea level, so that's good enough for me. Those of you that live at elevation will likely already know how to adjust accordingly, so just be aware.

So, bring the water to a full rolling boil for a couple minutes, and the temp will never climb higher than 212°F. Perfect.

created at: 05/24/2016

4. Take your initial reading. At first, ours read at 235° F, which means I've been regularly been way under my target smoking temperatures, cooking closer 200° rather than my intended 225°. No wonder my food always takes so much longer than recipes suggest to reach the desired internal temperature.

So now, use the wrench to adjust the temperature until it's as close to 212°F/100°C as possible. Use the Celsius scale if you have one, since the tick mark will be right on 100°. If not, 210° will be close enough for this decidedly non-laboratory setting.

created at: 05/24/2016

Make little changes, like 1/16th turns at a time. You're basically adjusting the radial origin point of the needle, so a little movement at the center means a larger change at the outside of the circle. 


created at: 05/24/2016

There you go. Mark your calendars to repeat every Memorial Day, or before any big parties or special cooks. Enjoy, and get outside and start grilling!


How to: Revive Your Waterproof Rain Jacket

$
0
0

created at: 05/25/2016

If your water resistant rain shell doesn't seem as water resistant as it use to be, it's time to give the coating a little revitalization to keep those beads forming, and your body dry.   

Backpacker.com offers three ideas to restore the durable water resistant (DWR) coating on your rainjacket. None of them are particularly difficult, and only one requires procuring any materials or spending additional money. Give it a shot, and then get outside, regardless of the weather. 

The Fix: Revive Your Rain Jacket


10 Unique Ways to Solve Problems With A Blowtorch

$
0
0

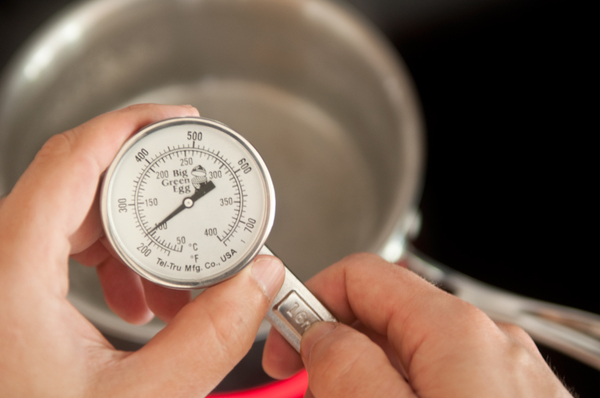
In the early days of building your workshop it's important to invest in tools with multiple functions so as to get the most bang for you buck. Now normally I'd think a blowtorch doesn't exactly fit that criteria, although since reading this I'm beginning to rethink that...Need to loosen some bolts? Blowtorch.

Need to cook a steak? Blowtorch.

Hell, need to kill some weeds? Blowtorch (it's more efficient than you'd think).

Check out all the uses on Popular Mechanics and let us know what other ideas you've got!

Home Bar 101: What's the Deal With Bitters?

$
0
0

BittersJust about any drink can be layered for a more complex flavor with the right dash of bitters, so it’s standard to find a few different bottles in the well-stocked liquor cabinet. So, which ones will serve you best? Let’s talk.   As a fan of a good cocktail, the maker in me loves to combine good ingredients into something even better. So my home bar is stocked with the staples, and a few extras to make those cocktails really memorable. By far, the most interesting ingredients I have in stock are the little bottles of bitters. These mystery concoctions add a bit of bitterness of course, but in addition can bring some sweetness, a bit or sour, or even some spice to that highball. They're like the salt and pepper of the liquor cabinet - the manage to make the other ingredients taste more like themselves. 


Bitters

Bitters began as patent medicines peddled by traveling apothecaries way before we knew how to actually treat everything from gout to consumption. The voracity of their beneficial claims were always a bit suspect, but with distinct flavors they easily found their way into cocktails as a flavoring agent to really make that mix shine. Even if a recipe doesn't call for bitters, it's perfectly acceptable to add a dash or two (that's a couple drops or so) to just about any cocktail for a new take on the flavor. Just be sure to keep them in the same family of drinks for best results:

  1. Citrus bitters – Light and fresh, good with effervescent drinks. Grapefruit or lemon bitters are a popular sweet mix with the tart sour flavors balanced by a light bitter finish and underlying sweetness.
  2. Angostura bitters – If a recipe doesn't specify a type, go for Angostura. Think sweet flavors with a distinct, well, bitter undertone. The flavor on this is heavier and pairs well with dark, syrupy drinks.
  3. Peychaud's bitters - Another of the "old fashioned" bitters, this time with a lovely pink color and a decidedly anise-y, licorice-y undertone. 
  4. Spiced bitters – Great to spice up a drink with a punch of cloves, allspice, cinnamon, or nutmeg. This could be fairly called a fall or winter ingredient, but don’t just confine it to the holidays. Best for creamy drinks, or something a bit too sweet that needs some balance.

Of course there are many different variations that fall loosely in the categories above, so finding your favorite will likely take a bit of experimenting, and don’t be afraid to branch out and try something new every chance you get.

Bitters

Can you make your own? You bet. Here’s a simple recipe to make some fresh and certainly a bit cheaper than $20 a bottle.

Here’s a recipe to get started: Grapefruit Bitters

Ingredients:

- 1.5 cups 80-100 proof vodka

- 2 large grapefruits, sliced (pulp and rinds)

- 2 tbsp fresh shredded ginger root

- 1 tsp Juniper berries (dried)

- 1 tsp Genecian root

- ¼ cup Simple Syrup

- 1 tsp Lavender flowers (dried)

- ½  tsp Coriander seeds (crushed)

Step 1:

In a large mason jar, combine all ingredients but simple syrup. Shake well and let for 7 days.

Step 2:

Strain mixture through a cheesecloth, then again through a coffee filter into a final container. Add simple syrup and gently combine.

Sounds simple? Try it out yourself and let us know what you think!

How to: Plan the Best RV / Tiny Home Road Trip

$
0
0

I once was hired to write a series of brochures for a product line of mobile homes and found myself becoming incredibly drawn to them. They're just so cool! So streamlined and efficient for living (though not for the environment), not to mention the whole, pick and go anywhere at any time you want thing.   My only real exposure to the RV community was when my brother and I rafted the Mississippi River and were stranded in a motor home community for a week after our motor caught fire. I was blown away by the camaraderie and simultaneous sense of a stable community coupled with a hearty vacation vibe and knew I would one day want to be a part of something like that.So if you're interested in dabbing your foot in the water, check out this insightful guide from Popular Mechanics on How to Plan The Best RV Trip Ever.  You don't necessarily need an RV to take advantage of the guide though. A tiny home or even living from a van would do just fine... 

Dapper Up: How to Make a Gentleman's Survival Kit

$
0
0

Survival KitYou never know when disaster may strike, so keeping a kit full of survival gear close is important. Here's a quick DIY on the gentleman's survival kit.   I've seen this project go around a few times and it just hits me every time. Sure with a kit like this, you won't really last long, but you'll definitely go out in style. But, for the less drastic points in life, a kit like this is an instant upscale mixer. Show up anywhere and you're bound to be the life of the party. Making the kitThe kit is a simple suitcase, with cut-out inserts for whatever essentials you may deem necessary to fully survive the moment, a few cuts and some simple leather straps to keep it all in place. Take a look at the process here and please, please send pictures over if you happen to actually go out and make it.


9 Awesome Podcasts for Makers, Crafters, Artists, and Designers

$
0
0

created at: 05/26/2016

Podcasts. You know 'em. You listen to 'em. You're moved by them. You laugh and are entertained by them. But are you inspired by them? Do they light a fire under your butt and make you want to get into your work space as fast as possible? Do they make you want to complete your workout faster so you can get home and make stuff? Do they make you thankful for your creative bent, and the creative work of others?   

Here's our thinking: podcasts, as a medium, are great accompaniment for a lot of things. There are certain podcasts you listen to on your commute, specific shows that work best for cleaning the house or cooking dinner, those to motivate you to work out harder at the gym, or on a run or bike ride. And we say - at least for those of us who just can help but get our hands dirty, try new things, and learn as much as possible - there should be a set to push your creativity, to accompany your work in the shop, or help your discover new things...which is the point of all this anyway, right? 

So, here's our list of nine podcasts for anyone who likes to make stuff. Some are about materials and techniques and some are simply about the creative process. But all of them are worth a listen. Give at least three episodes a shot. Once you get the know the rhythms and the hosts' personality, there's a lot of opportunities to learn. 

created at: 05/26/2016

1. Making It - This biweekly show is hosted by Jimmy Diresta, Bob Clagett and David Picciuto, all successful YouTube and internet personalities. Here, they're in conversation, and you get to learn about the ways our backgrounds impact our work, sense of design, and creative process. Check it out: Making It

2. Shop Talk Live is the podcast of Fine Woodworking magazine. And though it may come as a surprise - yes, you can make a compelling audio-only podcast about such a visual craft. (Though there is now a video feed where the hosts can show examples). What I like most about this one, besides Mike Pekovich's smooth and sage-like wisdom, is that every episode serves as a simple reminder: that woodworking, like most hobbies, is simply an opportunity to do creative problem solving with a specific tool kit. You have a vision, and go figure out how to make it happen. Highly recommended. Check it out: Shop Talk Live

created at: 05/26/2016

3. 99% Invisible - Definitely the show with the biggest listenership in this list, this show is about, in their words, "all the thought that goes into the things we don’t think about — the unnoticed architecture and design that shape our world." Interesting to ManMakers, it's also about the people that make those things and work on those projects, and how they affect contemporary culture. Nothing just appears, or exists. Some creative person thought it up, designed it, prototyped it, found a way to manufacture it, and put it out into the world before any of us interact with it. Check it out: 99% Invisible 

created at: 05/26/2016

4. Rendered (formerly Destination DIY) completed its run last summer, but it's archives are all still available. The show looks at DIY culture, and all the interesting ways it's revealed itself in our (increasingly) post-consumerist era.  Mostly, it's a look at what happens when we make things ourselves. (Hint: it's good) Check it out: Rendered

created at: 05/26/2016

5. Adventures in Design is the only daily show listed here, which makes it a great way to start of your morning. It features mostly interviews with designers, artists, and full-time creatives, and discusses everything from process to time management and what it's like to be a small business owner, working from your kitchen table. Check it out: Adventures in Design

created at: 05/26/2016

6. Song Exploder - This show focuses specifically on music, and while I seem to almost inevitably find an instrument or two in the closets of almost all makers and crafters I know, you don't have to be a musician to appreciate it. Each episode does exactly what the show's title suggests - explodes one song into its component parts, discussing songwriting, playing instruments and tracks individually, and discussing how the final mixes are built. I can't think of a better use of the podcast format than to spend fifteen minutes discovering new music and learning how some of my favorite songs are put together. A personal fave that I imagine any ManMade reader will enjoy. Check it out: Song Exploder 

created at: 05/26/2016

7. Reclaimed Audio explores the world of working with existing materials, recycling, upcycling, and making something new of things you already have, or can find cheaply or for free. It's a narrow focus, but the hosts mesh well, and, at least to me, have some pretty great ideas. The show always helps to remind me how much I do actually care about giving things a new purpose, and comes up with some clever ways to do it. If that's the kind of DIYer you are, you'll love it. Check it out: Reclaimed Audio

created at: 05/26/2016

8. Still Untitled: The Adam Savage Project - An audio effort by one of the maker movement's biggest heroes along with some solid co-hosts. It's about all the things we've seem Adam discuss over the years, but also manages to take it out of the shop and into popular culture, economics, politics, and whatever else is on their mind. If you're a fan of his previous work, there's nothing not to like. Check it out: Still Untitled: The Adam Savage Project 

created at: 05/26/2016

9. Faking It - A relatively new show that focuses on the lighter side of the hobby: jokes, mistakes, funny anecdotes, and lots of culture references. It's a gift for the fans of these guys, and for anyone who thinks geeking out about design and engineering, and does whatever it can to not take itself too seriously. Check it out: Faking It


What are some of your favorite creativity, craft, and maker podcasts? Please share in the comments below. 

Weekend Project: Make the Ultimate DIY Wood Burning Camp Stove

$
0
0

created at: 09/05/2014

When I bought it ten years ago, my backpacking stove cost me more than $100, and each time I fly to a destination trip, I've got to scout a local outdoor store to get my fuel bottles filled or source some disposable canisters.

The DIY Mountain Ranger Camp Stove, on the other hand, is made from (maybe) $5 in new materials and some recyclables and relies on found fuel - small twigs, sticks, and brush, to produce a very hot flame, very quickly. 

So. As we often find on ManMade, the DIY option makes a compelling case. 

Here are few details about the Mountain Ranger Camp Stove: 

  • Named in honor of the U.S. Army Rangers. (I'm a veteran and served with some of these men.)
  • Tested and proven by veterans during a 30-day mountain wilderness adventure at 7,000+ ft.
  • Burned 4 times per day on average, and up to 10 times in a single day (150+ burns total!) - no signs of degredation aside from normal wear and tear.
  • 30 minute burn times from found fuel are common.
  • Boils 2 cups of water in a canteen cup in 7 1/2 minutes (depending on altitude) and will pasteurize a full canteen of water on a single load of fuel.
  • 1 cup of wood pellets will burn for 90 minutes and provide heat for at least another 90 minutes.
  • Can quickly and easily be converted into a heater.
  • Designed to be protected from the wind - no windscreen necessary. (natural windbreaks are recommended)
  • Easy to relight if blown out, simply throw a spark at the top of the stove.
  • Once up to full temperature (less than 2 minutes) will re-light itself if blown out under normal conditions.
  • Smokeless, hot, bluish flame from found fuel - the ONLY DIY wood burner that truly gasifies.
  • Perfect for hunters, campers, hikers, bikers and, of course, emergency preparedness.

The team behind Mountain Ranger - a group of veterans - were kind enough to share the plans in full with ManMade readers. In the free download below, you'll note the simple materials list: a tuna can, a soup can, a quart paint can, a single screw, and a plumber's pipe strap, which you can get at any hardware store.

Download the plans here: How to Build a Mountain Ranger


For some more details, check out:

BUILD VIDEO: http://www.youtube.com/watch?v=qMTUfNoJPws
PAINTING VIDEO: http://www.youtube.com/watch?v=_P1dOlV3YZE
Questions, Comments: diycampstoveplans@gmail.com


Very cool. Thanks for sharing, Karl. 

What's Good for May 2016: What We're Reading Watching and Listening To This Month

$
0
0

created at: 05/27/2016

Welcome to What's Good, ManMade's monthly Show and Tell day, where we let you know what we've been reading, watching, and listening to. 

Here's what's good this month ...


Reading

Chris:

I mostly recently finished Norwegian Wood: Chopping, Stacking, and Drying Wood the Scandinavian Way. If you're wondering if you really can fill two hundred pages on the subject of firewood, the answer is an absolute yes. The felling and chopping aspects are definitely interesting, but what most compelled me was the exploration of what building and stacking of these wood piles each year means for these cultures. It's a fascinating look that I suspect most North American readers hadn't really thought about, but from which we can all learn a lot. 


David:

I recently picked up an old, well-illustrated book called "My First Summer in the Sierras" by John Muir while sitting in a sierra club cabin in the middle of a snowstorm on Mt. Shasta. I read the book by headlamp and I can't think of a better way to experience his The way that this man describes his journey through the California mountain ranges over 100 years ago is compelling. I don't how anyone could read this book and not be inspired to venture out and see a bit of the great outdoors. I highly recommend developing a spirit of adventure, and this book is guaranteed to stir it up in you.


Justin:

I just finished The Happiness Hypothesis by Jonathan Haidt which is kind of a pop psychology book taking a look at ten of the "Great Ideas" on happiness espoused by great thinkers and religions throughout history and examining their relevance and practicality in light of modern psychological research. I certainly enjoyed it and walked away with some new mental frameworks and processes. However, last week I listened to Between The World and Me by Ta-Nehisi Coates and it rocked me. An engrossing and personal letter written to the author's son about the realities of living with a black body in America. It's very much in the style of Baldwin's The Fire Next Time and is something I feel like everyone should read.

 created at: 05/27/2016

Bruno:

This article from Quanta Magazine pretty much blew my mind. In it, cognitive scientist David Hoffman makes the case that our perceptions of reality are, in fact, nothing like reality, and that they are nothing more than adaptations developed to maximize evolutionary fitness. In other words: we're living in the Matrix. Or something like that. Read it and tell me what you think.


Watching

Chris:

Nothing! I know. I've been out of town a lot a lot over the last four weeks, and haven't been able to dedicate any time to watching. I haven't been to the movies in almost a month, but the one I saw was The Invitation, a chamber thriller I thought was super creepy and well done. The last TV show I watched was Catastrophe season 2, but everyone already knows that's great. 


David:

With such great weather in California I've taken a hiatus from screen time for the most part. But I'm still down to watch a few Salvage Dogs, and Fixer Upper. These shows are great to see how others approach making, fixing, and the very best upcycles I've ever seen.


Justin:

Through a weird twist of events and random connections on Twitter, I ended up at the premiere of The Last Days in the Desert and got to talk to some of the cast and crew about their experience making the movie. I found it to be a profound experience and the movie is great fodder for good conversation. Ewan McGregor plays both Jesus and the Devil as Jesus finishes his fast and interacts with a family on the edge of the desert before beginning his ministry. Also, I saw The Lobster (without knowing anything about it) and it was the perfect way to experience the film. Truly bizarre and anything I've seen. Go see it!


Bruno:

My phone, as a million messages, photos, videos, and voice calls come through on WhatsApp. Yeah, I know, right? Who uses WhatsApp? Everybody, it turns out, in other countries. I'm in Argentina this week visiting relatives  and I can't believe how completely ubiquitous WhatsApp is here. Literally everybody has it, and uses it constantly. I'm not sure why it hasn't caught on as much in the U.S (yet), but it's pretty awesome, and I recommend you check it out.


Listening

Chris:

A Man Alive by Thao & The Get Down Stay Down, over and over. Holy cow. Thao Nguyen has been on and off my radar since her first EP; she's one of those artists where I'm constantly Shazam-ing or looking up on movie or TV show soundtracks, only to find out it's her. Her first few albums are a very successful funky, folky, indie pop-y, anthemic blend that hits all the sweet spots, but "A Man Alive" is a different beast altogether. It's a beat and bass heavy album, helped by production with Tune-yards' Merrill Garbus, and the content is all about an estranged relationship with her father. It's fantastic.

created at: 05/27/2016

David:

It's a mix of the Lumineers, Weezer, and a bit of Echo Smith and Modest Mouse. My taste in music has been a bit ecletic this month as I spent more time on projects with a set of headphones in, and I look for rhythm and a bit more acoustic layering with music right in my ears.

Justin:

Just Real Love Baby by Father John Misty over and over again. 

Bruno:

Carlos Gardel, Los ChalcharerosJorge Cafrune and other Argentine folk music spilling out of every cafe and taxi cab. As I mentioned, I'm in Buenos Aires this week, and I find the city bathed in autumnal light, a cool breeze, and a sort of lingering nostalgia that has no origin or destination. Just two old men wrapped in scarves, huddled around a little speaker, having their afternoon merienda at a cafe, listening to something like this: 


What are you reading, watching and listening to this month? Share your favorites in the comments below. 


How to: Build a Simple DIY Pegboard Shelf

$
0
0

created at: 09/23/2014

I love pegboard. I love organizing my workshop with it, I love using it in our office, I think it's cool when people do the Julia Childs-style pegboard pot rack thing...and I even like seeing it in store aisles, and noting all the clever and and adaptable industrial design things used to display items.

But...But! While pegboard is amazing for hanging stuff neatly on a grid, it does absolutely nothing for items without a hole in them. And there are plenty of those used-on-every-project type tools that it simply can't handle: glue bottles, drill bits, paint and putty, and most significant to me, a tape measure. I have three or four of them, all basically identical, and I use them all on nearly every project because there's no obvious place to store them on my pegboard in between making measurements, and they get set down in all kinds of places.

created at: 09/23/2014

So, I came up with a solution to create very affordable, very customizable DIY pegboard shelves that integrate into any pegboard system and can be made in just a few minutes. They're just as moveable as normal hooks, so you wont have to drill any holes in your pegboard, yet they still can support a surprising amount of weight across their length.


created at: 09/23/2014

The system is based on two key materials: 3/4" thick select grade pine, and square bend hooks. The 3/4" pine is sold as a 1x4, 1x6, 1x8 etc in the lumber section, and the L-shaped hooks can be found with the eye bolts and other hooks in the hardware aisle. 


created at: 09/23/2014

The are two important things to keep in mind when making this style of shelf:

  1. It's best to keep things to whole inch increments, at least for the width - the part that will butt up against the pegboard. Pegboard holes are 1" on center, and it's easiest just to consider the shelves as taking up a certain number of hole real estate, so they don't interfere with more spots than necessary. It's also wise to think of these as long rather than deep shelves. Pegboard is a mostly vertical system that allows you to use your wall space, not the floor space, so I'd recommend keeping these to no more than 6" deep.
  2. In order for the shelves to be installed tight and flush against the pegboard, you need to knock down the back top edge so that you can tilt the shelf to install it with the hooks. You can do this easily with some medium grit sandpaper, a knife, a hand plane, or a router. 

More on both below. 

created at: 09/23/2014

The assembly process is super simple.

  1. Measure out your hook spacing on the back. Since pegboard holes are 1" on center, as long as your holes are spaced at a whole inch length, you'll be good to go. 
  2. Make a mark at least 1 1/2" inches from either side, doing your best to keep them on the same center line.
  3. Drill a pilot hole for the square bend hook. I used a 3/32 drill bit for a #10 hook.
  4. Add the hook to each hole, making sure it's an equal number of turns from the back so that it's evenly spaced against the shelf. Obviously, both hook ends will need to be facing up towards the knocked-down edge. 


created at: 09/23/2014

The hooks can be a little tough to drive with just your fingers, so I like to grab them with a pair of pliers, and then spin the wood to drive the threads into the shelf.


created at: 09/23/2014

Then, attach it to the shelf. You can see how the rounded over or chamfered edge is important to get a tight fit here. It allows the hooks to sit just the pegboard's thickness (usually 1/4" or 3/16") away from the shelf, and still be able to attach it.

And... you're done!

created at: 09/23/2014

That's the basic, use-a-scrap-piece-of-wood-and-some-hardware system. It works great for small, flat items, and can easily be integrated between similar tools that hang on hooks.


created at: 09/23/2014

For an even stronger, more versatile shelf, you can add a bottom support that will handle much more weight. The idea is basically the same: 

created at: 09/23/2014

Cut a shelf to length, then add a slightly shorter and thinner bottom rail. Here, I cut the shelf to 18x5" and the bottom piece to 16" x 3 1/4", creating a total height of 4", or four pegboard holes.  Attach with a butt joint, and drill and sink screws to hold everything in place. 


created at: 09/23/2014

Since I have a router, I used a chamfer bit around the whole top, knocking down the top edge for installation, and to add a more finished look. 

created at: 09/23/2014

You could even add small hooks to the bottom support for even more versatile storage options. 


I plan to use this technique to create even more workshop storage solutions. Let me know what else one could make with this idea in the comments below. 


This ManMade post was originally published in September 2014. We're sharing it again cause it's time to get that workspace organized!

One Simple Super Trick to Turn Your Grill Into a Top-Notch Smoker

$
0
0

Last weekend I grilled in a public park for a friend's birthday and my buddy remembered all of the necessary ingredients... except for the grill. Someone dashed out to pick up a cheap grill from Target ($16!) and I began scouring the internet for cool ways to good meat on a cheap grill. And that's how I learned about the Snake Method...   

The Snake Method is one of the more recent innovations in the world of barbecue and one that's just now hitting the mainstream. It's a trick for turning your average circular charcoal grill into a quality smoker, for that falling-off-the-bone texture and smokey flavor of choice. By creating a semi-circle of briquettes topped with some flavoring wood of choice, you'll be able to create a slow burn that can cover all of your smoke-inducing needs. 

Admittedly, I wasn't able to pivot into a half-day of smoking meat with the Target grill (I stuck with hamburgers and hot dogs), but it sure got me thinking for next time.

Learn how to perfect the full Snake Method Technique here. 

Viewing all 2425 articles
Browse latest View live


Latest Images