![]()
For the last couple years, I've had a framed tattered page I tore out from an old book of poetry (pictured below) that I picked up at a garage sale in Minnesota when I was a boy. I've taken it with me wherever I've moved, usually displaying it on my desk, although occasionally on a shelf or bedside table. The poem is titled SEA-FEVER and came from a poetry collection called Salt-Water Poems and Ballads by John Masefield, first published in 1902.  The poem expresses the yearning for the grey seas from the perspective of a presumably landlocked rover, and was one of my initial inspirations for rafting the Mississippi River.
I must go down to the seas again, to the lonely sea and the sky,
And all I ask is a tall ship and a star to steer her by;
And the wheel’s kick and the wind’s song and the white sail’s shaking,
And a grey mist on the sea’s face, and a grey dawn breaking,
I must go down to the seas again, for the call of the running tide
Is a wild call and a clear call that may not be denied;
And all I ask is a windy day with the white clouds flying,
And the flung spray and the blown spume, and the sea-gulls crying.
I must go down to the seas again, to the vagrant gypsy life,
To the gull’s way and the whale’s way where the wind’s like a whetted knife;
And all I ask is a merry yarn from a laughing fellow-rover,
And quiet sleep and a sweet dream when the long trick’s over.
 Next up is INVICTUS (Latin for "unconquered), a short Victorian poem written by the English poet William Ernest Henley in 1875 and publish in 1888. A poem about the indomitable spirit of humankind, it has served as a comfort for great men throughout history, most notably Nelson Mandela during his 27 year incarceration in the Robben Island prison. Ironically, the poem was composed from an infirmary while Henley was recovering from a recent leg amputation...
Out of the night that covers me,
Black as the pit from pole to pole,
I thank whatever gods may be
For my unconquerable soul.
In the fell clutch of circumstance
I have not winced nor cried aloud.
Under the bludgeonings of chance
My head is bloody, but unbowed.
Beyond this place of wrath and tears
Looms but the Horror of the shade,
And yet the menace of the years
Finds and shall find me unafraid.
It matters not how strait the gate,
How charged with punishments the scroll,
I am the master of my fate,
I am the captain of my soul.
 [https://www.flickr.com/photos/nomadic_lass/12192973553/in/photolist-8UU4xT-dg7nMZ-iQ7Hud-6d6H-jzsbeX-jbUcMe-a4cdBY-2sTjo-5sm6TZ-9GiktK-prfQh6-pG7XTq-chQptu-o4SchE-8E8QQj-fvLJW2-8PDHvW-6i7Qu5-5piYcy-8yU1nd-iLrNUL-fM2DQF-pF52GT-pjQYd3-76SJSE-q3osP3-bQhBGT-gBRW22-A6pc9-pgCVZh-5MnGis-3DYhpp-2EFn8J-3TAYta-njtHtj-LUz-u3q6D-rA6cB-d9o5vJ-7Y5oks-i3DVuD-4NYgxf-ng2yHS-cwiY4Y-7v4948-7F15zZ-e6oDNw-cLiZbS-7yDWCB-b74son]") PIONEERS! O PIONEERS is Walt Whitman's great ode to the swelling spirit of those who set out in search of a better life throughout the history of western expansion. Originally published in Leaves of Grass in 1865, the poem stresses perseverance, determination, and the strength of youth carving its own path in the face of elderly wisdom. Here are the first six stanzas.
PIONEERS! O PIONEERS is Walt Whitman's great ode to the swelling spirit of those who set out in search of a better life throughout the history of western expansion. Originally published in Leaves of Grass in 1865, the poem stresses perseverance, determination, and the strength of youth carving its own path in the face of elderly wisdom. Here are the first six stanzas.
COME, my tan-faced children,
Follow well in order, get your weapons ready;
Have you your pistols? have you your sharp edged axes? Pioneers! O pioneers!
For we cannot tarry here,
We must march my darlings, we must bear the brunt of danger, 5
We, the youthful sinewy races, all the rest on us depend, Pioneers! O pioneers!
O you youths, western youths,
So impatient, full of action, full of manly pride and friendship,
Plain I see you, western youths, see you tramping with the foremost, Pioneers! O pioneers!
Have the elder races halted?
Do they droop and end their lesson, wearied, over there beyond the seas?
We take up the task eternal, and the burden, and the lesson, Pioneers! O pioneers!
All the past we leave behind;
We debouch upon a newer, mightier world, varied world,
Fresh and strong the world we seize, world of labor and the march, Pioneers! O pioneers!
We detachments steady throwing,
Down the edges, through the passes, up the mountains steep,
Conquering, holding, daring, venturing, as we go, the unknown ways, Pioneers! O pioneers!
A series of epic Levi's ads (directed by True Detective's Cary Fukunaga) featured excerpts of the poem, and you can also hear the entire poem performed by Will Greer here.
ODE (commonly remembered as WE ARE THE MUSIC MAKERS) is a poem written by English poet Arthur O'Shaughnessy and published in 1873. ODE is an elegiac tale one might tell oneself in the quietness between creative projects. The poem has nine stanzas all together, however the opening three are often the only ones remembered. I used to recite the first two stanzas to myself before going onstage each night, when I performed The Cherry Orchard in NYC and it's one that I still love having with me. Also, the poem holds the origin of the phrase, "movers and shakers." And Willy Wonka quotes the opening lines in the 1971 film...so, points there.
WE are the music-makers,
And we are the dreamers of dreams,
Wandering by lone sea-breakers,
And sitting by desolate streams;
World-losers and world-forsakers,
On whom the pale moon gleams:
Yet we are the movers and shakers
Of the world for ever, it seems.
With wonderful deathless ditties
We build up the world's great cities,
And out of a fabulous story
We fashion an empire's glory:
One man with a dream, at pleasure,
Shall go forth and conquer a crown;
And three with a new song's measure
Can trample an empire down.
We, in the ages lying
In the buried past of the earth,
Built Nineveh with our sighing,
And Babel itself with our mirth;
And o'erthrew them with prophesying
To the old of the new world's worth;
For each age is a dream that is dying,
Or one that is coming to birth.
 [https://www.flickr.com/photos/sofi01/15065759127]") ULYSSES is one of my all-time favorite poems and one that I almost accidentally committed to memory simply by reading it so many times. Written from the perspective of the famously harried Ulysses (Latin for the Greek hero, Odysseus), the poem was hailed by T. S. Elliot as "a perfect poem." At once contemplative and restless, the poem takes the form of a blank verse dramatic monologue as the man of constant sorrow seeks to reconcile the conflicting aspects of his aspirational personality. It's SO GOOD. Written by Alfred Lord Tennyson in 1833 and published in 1842, the poem has had a lasting impact on pop culture and was featured in both the Dead Poet's Society and in this epic sequenceof James Bond running from 2012's Skyfall.
ULYSSES is one of my all-time favorite poems and one that I almost accidentally committed to memory simply by reading it so many times. Written from the perspective of the famously harried Ulysses (Latin for the Greek hero, Odysseus), the poem was hailed by T. S. Elliot as "a perfect poem." At once contemplative and restless, the poem takes the form of a blank verse dramatic monologue as the man of constant sorrow seeks to reconcile the conflicting aspects of his aspirational personality. It's SO GOOD. Written by Alfred Lord Tennyson in 1833 and published in 1842, the poem has had a lasting impact on pop culture and was featured in both the Dead Poet's Society and in this epic sequenceof James Bond running from 2012's Skyfall.
This is the first section:
It little profits that an idle king,
By this still hearth, among these barren crags,
Match'd with an aged wife, I mete and dole
Unequal laws unto a savage race,
That hoard, and sleep, and feed, and know not me.
I cannot rest from travel: I will drink
Life to the lees: All times I have enjoy'd
Greatly, have suffer'd greatly, both with those
That loved me, and alone, on shore, and when
Thro' scudding drifts the rainy Hyades
Vext the dim sea: I am become a name;
For always roaming with a hungry heart
Much have I seen and known; cities of men
And manners, climates, councils, governments,
Myself not least, but honour'd of them all;
And drunk delight of battle with my peers,
Far on the ringing plains of windy Troy.
I am a part of all that I have met;
Yet all experience is an arch wherethro'
Gleams that untravell'd world whose margin fades
For ever and forever when I move.
How dull it is to pause, to make an end,
To rust unburnish'd, not to shine in use!
As tho' to breathe were life! Life piled on life
Were all too little, and of one to me
Little remains: but every hour is saved
From that eternal silence, something more,
A bringer of new things; and vile it were
For some three suns to store and hoard myself,
And this gray spirit yearning in desire
To follow knowledge like a sinking star,
Beyond the utmost bound of human thought.
![]()
Honorable Mention: THE MAN IN THE ARENA
This isn't a poem, per se, but still a masculine passage that has served me manyfold as a result of of committing it to memory. It's often referred to as "The Man in The Area" and is taken from Theodore Roosevelt's 1910 speech at the Sorbonne in Paris titled, "Citizenship in a Republic." The sentiment is one that he expressed a many different ways throughout his life, even repeating the metaphor in numerous ways, yet it is best expressed in the passage reproduced below:
"It is not the critic who counts; not the man who points out how the strong man stumbles, or where the doer of deeds could have done them better. The credit belongs to the man who is actually in the arena, whose face is marred by dust and sweat and blood; who strives valiantly; who errs, who comes short again and again, because there is no effort without error and shortcoming; but who does actually strive to do the deeds; who knows great enthusiasms, the great devotions; who spends himself in a worthy cause; who at the best knows in the end the triumph of high achievement, and who at the worst, if he fails, at least fails while daring greatly, so that his place shall never be with those cold and timid souls who neither know victory nor defeat."
This ManMade post was originally published in December 2013. We're re-sharing it because poetry is still awesome.


 Every great breakthrough has its "Eureka!" moment, whether we're talking the discovery of gravity or the founding of the world's largest shoe empire. In the latter's case, that happened while searching for a way to create cleats meant for a urethane track (meaning no more metal spikes on the bottom of running shoes), and it involved a household wafflemaker. The infamous wafflemaker was then lost for decades... and now found.

_large.JPG?1418619978 "credit: Justin Dobies") The poem expresses the yearning for the grey seas from the perspective of a presumably landlocked rover, and was one of my initial inspirations for rafting the Mississippi River.
The poem expresses the yearning for the grey seas from the perspective of a presumably landlocked rover, and was one of my initial inspirations for rafting the Mississippi River. Next up is
  [https://www.flickr.com/photos/nomadic_lass/12192973553/in/photolist-8UU4xT-dg7nMZ-iQ7Hud-6d6H-jzsbeX-jbUcMe-a4cdBY-2sTjo-5sm6TZ-9GiktK-prfQh6-pG7XTq-chQptu-o4SchE-8E8QQj-fvLJW2-8PDHvW-6i7Qu5-5piYcy-8yU1nd-iLrNUL-fM2DQF-pF52GT-pjQYd3-76SJSE-q3osP3-bQhBGT-gBRW22-A6pc9-pgCVZh-5MnGis-3DYhpp-2EFn8J-3TAYta-njtHtj-LUz-u3q6D-rA6cB-d9o5vJ-7Y5oks-i3DVuD-4NYgxf-ng2yHS-cwiY4Y-7v4948-7F15zZ-e6oDNw-cLiZbS-7yDWCB-b74son]") PIONEERS! O PIONEERS
PIONEERS! O PIONEERS [https://www.flickr.com/photos/sofi01/15065759127]") ULYSSES
ULYSSES


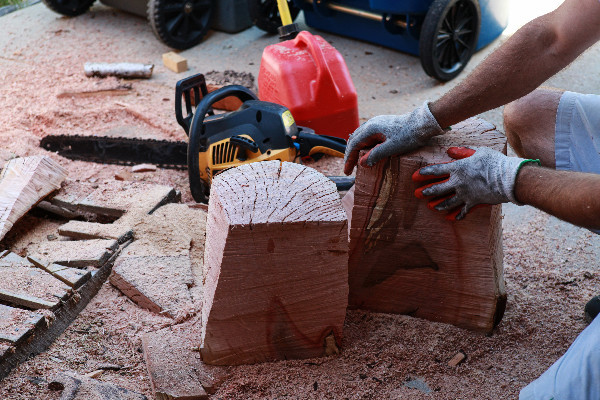
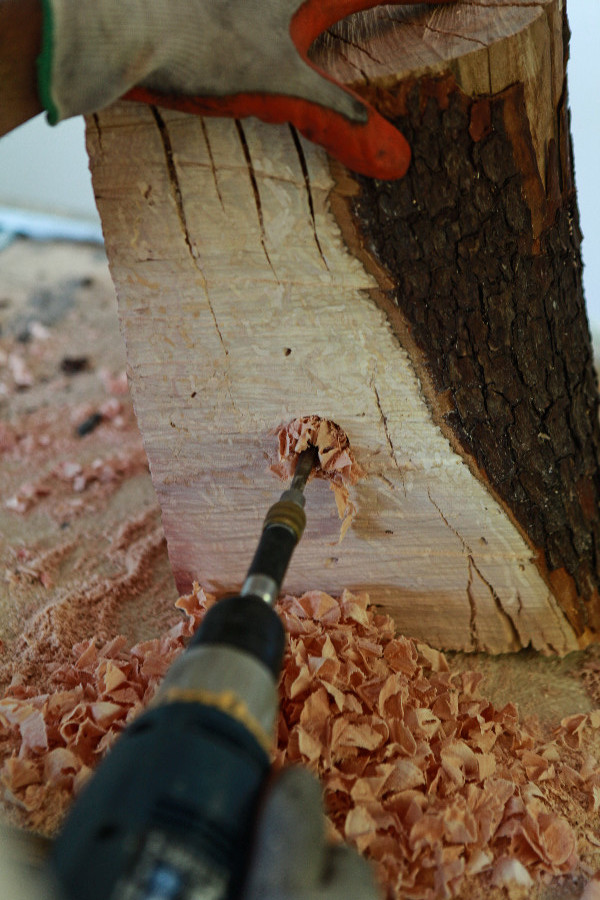
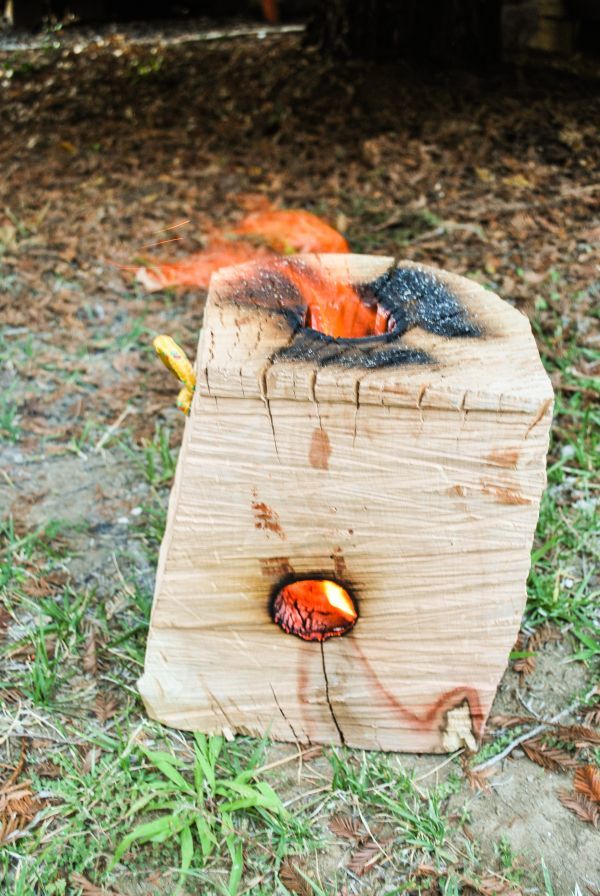
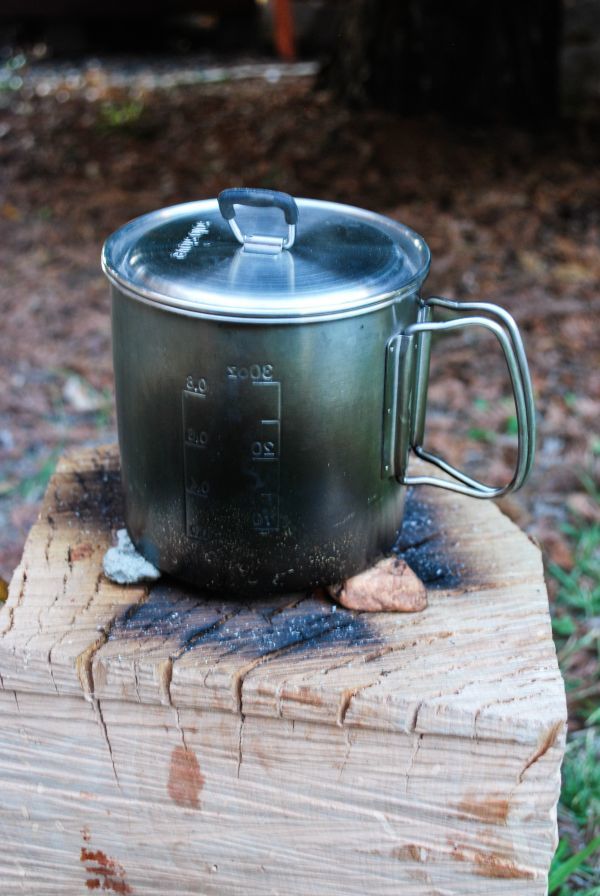
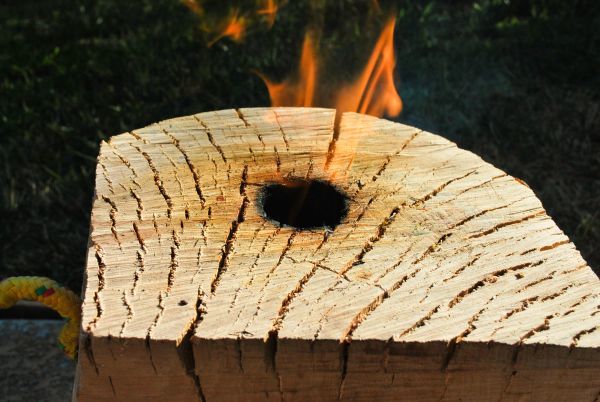 Here's another project that will go perfect with a long summer night at the beach. Make a portable campfire you can bring with you to light off wherever you need. This variation of a swedish flame
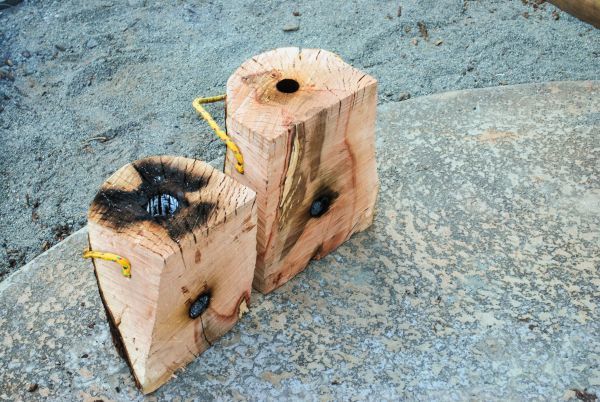

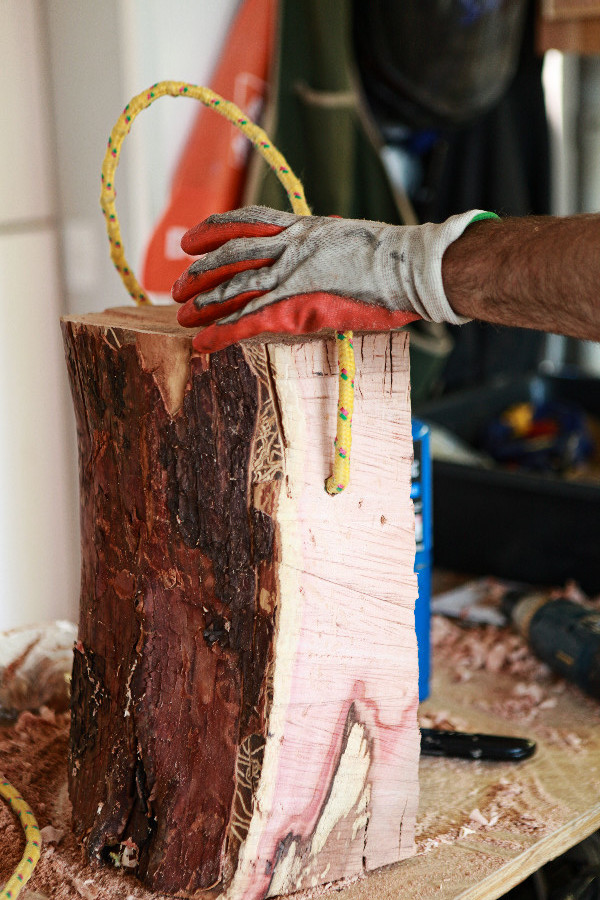 Step 4: Attach a Handle - Adding a bit of rope as a handle makes it easy to transport and manage. Using staples, screws, or nails, attach a length of rope at each side as a simple handle to keep it mobile.
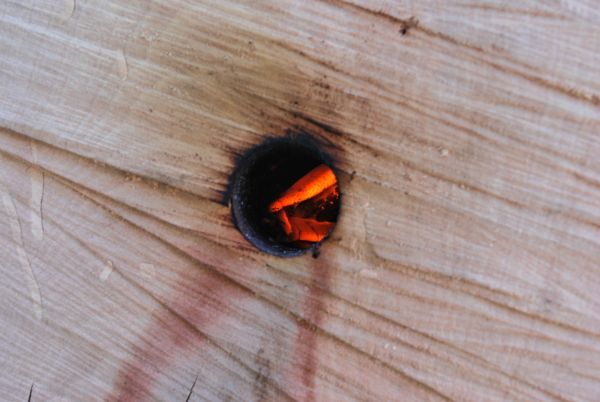
 There's something special about the printed word. As the digital age quietly kills those musty hardcovers, there is still a place where ink is alive. Watch it now. If you're like me, you love books. It's the smell, the feeling and the experience that comes with holding a solid, well worn hardcover with the marks of countless readers along the way. Here's a story about the man who is still holding strong to the books we all love, and why he's doing it.


 [https://www.flickr.com/photos/matthamm/3345597895/in/photolist-66D4Gk-poTh4C-k98N9K-4qBqbC-s7HJdP-4qBqwQ-dXrYiD-7v5ZcW-nWb57-6bbr1o-dXrYke-6EW2e-d43bn7-eqa2ya-5FPtfL-69tdC5-dKQnkY-Kvqb5-dKRqDu-dL16eQ-aLToFi-86PdSh-dKQzL5-dKUzUT-f9VxDL-g1JAEd-ow7XCE-23N14v-6bbeyf-6bbmFJ-8wBtp2-g1JCEp-7YuBAy-dSXXeX-dKQQZW-dKPTkA-6EW1a-dZtcpD-dKRvzW-dKKQ6i-at19ah-6vETf6-6wA7jh-bSFKDn-g1Jqz1-7pcvbu-qpm19M-oeQrY1-dKRoCq-9BAgxx]")


 Now that everything is cut, it's time to assemble. Grab your box of screws and drill and join together two legs and one shorter stud. What makes building this bench so fast is the softness of the cedar and the self-tapping screws. Fastening each joint of this bench doesn't require any pocket holes, pre-drilling or countersinking. Just angle each screw into each joint and drive it just below the surface.


 I actually don't remember a lot of the blur that of this exceptional decade in my life, but I do remember a few things I should have known. Here they are.


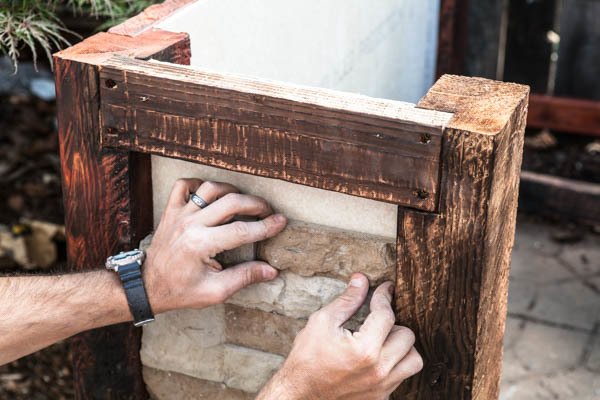
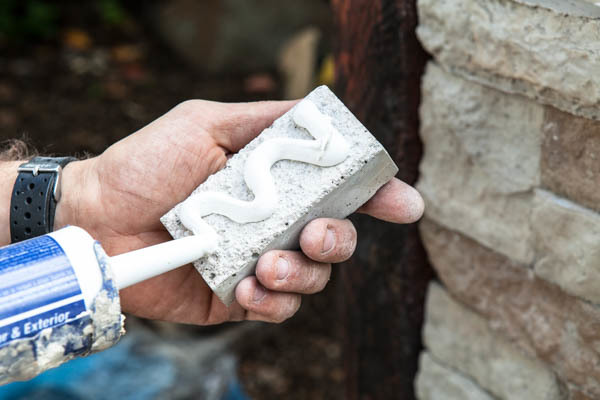
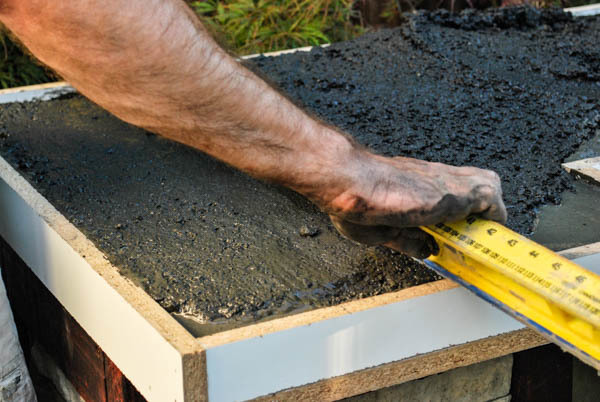
_large.jpg?1469075095) There are many reasons we DIY projects: saving money, customizing for the space, or to make something from quality materials without a particleboard heart. But never do we do it because we want it to look like a thrown-together project.
There are many reasons we DIY projects: saving money, customizing for the space, or to make something from quality materials without a particleboard heart. But never do we do it because we want it to look like a thrown-together project. _large.jpg?1469078535) This project is made from simple materials and has a simple design, but the finished project still looks polished enough to look like a custom build. First, the foundation of the bench is made from simple lumber finished with a bit of roughing and charring for character. Next, a bit of creative joinery turns ordinary boards into something a bit more interesting, with laps to provide a strong base that looks great. Then, the top is made from standard concrete formed up with a wood-grained top for an interesting look. Finally, I finish it all off with a smooth, durable outdoor protectant to make sure it keeps looking good well into the future.
This project is made from simple materials and has a simple design, but the finished project still looks polished enough to look like a custom build. First, the foundation of the bench is made from simple lumber finished with a bit of roughing and charring for character. Next, a bit of creative joinery turns ordinary boards into something a bit more interesting, with laps to provide a strong base that looks great. Then, the top is made from standard concrete formed up with a wood-grained top for an interesting look. Finally, I finish it all off with a smooth, durable outdoor protectant to make sure it keeps looking good well into the future. _large.jpg?1469078707)
_large.jpg?1469075374)
_large.jpg?1469075311)
_large.jpg?1469075362)
_large.jpg?1469075283)
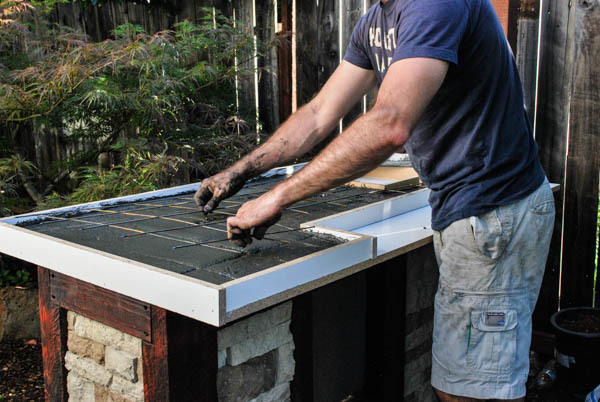
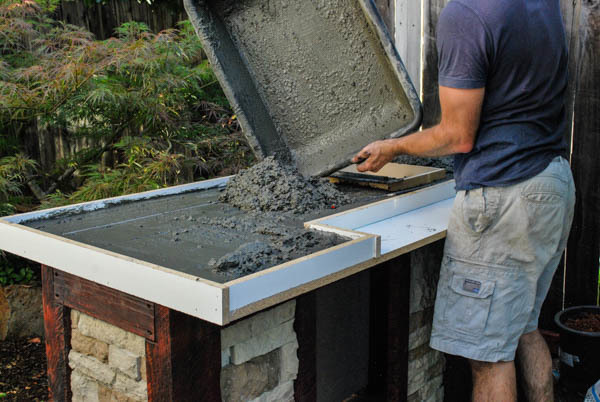
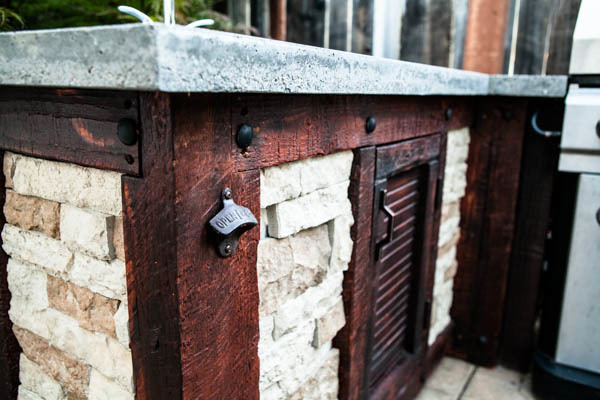
_large.jpg?1469075262) To give the tops a bit of character, I used textured siding boards as the forming base (which would eventually be the top).
To give the tops a bit of character, I used textured siding boards as the forming base (which would eventually be the top). _large.jpg?1469075248)
_large.jpg?1469075177)
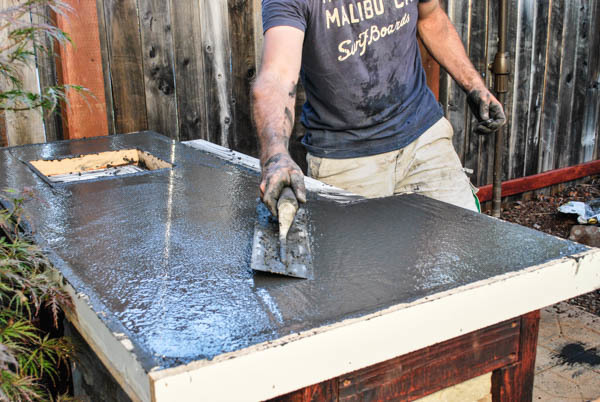
_large.jpg?1469075231) I placed the tops and secured them with construction adhesive, then added a waterproof sealant to protect from spills and weather.
I placed the tops and secured them with construction adhesive, then added a waterproof sealant to protect from spills and weather._large.jpg?1469075108)
_large.jpg?1469078859) Wrapping it up
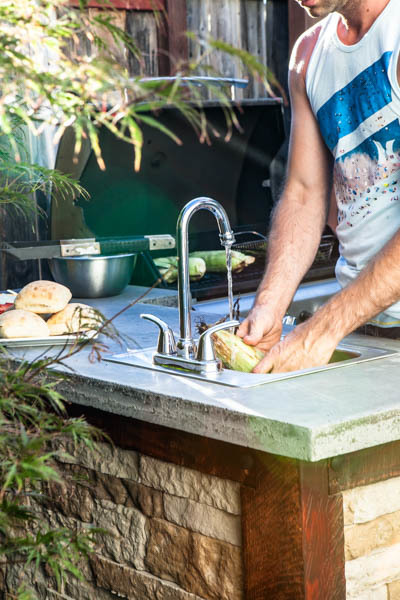
Wrapping it up_large.jpg?1469075413) The next step in my big backyard makeover is building a corner table, and then I’ll finish the whole thing off with a solid fire pit.
The next step in my big backyard makeover is building a corner table, and then I’ll finish the whole thing off with a solid fire pit. _large.jpg?1469075513) This is definitely the place where evenings with friends last late into the night.
This is definitely the place where evenings with friends last late into the night._large.jpg?1469075543)

 [https://www.flickr.com/photos/eltpics/17236416365/in/photolist-79ozQo-77e954-xZDRG-5SMm2w-sg895v-4yY6Bk-4L3R29-4KYBkP-sGDnt-sGDo2-sGDnT-4G3ZEX-4Djud2-5qsBZ9-bSpPKx-brYDTM-bmWBXy-4W575Q/]") Check out this article
Check out this article  Is the first thing your guests see when they walk up to your front door a worn-out welcome mat? Make a good impression with one of these DIY wooden front door mats. Take a look: I've been meaning to toss the tattered rugs at my front door for a while now, but just could never find something that I wanted to replace it with. These great wooden mats still provide space for dirt and water to catch before walking into the house, but upgrades the space much more than another fuzzy rubber mat ever can:

 3. Diagonal Wooden Mat -
  4. Chevron Wooden Mat -

 This also makes a great homemade and masculine gift to give to friends, especially if you engrave it with their initials or another simple message.
 [https://www.flickr.com/photos/thiagopompeu/6179711592/in/photolist-nvcpn-o2DFp8-pzodd1-dNJ51S-i6pfia-mjecL-eWDkXJ-aq5CXA-4Y7YSC-njsTMs-cCk1Pf-ggsoA-gFEsaP-4E3bqZ-joTUZ4-ffz3FB-9aJQyg-2YY128-aJhHwV-dbFF6V-pEYLEL-5dRNUr-k55eNR-6kKZio-bUrSpq-2YYt1D-oRow8Z-dVFYHj-egsHhP-a2MfPa-6iU4Kp-3vVicp-dVArba-feTyVF-aJhJ9V-9CJ5Fo-egy7co-nRgZm1-5mkSf2-cfiejJ-6penxR-89uHNZ-bUrRB1-cficYA-cfiebb-af5Y36-drxpX6-dVFY7U-6pepgg-aftdYm]") Five years ago I found a tiny grant through a journalism fellowship so that I could shoot a documentary short about sex-trafficking in South Africa during the 2010 Soccer World Cup. Four years ago I found some small financial aids to help me study the Lakota language, and three years ago my brother and I found a grant through his college that helped fund our dream of
Five years ago I found a tiny grant through a journalism fellowship so that I could shoot a documentary short about sex-trafficking in South Africa during the 2010 Soccer World Cup. Four years ago I found some small financial aids to help me study the Lakota language, and three years ago my brother and I found a grant through his college that helped fund our dream of 
 [https://www.flickr.com/photos/druidabruxux/9433296275/in/photolist-fnA7ke-fncVNz-4sc2qF-ekW5xW-bBBKdu-iufw6A-6B9Ynq-5PdJKN-fouWbu-EF5on-BWo9Z-BWoe1-561v3m-48ZdMa-jyWsbX-7pUvWd-8caDFA-T1eEL-48qtiH-bExZJP-bEy8Mk-bCnUtP-46XgWW-9JT4jP-9dSmCo-86snUU-2hjFJc-68qzAN-8caAYb-8cazys-8caAa9-5qz322-9L863i-64m61x-89JBqL-8vJ2dA-fKjGZt-8curU9-69s9CG-52VJEd-dQEtzr-8c7eri-5xGzBW-yGD4U-89FjU6-8QLJ7v-o7q4TJ-5rUthQ-dSrrKs-bjnZVc]") Study Abroad - If you're still in school and your program is somewhat flexible, you should absolutely check out the study abroad or foreign exchange programs. Generally speaking, it's much cheaper to live abroad in student housing than as a normal traveller, and it's much easier to attain a visa. Not to mention you'll get a whole new perspective on education and you'll be able to absorb a new culture over many months.
Study Abroad - If you're still in school and your program is somewhat flexible, you should absolutely check out the study abroad or foreign exchange programs. Generally speaking, it's much cheaper to live abroad in student housing than as a normal traveller, and it's much easier to attain a visa. Not to mention you'll get a whole new perspective on education and you'll be able to absorb a new culture over many months.  Wwoof it - The
 Consider Teaching English Abroad - If you're ready for a more long-term adventure, there are so many organizations that facilitate this that it's hard to narrow down the list. Most programs don't require previous teaching experience, but of course require you to be in the country for at least a full school year. Good programs to check out include
  Road Trip Nation Travel Grants


