Quantcast
Channel: Man Made DIY Recent Posts
Viewing all 2425 articles
Browse latest View live

15 High-End, Long-Lasting Goods that are Worth the Splurge

$
0
0

created at: 12/30/2015

Here at ManMade, "value" is all about getting a product which has a quality you're comfortable with at a price that you're comfortable paying. For us, that means we're rarely recommending "luxury" goods, and instead, looking for pieces that will last lifetimes for a fair price. And sometimes, having the top-of-the-line grade of goods are simply worth the investment. Here are fifteen we think are worth paying for.


1. Leather boots that can be resoled. Since it's winter, let's begin with footwear that will keep you warm and dry. A pair of all-leather, Made in America boots might set you back $200-$250, but properly cared for, they'll last as long as you can walk in them.

ManMade Recommended: Red Wing Heritage Iron Ranger, from $250

2. A serious butcher block cutting board. Big, sharp knives require a large work surface. Look for a nice, thick board made of end grain. Here, the tools slice in between the wood fibers, which will naturally heal themselves and maintain antibacterial properties. Lasts decades.

ManMade Recommended: John Boos Reversible Chopping Block in End Grain Construction, 24 by 18 by 2.25", Maple - $280


3. The best travel mug. When its something you use every day, there's a reason to get the best. Thankfully, in the sphere of travel mugs, the "best" only costs you $20. 

ManMade Recommended: Contigo Autoseal West Loop Stainless Steel Travel Mug with Easy Clean Lid, 16-Ounce or 20-Ounce


4. A legit wool blanket. Nothing keeps you toasty this time of year like an American wool blanket made from American sheep in an American factory. Well, except for wool from New Zealand and Canada and Scotland, who all know a fair bit about sheep, but the point is: not acrylic, not made in a sweatshop.  Yes, paying $150-$300 is totally worth it. Once you snuggle up with a special someone on a winter's eve, you'll know why. 

ManMade Recommended: 


created at: 12/30/2015

5. A really nice set of bench chisels. A chisel that won't stay sharp or feels awkward in your hand is not frustrating, it can ruin your wood stock and project, and potentially be very dangerous. If you're ready to step up to a real set of chisels for fine joinery, don't skimp and save until you can get a set your proud of, and can sharpen for the next fifty years. (Hint: they don't sell these at the home improvement center). Start with a 1/4" and 3/4", then fill in what you need from there.

ManMade Recommended: 


6. That $70 bottle of Scotch. A standard bottle of whiskey is 750 ml, or a "fifth" of a gallon, or 25.6 oz. That's about sixteen 1.5 ounce servings (a "shot"), and if your Scotch costs around $70, about $4.40 a glass. Cheap? No. But considering you pay at least that much for an average draft beer, twice that much for a cocktail at a restaurant, and almost four times that much for the same whiskey at a high-end bar, it's worth it every once and a while. Sure, find the budget bottles for your average week night, but being able to invest a little more cash up front and sipping slowly for a few months nets some true pleasure and a great night in. 


created at: 12/30/2015

8. A high-quality 12" stainless steel fry pan. The key to getting deeply flavorful food and great crusts from your stovetop is an evenly heated pan with just the right surface to promote browning and caramelization. A tri-ply stainless steel skillet does exactly that, and goes easily from cooktop to oven to finish cooking. (Works on your grill grates, too).

ManMade Recommended: 


9. A professional level camera lens. Great photos are about great light and composition. But some serious glass can certainly help. In our experience, a better lens helps to turn out much better images than a better camera body. For creative types and makers, its often helpful to know that your gear is top quality. What you need to work on is your technique. 

ManMade Recommended:


10. A high-end pair of sunglasses. You might think: why spend $100 on a pair of when I always lose or break my $20 ones? Because if you pay $100 for sunglasses, you won't. It's the cheap models that snap or aren't worth keeping track of. Buy a good pair of shades, and you'll be surprised how motivated you are to take care of them.

ManMade Recommended: Ray-Ban RB2132 New Wayfarer - $70 and up

11. A SawStop Table Saw - Patent and litigation controversy aside, ask yourself: is one of your fingers worth $1400? Is the continued use of your dominant hand to play music, touch your kids, or write your masterpiece worth $2000? Mine is. If you're a serious DIYer and make countless cuts each week, this is a major innovation that actually works. Thankfully, they're among the best reviewed models in their class. Save up, and use often.

ManMade Recommended: 


12. A breathable rain jacket. Call us crazy, but with today's modern materials, there's simply no reason your core should be wet during winter and spring. That soggy look works for no man.

There's lots of options to check out, but here a few solid models to get started:


13. A burr coffee grinder. Yes, you can make great coffee at home. The key: proper technique, and fresh ground, high-quality beans. Over the last few years, the home burr grinder has become much more affordable. They're easier and cleaner to use than blade grinders, and simple help to turn out the best cup of coffee one can make at home. 

ManMade recommended: Bodum Bistro Electric Burr Coffee Grinder - $99.95


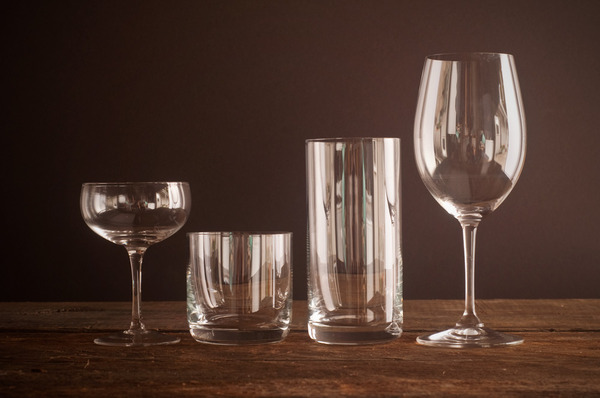
14. A proper set of cocktail glasses. A properly made drink deserves a proper glass. Your arsenal is thus: 

  • 6 oz. coupe glass for martinis, drinks served "up" and bubbly things
  • 8 oz. rocks glass - neat whisky, simple cocktails, or drinking "on the rocks."
  • 16 oz. highball glass for "tall" drinks, or cocktails that are mixed with lots of ice and soda for slow, cool sipping
  • Stemmed wine glasses for wine and everything else

Get glass that's bubble and defect-free, and feels right in your hand. Buy four of them. Otherwise, the style is up to you. 


created at: 12/30/2015

15. A Starrett Woodworking Square. There are other measuring devices, and then there are those made by Starrett. You'll have to pony up a bit more upfront, but these will outlast your project making days, and maintain serious value when you've retired and ready to sell it.

If you already have a 12" combination square you like, try the Starrett 4" double square (pictured above) to supplement, and experience the quality. You'll be convinced... and then replace your 12" with the Starrett, too. They just work. 

ManMade Recommended:


ManMade Essential Toolbox: Beyond the Basics - Get Yourself Some Beautiful Tools

$
0
0

H.O. Studley ToolkitWe've spent the year highlighting the tools we love in the shop. From the functional to the specialized, there have been 51 posts on the best tools for tackling creative, DIY, or around the house projects. Assembled together, they're functional, long-lasting, and straightforward to use. But now, for this last post in the series, it's time to go beyond the basics to explore those are as beautiful as they are useful.    Lee Valley Parallel Tip Screwdrivers1. Lee Valley Parallel Tip Screwdrivers $50 These beautiful screwdrivers are designed to perfectly seat into a flathead screw without nicking the inset wood. Smooth and polished cherry wood handles make them easy to control when seating those final fasteners. Complete with a burnisher to create a small layer of burrs along the edge so the driver won't slip while turning brass screws.


Cergol Hammers2.  Cergol Custom Forged Hammers $400+ What happens when you blend traditional craftsmanship with incredible design? Excellence. That is exactly why you'll have to wait about 3-4 months after ordering for a piece from Cergol Tools to arrive at the shop. Cergol has been featured by the industry many times over because his tools are distinct, his methods are amazing, and the finished products are the epitome of useful beauty.


Thin Keft Japanese Pull Saw3. Thin Kerf Japanese Pull Saw $400+ There is some debate as to the effectiveness of earlier, Asian craftsmanship tools versus the more modern western tools. In my mind, the traditional tools are still the best for a variety of reasons. First, I love the thin kerf this saw leaves behind, and cutting on the pull stroke is more precise in my experience. These traditional saws will set you back a bit, but if you're looking for the best joinery saw, this is it.


Chestnut Tools Pocket Wrench4. Chestnut Tools Pocket Wrench $12 This tool makes the list because of it's simplicity. A small, versatile tool that just works. This 5.5" pocket wrench uses a unique jaw design to adjust to the nut size easily. It may not provide the gripping pressure of the traditional wrench design, but look at it. It just looks good.


Harold and Saxon Chisels5. Harold and Saxon Chisel Set $750 If the fine art of carving wood is a profession for you, a quality set of chisels is completely an essential tool. That said, this chisel set is on the high side of essential and well into beautiful with the exotic wood handles, extremely durable and sharp steel, and polished finish that just begs to be held.

What tools do you have in the shop that would be just as welcome in an art gallery?

How to: Sew This Awesome Weekend Bag

$
0
0

I recently saw Spectre and was struck by how many amazing suits James Bond had (naturally), and that he somehow managed to fit them all into a single leather duffle bag (unnaturally). Now I'm a big sucker for quality duffle or weekend bags, even if they don't possess Mary Poppins magic. After scoping around the internet a bit for some cheap ones to purchase it occurred to me making one would be way cooler...   And that's when I found this Safari Duffle in Canvas or Faux Leather from Sew4Home.com. The guide is incredibly detailed and looks like it wouldn't be too hard for a first time (albeit ambitious) project. Not to mention the bag looks pretty dope. 

Check out the guide here and please let us know if you make one of your own!


How to: Build a Bike Repair Stand for $30 in Hardware Store Parts

$
0
0

Bikes have moving parts...it's precisely what they're designed to do. And things with moving parts need maintenance to keep them moving smoothly. And since a bike's very design is to move forward as it's parts move, you either need to a) get your bikes wheels off the ground while maintaining access to gear shifts and break levers and b) grow two more arms and hands.   

The first option sounds actually sounds like a little less work (but can you imagine the possibilities?!), so you gotta get that frame up into a repair stand to let the wheels spin, the drive train move, the crank arms rotate, and the headset move freely. Commercial options are great, but can be pretty expensive. So, instead, hit up the home improvement center and build one for about $30 in parts. Which is sweet, because while you can fill up your tires and lubricate your chain and adjust your brakes with it on the ground, once you've done it in the air, it's kinda hard to go back.

The DIY stand is put together like this: some vertical 1" galvanized pipe is attached to a square of plywood to provide support. A 1" to 3/4" reducer elbow makes an arm, to which you attach a 3/4" Pony pipe clamp hardware, outfitted with custom jaws.

You could, in theory, attach the upright to a work bench for more support, but then you couldn't take your bike stand outside to work on during those nice days in the summer. And where's the fun in that?

This project comes from Jim Langley's e-book, Your Home Bicycle Workshop, and is available, in full, at Bicycling.com: Your $30 Hardware Store Stand

10 DIY Ideas to Stay Occupied While You're Snowed In

$
0
0

10 man-made snow day projects

This week they're predicting record-breaking winter storms in my area which means, aside from braving my drive to and from work, I'll be stuck inside. So, instead of heading to the grocery store for bread and milk I'm headed to the hardware store to get some supplies to keep myself busy under the snowpack.

Here's a list of 10 projects you could do in a day or two. Some take care and attention to detail and others will prove beneficial during these cold months. Either way, you'll definitely keep yourself busy!

Tartine Bread Recipe

1. Make bread

This time-consuming recipe is certain to keep you warm. Especially when you have to cook it at a ripping 500 degrees! I recommend Tartine's Country Bread recipe. It's has such a great flavor and the method of making the bread is methodical and calming.

carve your own spoon

2. Try your hand a spoon carving

I started spoon carving during the winter of 2014. I bought a hook knife and a small axe and went to work on a few nice pieces of firewood. It's a great indoor hobby. I'd recommend a vacuum too, it does make quite a mess! Check out this video tutorial on basic spoon carving to get you started.

3. Print your Instagram Pictures

Take this opportunity to get your favorite pictures off your phone and onto paper. Check out websites and apps like printstagr.am or Snapfish that will allow you to print straight from your phone.

4. Binge-watch Brooklyn Nine-Nine

That show is hilarious. I recently watched all three seasons on a mixture of Netflix and Hulu. Seen it already? Have you checked out Master of None yet? It's our favorite new show of the year. 

http://readywisconsin.wi.gov/winter/images/winter_car_kit.jpg

5. Make Your Own Emergency Snow Prep Kit

If the snow is piling up there's a chance the power might go out. Get ahead of the game and make your own emergency candles. You can also assemble one to keep in your car so you're prepared for getting stranded. Here' s a great kit list from Ready Wisconsin. I bet they know how to handle the snow! 

7 winter movies

6. Watch Some Winter Themed Movies

Embrace the cold and bundle up with these seven movies based on your favorite time of year. "Your" is subjective, of course.

7. Knit your own Hat

Pick up one of those knitting looms and make your own hat! Here's a quick and easy wiki on the process.

http://s3.amazonaws.com/manmadediy-uploads-production/photos/24370/IMG_0246_large.jpg?1419801940

8. Make Some Pantry Essentials

Start a batch of vanilla extract or turn some wine into vinegar while you're stuck at home.

9.  Waterproof a Jacket Before You Head Into the Snow

Check out this tutorial on applying wax to a canvas coat.

10. Make Your Own Soap

Using a Crock Pot you can make your own soap in a shorter time than traditional soap making. Order the supplies ahead of time and have them ready for the next snowstorm! Here's a recipe from DIY Natural.

Attention Woodworkers: This is a Really Good Deal on Adjustable Bar Clamps

$
0
0

created at: 01/04/2016

Most articles on the value of clamps will begin with the old adage, "You can never have too many clamps." This one, apparently, does too. (See what I did there?) Because the truth is: you really can't.   

And there's good reason to buy really nice clamps, with a wide capacity and lots of clamping pressure. But it's also nice to have some lightweight, easy-to-use clamps for medium level work - attaching fences and guides, glue ups, and holding things down on your work surface. Those you can keep at hand to make quick work of keeping things in place.

Right now, Home Depot has a great sale on that latter type of clamps. Like really great. Our suspicion is it's a leftover from the holiday gift impulse section, knocked down even more post giving season, which is a-okay with us. 

created at: 01/04/2016

Currently, you can get six 6" F-style clutch clamps for $15.00. That's $3.20 a piece. Sold individually, these guys normally go for $9.97. Do the math, and that's roughly 70% off.

created at: 01/04/2016

Not surprisingly, the clamps are not Bessey's super high quality, high performance models. They have a load limit of 600 lbs, putting them in the "medium-duty" category. (Bessey's very fine parallel jaw clamps come in at 1100 lb) .They're made in China, as opposed to Bessey's higher-end clamps which are usually assembled in the USA or Europe of foreign-sourced parts. But most clamps are made in China, so that's neither here nor there on this kind of product. And we repeat: they are $3.20 apiece, in stores and online, and that's an incredible deal. That's even less than half the price of the same set on Amazon. 

created at: 01/04/2016

So, unless you have every clamp you'll every need, we suggest you pick up a set. We played with them over the weekend, and never had trouble with the oil residue issue from the one review. They work, and they work well. Go ahead and get two :)


Note: for some reason, you can buy these on the mobile site, but not the desktop version. Home Depot's current search function seems to be a bit off. (There are dozens of products that don't turn up). This link will get you where you need to go.


What's the Deal with Bulletproof Coffee? (And how to make it...)

$
0
0

Bulletproof CoffeeYou've likely heard of it, especially if you read any men's lifestyle publication. Wherever the name comes from, the recipe for Bulletproof Coffee is simple: take some perfectly good and delicious coffee, and add a whole bunch of fat to it, usually as butter or lower cholesterol coconut oil. I'll admit, I've been hearing enough about Bulletproof Coffee that I really am tempted to try it. Who knows, maybe this will be the key to my best year yet?There isn't much to what goes into a Bulletproof Coffee; it's just the abundance of fat that makes it a bit interesting... and a bit disconcerting. The idea is something like: give your body a whole bunch of fat first thing in the morning, and that teaches it to burn fat efficiently...or something. Why butter is better than traditional cream, from which butter is made and is often associated with coffee, is sorta unclear. But that's the recipe. 

I keep thinking about trying it, with both butter and coconut oil (premium, and unsalted of course). But then the actual morning happens and I just can't think of anything more depressing than ruining my morning roast.

Here is the recipe, and I really want to hear if you think butter and coconut oil are valid additions to my morning routine. Have you tried it, and more importantly why would I want to? Leave your comments below, and look for my update on how it goes once I decide to try it myself.

How to: Build a Cheap Home Gym

$
0
0

Starting the new year, I'm guessing quite a few of us have new physical health goals that require some quality workout equipment. If you already have a gym membership or just joined one: ROCK ON. Personally, I've never been much of a gym membership guy for budgetary reasons, though I take daily workouts extremely seriously, so I know the hardship that can be trying to get in a full body workout in just your living room with limited equipment.   

First of all, I'm a huge fan of these Black Mountain Resistance Bands. I had a set that lasted over a two years of extended daily use before I had to re-up to a new set. And now just this week, I found this guide to exceptionally cheap home exercise equipment to get you started on your new fitness regiment. Good luck!


10 Ideas for Organizing Your Workshop for the New Year

$
0
0

Hopefully, the new calendar has you motivated to take on some new projects. And we all know the key to working quickly, efficiently, and creatively is: organization. Keeping things where they need to be allows your work surface to stay clean and makes your tools easy to find. Plus, when well organized, you'll find you can actually fit a lot more gear and materials into a small space.   

Regardless of your craft, keeping things densely, but cleverly, organized keeps you productive. Makezine.com recently shared ten of favorite articles they've published on the subject of workshop organizing, and we definitely think it's worth a look. 

10 Tips for Organizing Your Workshop [Makezine.com]

The Process: From Timber to Tide

$
0
0

This process video was one of Vimeo's Staff Picks and it's easy to see why. The five minute short is full of gorgeous cinematography as UK native and traditional shipwright Ben Harris discusses his lifelong love of woodworking and shipbuilding, and the kinship one feels with their craft when one starts at the very beginning with the rawest of materials.

 I'm a big fan of quiet, contemplative, maker-oriented short films, and if that sounds up your alley, this is one you won't want to miss.      

From Timber To Tide from Pixillion on Vimeo

How to: Make Everything Taste Better this Winter with DIY Charcoal Salt

$
0
0

created at: 01/06/2016

In the summer, it's easy to get those deep, blackened and charred flavors in your weeknight meals. During grill season, you simply head outside, and cook your meal over an open flame.

And then comes January, where the produce is poor, and everything lacks that certain zing that the warm sun and fire-seared foods provide.   Over the past few years, I've seen difference chefs experiment with ash and charred X and Y to bring in those slightly bitter and deeply satisfying flavors of open fire cooking. So, it got me thinking... where can I get some ash that I'd actually want to eat?

The answer is: there's a whole bag of it on my back porch. Not leftover in the grill (though that might work), but in solid form: charcoal.

created at: 01/06/2016

Of course, if you're gonna put charcoal directly in your mouth, you gotta make sure it's the right kind. So, skip the chemical-laden compressed briquettes and opt for 100% hardwood lump charcoal, and make it organic if you can find it. This is nothing but hardwoods like oak, hickory, and mesquite that are burned in the absence of oxygen. 

You could just sprinkle it directly on your food, but mixed with salt and some other seasonings, it makes a great way to add some of the grilled flavor to even the blandest of wintertime meals. Here's how to do it. 

Ingredients:

  • 1/2 cup kosher salt, such as Diamond Crystal
  • Zest of 1 lemon
  • 1/4 teaspoon crushed red pepper flakes
  • 1 teaspoon garlic powder
  • 1/2 teaspoon sugar
  • Special equipment: Microplane or rasp-style grater

created at: 01/06/2016

1. Measure out the salt and add to a mixing bowl. Zest the lemon with the Microplane, and add the garlic powder, sugar, and chile flakes. Stir to combine.

The acidity in the lemon and sugar help to balance the bitterness of the charcoal, and the garlic gives it a rounded, savory flavor. If you wanted to add some fresh herbs like rosemary or thyme here or a bit of ground cumin or coriander, I certainly wouldn't kick you out of the kitchen.

created at: 01/06/2016

2. Grate 1-2 teaspoons of hardwood lump charcoal into the mix. Start with one teaspoon (about 8-10 scrapes), stir and taste. Add more as necessary to get a nice balance. Stir thoroughly to combine. 

created at: 01/06/2016

Store in an airtight container. The high sodium content will dry out the lemon zest and prevent any little creepies from growing into the mix. You can keep this indefinitely, I'd imagine, though it'll start to lose its punch after six-eight weeks. If you're concerned, you can store it in the fridge. 

Use it as you would any salt: on meat or fish, vegetable dishes, a piece of toast, or as a finishing salt for pasta, potatoes, or rice. The flavor is nicely bitter, and works well with anything that you'd normally grill. I added some to leftover pizza for lunch, and it made it taste much closer to something that came out of a wood burning oven. It's good stuff. 

How to: Make a New Candle from All Your Spent Ones

$
0
0

Turn all your old candles into a new candle

As a man, I fully endorse candles. If you look beyond the Yankees and Bath and Body scents you can really find some invigorating scents. My personal favorites smell like camp fires, tobacco and patchouli.     Funny enough, all of those candles I have around my home have reached the bottom of the container and the wick no longer lights. It's really frustrating when there clearly is plenty of wax left but no more wick and you paid $20 for the thing. What usually happens is the wax and wick are spread across a large surface area, so you need to transfer the wax to a new, smaller container to keep the fire going.

Here's what you'll need:

  • Various spent candles
  • A pack of wicks and bases. You can buy them together or separate.
  • Glue Gun
  • A small mason jar, our use one of the candle containers you already have
  • Oven Glove
  • Old Cookie Sheet

Set your oven to the lowest temperature–mine goes to 170 degrees–this will warm the candles enough to melt but won't release all of the aromatic oils into the air as it melts.

Turn all your old candles into a new candle

Place your candles on an old cookie sheet and put in the oven. It took my candles about 30 minutes to melt. 

Turn all your old candles into a new candle

Turn all your old candles into a new candle

While your candles are melting, warm up your glue gun and put a glob on the base of wick. Place it firmly in the bottom of the empty container. 

Turn all your old candles into a new candle

Once the candles are melted, take a minute to pick out the old bases and chunks of burnt wicks. You don't want those back in your new candle. I used a pair of long, skinny pliers to grab them. 

Turn all your old candles into a new candle

Let the glass cool enough to touch with your hands and carefully pour out the wax into the new container. 

created at: 11/23/2014

Once you pour one candle in, let it cool completely before pouring the next scent. This will create layers of scents that change as the candle burns. I actually put my candle in the fridge to let cure. It didn't seem to cause any problems as it cooled.

I used a pre-waxed wick that stands up straight on its own. Other kinds of wicks will require something to hold the wick up straight as the wax cures. A clothes pin or chopsticks pinching the wick over the mouth should do just fine.

Turn all your old candles into a new candle

Trim the wick and you're finished! 

Bonus: If you want to clean out the old containers from wax residue you can pour really hot (just below boiling) water into the container. The wax will melt then reform into a disc that will float at the mouth of the glass for you to easily grab.

9 Secrets for Saving Money at Lowe's

$
0
0

Donald Glover has a great stand up bit about Home Depot being where your childhood goes to die, and while that may be true, there are few places that get me as amped up as a supply run to a hardware store. The more you go, the more you know, but I was surprised to find out that many of these tips were new to me. Who knew Lowe's could haggle?   

Not only does Lowe's price match their competitors, but they'll also take an additional 10% off (and as it turns out Home Depot does this too). And while it's technically up to the discretion of the store manager, Lowe's has been known to honor competitor's coupons, although you'll have to navigate that one on your own. 

Click here to check out all of these money-saving tips at PopularMechanics.com

How to: Mount Posters and Art to Plywood for an Affordable Modern Look

$
0
0

Mounting odd-shaped posters on plywood

In my hometown there's a poster shop that makes letterpress posters for every band that plays at The Ryman Auditorium. The fun part is you never know what size the poster will be and you can count on the size being something that could only be framed in a custom size.     Custom framing is expensive! Here's a simple way to mount gig posters or any oddly-sized art you might want to hang. 

What You'll need:

  • A poster (read on to see what kind you can actually use)
  • A container of Mod Podge (matte finish)
  • Paint Brush
  • Craft Paper
  • Ink Roller (like what you'd use for block printing)
  • 1/2 sheet of birch plywood cut to the dimensions of your poster
  • Frame mounting hardware

Before you begin, it's very important that your poster is able to withstand water-based Mod Podge. The poster I'm using is about 100# (thick) paper and the ink is an oil-based ink that will not bleed when wet. If your piece is acrylic, water-based or washable you need to research methods for applying a polyurethane glaze.

Before you begin gluing, measure and cut some birch ply to the exact size of your poster. I used the high-end birch because the edging of the board is more consistent and clean, whereas cheaper ply can have dark gaps and cracks that won't look as nice around the edges.

Mount an odd-sized poster on plywood


First, I put down some craft paper to keep my workspace clean. Then, I applied Mod Podge to the back of the poster. This will wet the poster and keep it from bubbling up when you place it on top of the plywood. Work quickly, this stuff dries fast.

Mount an odd-shaped poster to plywood

Quickly pour some Mod Podge on the face of your plywood and spread it evenly. 

Mound an odd-shaped poster to plywood

Place the poster onto the plywood surface. If you put enough Mod Podge, you will be able to shift and slide it around to line up with the edges of the poster. 

Mount an odd-shaped poster to Plywood

Next, smooth out the poster and get as many bubbles out as you can. I used an ink roller to smooth everything down. Any kind of roller would work just fine.

Mound an odd-shaped poster to plywood

Now, cover the top of the poster with a liberal amount of Mod Podge. You'll likely have to use your finger to smooth out some of the edges where the paper bubbles up, just hold it down for a few seconds to let the paper soak in the glue.

When everything is covered, go back over with your brush and make uniform vertical strokes. Allow everything to dry for about an hour. You can add more coats and sand to a smooth finish if you'd like. I personally love the textured look after it dries.

After everything dries, add some mounting hardware like hooks and wire or route a keyhole in the back. 

Mound an odd-shaped poster to plywood

And you're golden! I really love the modern look of the plywood edge and how it offsets from the wall like a decent frame does. Sure beats the college days with thumb tacks! 

Mound an odd-shaped poster to plywood


A Special Finish: How to Make Faux Corroded Iron

$
0
0

Faux Metal FinishThe finish on a project can make it stand out or just fade off. Here is a great corroded iron finish that can be applied to simple wood to make it look like so much more.   I've always enjoyed the last step in a project. It's the final touch, the wrapping up, the last chance to make it something great. That's why the finish application is so important. While there are plenty of stains, paints, and techniques to make wood look good, this interesting finish actually mimics corroded iron with some major texture and paint layering.DIY Texture

It still won't have the weight or durability of metal, but for the most part will pass for metal in both look and touch. corroded Iron

The secret to the texture is in adding some materials to the base paint that creates the massive amount of texture. Want to see the whole process? Take a look over at The Rogue Engineer here.


How to: Make a DIY Wooden Salt Cellar for Your Next Dinner Party

$
0
0

created at: 10/26/2014

We recently procured a salt shaker for our dining table. It looks like an owl. My wife likes it. However, it seems that the sea salt we put in it never actually comes out of the little holes. Taking from the kitchen salt cellars you scoop and pinch from as you cook, I thought I'd create a communal cellar to place on your table that's perfect for a party of one or a party of many. No more clogged shakers!    

Here's what you'l need:

  • Router with a flat cutting bit. I use a 1/2" bit.
  • Router guide bushing kit that fits your bit of choice
  • Large piece of wood. I used a large oak beam from a barn.
  • A piece of scrap plywood
  • Sander or Sandpaper
  • Cutting Board sealant. I used watco.

I used a rather large barnwood beam for this project. I honestly didn't think it through and had to work a little harder to cut everything since my blades weren't large enough to cut through. I did a lot of rotating and passing over the saw to cut the other side.

created at: 10/26/2014First, I cross cut the beam 8" long. In total the block measures 8"x6"x4" after the cut. The next step is to rip cut the block. The side grain of my block is going to be the top (I want to keep the lid looking like barnwood.) The cut, for my block, is about 4" wide. Always remember to cut way more than you need when you build things like this. 

created at: 10/26/2014

Now you can cut the lid and the base out of your 8"x4"x4" block. In total, I want the salt box to measure 2" high. The base is 1.5" and the lid is 0.5" so there will be a lot of waste from the original 4" cut I made. Feel free to use that waste as the base of another box!

created at: 10/26/2014

Next, it's time to remove the inside of the base block so you can fill it with salt. I used a router with a template guide and a plywood template. You could also use a chisel or a drill press and forstner bit. 

created at: 10/26/2014

The final cellar will measure 5x4 with a 4x3" salt-holding cavity, this leaves a 1/2" lip around the opening. I made a 5.25"x4.25" template from a scrap piece of plywood. The .25" is to accommodate for the brass template guide. I cut it with my jigsaw. (The blue tape is where I broke it and put it back together) The extra wood on the block–and the template– is for attaching the template with screws to the block. I then clamped the block to the table.created at: 10/26/2014

Set the depth you want to cut (about 3/4") and make shallow passes around the template. Be prepared for a dusty mess! I decided to keep it shallow so I didn't have to pour tons of salt in. You can definitely cut deeper if you'd like.

created at: 10/26/2014

When you've finished routing out the cavity, use a chisel to square up the corners.

created at: 10/26/2014

Cut off the extra piece from the block so the overall width of your cellar measures 5" wide. Pass the lid through to make sure they are both the same size. Now you're ready to sand! Be mindful, as you sand, to keep everything level and apply even pressure so everything finished flat and square.

created at: 10/26/2014

After everything is sanded, seal it all up with some butcher block oil. I went with a pre-made one from Watco instead of using something natural like mineral oil. Since you'll be putting salt in this, I wanted to make sure the salt and the wood wouldn't interact and dry out the block over time.

created at: 10/26/2014

Once everything is dry, add your favorite salt or other spice mix  and you're ready to go! 


4 Classic Books Every DIYer Should Have on Hand

$
0
0

created at: 01/19/2015

I want to give props to the internet for almost single-handedly fueling the DIY movement across America. If you need to know how to do anything, a search engine will lead you to the answer. Heck, it might even bring you here!   However, there are some things the internet cannot give us so easily. That's where books come to the rescue! I've rounded up some of my favorite books that I keep on hand for whenever I need a helping hand or a reminder to get back on the right track.

4 Classic Books every DIYer Should have on Hand

Handyman In Your Pocket - Richard A. Young and Thomas J. Glover

This little book is amazing. When I say it has everything you'd need to know when it comes to doing anything yourself I'm not kidding. It has charts, quick-reference, guides, definitions, scales and much, much more! I used to run into a problem, like "How much weight a certain length of chain can hold?" or "What gauge of cold-rolled sheet metal do I need for this table top?" This book has kept me fro furiously trying to describe to Google what I am looking for. I keep it nearby at all times.

The Impractical Cabinetmaker - James Krenov

It may seem strange to put cabinetry guide book on this blog, but there's a lot to learn about what makes up a cabinet that will transfer to anything you want to create. With this book you'll learn the importance of making things square, planning with accuracy and finishing a project with with the highest quality. Just because something is DIY doesn't mean it needs to look like you just threw it together. I recently took a cabinetry class based on Mr. Krenov's methods and I learned more about the basics of anything thing with my hands, not just fancy boxes (cabinets). 

4 Classic Books every DIYer Should have on Hand

The Drunken Botanist - Amy Stewart

I love learning where my food comes from. I believe when you learn the history and science behind how foods come to be you can easily plan where you want that food to go. Learning what composes your favorite liquors and cocktails can give you the confidents to make better drinks (and cook better foods) for you and your friends. This book is a hearty reference for mixing delicious drinks and understanding where and how our favorite spirits came to be.

4 Classic Books every DIYer Should have on Hand

The War of Art - Steven Pressfield

This book is a punch in the gut. Inspired by the writer's personal struggles with demon of resistance, The War of Art is the perfect book for the stuck and uninspired. Written in short, sometimes four-sentence chapters, this book's brevity will help you get back on your feet, fast. It will break down your walls, clear your schedule and get you back to work. Read it with caution! Don't let resistance be the reason you don't go buy The War of Art immediately. 


How to: Access 76,000 Secret Netflix Movie Categories

$
0
0

created at: 01/11/2016So you know how Netflix has some bizarrely specific movie categories like Gritty Tearjerkers or Mind-Bending Biographical Dramas (currently empty since they took A Beautiful Mind off the list)? Well if you take a look at the URL e.g. http://www.netflix.com/browse/genre/276, you'll notice a number at the end.Gizmodo recently discovered a secret guide to Netflix's numbering system allowing you to scroll through every esoteric genre you could ever want.   


It looks like Netflix has been working to counteract people's desire to access this list, so you may have to hurry, but as of posting, this website has the full listing with links. 


6 Masculine-Friendly Ways to Incorporate Indoor Plants into Your Home

$
0
0

created at: 06/16/2013

Indoor plants in your home are a no-brainer: they bring the outside in, improve air quality, provide lots of natural color and texture, and encourage you to take an investment in the spaces you spend your time. They literally (and figuratively) add life to your home. Learn how to rock the green look with these six guy-friendly decor ideas. No floral wallpaper need apply.1: Mix and match. (pictured above) Go freestyle! Hit your nearest nursery and select a few different varieties. A few ideas include: palms, ferns, Massangeana, and rubber tree. Make sure to ask them about any special care requirements for each one of them (prior to visiting a nursery take notes about how much light the room gets). Add character by using mason jars, cans, and other reusable containers.

2: Wild. If you have an empty space and you don't want to fuss too much about it, get a plant that will grow wild and free like a Monstera deliciosa (shown above). These type of plants require very little care and they'll do their own thing. Perfect to cover those awkward spaces where you cannot fit any furniture. 


6 ways to add indoor plants

3: Hang it. This container from Ikea can be easily installed on a wall or window frame. Use it in your kitchen and grow your own fresh herbs!


6 ways to incorporate indoor plants 

4: Minimal. If you only need a pop of green in the room, use a single kind of plant. Cactus are the best for this type of design - they're pretty sturdy and will survive in most conditions, plus they add a bit of a rustic feel to the room.


created at: 06/16/2013

5: Contain it. Another great option for small spaces - terrariums are easy to maintain and you can even make them yourself with a glass container, rocks, moss, and any low-maintenance plants like succulents or air plants.


created at: 06/16/2013 

6: Go epic. If you have tons of space, you can venture into making a living wall. They are quite pricey and they do require lots of work, but if you manage to nail them, they look AH-mazing. You could cheat the system by getting fake plants, but that kinda defeats the point of adding more life to your home (if you do, we'll keep your secret).

The Plan to Rebuild the Colossus of Rhodes

$
0
0

Some of the most awe-inspiring moments in fantasy movies, not to mention real life, are those featuring characters who happen upon a new city that greets its travelers with the most gigantic statues you can imagine. Whether its the Titan of Bravos, the Gates of Argonath, or Lady Liberty herself, they can all be traced back to the Colossus of Rhodes, one of the Seven Wonders of the Ancient World. And now there's a plan to rebuild it... five times larger.    Imagined by a team of artists and designers partially as a way to stimulate the Greek economy with jobs and new tourism (no matter the $283 million dollar cost), the new colossus would stand over 150 meters tall and would serve as a cultural center, library, a general exhibition hall, and an actual lighthouse. 

Read more about the project at PopularMechanics.com and check out the video below. 

Viewing all 2425 articles
Browse latest View live


Latest Images