Quantcast
Channel: Man Made DIY Recent Posts
Viewing all 2425 articles
Browse latest View live

22 Ingenious Ways To Repurpose Old Junk

$
0
0

With a great series of before and after photos, Popular Mechanics is rocking a host of new ideas for turning old junk parts into practical, masculine decor.   

Have some old PVC or plumbing pipe lying around? Make yourself a super cool steam-punk chess set. Or pick up some rusty cheese graters and make yourself a set of pendant lamps. 

Or my personal favorite, take orphaned keys and bend them into wall hooks.

Click here for all 22 Ingenious Ways to Repurpose Old Junk.


How to: Make a Wooden Bedside Phone Rest

$
0
0

created at: 11/16/2014

Don't you hate it when you're ready to plug in your phone for the night and the dang cable has fallen off your night stand and into the void between your bed and the wall? Yea, so did I until I invented this lovely walnut Phone Throne!    

This project is so quick and easy, you could start this project on a saturday afternoon and have it ready to use that evening.

created at: 11/16/2014

Here's what you need:

  • A small piece of wood. Mine was 10x8" (the size will depend on the phone you have)
  • Danish Oil
  • Xacto Knife
  • Peel-n-Stick Cork drawer liner
  • A rag for applying oil

created at: 11/16/2014

Measuring how large your throne needs to be will depend on how large your phone is. I have an iPhone 5 so I want the top surface 4" x 5.5". I want to make this throne a bit more interesting than just a block of wood, I'll be cutting a 45 degree miter on the longer ends. To account for that, I want the entire piece to measure 4.5" x 5.5"

created at: 11/16/2014

After you make your initial 4.5x5.5" cut I set my blade at 45 degrees and my fence at 4" to cut the miters on the long edges of the block. Make the first cut, rotate the block 180 degrees and cut the other side.

created at: 11/16/2014

After I made my miter cuts, I felt like the edges were really sharp to the touch. First, I reset my blade to 90 degrees. Then, I moved my fence in 1/8" and cut the edge flat.

created at: 11/16/2014

Now you want to cut a groove up the middle of the rest by passing the block over the blade. With a speedsquare or measuring tape, raise your blade up .25".

created at: 11/16/2014

 I made three passes to cut the groove up the center. The first cut was up center. For the second, I moved the fence 1/16" to the right and cut. Finally, I moved it 1/16" to the left of center and cut.

created at: 11/16/2014

Now, you want to check and see that your cable will fit in the groove. If it doesn't go back and cut another 1/16 inch kerf. When everything fits nicely it's time to sand!

created at: 11/16/2014

After you've sanded it down to at least 220 grit, rub in a nice dark oil like this walnut colored danish oil. I love using oils like this because I don't have to go back over with a clear coat of poly. Also, the oil really brings out the natural colors of the wood.

created at: 11/16/2014

I found a roll of cork liner with an adhesive back. You can certainly use some sort of rubber or sticky feet if you have those lying around. For this step, set the rest on the cork and cut along the edges.

created at: 11/16/2014

Make sure the base of your throne is clean. I wiped it with a bit of water before I applied mine. Use a lot of firm pressure to apply the cork to the back. 

created at: 11/16/2014

Next, use an Xacto knife to make marks in the cork on each end of the block. I then used a ruler to align the notches to make a clean, straight cut. 

created at: 11/16/2014

After everything is cleaned out of the channel I placed the rest cork-side down and cut around the block at 45 degree angle. This cut back the cork just slightly so it hides under the block. 

created at: 11/16/2014

And you're finished! All you need to do now is lay your phone cord down and place the block on top. Now rejoice, because whenever you unplug your phone, the throne holds the cord in place. Never again will you go fishing for your lost cable! 

created at: 11/16/2014

Blow My Mindsday: February 3, 2016

$
0
0

Each Wednesday, I post some of my favorite can't-miss links, images, and otherwise mindblowing goodies from across the web.


I just spied these carved wooden drawer and cabinet pulls on Pinterest, and I can find zero information about them. All searches just lead to the same static image URL. Anyone have any ideas? 'Rock Garden' handles/hooks 


You can now visit the world's largest model railroad anytime you want... in Google Street View.    

created at: 02/03/2016

According to TechCrunch, "The layout features everything from your typical German, Austrian and Swiss landscapes to miniature versions of Las Vegas, the Grand Canyon, Norwegian fjords, and a DJ Bobo concert (yep — somebody called DJ Bobo is a thing in Germany, but then, so is David Hasselhoff’s Christmas album). There’s even a working airport." Read more there

99 BOTTLES OF CRAFT BEER ON THE WALL SCRATCH-OFF CHART! (!!!!)

Get yours at Pop Chart Lab: $35

created at: 02/03/2016


Ben Schott has some fun with the hyper elaborate coffee-table cookbook recipe.

I have never had an oven baked fry that actually gets crispy before becoming totally soft and overcooked. If this method works, I'm sold.  See it at Gimme Some Oven


How to: Make a Better Egg McMuffin, At Home

$
0
0

I'll admit it. I'm a total sucker for these "make a classic fast food staple at home" techniques. Especially when it's the Egg McMuffin, whose egg, American cheese, Canadian bacon and English Muffin combo sounds great in theory (and a bit like a joke that takes place at UN summit), but never quite comes together on those early road trip mornings when we all inevitably stop because its the only place at the exit.   So, in usual form, The Food Lab takes on what should be a great breakfast sandwich, and makes it one. 

Kenji says, "These days, the Egg McMuffin is more than a sandwich; it's a cultural icon. But, for all its recognition and all that it gets right, it's an inherently flawed product. One that, with a little time and effort, can be improved upon at home. Here's how I make mine. Hopefully, we'll learn some lessons that can be applied to all breakfast sandwiches, not just Egg McMuffin clones."

Find out how at The Food Lab: Building a Better Egg McMuffin


How to: Dress for a Date...Like You Know What You're Doing

$
0
0

With Valentine's Day next week, couples of all sorts will be headed out on the town to celebrate. Whether such plans are on your radar, or you're generally interested in looking snazzy without seeming like you just came from a sales meeting, we thought we'd share some basic ideas and tips to, well, nail it.  

1. Focus on looking stylish, not dressing up. There are two ways to think about non-jeans and t-shirt clothes: looking professional and looking stylish. Dressing professional is what you do for work - tucking your shirt into semi-casual clothes, wearing a dark suit, starched collars, etc. Unless your date also has the ability to offer you a new job, your goal is look snazzy, not dress up. Some clothing pieces you own are good for both, which is awesome. The trick is in how you put them together.

As you assemble an ensemble, ask yourself this: Am I trying to impress my date or my date's mom? 

2. Take a shower an hour before you leave. It's important to be clean, but also to appear natural. Your hair needs time to dry, your skin time to return to its actual color, and any scents in your soap or shampoo to stabilize. As always, the goal is to smell like a man, not like chemicals. Use cologne lightly, if at all; deodorant might be all you need.

3. Have options. You wanna match your date and your destination in dressiness. Try to choose clothing that can go a multitude of ways - with a tie/without, with a sweater, under a jacket, etc.  Have an idea of the most you can wear, and the least, while still looking put together. If you're picking your date up, keep a jacket or sweater under your arm until you have all the info. If you're getting dressed in the same space, feel free to ask, and be extra careful not to outdress your partner. That'll start things off on a sour note, indeed.


4. Match. This seems obvious, but it's essential if you don't own lots of dressier clothing, and you're looking to make the most of it.

  • You socks match your pants, not your shirt or jacket.
  • Your belt matches your shoes, which coordinate with any metal you might be wearing (a watch, buttons on a sportcoat, belt buckle, shoe buckle, jewelry)


5. Don't Look like a Guy. Look like a man, whatever than means for you. For many, it can mean avoiding certain "guy" standards, like:


  • White socks. Someone will see them, and it'll probably be your date. Don't do it.
  • Pants should have three or four pockets: two on your hips, and one or two on the back. No cargo pants or shorts. On a date, but preferably ever. 
  • Sandals. Or baseball caps. But you knew that already. 
  • Wear a watch. You don't wanna be pulling out your phone to check the time.
  • No jewelry, unless you're on a date with your partner and it's your wedding ring.


created at: 02/09/2012

6. Don't Wear Sneakers. Even if you're wearing casual/dressy-casual clothing, at least go the extra bit to wear a dressier belt and shoes. It'll make you feel like you're doing something different, and that'll inform the mood of the date as something special. I promise.

7. Contrast. Be sure that your clothes coordinate, but are not all the same saturation of color or tone. Never wear a white shirt and khaki pants, unless you're going boating, even with a dark/colorful tie. (See #9) You'll look off-balance. If you're wearing lighter pants, balance it with a dark sweater. If you're wearing darker pants, choose a lighter shirt or jacket, and wear brown shoes instead of black.

8. You don't have to shave. Depending on your beard, you might consider not shaving before your date, especially if you shaved that morning, or the night before. One, you'll increase your chances of cutting yourself, which, if you're trying hard not to, you naturally will. But two, totally clean faces can sometime look a bit off with well-cut dressier clothing, and you might come off looking younger than you are. You can consider leaving a day (but no more!) of stubble, especially if you're wearing a jacket or tie. Look at the faces of the guys on the covers of fancy magazines. They didn't shave right before they got dressed, so perhaps you shouldn't either. If you're lucky enough to have a full, balanced beard, use it.

9. Don't wear a tie unless you're wearing a sweater or jacket. You'll look like a temp, or a seven year old at a wedding.

10. Consider jeans. Dark jeans, that is. If you're concerned about over-dressing for your date, the restaurant, or the event, try dark jeans. Coupled with a sweater or a jacket, you'll look plenty dressy, and come off as being put together, like you planned it. 

11. If you don't feel confident in what you're wearing, don't wear it. This principle is the mirror of the first - stylish vs. dressing up. If the only jacket you have is big and baggy and left over from college, don't wear a jacket. Just because a shirt has a collar doesn't mean it's dressy. You'd be better off in a well-fitting henley or sweater than a worn out button-up. This is a date, not church. There isn't a dress code...it's an opportunity to make the night special.

For more style and menswear ideas, check out:


And the ManMade "Style and Fashion" and "Modern Manliness" boards on Pinterest!

For looks worthy of modeling, check out my fave: F**k Yeah Snazzy Bastards 

Learn how to dress for a date like you know what you're doing.

Dappered on a Dime: How to Get a Great Suit without Breaking the Bank

$
0
0

Suiting UpEvery man needs a suit. There are many times in our life that dressing up calls for a bit more than a collared shirt and sneakers. But dressed to impress can mean shelling out a huge chunk of change. Here are some tips to get yourself a suit without breaking the bank.   Keep in mind, no good suit is going to come for free, and you definitely get what you pay for. So plan on spending at least a few Benjamins to get set up right. Here are a few things to look for when figuring out what you need to make the right call on your pick.The Rack

1. Don't settle for off-the-rack fit.  Get your suit tailored. It's the icing on the just-spent-all-that-money-to-look-sharp cake. While it's tempting to grab a suit from a local source and ignore the one-size-fits-all bagginess, a bit of custom work can make the difference between Mr. Bean and Mr. Bond. The fit and hang of the suit makes it look great but also more comfortable for a full day of wear. A tailor can make small alterations to the fit of the garment, but make sure it's a pretty good fit to start to minimize the work needed to make it work for you. Also, a bit long in the sleeves and legs is better than too short. $25-$50 for a better fit.

2. Get the right cut - Suits are made to fit different body types, so buy according to that cut. The most typical cuts are: Slim, Modern and Classic.

  • Slim - This style is best as a daily wear, and can be dressed up with a vest or down by ditching the tie; but will look a bit informal at classier events. As the name implies this suit is cut slim without much excess fabric and is more associated with a European style. The pants and arms are tight, but shouldn't be restricting to movement like reaching arms above your head. This fit looks great on trim guys, where too much bulk (fat or muscle) is in short supply. Most men will find the jump to slim fit a bit much, so this is a good choice for your second suit.
  • Modern -This fit is a cross between the classic and slim, with a bit more room in the legs and arms. The fit of this suit can be a bit more forgiving, but still looks trim enough to really stand out in the crowd. While it's still a perfectly good choice for slim guys, if you're a bit more muscle-bound this is the fit for you. Most men will be comfortable with a modern fit suit as the first choice into the world of dappered up. 
  • Classic -This is your dad's suit, clean and simple with plenty of room to move and all of the classic looks you associated with the classy gentlemen of the last generation. This is what most department store "off the rack" suits will be cut like. For most of us this suit is ok but just won't look like a finely tailored as either the slim or modern cut. If this is what is already in the closet, take it down and get it tailored to fit and you'll definitely look like a winner.Char. Suit

3. Colors matter - While black is a smart looking color, just about the only time it's appropriate is at a funeral or black-tie event. Opt for charcoal or dark gray for a more versatile look. As far as patterns, a thin pinstripe looks classy, and lends a bit more formal look to the suit, but solid colors are more versatile.Knit Tie

4. Accessories - Ties, and vests can turn the suit from daily class to high society. For daily use, go with a thin, light patterned tie with a simple tie clip. For a dressy upgrade, add a vest and thicken up that tie just a bit. For a bespoke upgrade, consider the knit tie.

 Now that you know a bit about what you want, take a look at a few outlets that have just what you need:

1. Combat Gent - This company has been making a name for themselves with great quality at affordable prices. Expect mostly modern and slim cut suits, with a great variety of designs and colors to fit your taste. $200-$400

2. Indochina - Another online company offering custom suits with excellent selections. The suits are high quality and look good enough to wear straight out of the box. $350-$450

3. Modern Tailor - This is the full build-a-suit service. Choose the materials, the details, the fit, and just about everything else about it, then upload measurements and the suit will be tailored to fit exactly. There is decent pricing and high quality materials so the suits should be a good fit for a good price. $250-$450

4. JC Penny's - There are plenty of brick and mortar options to get a suit, but at the lower end of the pricepoint JCP does well with their suits especially during sales. Claiborne is well-known and well-made so keep an eye out and score a deal when the opportunity comes up. $200-$500

Now there's no excuse to skip the suit, you can have a few extra bones to spend on a few classy accessories like a few tie clips and pocket squares. Do you have a few tips on what you look for in your favorite suit?

How Fujifilm's Cameras and Lenses are Made in Japan

$
0
0

In a world which often values the lowest price and quantity over quality, it's fascinating to see inside the belly of a gigantic manufacturing beast. Sam Byford of the Verge took a tour two weeks ago through the Fujifilm Taiwa factory in Sendai, to take an in depth look at the manufacturing processSurprisingly the cameras produced aren't made by robots but by a number of actual people performing quite delicate work.   

When it comes to lenses, Fujifilm claims its optics subsidiary is the only company in the field that transforms raw materials all the way to their finished product. There's something a little meta about looking at photos of Fuji cameras being manufactured, themselves taken on Fuji cameras.

Begin the full photo tour at TheVerge.com.

Gifts for Your Girl on Valentine's Day

$
0
0

ManMade Valentine's Day gift roundup
Whether you're into it or not, Valentine's Day is 'round the corner and now's the perfect time to make a plan. Let's be clear: you don't have to do gifts for Valentine's Day. But you should do something thoughtful, caring and personal. If romantic expressions aren't your forté, a nice gift can go a long way instead. 

To help you out, we've rounded up a few Valentine's Day favorites we think will be a hit this year. If there's a woman to tell I love you, then these are a good way to go. 

1. Candles. They smell great, evoke warmth, set the mood, and they're the perfect gift no matter the status of your relationship. Our current favorite is the Tobacco + Sandalwood soy candle from Sidney Hale Co ($24.98). You can make the gift even cozier by including a wool wrap - we love this one by Julia Szendrei ($119.98).

Scented candles

Wool montara wrap


2. Hand Embroidered Custom Portrait. These hand-stitched portraits are the definition of thoughtful and original. Made to order by ButterPuppies ($160). 

created at: 02/02/2016


3. A Travel Carry All. This is a practical gift you can give as-is or easily add to. The sentiment is sweet because it evokes a sense of adventure and a bit of pampering. Our favorite is the La Nuit Large Tent Pouch by Odeme ($45). It holds everything she'll need to travel and it folds flat when she's done. Pair it with a sweet piece of jewelry, like this aquamarine necklace ($34.98) or a monthly subscription to Birchbox ($10/month), and the only thing she'll need is a travel destination.

Travel carry tote

4. Gloves with Heart. These gloves will keep her hands toasty and she'll think of you every time her palms meet ($32).

created at: 02/02/2016

 5. Barware. If your lady fancies a cocktail, gift her this pineapple tumbler. It symbolizes warmth and hospitality and it's a unique piece ($29.98) and a conversation starter.

Barware

6. Wine Box. A box filled with a trio of her favorite wine is thoughtful. But this Three Nights Wine Box ($130 for the box) - with its rustic aesthetic and toast-worthy occasions - says it all.   

created at: 02/04/2016

7. Scarf and Mug. It's nearly the coolest time of year in every part of the country. Being cozy is the cure. Pair a soft scarf ($22.98) with a hand-thrown ceramic tumbler ($40) and her favorite tea and she'll warm right up. 

Scarf and mugGot a favorite Valentine's Day gift you plan to share with your sweetie? Tell us about it in the comments section.


How to Keep Your House Clean – and Your Guests Happy – on Game Day

$
0
0

Get ready for gameday - and keep your house clean too!

This post was published in partnership with Tide. Thanks for supporting the brands that support ManMade. 

Here's the thing: if you're following along on ManMade you know we're not afraid to make some messes. Sawdust, bike grease, paint splatters, garden dirt, food spills ... they're all part of the handmade lifestyle. It just comes along with the territory.    

But, that doesn't give you an excuse to be a slob or have your home covered in stains and spills. If you're avoiding having some friends over this weekend to watch the game, don't be. It's time to get your stain-fighting game plan in place. We teamed up with Tide Pods to bring you ten tips to prep your house for a seriously good time. Tide Pods are convenient and easy to use, and they're super concentrated to give a better clean than most bargain brand detergents - which tend to be mostly made up of water. Lame.Tide Pods Plus Febreze

So, invite everyone you want, and serve all the messy, greasy classics: wings, nachos, dips, and everything covered in barbecue sauce. Just do a little prep work ahead of time to protect you and your home, and everyone wins! Well, except the other team. 


Use sturdy paper plates

1. Use sturdy paper plates, but skip the plastic forks. Nothing scares you away from hosting an event like thinking about all those dishes you're gonna have to wash once your friends depart. So don't. There's nothing wrong with using paper plates for special occasions like this. Just make sure they're strong and sturdy, so they can prevent the weight of the food from making them flop over, and won't absorb liquids and let them seep through. We like these natural, compostable options.

But - do use actual metal forks. Plastic ones break easily and can't stab the food properly, so they send stuff flying to the floor. Plus forks are easy to wash; just put out the little silverware caddy from your dishwasher, or ask your friends to rinse their own and let them soak in some soapy water. 

2. Create extra table-top surfaces. Nothing leads to messes like not having a safe spot to place food and drinks. Unless you own the world's biggest coffee table, you're gonna need some extra flat surfaces. Here are a few ideas:

  • Bring in all your chest coolers. Bonus! It doubles as drink storage. 
  • Use two inverted five gallon buckets with a 2x4' plywood handy panel as a table top
  • Bring in all your folding and card tables from the garage. No one has to sit at them like a wedding reception, but they can hang out in the background to hold the goods. 


Super easy DIY coasters

3. Put. Coasters. EVERYWHERE. You can't expect people to care about your wooden surfaces as much as you do. They're here for FOOTBALL, after all! 

But, protecting your furniture is as easy as putting out plenty of coasters for people to use. If you don't have a bajillion coasters lying around, MAKE SOME! It's easy:

DIY cork coasters - step by step

Simple cork coasters are easy to make. Just grab some squares of 12"x12" cork (we got ours at Target), and slice them up into 3"x3" squares. Then write your friends names on them in big bold marker (or leave them blank and let people decorate their own). No more orphaned drinks, no more ruined furniture.

4. Put away extra throw pillows, blankets, and extra fabric items. They won't do any good during the game, and it's just not worth the risk to leave them vulnerable. Place them in another room, just for Sunday. 


5. Put the garbage and recycling receptacles nearby. Less room to travel means less chance for spills. Use five gallon buckets, bring in your recycling bin from outside, or just put a heavy duty trash bag inside a large cardboard box. 

Keep a stain remover pen handy for the inevitable spills

6. Have a fresh stain-remover pen on hand. We like the Tide To Go Instant Stain Remover for treating stains as soon as they happen ... and they will, inevitably, happen. That way, you'll keep stains from setting in, and won't risk missing an important play while you're doing it.

Flour sack cloth napkins

7. Buy bulk flour sack cloth napkins: They're bigger than paper napkins, absorb better, and guests can even use them like mini-placemats (or bibs). Plus, in the case of a real emergency (like a big spill), you'll have plenty of absorbent material to get the liquid up fast. Best of all; they're super cheap, so you don't have to sweat it if a few of them get ruined.

8. Don't serve:

  • Red wine. Beer spills come out easier. Plus, it's a football party. 
  • Dark berries like blueberries and blackberries. If you want fruit, pineapple, watermelon, grapes won't stain. Plus, it's a football party. 
  • Beets. They're super messy. Plus, it's a football party. 
  • Chocolate. Have some more popcorn instead. Plus ... you get the idea.

Stop snowy feet at the door

9. Stop dirty boots at the door. Have you noticed that the Super Bowl is always in winter? Even if you don't have loads of snow (like we do), chances are your game day guests are going to have messy footwear when they show up. Grab an extra jute welcome mat, or pick up some boot trays like I did (above). Tide Pods concentrated detergent


10. The rest of the house will look ready for game day, you should be, too. Run around your bedroom and grab all the piles of dirty clothes and run a load while the pulled pork starts getting tender. A fresh load of laundry makes your room look clean and people can throw coats on your bed (and so you don't look like a schlub). Tide Pods Plus Febreze (above) include a detergent, stain remover, brightener, and odor fighting Febreze, so your stuff will be clean and odor-free. All you need is one pac for regular loads and two pacs for extra large or heavily soiled loads. Simply place the pac into the main laundry drum before your clothes and your job is done.


Being a good host means welcoming people into your space and actually being with them while they're there, not rushing around dealing with food and cleaning. A little prep work ahead of time puts you where you need to be: right in front of the game. Go team! 

Go team!


A Movie Poster a Day

$
0
0

Australian designer Pete Majarich began a pretty big project for 2016. Each day, he'll create an imagined movie poster from his favorite (365?) films, working in his own style and highlighting the memorable visual and thematic elements that stuck with him most.     

You can follow along on Pete's Instagram account, or get gallery-quality giclée prints in his Society6 shop, Craft and Graft.

created at: 02/05/2016

How to: Make a Masculine Treasure Box (with a Secret Hidden Compartment)

$
0
0

We've said it before, and we'll say it today: every man needs his own keepsake box. You know, all the trinkets and masculine things that enchant you as a child that your father probably had thrown into an actual box...or in my dad's case, a tiny dresser drawer. But now here's a stellar guide to not only crafting your collection, but building your own sliding tray box to keep all your treasures that includes a built-in, hidden compartment for the super-secret gadgets.  

On quality keepsake boxes, Theodore Roosevelt wrote in his autobiography:

We used to wait in the library in the evening until we could hear his key rattling in the latch of the front hall, and then rush out to greet him; and we would troop into his room while he was dressing, to stay there as long as we were permitted, eagerly examining anything which came out of his pockets which could be regarded as an attractive novelty. Every child has fixed in his memory various details which strike it as of grave importance. The trinkets he used to keep in a little box on his dressing-table we children always used to speak of as “treasures.” The word, and some of the trinkets themselves, passed on to the next generation. My own children, when small, used to troop into my room while I was dressing, and the gradually accumulating trinkets in the “ditty-box”—the gift of an enlisted man in the navy—always excited rapturous joy.

 Check out the full tutorial at Instructables.com and take a look at the video below.

The Morning After: How to Clean Spills and Stains from Your Recent Bash

$
0
0

 created at: 02/05/2016

This post is sponsored by Tide. Thanks for supporting the brands that support ManMade.

So you had your big party, and everything went great (hopefully you prepped using our guide from last week). But, despite your best efforts, that brand new jersey had a run in with a chicken wing, your couch pillows got nacho-cheesed, and you have a pile of stained hand towels giving you the evil eye from across the room.

What's the next step? We tried our hand at erasing three typical party-day stains, and are happy to say the results were impressive. Read on to find out how we did it:

Tide Pods Plus Febreeze

We're teaming up with Tide Pods to bring you tips about keeping your stuff spotless, without avoiding the fun, creative activities that will inevitably make some messes. 

Tide Pods are easy and convenient to use; you just grab one for regular loads or two for extra large/soiled loads, and put it in the washing machine drum before you put the clothes in. They're super concentrated, resulting in a better clean than bargain brand detergents (which are mostly water). We tried them on a few game day party food-related stains:

1. How to Remove BBQ Sauce Stains from Your Favorite Jersey

Rule number one (and this goes for every stain) is: act fast. The longer a stain has to settle into the fabric, to harder it will be to get out. Don't be tempted to wait for the next commercial break to clean that chicken wing sauce off your chest. Clean it up now, dabbing at the stain with a clean towel to get the bulk of the material off quickly. Dab, don't smear. 

An instant stain-remover stick is a great thing to keep on hand in the TV room because it allows you to pre-treat without missing a second of the game. Score!

A few more tips:

  • For alcoholic beverage stains, try a 1/2 tsp. dish soap mixed with 1 tbs. white vinegar, and soak the shirt in that solution for 15 minutes before washing.
  • Loosen the stain from the inside of the garment by rubbing with a wet, clean rag or towel.
  • Whatever you do, don't let the garment go through the dryer until the mark is gone. The heat will permanently set the stain. 

How to remove a stain from a jersey 

removing a stain from a jersey

created at: 02/04/2016


Clean jersey after stain removal

clean jersey

2. How to remove stains from upholstery

Even if you put all your throw pillows away (as we advised), there's a good chance someone's going to spill queso on the couch. If and when it happens, mix a tablespoon of dishwashing soap with two cups of cold water, then dab the suds onto the stain with a clean white cloth. 

For pillows with removable pillowcases, take the cover off, pre-treat with a stain remover, and launder with a heavy-duty, concentrated detergent like Tide Pods.

Stained upholstery

Clean upholstery 


3. How to clean up your napkins and cloth towels 

Good news: if you used flour sack cloth napkins for your party, you can afford to lose a few to the junk rag drawer. They're crazy cheap, after all. But you can probably salvage the ones that aren't beyond repair with simple laundering. Our greasy BBQ potato chip stains came right out with one pass through the washing machine using Tide Pods Plus Febreze. We didn't even have to pre-treat them, and there was no trace of the stain.

Stained napkins 

clean, stain free napkins 

As always here at ManMade, we encourage you to get creative, enjoy time with friends, and get messy along the way. Here are few projects from the ManMade archive that are totally worth any resulting stains:

  1. How to Make a Swedish Flame
  2. How to Clean Your Entire House in 45 Minutes: A Modern Man's Guide
  3. Brewed: The Basics of Making Beer at Home
  4. How to: 5 Easy DIY Bicycle Tune-Ups Every Guy Should Know
  5. Shop Skills: How to Clean Your Saw Blades


Check Out Art Sculptures Made Entirely from Drywall

$
0
0

When considering the virtues of hanging art on your walls, you might want to stop and consider if it's worth just turning your walls into art. That's what drywall art sculpture Bernie Mitchell does using nothing more than drywall and basic drywall tools (plus the extra brush and spoon).   

Mitchell started experimenting with his relief-based sculpting in the 1990's as a drywall finisher and is personally drawn to the animal-landscape vibe you can see in the work above. 

A Sharp Office Makeover, Complete with a DIY Retractable Standing Desk (IKEA Hack)

$
0
0

created at: 01/16/2014

Brooklyn-based artist, designer, and tinkerer Kelli Anderson had an amazing studio/office space with lots of useable work surfaces...which were ever topped and filled with clutter and creative detritus. So, she decided to trade in her classic door-and-filing-cabinet combo of a desk for a proper, organized solution. 

The new wall-long desk is built around mounted cabinets from IKEA topped with a solid white acrylic countertop from Lowe's. 

But the real centerpiece is this built-in standing desk, that raises and lowers itself via a liner actuator. It allows the computer portion of the desk to sit flush with the surface for general use, but then rise to standing height at the push of a button.

Cool, right? 

See Kelli's full makeover, complete with DIY acrylic file organizers and lots of process photos, at her site:

A Stand-up Desk (Ikea hack) [KelliAnderson.com]


How to: Make Your Own Moonshine Still from Hardware Store Parts

$
0
0

created at: 02/09/2016

Cause sometimes you just need to distill something non-drinkable into clear, pure liquid...you know, like, uh, water. Yeah, that's right. Distilled water.    

Alex from DIY Ready came up with a technique for crafting one from an aluminum cooking pot, a 5-gallon bucket, some various fittings, and a copper refrigerator coil. You can find everything you need at the local home improvement center, and fit it together using just a cordless drill, a hot melt glue gun, and a free afternoon.

What you do with it after that is between you and your local law enforcement. 

How to Make A Still | Self Reliance [DIYReady.com] 


How a Man Dies... and How to Prepare for It

$
0
0

created at: 02/09/2016

We've all got death ahead of us no matter what we do, and thus it's a topic that touches us all. Normally I wouldn't write about death or dying on a platform that is as centered around aesthetic sensibilities as ours is, but I know that many of our readers are interested in living an intentional and well-crafted life, and I found these three pieces of information to be particularly insightful pieces of that equation.    

created at: 02/07/2016The first one is a little more whimsical in demeanor if not in content. It's an interactive chart from FlowingData.com that quasi-jokingly claims to compute how you'll die, statistically speaking. You punch in your demographic information, and based on the Underlying Cause of Death database from 1999-2014 maintained by the Centers for Disease Control and Prevention, it'll give you information on what is most likely to kill you and your demographic, and then you can watch that underlying cause change as you let the model run and your information changes with age. It's super nerdy but has a great visual system for representing the data which I thought made it worth taking a peek. 

The second thing is this Art of Manliness podcast interview with Barbara Karnes, a hospice nurse with a lifetime of experience and many published books under her belt on the subject of death in modern society - its myths and misconceptions. It goes through the science of how the body prepares for death and what the process is actually like both for the dying and the loved ones who are there, and so much more. As a guy who only made it halfway through training to be an EMT before other jobs made me postpone my studies, one thing I remembered from my teacher was that dead people's eyes don't stay closed when you delicately bring down their eyelids like they do in the movies. In fact you have to hold them shut for about 30 seconds before they stay that way. The whole podcast is riveting and I think will give you some meaningful thoughts to think about before moving on with the rest of your week. 

created at: 02/08/2016

Finally, I've started moving beyond podcasts in my day to day listening and slowly branching into the world of open courses online. In my recent search I came upon Yale philosophy professorial legend, Shelly Kagan's infamous course simply called "Death" and was blown away to find it online. Shelly Kagan was one of the big name professors everyone said you had to take a class from when I was at Yale, and (un)fortunately there are a lot of those there, so I was never able to take his class. However, the praise I've heard from everyone who did take it makes it worth checking out, not to mention you can spend a couple hours with one America's great philosophical minds as he works through a series of questions all relating to death. 


So those are all just little starting places I'd suggest checking out in as it relates to thinking about death and how that might effect your life. I'd also love to hear comments from anyone who checks these out and if you have other recommendations on good sources to check out relating to these ideas. 


Woodworking Faux Pas: 6 Things You Should Never Do When Tackling a New Project

$
0
0

When you're just getting started in the world of building things, you'll find it can be rather hard to some "best practices" to help guide you down the right path. You're busy trying to figure out what the difference between a bevel and a miter is, but what you really need is someone to say "do this, not that."

created at: 10/06/2014It wasn't until I took a few classes and befriended some woodworkers that i really started to learn how to not do dumb things. Here's a five things I wish I would have learned before I wasted money and time on early projects.   

created at: 10/06/2014

1. Using pressure treated pine indoors
It may be a cheap building option, but PT pine is treated with chemicals that, if ingested, are harmful to you, your children and your pets. If the FDA doesn’t approve it for food contact, I wouldn’t recommend it to be used in furniture inside your home. It also stays wet, and can be hard to finish or paint. If you are trying to save money, use kiln-dried or furniture-grade pine.

created at: 10/06/2014

2. Thinking you don’t need to measure twice and cut once.
This rule applies to everyone. Take my word for it: Don’t cut into expensive materials without double-checking your measurements. Ruining an expensive piece of tropical hardwood will make you wish you would have heeded that advice. Measure twice, heck, measure three times.

created at: 10/06/2014

3. Using stain and polyurethane in one.
There’s no substitute for applying stain and poly separately. Stain needs to be applied with care and attention to detail. Poly needs to be applied in several coats, including in-between sandings. When you put the two together you make it harder on yourself when you mess up. The more coats you do of the poly/stain, the more murky layers you cake on top of your wood project, and the more buried the wood grain gets. 

4. Maverick drilling
The quickest way to ruin a project is to avoid drilling pilot holes. Skipping that one easy step will assure that the screws will split and crack the wood or the screw heads will get stripped. Don’t get cocky and think the screw will be ok without it. It won't. If you want your screws to go in even smoother, roll them on a bar of soap or beeswax. This reduces friction and will guarantee a quicker, smoother grip.

5. Disobeying the order of the sandpaper
Sandpaper is ordered by grits. The higher the number, the smoother the paper becomes. After you’ve determined what grit you need to remove or smooth material on your project, you must work you way up the scale. The idea is that each level of paper blends into the previous one. If you start with an 80 grit and skip to a 400 grit, you’re going to have a hard time getting those deep scuffs out.

created at: 10/06/2014

6. Going against the grain
That cliche phrase is so over used I think we may have forgotten why we say it. Paying attention to the direction of the grain can help you when it comes to cutting and sanding any kind of wood. Think of it like petting a cat from the back to the front–it's a great way to get scratched. Going against the grain may get you a promotion at work, but when you sand, plane or scrape against the grain it can pull up fibers and make your task a heck of a lot harder. This same principle applies to rip cutting a board. It can make a difference in whether or not your wood splinters and tears out as it is cut. Check out this article from American Woodworker for more information.

The general theme here is to not cut corners. Take your time with your projects and be wary of "quick and easy" DIY plans that tell you how to avoid important steps to finish quicker. If you take your time and focus you'll have results and less money in your swear jar!

A Closer Look: Urushi Craftsman

$
0
0

Seated Making BowlsHere's a look at the traditional art of Urushi Craftsmen as they talk about the process, and perfection of this unique and beautiful work.   I rarely think much about the finish on a piece when I'm working on it. There comes to mind a few options but for the most part, I'm a poly, wax, or lacquer kinda guy. The craftsmen in this video go a lot deeper into their craft as they talk about exactly what it takes to be called a Urushi craftsman, and what it means to truly focus on the piece.

What would your next piece come out looking like if you considered the weather, season, and days in your finishing process? Do you have a favorite finish you go to every time?

This is the Cocktail Every Couple Should be Drinking on Valentine's Day

$
0
0

created at: 02/12/2015

To be honest, we're firmly in the "don't make dinner reservations for Valentine's Day" camp. Especially on a year like this, when the date falls on a Saturday. Save the special evenings for anniversaries, celebrations of achievements or special events, or heck, any random Friday night. Those are guaranteed to be more "romantic," memorable, and special.  

So, if you wanna do something fun on the 14th, spend the day outside - go for a snow hike, a bike ride, or visit a museum. Then, come 5:00pm, head home and either cook together, or snag some takeout and allow the time to make the day special, not the prix fixe menu. 

Oh, and since you're home and not driving, you've totally gotta make this cocktail.    

created at: 02/12/2015

It's called a French 75, and here's why it's the ultimate Valentine's Day cocktail: 

  • It involves champagne, but isn't just, you know, a glass of champagne. The cocktail relies on sparkling wine's effervescence and flavor, but is fortified with other ingredients, saving money and stretching the bottle to last all night. 
  • It's fresh and easy to drink, so if your sweetheart isn't super into spirit-forward cocktails, this is one that most anyone can get into.
  • Since its citrus season, lemons are at their peak right now, turning a cold, dark February night into something bright and playful. 
  • It's a basic recipe that doesn't require any exotic liquors, or spirits you won't use again. But, if you're into it, you can easily fancy it up to include your sweetheart's favorite flavors.
  • The drink is named for a potent piece of French field artillery from World War I, the 75-millimeter M1897, a small canon known for its rapid and efficient firing capabilities. So it's got a built-in little anecdote that you use to entertain your date while you whip these up. Also, insert jokes about small canons and rapid firing... 


The French 75

  • 2 oz. London Dry Gin
  • 1/2 oz. 1:1 simple syrup (dissolve sugar in an equal part boiling water)
  • 3/4 oz. fresh lemon juice
  • 4-5 oz. Brut champagne 
  • Garnish: lemon twist


Directions: Make the simple syrup ahead of time and allow to cool. Zest the lemon with a peeler or paring knife, then juice. Combine the gin, lemon juice, and syrup in a cocktail shaker (or Mason jar) and shake with ice. Strain into a tall glass filled with cracked ice and add champagne. Finish by twisting the lemon peel over the drink and adding to the glass. 

created at: 02/12/2015

Some additional notes and thoughts: 

  • There's a reason this thing is named after a canon. It's strong. With two ounces of gin and the champagne, it's basically a double. Not that that's a problem, but just be aware.
  • You might note that this isn't served in a champagne flute. That's because: champagne flutes are dumb. Don't own a set of glasses you can only use for one drink. Champagne tastes better out of a wine glass anyway. If you have some coupe or larger martini glasses, those are cool: just omit the extra ice. But I think the iced tall glass works best here. 
  • The basic recipe is classic, and more than 75 years old (probably). But you can spice this one up if you'd like: add some fresh herbs to the syrup. Use meyer lemon juice. Add a drop or two of bitters. Try other winter citrus. Just remember the ratio, and you'll come up with something drinkable.

Cheers. Happy Valentine's Day. 


DIY Essentials: How to Assemble the Ultimate Homeowner's Tool Kit

$
0
0

A little personal update: after a few years of saving, I finally bought my first home. It's an awesome Northwest Craftsman bungalow built in 1924 in a great inner southeast Portland neighborhood. We're totally in love with it.

And it needs a lot of work. Not a lot to make it livable, but to make it ours. To make it a space where we're going to live and work and welcome others for the next 30 years. Of course, as a DIY blogger, I want to do most of it myself, and thankfully, I built up a handy collection of tools from my woodworking and general tinkering efforts (and now I actually have a garage in which to put them!)

So, today, I'm sharing the ManMade take on the essential toolbox we think everyone should keep on hand, even if you're renting, to help cover everything from light fixes to emergencies to full-on remodeling projects. And we'll make a few suggestions for quality, investment pieces that will last you for years to come, all of which you can buy online at great prices.

Here we go. 

1. Cordless drill/driver: Nearly every home project not involving plumbing starts here. Get the best you can afford. They're worth it. 

ManMade recommended: 


2. Random orbit sander: A 5" model makes quick work of everyone's least favorite task.

ManMade recommended: 


And for sandpaper, these are the ones I prefer. I don't know if they're the absolute best, but they sure work great for me, and cost about 40¢ a piece.


3. Circular saw: Makes rips and crosscuts in everything from a 2x4 to plywood. Portable so you can take the saw to the work. 


ManMade Recommended:
Sidewinder
Worm Drive
Cordless?
Sure, but only if you already have a good corded saw. The Milwaukee 2630 ($117) is the one I'd get.
 
Blades


4. Jigsaw: Easily cut curves in wood and sheet metal. It's worth getting the best one you afford to save on headaches and wasted materials from using a cheap one. 

ManMade Recommended: 


5. 13 - 20 oz claw hammer: How could you have a tool kit without one? Keep one on every floor in your house, and one for the garage. 

ManMade Recommended:


6. Aviation snips: You won't use them every week, but when you need to cut metal, there's no better way. 


7. Screwdriver set: Get a full set for your workshop pegboard, and several multi-bit drivers to keep around the house for regular tasks. We really like high-quality precision sets, and think they're worth the extra cost. After all, you'll use them for the rest of your life. 

ManMade Recommended: 


8. Locking pliers: Commonly called by the brand name Vise-Grips, are, well, basically what both names suggest: they're pliers, whose jaws lock around an object, providing a vise-like grip.Practically, they're typically used in two fashions: 

  • To provide a non-slip hold on hardware, arms, rods, or objects, and used as a level for turning or bending an object
  • To hold an object or piece of hardware that won't respond to a traditional wrench - such as a rusted or rounded over nut, to allow force to be applied and the object unstuck


9. Tongue and groove adjustable pliers: Slip joint pliers that have a moveable jaw for gripping large or irregular shapes.

ManMade Recommended: IRWIN Tools VISE-GRIP GrooveLock Pliers, V-Jaw, 10-inch (2078110) - $10.08


10. Adjustable wrench: If you do a lot of work on cars, bicycles, motorcycles, and the like, you probably should have a dedicated set of combination wrenches. But for most homeowners, DIYers, tinkers, and woodworkers, a simple set of mechanical tools will work just fine.   

You definitely want a full socket set (more on that in a future post), but for general tightening and loosing of hardware, you can get by with a set of adjustable wrenches for a good 90% of tasks. If you own anything that moves or is made of metal, you need an adjustable wrench. 

ManMade Recommended:

  • Stanley Adjustable Wrenches
  • Channel Lock Adjustable Wrenches (Read the reviews on these; people love them)

11. Needle nose pliers: The perfect tool for grabbing smaller items, or fitting into small spaces.

ManMade Recommended: IRWIN Tools Vise-Grip 8-Inch Long Nose Plier and Comfort Grip (2078218) - $11.70


12. Socket wrench set: For serious wrenching of hex-headed hardware, get both metric and standard sizes, with 1/4" and 3/8" drive sockets.

ManMade Recommended: 


13. Voltage tester: Let's you know when you have a live wire, a powered outlet, or confirms when you've turned off the circuit you intended to. 

ManMade RecommendedKlein Tools NCVT-2 Dual Range Non-Contact Voltage Tester - $18.66


14. Shop Shears/Scissors: Shop shears feature heavy-duty blades that are more precisely ground, which lends to durability for everyday use and longevity over the tool's life. They often feature longer blades than normal office scissors, and have offset handles for better leverage for cutting tasks. They can cut through rubber, heavy duty fabric, leather, rope thick plastic, and the like. They usually have oversized handles with larger finger holes, so you can use as much of your hand strength as possible to cut through thicker materials. 

ManMade Recommended: 


created at: 11/16/2014

15. Painter's Multi-Tool

Man, I love this tool. Some brands claim this thing can do 17 different things and I believe it! It can scrape off old debris, pry open paint cans, cut old rags, clean off paint rollers pull out small nails, chisel out caulk and more! I keep it hanging above my work station so I can grab it whenever I need it, which is often.

ManMade Recommended: Red Devil 6251EZ 7-In-1 Multi-Purpose Painter's Tool - $10.58


16. Utility knife: We prefer the replaceable (or sharpenable) slide-out style  utility knives over the snap-off box cutter type. The sturdier handle allows you to apply more pressure for cutting through thicker materials, and the thicker blade is better when meeting resistance when opening boxes and packages; you don't have to worry about it slipping when pushing hard (away from you, of course). 

ManMade Recommended: 


17. Dripless Caulk Gun - Probably the least expensive tool in this list. Get one with a puncture wire and a cutter built into the handle. 

ManMade Recommended:Red Devil Half-Barrel Caulk Gun 


18. Hack saw with a Bi-Metal Blade: A hacksaw is a basic C-shaped frame, usually designed with a pistol-style grip at one end. Modern hacksaws have screw adjusted pins that make quick work of installing and removing blades, which are a standard length of 12". Tightening the screw and closing the handle puts the blade under tension, allowing it to cut quickly with only the desired amount of flexing.

ManMade Recommended: 


19. Molding Pry bar: For wedging, light demo work, and dressing up like a cat burglar for Halloween.

ManMade Recommended: BOSTITCH 55-506 10-Inch Molding Bar


20. Nail sets: Does just what the name says. Accept no substitute.

ManMade Recommended: TEKTON 6578 Contractor Nail Sets, 3-Piece


created at: 11/16/2014

21. Box Beam Level: Not only can you use this tool to make sure things are level and plumb, its machined-flat edge makes a fantastic guide rail for your circular saw. You can also use this tool to check for straight cuts on the board edges. I have levels sizes ranging from 1-6 feet that I use on a regular basis. 

ManMade Recommended: 


22. Speed Square:  A carpenter's tool rather than a fine woodworking tool, which means its intended for quick and reliable marking of butt and miter joint lines, rather than precision layout of parts for furniture. And, in this case, that's a good thing: cause, combined with a tape measure, this will help you break down dimensional or "two-by" lumber in no time. When using a marking knife, I'll reach for a try or combination square; but anytime I'm using a pencil, the speed square is the way to go. 


23. Stud finder: Placing against your own chest and making beep noises totally optional.

ManMade Recommended: Zircon StudSensor i65 Center-Finding Stud Finder


24. 16' tape measure: It's the one you reach for nearly every time, and there are loads of DIY projects and household tasks for which rough measurements will do just fine.   The problem with a tape's accuracy is, of course, also its benefit: that little hook that allows for one-handed or far away operation. It has an intentional built-in play, which allows you to use the tool whether the hook is on the outside (pulled) or pressed against an object (pushed).

ManMade Recommended: 


25. Pull saw: Sometimes, the powered option is not the best tool for the job, and there are many cuts for which you should leave the table saw, the miter saw, or the jig saw behind. And in those cases, what you should grab is the Japanese pull saw.   


26. Heavy duty staple gun: Look for a T50 sized stapler, and keep it handy. There's a myriad of household uses.

ManMade Recommended: Arrow T50 Heavy Duty Staple Gun


27. Ladder: Of course, pay attention to your home's needs. You got cathedral ceilings? Plan accordingly. But for most of us, this is what I'd get.

ManMade Recommended:

Hybrid and A-Frame Ladders


Step Ladders


28. Drain Auger: When the plunger doesn't cut it, reach for the snake. 

ManMade Recommended: TR Industrial 8012 Drum Auger for Plumbing with 1/4" x 25' Spring Cable

29. Ear protection: Power tools are sustainably loud enough to cause permanent hearing damage, and that ringing in your head may never go away if you don't protect those ears. I started with a big jar of ear plugs in my shop years ago, but taking them in and out was annoying and just didn't work very well. I then switched to 3 sets of ear muffs that I hung on my tools and popped on when I needed them. While that worked better, the best upgrade was to a set of muffs that had integrated earphones. Plugging in my music and keeping my ears protected all at once, now they just stay on all day in the shop.


30. Dust mask or respirator: Essential whenever you're dealing with strong chemicals, noxious fumes and finishes, lots and lots of sawdust, or aerosol-based products. An N-95 rated mask works for everyday tasks, but spray paint, pesticides, and other sprays demand an P-95 or R-95 rated mask or respirator. Don't mess around here. Keep your lungs safe. 


31. Safety glasses: The style is up to you, as long as they're safe. Wraparounds are inexpensive and lightweight and easy to store in a pocket or pegboard. If you wear glasses for vision, a pair of Walter White-esque safety goggles are actually quite nice for a variety of tasks. And a full face shield is great when doing rough work, like turning on a lathe or large hole drilling, or when working with metal and there are sparks a-flying. 

ManMade Recommended: 

32. Work gloves: My hands have a few dozen scars from working in the shop. It's an inevitable part of working with wood that a bit of blood will be smeared on a joint or two. But a thin set of gloves improves grip, and gives an extra tough layer to minimize the sacrifice to the woodworking gods. I've found that knit gloves with textured palms and fingers (the gloves are dipped in a latex/rubber liquid) still provide plenty of dexterity and stay cool while protecting your digits. Keep in mind that gloves (and any other loose clothing) is a danger around tools as they can get snagged and pull your hand into the tool. Don't ever use gloves while using a drill press, table saw, or router table, or other spinning tool where that danger is greatest. The rule is: stationary power tool: bare hands and rolled up sleeves. But for carrying materials, working with knives, carving tools, or chisels, or just any time splinters are inevitable, go with gloves.

ManMade Recommended: 


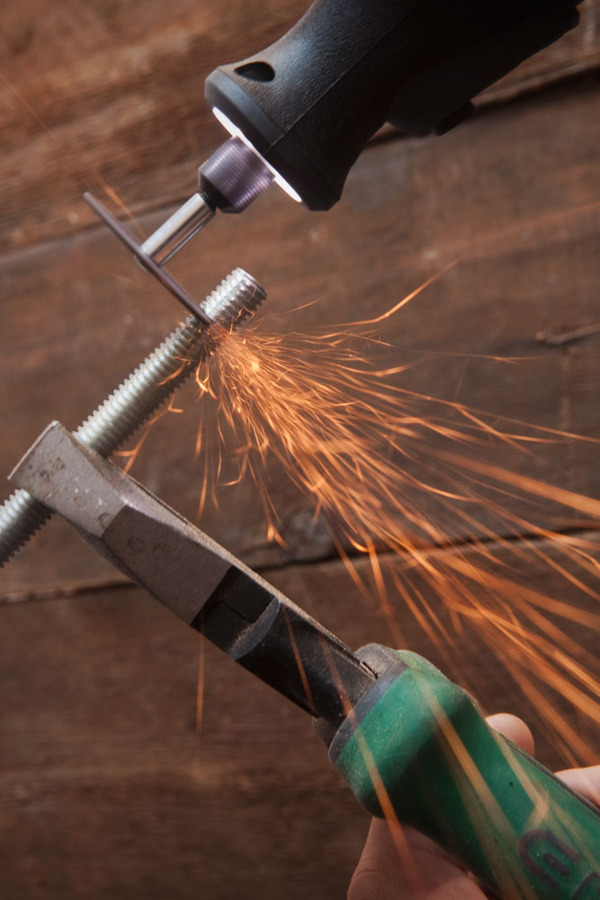
33. Rotary Tool: The dozens of bits and the light weight allow you to accomplish things no other larger tool can pull off. At least not with this little hassle. 

ManMade Recommended: 


Viewing all 2425 articles
Browse latest View live


Latest Images