Quantcast
Channel: Man Made DIY Recent Posts
Viewing all 2425 articles
Browse latest View live

Let's All Go to Deer Cabin

$
0
0

Deer cabin

It must the sense of fall wanderlust settling, cause there's no place I can imagine I'd rather be on this grey, wet autumn day thanDeer Cabin near Flathead Lake in Montana.

This one-room, 300-square-foot log cabin is built in the Adirondack style, and sticks to the basics.

As Connie Stone, the cabin's owner remarks in the piece from Architectural Digest, "'Every man, including my husband, who walks in says, 'What more do you need?' relates Connie Stone. 'Even people you wouldn't think would respond to it want to be there washing the dishes and heating the water and all that.' "

Get the water boiling, Ms. Stone. We'll be there in just a bit.

Read the full article and see the whole slideshow at ArchitecturaldDigest.com: Deer Cabin Reverie


So, What's the Deal? How Often ARE You Supposed to Wash Your Jeans?

$
0
0

No doubt, in your quest to learn more, look sharp, and be informed (you clever ManMaker, you ), you've come across the advice: you should never wash your jeans. Like, ever. For many, that's a welcome recommendation. It's nice when wisdom confirms your natural habits, cause you weren't washing 'em anyway. For others, that's the most digusting thing you've ever heard, and it makes you want to strip down to your shorts and toss your pants in the machine before even finishing reading this sentence. Or perhaps you've heard that you should forgo the soap and wash with vinegar, or in a bucket, not the washing machine.

So...what do we do with all this information? What's the best way to take care of your denim?    

First, let's get this out of the way - here, we're talking about a regular pair of jeans — that is, pre-washed jeans. These are different than raw denim. If you don't know whether you have pre-washed jeans or raw denim... you have pre-washed jeans. If you sought out and paid for raw denim, you'd know it. Okay? Great...moving on.

1. It is not unsanitary to not wash your jeans.

Worried about germs and stuff growing in your pants? Don't be. Studies have shown that there are comparable amounts of normal, healthy bacteria in jeans that have been worn for days, a few weeks, and over a year. 

2. Spot cleaning is better than a full laundry cycle. 

If you spill a bit of your lunch on your jeans or  wipe your hands on the side of your denim without thinking, don't toss them in the washing machine. Unless it's a serious sticky substance that will stain your jeans for the worse, just spot clean them with a rag, cold water, and mild detergent. Rinse thoroughly, and allow to air dry. 

3. If they smell, air them out. 

Before tossing a pair in the washer, trying hanging them up outside and let them breathe a little. The shade works best for this; but one day in the sun won't cause them to fade. A clothesline is great if you have one...or just drape them over your deck/balcony/fire escape. None of those? Place them on a chair, and weight them down with a book or other heavy object. Turn them occasionally to promote airflow. 

4. When they're dirty, wash them. 

At last, when it's time, you gotta wash your jeans? How often? That's up to how you wear them, but shoot for anywhere from two to five times a year.

But don't simply throw them in the hamper to go through a spin cycle with your socks and t-shirts. Follow these steps:

  • Turn the jeans inside out. Be sure to empty all pockets.
  • Start a cold/cold cycle, with gentle agitation. Place a mild detergent in the water before adding your clothes, and allow it to combine. (You should do this on all loads of laundry, anyway.)
  • Place in the washing machine by themselves, or with other very dark items.
  • One rinse. Two spin cycles. 
  • Allow to drip dry fully extended. Use your shower, or hang directly over the washing machine. 

Done. No chemistry, no magic mumbo jumbo. Just clean-as-they-need-to-be pants. 


How to: Make DIY Industrial Mason Jar Pendant Lights

$
0
0

created at: 02/18/2013

I find lighting to be one of the more difficult parts of creating a masculine or industrial interior, especially when it comes to DIY projects. While you can

sometimes find older lamps at secondhand shops, those that still work with up-to-date wiring can be pretty pricey, and usually more accent pieces than functional ways to light your space. (If you know of other great tricks, please let us know in the comments)

So, I love this DIY mason jar lighting project. While it's not the first time I (or likely you) have seen the lamp kit attached to the glass jar trick, this example shows you how important the details canbe. By sourcing the right lamp kit, spray painting the lid and fixture a warm copper, and using an industrial bulb, Tom and Brit took this technique from Pinterest-chic to something timeless that would work well in lots of homes, especially those with masculine elements.

created at: 02/18/2013

I love the trick of using a hammer and nail to make a perforated score line to cut out the larger circle in the jar lid. A great technique for those without a bunch of tools. 

The instructions are in Dutch, but the photos are fantastic and very clear, and Google Translate will take care of the rest.

Check it out: DIY Jar Lamp [Woonblog]

5 YouTube Channels Every Woodworker Needs to Watch Right Now

$
0
0

created at: 04/29/2015

The internet is full of great content. Inspiration for DIYers doesn't get much better than these five excellent woodworking makers.   Diresta Logo

1. Jimmy Diresta

This talented maker can create absolutely anything and the style of his videos are as close to meditative as a maker can get. I often turn them on with no sound in the background because it's just fun to see the creations materialize. He is a master on the bandsaw and the variety of materials under his control is amazing (check out his bandsaw tips here). I've never seen anyone as obsessed with branding every surface with his name as this guy, and that also becomes a big source of fun as I try to count how many places he's strategically placed it. As Jimmy says though: "these are not how-to videos, they are entertainment" and the lack of safe practices in his shop drive that home repeatedly.Wooden Cutting Board

2. I Like To Make Stuff

This guy is a tinkerer at heart and I love to see the massive variety of cool things he comes up with. From Arduino-controlled dust collection to secret-door bookcases, this guy has a blast in his shop and it's fun to watch it all happen. Drunken Woodworker

3. Drunken Woodworker

This guy has some very high quality standards, loves to teach, and also enjoys good beer. Sounds like I'm looking in a mirror so obviously I love to watch his videos. His focus on woodworking comes across as approachable and easy to understand, and the final products are worth bragging about. Check out his curved inlays for a start.Making a Wooden Mallet

4. Woodworking for Mere Mortals

Steve Ramsey has a huge library of videos gears toward guys like us who love to make but don't have the best tools to work with. His entire approach comes with the attitude that anyone can do it with the right information and he's there to help. Fun projects like the Marshmallow Crossbow and the Router Wood Chain are balanced out by Easy Bookcases and Adirondack Chairs. There is truly something for everyone on his channel.Now you'll have something to do when you can't be in the shop. But with all those great videos, don't forget to get out and make a few things with all that new inspiration.


5. Frank Howarth

Of the craftspeople listed here, Frank is perhaps my favorite. He not only creates incredibly innovative projects and approaches them from unique angles (he's a trained architect), but his videos are fascinating to watch. They combine inventive camera techniques, stop-motion animation, timelapse, cool voiceovers, and makes these mini-movies with every update. Plus, his shop is amazing, and it's great to see actual projects being built, not just techniques. 


How to: Make DIY Whiskey Flavored Toothpicks

$
0
0

created at: 02/04/2014

My grandfather was a toothpick guy. Like, he had a seven-or-eight-a-day habit. When he died and we helped my grandmother do a clean sweep of the house, my aunt found more than one hundred individual ones tucked away into couch cushions and drawers and pockets. Last year, when my grandmother passed away and we prepped the house for selling, we found at least a couple dozen more stashed away. 

He and I weren't very close. He was a traditional, working-class member of the greatest generation and I was a little too artistic and sensitive for his taste. He was the kind of guy who was inclined to build walls, and I was outside them. He was often incredibly critical and sometimes very cruel to me. But, on the better days, when I grew into a teenager and later as a young adult, my grandparents and I would go to a diner or a breakfast spot. And when it came time to pay the bill, he'd grab a handful of toothpicks and pass a few to me. Cause - I think - in his mind, men just used a toothpick after a meal. 

All of which is to say: toothpicks are also "thing" in my mind, and whiskey is a thing in my heart. So, when I saw these flavored high-quality toothpicks on the excellent Huckberry last week, I thought it was certainly something worth a try. No, these DIY versions not made of "veneer quality birch" but they're super easy, and they smell amazing. All for a couple ounces of whiskey, 75¢ worth of toothpicks, and five minutes of work.

These would make a great gift for any whiskey fan, and would be super easy to make in bulk to give as favors, to your groomsmen, or to someone special for Valentine's Day. You'll never be able to use a regular toothpick again.


created at: 02/04/2014

Supplies:

  • Whisky - I used about 3 1/2 oz. of a single malt Scotch from Islay, which has a strong smoky, peaty smell that gives the toothpicks that characteristic aroma
  • Round wooden toothpicks
  • A small bowl that will allow the toothpicks to fit and fully submerge without unnecessarily wasting any Scotch
  • Another smaller bowl that will weight the toothpick down for full coverage.


created at: 02/04/2014

Add the whiskey to the larger bowl and throw in a handful of toothpicks. Place your weight on top, then cover the whole thing with plastic wrap for an airtight seal. This prevents the alcohol from evaporating. 


created at: 02/04/2014

Allow them to soak for 48 hours. After day one, mix them up and flip everything around a bit for full coverage. On the second day, you'll note how much has been either soaked up into the wood, or evaporated, leaving the flavor behind. 

Also - you can drink this if you want. (I did.) It will taste different; all the good stuff now lives inside the toothpicks, and what's left behind is pretty flavorless.


created at: 02/04/2014

Then, lay the toothpicks out in a single layer and allow them to dry for a few hours.


created at: 02/04/2014

That's it. Total of five minutes. These definitely take on the strong aroma of Scotch, and after you've warmed them in your mouth for a few moments, you can definitely taste it as well. I mean, they still taste like toothpick, but they also taste like awesome. A great way to end a meal.


created at: 02/04/2014

To store them, I'm using a waterproof match safe I keep with my backpacking gear. They fit perfectly. Any small container will do: small glass vials, a film canister, pill bottles... even a dedicated toothpick holder.


There it is. A simple way to make an ordinary experience something special. 


Oh, and here's a nice, social media-friendly image. Feel free to share on Pinterest!

created at: 02/04/2014


Edited from a post previously published in February 2014

How to: Make an Easy DIY Wood Slice Serving Board

$
0
0

created at: 02/25/2014

Sometimes, the best DIY projects are also the simplest. This rustic cheese board takes less than an hour to whip up, and costs less than $10.00 in materials. Plus, it's easy to create even if you don't have access to a huge forest or wood pile, and doesn't require a chainsaw or any fancy power tools.  

Let's make one!   

Tools and Materials: 

  • Wood slice - we used a basswood round from the craft store
  • Stiff brush
  • Sandpaper - 150 and 220 grits
  • Mineral oil or butcher block oil

created at: 02/25/2014

1. The key to this project is finding the appropriately sized wooden slice. If you have access to large hardwood stumps or limbs that have been dried or seasoned, they'd be perfect. If not, you can find basswood slices in the unfinished wood section of the craft/art supply store, or easily on Amazon. Once you've procured your slice, it's just about prepping it for food use.


created at: 02/25/2014

2. Begin by using a stiff-bristled brush to clean the bark. Make sure to remove any moss or lichen, as well as any loose bark or debris that will fall off easily and could mix with comestibles. If you have access to compressed air, give the bark a few blasts to really get rid of any dirt. 


created at: 02/25/2014

3. Then, sand both sides throughly with 150 grit then 220 grit paper. A powered sander is helpful here, but a simple hand sanding block works just as well. Be sure to keep the sandpaper flat against the surface so as to avoid rounding over the edges or interfering with the bark. 


created at: 02/25/2014

4. Lastly, finish the slice with mineral oil or butcher block conditioner. Since basswood is a relatively soft wood and you're applying to the end grain, it'll will soak up a lot of finish. End grain is basically a bunch of little straws all lined up, and they'll happily accept as much liquid as they can get. 

To apply, simply flood the mineral oil onto a side, and wipe with a clean rag to distribute. You may see a bit of blotchiness at the beginning, but that will subside as the wood becomes fully saturated.  After 30 minutes or so, repeat with a second coat. Allow the finish to soak in overnight, and then add a third and fourth coat if necessary. 


created at: 02/25/2014

Once the finish has fully dried, your wood slice board is ready to use. It's important to note that this really isn't a cutting board or butcher block. Basswood is a relatively soft wood (it's easy to carve, which is why they sell it at the craft store), so don't go hacking at a chicken carcass with a super sharp clever. But, since it's exposed end grain, and wood is naturally self-healing, most light scuffs will be invisible with a fresh coat of mineral oil. Plus, I kinda like a bit of knife wear-and-tear; it gives the piece a more rustic, worn-in look with plenty of character.


created at: 02/25/2014

The project's round shape and light weight makes it perfect for serving charcuterie, cheese, and other staples. Or, it'll work great for other dry foods like desserts, cured meats and fish, or small bowls of pickles and sauces. I've been using mine in our bar area for assembling cocktails, cutting citrus, etc. 


created at: 02/25/2014

These basswood slices cost less than $15.00, and you can always find a 40-50% coupon for all the major craft stores at their web site or mobile app. So, $7.00 in materials plus a little sandpaper, some mineral oil, and about an hour of work. 

Enjoy! If you make one, we'd love to see it. Share a photo of your project in the comments below or mention @ManMadeDIY on Instagram or Twitter. 


How to: Make Leather Cup/Mug Jackets

$
0
0

I have this one tall ceramic thermos with no handles that tends to heats up so much when I pour coffee in that it's barely functional. My girlfriend knit an adorable cozi sleeve for it but unfortunately it stretches out too much and just slides right off. Which brought us to our next solution: leather.    

This DIY tutorial comes via Matt at DesignSponge.com. The leather jackets are a great way to upcycle those mason jar glasses that literally everybody has and they're fairly simple to make so long as you have a leather puncher and some scrap leather. In my case though, you really wonder at one point we'll just get a new thermos.

Click here to view the full guide.

What's Good for October 2016: What We're Reading, Wearing, and Thinking About This Month

$
0
0

What's Good on ManMadeDIY - October 2016

Hey ... welcome back to What's Good. In case you're new here, What's Good is our monthly series where we (the ManMade guys) get to talk about what we're currently into. This month, it's media, clothing, and wonderment. Yeah, you read that right. Wonderment is a thing too. Read on to get your monthly dose...


Reading

Chris: In honor of Halloween this month, I'm immersing myself in the whole of the Hannibal Lecter world, in all formats: books, movies, and TV. I've read the first three novels, seen both the Red Dragon and Manhunter films, and am on the third season of the Hannibal TV series (which is streaming on Amazon Prime.) We're saving the Silence of the Lambs movie for Halloween weekend. I will read the forth novel and watch the final two films, even though they aren't as well received. 

I actually quite like it; I'm amazed by how current the novels feel. I don't read a lot of mystery, but they have the pace and forensic analysis of a current thriller. There's just landlines instead of cell phones, and actual newspapers, not blogs. The feel and excitement is really strong; no wonder they became such a big deal in the 80s. The Manhunter and Red Dragon films and the last half of the third season of the TV show all deal with the same story, and I, coincidentally, watched them back to back on consecutive nights. That means three Hannibal Lecters, three Will Grahams, four Jack Crawfords, a bunch of Francis Dolarhydes, etc, etc. I really like watching the different interpretations of them, all the while realizing how much of the dialog comes straight from the book, because it's that strong, and didn't need changed. Also, I could watch 100 versions of that petting the tiger scene. Gets me every time. Or at least all four. 


David: Sometimes I need a break from the gritty, dark TV that is out there right now. So, I've been on a comic book TV show kick lately, checking out the Supergirl, Flash, and Luke Cage series. I know they're super simple, especially the villain battles and ongoing love trists, but I quickly get attached to the quirky characters and it's great to have on in the background while I'm doing other things. Supergirl is a bit of a coming of age comic about how a meek girl becomes a kick-ass hero and it's full of self-doubt and plenty of twists. Flash is fast-paced and the likable main character is propped up well by friends and enemies alike. The new Luke Cage superhero is a fresh take with a bulletproof Black man in a hoody reluctantly becoming a public hero without a secret identity to hide behind. It's more brutal than most comic series, but the plot and characters are less villain and more thug so it's fitting.

Justin: I am burning through audiobooks like nobody's business. Seriously. In the past two and a half weeks I've made it through Waking Up by Sam Harris, The Unbearable Lightness of Being by Milan Kundera, The Ancient Minstrel by Jim Harrison, Stranger in a Strange Land by Robert A. Heinlein1776 by David McCullough, and I'm currently on Gandhi's autobiography. I highly recommend Waking Up as Harris has a truly incisive mind and it's a fascinating deep dive into neurology, religious study, and sociology. I actually recommend all of them except for Stranger in a Strange Land which I felt was good for only about the first 2/3rds of the novel before becoming a meandering exercise of the author's fairly schematic opinions.

Bruno: 

Lightnote.co is a really cool interactive introduction to music theory. It’s laid out really simply, and in a way that’s not intimidating. It’s definitely for beginners, but even for someone with a little music background, I found some new ways to think about notes, scales and chords.


This thread on Hacker News turned into a little bit of a rabbit hole for me. Check out some of the more unusual diagnostic codes from the ICD-10-CM (Medicare’s disease classification system):

  • W2202XA Walked into lamppost, initial encounter
  • W34111A Accidental malfunction of paintball gun, initial encounter
  • W5629XA Other contact with orca, initial encounter
  • Y36511D War operations involving direct blast effect of nuclear weapon, civilian, subsequent encounter
  • V657XXA Person on outside of heavy transport vehicle injured in collision with railway train or railway vehicle in traffic accident, initial encounter
  • Y92331 Roller skating rink as the place of occurrence of the external cause

Wearing


Chris: 

WORKBOOTS. I've been doing a lot of demo and construction-like work in the basement, and I love how vital these are in the process. It's messy work, and dangerous, and I'm going in-and-out of the house, moving between floors, etc. The weather here has been pretty rainy, and these things have kept me warm and dry and working hard. It's tough to stand on a concrete slab all day; solid boots with real support make that bearable.

I use the Duluth Trading Co. moc boots, and I replaced the foot beds for extra support. (I have crazy high arches and narrow feet). The boots have fully formed to my feet shape, and have an honest-to-goodness patina of true work. Love 'em.  (Also, wool socks are essential to staying dry all day long. Cotton will never wick sweat in the same way, and wool prevents you from feeling clammy.)


David:The weather has been random here in Northern California, so I've been lacing up my waterproof shoes for whatever may come along. My favorite sport shoes are my Topo Hydroventure shoes, they look and feel like a pair of running shoes, but the e-vent liner makes them waterproof and breathable in any weather. For something burly, I grab my La Sportiva Core GTX boots. They're tough enough to keep me protected but they're comfortable enough to wear all day without getting sore.

Justin: I'm in same boat as Chris on this one: work boots. I recently got a side gig with Luke Hobbs Design so I've been spending a good deal of time in the wood shop and good boots come in handy. I'm reppin an untreated leather version of the Classic Moc 6" Boot from Red Wing Shoes where my childhood best friend is a designer. I've actually already re-soled these boots once because I tend to wear them on so many occasions. It's nice to see them covered in sawdust and in their natural habitat now though.


Bruno:

Ankle braces. Boring, I know, but over the summer I started playing in a weekly pickup futsal game at a gym nearby, and these ankle braces make me feel a lot more stable and secure. They’re a little bulky, and take some getting used to, but if you do any physical activity that involves quick sprints, cutting, or changes of direction, I highly recommend them. Soccer, basketball, tennis players … I’m looking at you.


Wondering

Chris: Do you know what state is the flattest in the US? Nebraska, maybe? Kansas? Oklahoma?

Nope, it's Florida, Followed by Illinois, North Dakota, Louisiana, Minnesota, and Delaware. Wild, huh? Read more here


David: Someone recently asked me about my name versus my identity. They said "I know what to call you, but what do you call yourself?" He said he was a dad, a husband, a runner, and a banker. Those where his identity, what he called himself. So I started thinking. I call myself a lot of things, and they're not all good. What names are you giving yourself and how much does that shape your identity? With my kids, I'm always encouraging them to practice positive self-talk, but I give myself a pass when I say things like "I always so that" or "I'll never be good at that". It's something to think about, what are you letting your identity become with your self-talk?

Justin: I like to think I'm up-to-date on the American political system but I realized recently I don't actually understand the electoral college as well as I'd like. These were my two initial jumping off points which as good of starters as any:

http://www.huffingtonpost.com/2012/11/06/what-is-the-electoral-college_n_2078970.html

http://people.howstuffworks.com/electoral-college.htm


Bruno:

What ever happened to Hypercard? It was my first exposure to any kind of computer programming, and the first time I really was able to understand the power of a computer as a creative tool.


Wanna know what was good last month? Here's the whole series.


My 36-Hour Warrior Dash Weekend in Portland, OR

$
0
0

"It's only three miles." This is what I tell myself, as I drag my feet up a seemingly endless hill toward the last obstacle of my very first Warrior Dash. At this point, I'm soaked, covered in mud, and wondering how it's possible that all the hills on this course are uphills. Is that some some sort of tricky 'Keep Portland Weird' thing?

But let's rewind. I started out the day at 3:45am, in Minneapolis. Tip-toed out of the bed to avoid waking my wife, and snuck into both kid's room for a goodbye kiss. Tried to explain to the Uber driver how it was that my job involves flying across the country to run a mud race. "What's a mud race?"  

Delta - Warrior Dash 2016 sponsor
Race participants had the option of showering while singing karaoke. Share your own mud race photos with the hashtag #HappiMess

By noon I was in Portland, Oregon, after a one-hour Denver plane delay (captain's suggestion, once we finally took off, was that, since we had no water pressure, all bathroom visits should be number ones, only). Portland, in addition to hosting that Saturday's Warrior Dash was being held, is also where my friend and colleague, Chris Gardner, lives. 

Chris and I have known each other since 2007, when he first started writing for Curbly.com (ManMade's older 'sibling'). In 2010, once we learned we really like working together, he came on  work full time on Curbly and develop ManMade into the no-nonsense men's lifestyle blog you know and love. Chris's idea was simple: why limit a guys' publication to motorcycles, football, and swimsuit models? That's not the type of dudes Chris and I hang out with.

Fast forward to 2016, and though we talk several times a week, and know each other's home and family's intimately, I've actually only ever been in the same physical location with Chris a handful of times. So when Delta Faucets offered me an opportunity to a) visit Chris, and b) get to know Portland and c) run in a Warrior Dash race? Well, that was just too good to pass up.

At that point I was going on twelve foodless hours...

So I hopped off the plane, grabbed my rental car, and made my way over to Chris's house in Southeast Portland. He just bought his home this year, and after hearing so much about it and the city, I was excited to finally get to see what's up with the magical Northwest. 

And Portland didn't disappoint! Tall Douglas Firs everywhere, like they just forgot to cut them down when they were busy logging the rest of the Pacific Northwest. Beautiful, snow-covered (even in August) Mt. Hood on the eastern horizon, and St. Helens to the north. Coffee shops at every corner, beckoning (especially after my extra-early wake-up). And yes, it's true, Portland is the city of bikes; they're all over the place, like some untamed-but-friendly insect horde, with riders of all sorts, shapes, and lifestyles a top. 

I picked Chris up and we were off, dashing south along the Willamette River to get to the race in time. Because of the plane delay my time window had gotten really short, and I didn't have time to eat anything before we left. Chris promised me an incredible 11-course chef's tasting menu at El Toro Bravo, one of Portland's most notable restaurants, when the race was done. But at that point I was going on twelve foodless hours, and wondering how that would bode for my first obstacle race experience. 

When we got to The Sherwood Forest Equestrian Center, the scenery was impressive. Mountains (again) off in the distance, rolling hills and forests, and a bright, cool, blue autumn sky above. 

We hiked up a long, grassy hill to the race entrance, and suddenly all around me were soggy, mud-covered people stumbling around, holding beers and looking pretty satisfied.

At the Delta shower station, dozens of people were merrily rinsing off the layers of dirt, smiling and laughing, while others sang karaoke and hosed off. The shower stations were equipped with H2OKinetic shower heads that have nice added bonus: they create the feeling of more water, while actually saving 40 percent more H2O than standard showers.


As I waited for my start time, I wondered how I could possibly end up as muddy as some of the people I was seeing before me. I mean, mud in your underwear? Mud up your nose? Mud in your ...

... and then we were off and running. With my body camera switched on, I headed down the track, through a series of log baffles and up a hill to the first obstacle (did I mention Oregon has hills?). It was a simple over-under, not too difficult, but I knew there was more to come. 

And there were. A series of dirt tunnels, a dripping, slippery balance beam, jerry-rigged climbing obstacles and swinging rings. Ten mind-and-muscle-bending obstacles later, and I found myself on that never-ending hill. People were tackling it at different speeds, some slower than me, some faster, but everyone was hurting. At one point I thought I might have to quit, or at least stop for an extended break, but I didn't want to let up, and resolved to power through to the top.

At the top of the hill I saw my friend Chris watching from the sidelines and cheering me on. That was all I needed to climb up the last obstacle, then zip down a giant slide into a freezing pool of muddy water, and out and into a tepid pit of chocolate-mousse-looking mud.

At the finish line, I got my race medal and a hug from a race volunteer, and then I understood why all those people at the Delta shower station had such happy looks on their faces. 


When I was clean and freshly showered off (no, I didn't do the karaoke), Chris and I hung out in the gorgeous afternoon sunshine, with beers in hand (my only 'food' of the day), watching the the other competitors finishing the course. We drove back to the city, marveling the scenery that makes even the freeway look beautiful, and spent the evening exploring the neighborhoods, and following through on that meal I was promised. (It lived up to the hype.)

14 hours, 1,800 miles, twelve muddy physical challenges, eleven tasting courses, and one good friend? That's a great way to spend a Saturday.


This post was sponsored by Delta, but all opinions are mine alone. Thanks for supporting the brands that make ManMade possible.

How to: The Easiest Way to Make Carbonated Cocktails at Home

$
0
0

Friends, it's time to step up your home cocktail game. But it's not about procuring a special bottle of small batch spirits, or some crafty house-made infusion, or even an obscure, esoteric bitter liqueur made by monks in the mountains of Europe. In fact, it's not about the ingredients of the drink at all. It's about texture.

Carbonating cocktails adds effervescence, tingling the tongue and bringing out new flavors and drinking experiences. Club soda is traditional, and it works, but waters down the drink, and often just floats on top, never fully integrating with the heavier alcohol.  There are brands that tried to make carbonated cocktail systems. Unfortunately, the "at home" version - the iSi Twist 'n Sparkle - was recalled for exploding all over the user, and the Perlini systems, while still available, cost anywhere from $350 to $5,000. 

That leaves the common home carbonation system we're all aware of: theSodastream. You can buy one for around $70, and use to create carbonated water on demand. (Which at my house, is a lot). I've seen these as low as $45 on sale.

Of course, if you read the manual, Sodastream forbids carbonating anything other than water, and for good reason. If you need a reason why not to fill it up with wine or booze, then, well, just watch this guy.

The problem here is the sugar found in all fermented beverages. It holds the carbon dioxide differently than water, and creates too much pressure.

Even if you could safely carbonate a bottle full of cocktail, in order to get the bubbles in, you'd need to fill the vessel until the nozzle enters the liquid...and while it might be, um, fun to have twenty ounces of fizzy cocktails, that's a lot of booze, and therefore expensive, and unless your making drinks for a crowd, wasteful. Also, as demonstrated above – dangerous. So, we gotta hack the Sodastream to pull this off safely.

There is a way to carbonate a single cocktail at a time: to add just as much fizz as needed, and keep everything from exploding. The solution lies in the hardware store.


Head to the plumbing aisle, and pick up some clear plastic tubing. This only requires about 40¢ worth, if you can buy it by the foot. The size you want is a standard 1/4" outer diameter with a 17/100" internal diameter (how's that for a fraction?)


This fits my machine perfectly, but it's about six years old at this point. In case they've changed the size, just bring your SodaStream along with you to the hardware store.

 When you get home from the hardware store, cut your bottle to rough length, about 10" depending on your Soda Stream design. 


Then, affix it to your nozzle. Pour 3-4 oz of water in your bottle (average cocktail size), and twist it on. Note where the tubing meets the liquid, and cut it to final length. You want it to be just below the surface, at a similar distance to where the normal nozzle meets the water fill line.


Then, create a cocktail. We're making a Negroni here, because 1) a carbonated Negroni sounds delicious, and 2) it has typical sugar levels for testing. 


Measure out your portions, then shake or stir thoroughly to chill. Whether your cocktail will be served on the rocks or up, cold liquids carbonate better than room temperature ones. And you don't want to shake or stir after carbonating, as it will rupture all the bubbles you just forced in there. So, this is your chance to chill it. Plus, the  extra water from dilution will help aid bubble formation. 


Use a funnel, or a very careful hand, to pour the cocktail into the SodaStream bottle. 


Now, carefully press the lever down in one second bursts three times. Release the gas pressure, then press it three more times. 


Pour the now fizzy liquid into a glass, a kaboom! You have a reasonably-sized, explosion free carbonated cocktail. Try it with any drink that possesses a medium amount of sugar - a margarita, a Sidecar, a Vesper, a fresh Gimlet, Boulevadier, or a club soda free version of a mojito or Tom Collins. 


Give it a shot, and share your results in the comments below!


Roundup: 6 Masculine Ways to Use Plywood in Your Home

$
0
0

Plywood DIY Ideas

Plywood. We love it. It's affordable, it's easy to work, and brings all kinds of warmth and texture into any masculine-friendly decor.

Furthermore, it can really match a wide variety of aesthetics - left unfinished, it's bright and modern. Filled with knots, it pulls off a rural vibe, and oiled and waxed brings out the cabin-lodge feel.

So, here's a collection of ideas to inspire you to bring in some ply this summer.

1. Wall panels and texture (at top): this Melbourne home got a huge upgrade when their owners decided to go all out on the plywood. The addition of this material made the room super airy and bright. You can do the same by installing bare panels of plywood on your walls or by building storage room or cupboards without painting or staining. You could even have it as a feature wall of just plywood. (image)


Plywood board

2. Communication or Memo Board: Buy a huge sheet of plywood, bring it home, put it by the entrance or by your kitchen and use it as a communication board for your home - leave notes, place art, add some mementos. You can spruce it up with some cool lighting like the one shown in the photo. Also, black washi or electrical tape look sleek and cool. (image)


Plywood desk / shelf

3. Desk / Shelves: With just a few pieces you can create a little reading nook or work area. Try creating a few different modules at different heights for visual interest. A few other cubes at floor level can help you organize magazines and other trinkets. (image)


Plywood Table

4. As Furniture / Decor: Build your own table! All you need is a long sheet of plywood, some pin legs from the hardware store or sawhorses (or any other legs of your liking), and you're good to go. You can make your own - easily - in a weekend. Don't know where to start? We have lots of table DIYs over here. (image)


Plywood tray

5. Accessorize: If you don't want to have HUGE pieces of plywood around your house, then you can go for something a little more subtle, a few touches here and there, like this tray for your couch (on sale on Etsy btw). You can use 3 smaller pieces and glue/nail them together to do this neat little tray (which will save you from spilling your drink on the couch).


plywood wall hanging

6. Make Some Art: If you want to be a bit more creative, then make some art with plywood! You don't have to create an insane design, something simple and rustic like the frame above works like magic. Use the wood grain and any other imperfections as part of your design - instead of covering them with paint, use them to your advantage to create unique patterns. (image)

See? Plywood. If you're looking for something cozy and modern, go for it.

How to: Install Your Own DIY Industrial "Track" Lighting on the Cheap

$
0
0

ManMade reader Mark Devlin, founder of the DIY site DesignsbyDevlin, came up with this great technique for an "open warehouse" -style industrial track lighting project that's easy to implement in your own home. So we asked Mark to walk us through the process, materials, and techniques. Here's what he had to say. 

Having low ceilings and zero crawl space makes for a challenge when designing lighting for the main room in the house. If you love a good DIY project that involves electrical and industrial lighting, I designed a cheap and unique way to install custom industrial track lighting using simple products from Amazon.com and the hardware store.   

created at: 03/17/2015

First, I needed to find a light. I searched for something inexpensive, multifunctional, and that would look great.  I ended up finding the perfect light on Amazon which made for a beautiful display that dims, rotates and pivots. There are 9 lights in all, 3 tracks of 3 and each light can move to accent any piece of the room.

Supplies needed:

  • ~30 feet of ½ inch EMT conduit
  • 9 small octagon EMT boxes
  • 3 large square EMT boxes
  • 12 gauge Romex and some 12 gauge black, white, and green solid wire.

The build is simple and can be completed in a weekend to add a one-of-a-kind personality to any room.

created at: 03/17/2015 Start by measuring the light locations and setting up the general frame.

 created at: 03/17/2015

Once the framing and wiring are complete, drill a 3/8 inch hole in the octagonal EMT box plate cover and deconstruct the cube on top of the light mount so both can be combined.

created at: 03/17/2015 All that’s left is mounting the plate to the box and wiring up all 9 lights.

 created at: 03/17/2015

I have customized many aspects of my home, and I've learn to be truly proud of a project takes just a few things: proper planning, detailed craftsmanship, and choosing unique building materials.

You can follow Mark’s DIY adventures on Instagram.


Clean Man Giveaway: Win The Best Damn Shower You Could Want

$
0
0

It's fall, which means the nights are getting longer and the temps are getting colder. If you're anything like me, a hot shower is the highlight of your morning. This month ManMade has teamed up with our friends at Delta Faucets to give away a Delta® IN2ITION H2OKINETIC® 5-Setting Two-in-One Shower. Yeah, it's a mouthful to say, but it's worth it when you can use the shower head AND the hand shower at the same time. That's some future-tech right there! Read on to find out how you can win one ($250 value!).


Last month, we got a firsthand look at this showerhead when we flew out to Portland to get muddy at the Delta-sponsored Warrior Dash. A messy good time was had by all, and the shower at the end of the race was definitely a highlight. Check out the video! 

The Goods:

One lucky guy or gal (we know you're out there) will win an aforementioned Delta® IN2ITION H2OKINETIC® 5-Setting Two-in-One Shower. Here's why it's awesome:

  • IN2ITION shower heads dock into each other, and can be used separately or both at the same time. 
  • It has H2OKINETIC® technology: a unique wave pattern plus larger water droplets means you get 3x more coverage than a standard showerhead while still conforming to EPA WaterSense guidelines. Saving water is awesome. 
  • It has MagnaTite® technology: the hand shower docks magnetically into the shower head. Magnets are awesome. 


 Those five settings we mentioned are nice too. You've got Delta's proprietary H2OKINETIC Spray setting, a full spray setting, a massage setting, a combination full/massage setting (awesome), and a pause setting (that lets you minimize water usage for shaving, lathering, etc.).


This thing looks good, is crazy efficient, and can also help you grow a bigger beard! Well, ok, not that last one, but it is pretty great. Use the form below to enter!

a Rafflecopter giveaway


Whether you're dirty from a mud race, a weekend camping, or covered in sawdust and glue from a week in the workshop, you're gonna need to get clean again. Enter now to make showering up the best experience possible. 

How to: Build This Simple Coat Rack for $20 (and Other Winter Storage Contraptions)

$
0
0

Halloween is over which means we're officially heading into the colder months of the year. And if you live in a place where people have an accent that sounds anything like this wonderful woodworker, you'll likely be in need of a quality coat storage this winter.    

I'm from a big family, so growing up we had an entire coat closet that was so stuffed to brim with puffy jackets and snowsuits that we usually left our stuff on the floor so as not to have to try and re-shut the closet once we opened it (this rarely went over well with our father). Come to think of it, we also had a whole 'nother rack for boot storage too. The point is we were in need of constant winter weather storage. 

Matthias Wandel

Take a look at Matthias Wandel's woodworking YouTube channel for some great DIY ideas, from coat racks and shelves to DIY boot nooks.  


You Want to Explore the National Archives' Huge Collection of Vintage GIFs

$
0
0
Oh, just imagine the possibilities...
The National Archives and Records Administration recently opened up a new wing of their department by partnering with Giphy. That's right, our government branch tasked with preserving the media that documents the American experience is now transferring its seminal work into GIFs...   


And you can check them out here. As of this writing they've added 171 with more to come, covering such diverse topics as the moon landing, the Great Bambino, Ernest Hemingway drinking wine, and many more. Let us know what are some of your favorites and definitely save a couple to your phone to have at the ready in that text message conversation...

Enjoy!


Smart Tips and Tricks for Taking Seriously Awesome Outdoor and Travel Photos

$
0
0

My Instagram feed is about 50/50 with friends and outdoorsy travel photographers. I try to get out in wilderness as much as I can, and when I can't, I try to at least keep some photographic inspiration readily at hand. And let's be honest, probably all of us have tried our hand at capturing that gorgeous vista to which we couldn't quite do justice...    

Gear Patrol recently profiled photographer Bradley Castañeda who's previously worked with such outdoorsy brands as Jeep, Gore-Tex, and REI. The result is an article detailing a handful of helpful tips for those of us who'd like to improve our landscape photography. There'll be a couple standard ideas here such as the compositional rule of thirds, but also some more detailed things like filter and camera recommendations. If nothing else, it'll add a little flame to that get-on-out-there fire.

Click here to view the full article.


How to: Drill Picture Perfect Countersinks

$
0
0

Countersinking hardware, such as screws or flathead bolts, is key to a sleek surface and a quality, finished look. But it doesn't always go smoothly, and the multiple bits can lead to tearout and misshapen holes.

Recently, I was making a jig from some hard maple that required precise countersunk holes for hardware alignment. I needed the hole to be placed exactly for registration, so I first drilled out the hole, and then the countersink. But every. single. hole. gave me fits. Once I finished one side of the jig, I was determined to come up with a better solution.     

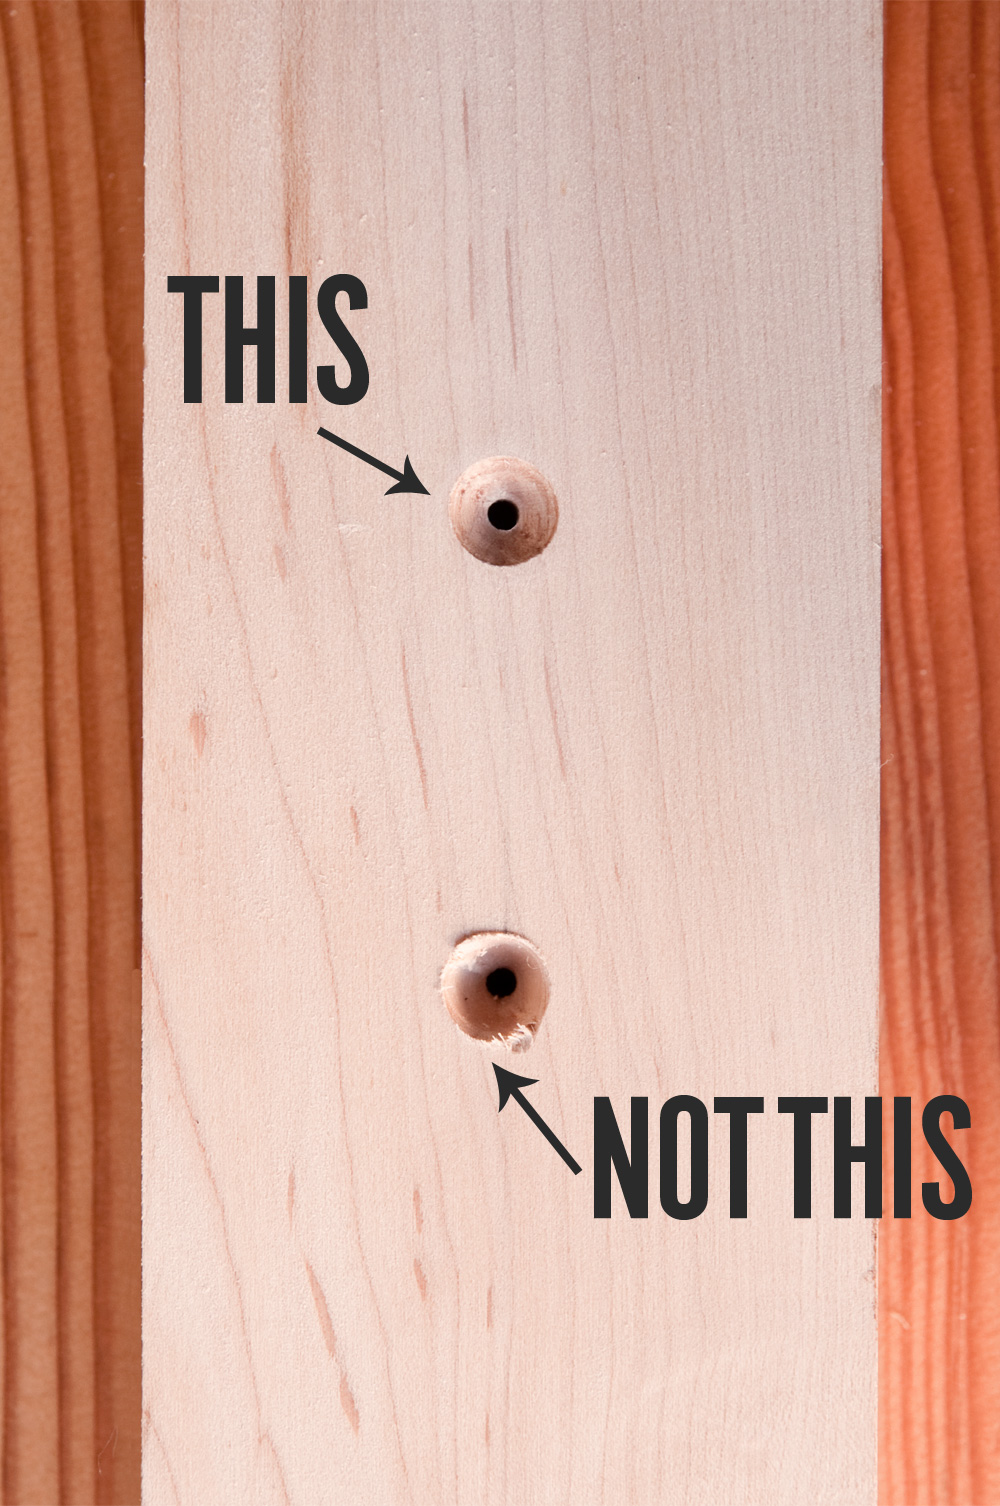
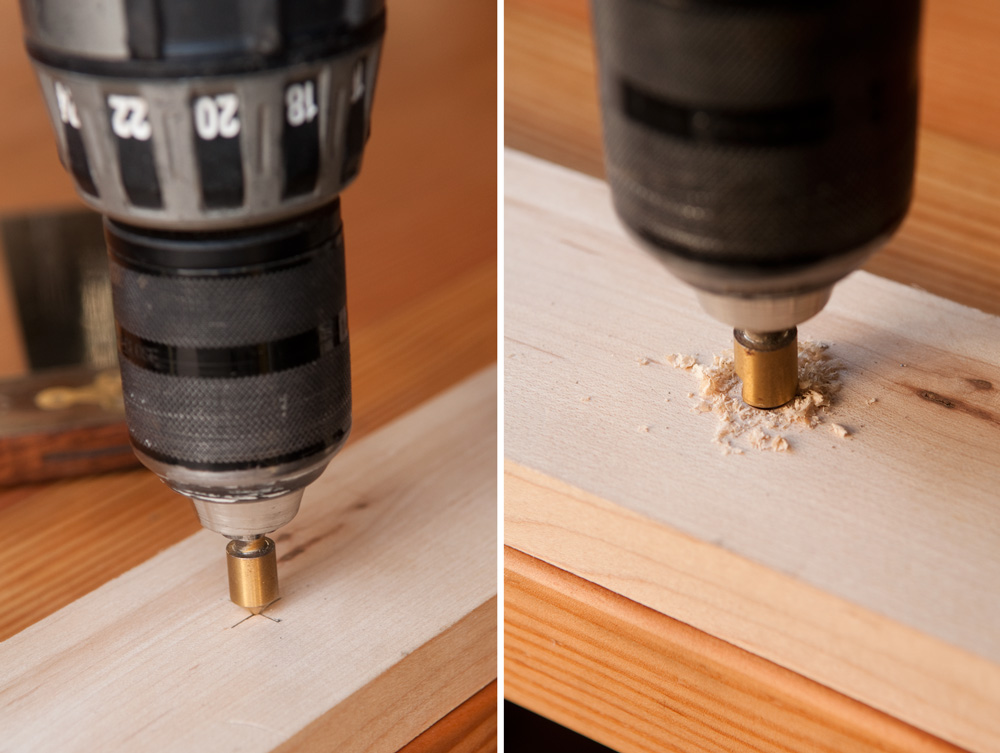
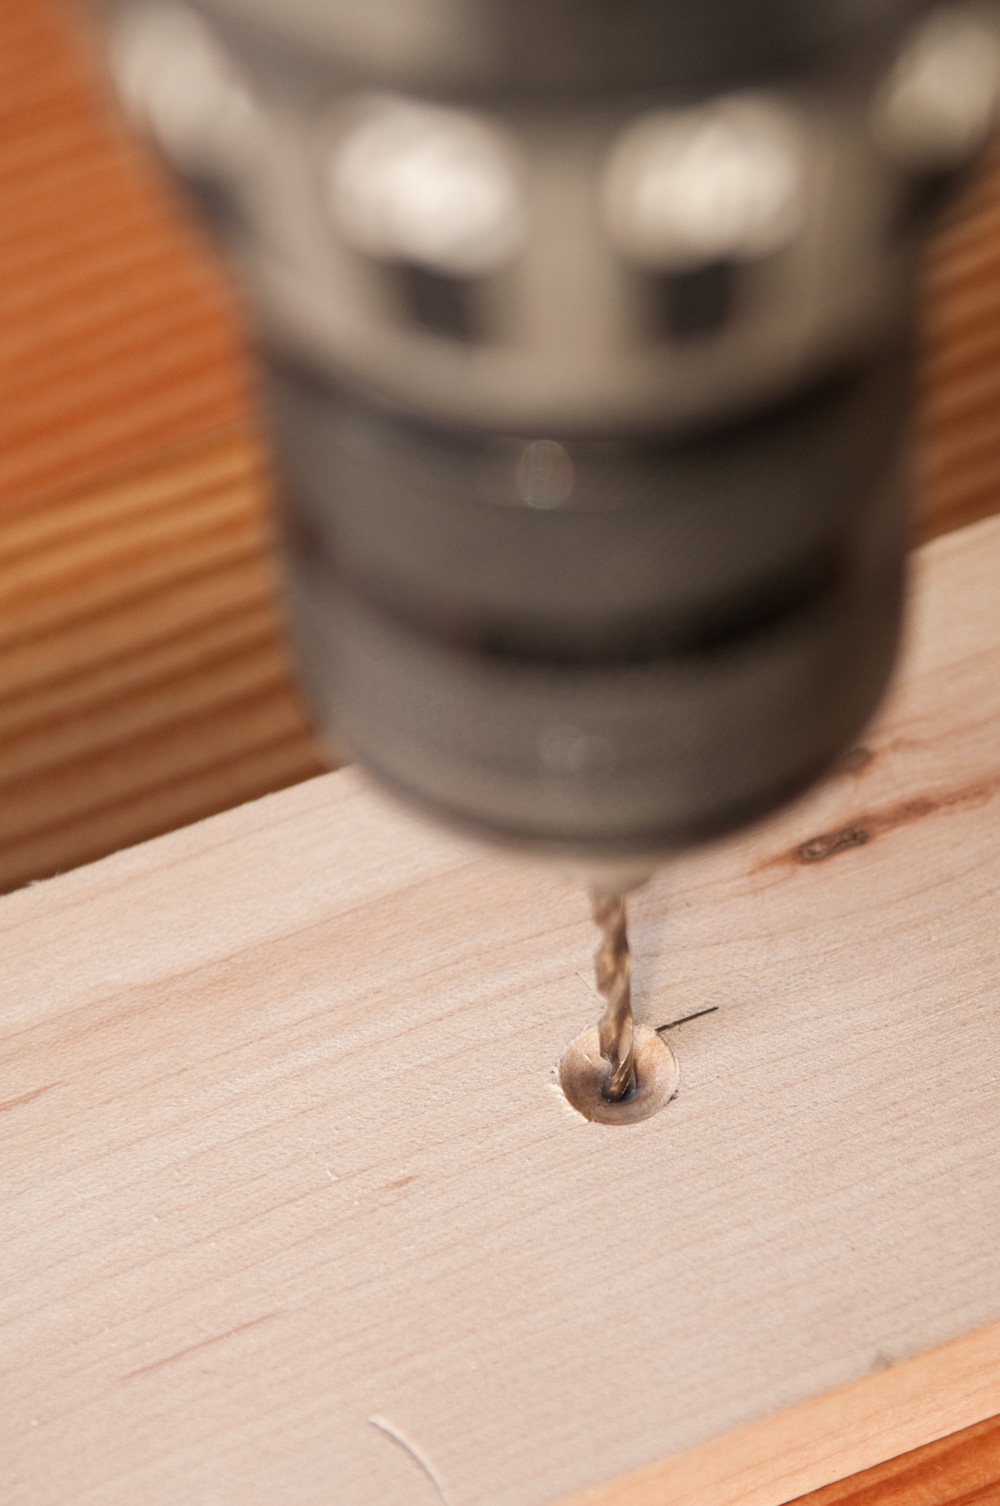
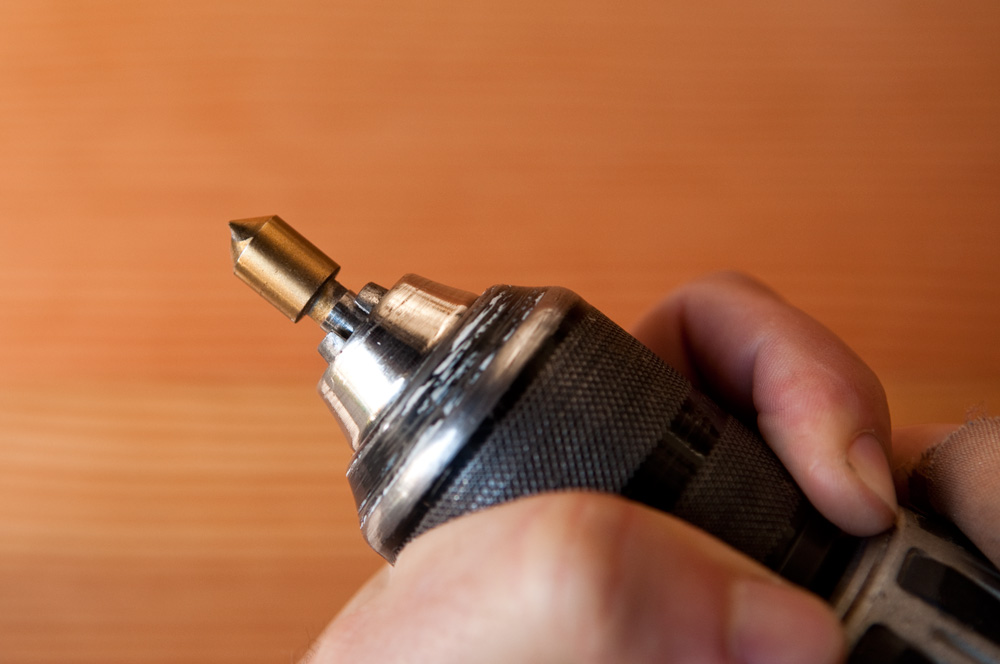
Just to see what happened, I tried the countersink first. I was worried that the bit would wander and not allow the precise placement I was after, but I realized the sharp tip of the countersink bit made it perfectly easy to locate my mark and produce the clean look and round hole I needed to fit the bolts

So, here's my technique for how to make a perfect countersunk hole every time.


Lay out your mark where the shaft of the hardware will go.You can make a starter dimple with an awl, but I found it wasn't really necessary with a nice sharp tip. 


Place the appropriate countersink bit on your mark, and drill just beyond where the chamfer meets the flat surface.


Then, you can finish up with a brad-point drill bit, placed exactly in the center of the conical hole left from the countersink.


Lastly, sand the surface smooth. If you need to remove your pencil layout marks,just follow this technique.

Of course, if you're creating pilot holes for countersunk screws, you can save a lot of time with these combination countersink drill bits, which drill both a pilot hole and countersink at once. But, if you need a full clearance hole for a bolt, or are using an unusual hardware size, choosing the exact countersink size produces the best results.


ManMade Recommended: 


6 Smart Home Devices You Actually Want in Your House (and a Few You Don't)

$
0
0

As you  might have read last week, I'm the proud new owner of a honest to goodness house in Portland, Oregon— a city I love, surrounded by forests, rivers, and mountains. Our house is a classic Northwest-style bungalow, full of character, and plenty of history. And while the 'patina' our house has developed over many years, I don't see any reason why the old can't co-exist with the new. These days, there are dozens of new gadgets, technologies, and inventions that can bring even the oldest of homes into the modern era. Here are some of the ones I excited about, and a few I think aren't that interesting. 

Smart Locks


This keyless smart door lock allows you to unlock your deadbolt with the touch of a finger, eliminating the need to fumble for keys. It unlocks by sensing the presence of your smartphone, and it’s totally awesome. And if you don’t have your phone on you, it unlocks like any deadbolt using traditional keys

Last week I installed Kwikset's second generation Kevo Smartlock, because lots of tenants had been through my house over the years, and I didn't know how many keys were still floating around out there. Also, I love the idea that I'll never get locked out of my house again. Seriously; getting locked out is the most annoying thing that can happen to any home owner. And happen it will.

Plus, I can control my smart lock remotely from my phone (say, to let someone in when I'm away) through the Kevo Plus upgrade, or give temporary access to friends or visitors through the Kevo app. It's great!

We like:

Thermostats

Smart thermostats make a lot of sense; they let you control the temperature settings from anywhere in your home (and beyond!). If you leave for vacation they can automatically sense that you're gone and lower the temperature to save energy. Then when you're on the way home from the airport, you can tap mobile app to bring the house back to a cozy setting by the time you step foot in the door.

The Nest even syncs with smart locks, like my Kevo, so it can automatically adjust the temperature based on your comings and goings. Cool!

We like:


Home security 

Home security can bring a huge amount of peace of mind, if it's done right. Likewise, wondering wether or not your home is safe is a great way to get stressed and lose sleep. So I'm definitely in the market for a simple, affordable, reliable smart home security system. Something that's dead-simple to set up and will let me capture video of my home's entry points, but doesn't have any ongoing maintenance fees or yearly contracts. 

Options:


Smart outlets

I don't really get the appeal of connect electrical outlets. Sure, they let you control stuff with your phone, but if turning on a lamp remotely was that big of a win, we'd all have "The Clapper" installed throughout our homes (remember those?). Still, I expect connected outlets to become the norm in new construction and new remodels. But I'm not sure a compelling use case exists.

Options:


Virtual Assistants and Home Media

Unlike smart outlets, I'm bullish on this category of devices. These things (you've probably seen the Amazon Echo commercials) sit in your house, listening for a verbal cue. Once you give it, you can ask the device to do a bunch of things using nothing but your voice. If you have other smart devices in your home, you can control them with voice commands (turn on lights, adjust the thermostat, control your sound system, etc.). And they can help with lots of real-world tasks too, like setting reminders or ordering pizza. Or, just asking who's that actor in the movie you're watching that you just can't seem to place. 

Some of these functions may seem silly (like: why wouldn't I just call and order pizza myself?), but I think that's just because it's the early days of this technology. I think we'll see lots of useful and innovative applications for this stuff coming out over the next few years, and it won't be long before we wonder how we ever lived without it. And telling your stereo to play your favorite album and have it filling your house within seconds? Pretty cool.

Recommended:


Smart lights

I'm skeptical about this category. These gadgets do all kinds of clever things with your home lighting, like the BeOn Home Lighting System, which claims to learn your lighting patterns/routines, and mimic them when you're out of town, to deter would-be burglars.

I just don't get excited about it. Changing the color of my living room lights, or turning on the porch light from my iPhone? Whatever. 

One that I do think is pretty cool (if it works as advertised), is the Sengled Pulse wireless sound system. These are LED bulbs (they screw into any standard socket) with Bluetooth-enabled speakers built in. So you can set up a sleek, wireless sound system in any home (new or old), and get your smart lighting fix covered at the same time. Sign me up.

Options:


The Rest


And then there are a bunch of 'smart' home devices that we just think are solutions in search of a problem. 

First up, this app-enabled smart egg tray? We like a breakfast full of eggs as much as anyone, and I guess it's kinda cool that someone figured out how to make this work. If it actually worked...check the Amazon reviews for its reliability. We don't need robots in our fridge.

Speaking of which, how about all those refrigerators that have a touch screen built into the front? I don't even want a water dispenser on my fridge (they just tend to cause maintenance issues), much less a computer. A planter that waters itself? Maybe I'm old fashioned, but I actually like watering my plants. Why add technology into the equation? It's simple: you feel the soil, you look at the leaves, you give them some water. Finally there's the HAPI Fork, which I'm sure is well-meaning, but, come on ... you don't need an electronic fork to tell you to slow down and chew your food. Just have your mother over for dinner ... she'll remind you.


What do you think about connected smart home devices? Which ones are you most excited about trying out in your home? Let us know in the comments.


This post is sponsored by Kwikset. All opinions are mine alone. Thanks for supporting the brands that make ManMade possible. 


How "Man Caves" Took Over America's Basements

$
0
0

How do you feel about the term, "man cave?" I have mixed feelings on it myself. One the one hand - like "girlfriend" or "foodie" - it's easy to use it colloquially since everybody has a general sense of what you mean when you say it. On the other, I haven't really worked out for myself all the connotations that come with its use, since it sometimes seems to me like it implies that one can't be a man outside of his man cave (or at least that its a necessary domicile of rejuvenation), Or that the rest of the home is then outside of his purview. Or, all spaces for men must be themselves a cave, involving sports memorabilia and beer signs. In that way, I mostly see the term "man cave" as potentially condescending. Now obviously that's a drastic oversimplification, but I've been thinking about the word recently a fair amount.  

I then came across this article on the history of man caves and their terminology, and I'd love to hear what you guys think.

Atlas Obscura

How do you feel about the phrase, "man cave?" How do you feel about the idea of having a specific masculine space within your home? I'd also love to hear about your own man cave and what you like about it if so.

No Drama Noodles: A Man's Guide to Making Fresh Pasta at Home

$
0
0

When we were young men, we turned to boxed pasta and jarred sauce as a crutch. It was cheap, it was filling, it was hard to screw up, and, it was good enough. 

Knead dough

But it's time to liberate pasta from the fallback of the less mature. To take back covering the starch in piles of flavors that cover its lackluster...uh, ness. In Italy, pasta courses are about the noodle, not the sauce. In fact, they refer to whatever get's mixed into the pasta as "a condiment" - just a little some extra to highlight the excellence of what's already there.

Done right, a good pasta dish doesn't need to be drowning in sauce. Done right - pasta stands on its on. If you've never made a flour volcano and dropped a bunch of eggs...now, my friends, is the time. 

Ingredients 

  • 4 cups all-purpose flour
  • 5 whole eggs
  • 5 egg yolks
  • 2 tsp salt

The Process

Handmade Pasta

1. Prepare the Surface

I used my wooden countertop for a wide open space to get a bit messy. Use a bowl if you're limited on space. If adventurous is more your speed, pile up the flour in a circle on parchment paper or a floured surface and create a small opening in the center. Sprinkle the salt over the top of the mound.

Handmade Pasta Eggs

2. Add Eggs

Add all eggs and additional yolks into the center of the mound and start to slowly mix in the flour with a fork. Be sure to keep the edges high enough to avoid spilling the eggs outside of the mound. Incorporate the egg mix until the dough can be kneaded by hand. An alternative method is a a mixer with a dough hook, but there's something fun about kneading by hand that makes the process enjoyable. 

Knead dough

3. Knead the Dough

Knead the dough for about 10-15 minutes, until it is smooth and elastic. The consistency should feel similar to play-dough. If the mix is too sticky, add a bit of flour, if it's too dry, wet your hands to incorporate a bit of moisture.

Rest Dough

4. Let it Rest

Once the dough feels right, tightly wrap it in plastic wrap and let rest for at least 30 minutes to let the dough relax. It's an important step that makes the dough great to work with when rolling it out later.

Handmade Pasta Dough

5. Roll Out

Section the dough into 6 equal pieces with a sharp knife and  on parchment paper or a floured surface, roll out the dough with a pin, flipping often to keep the thickness consistent. You can also use a pasta roller, but by hand is not difficult and requires no special equipment. 

Rolled Dough

6. Roll and Slice

Once the dough is thin and almost translucent, flour both sides evenly and loosely roll lengthwise. slice the roll in 1/8" slices then unroll each slice for a long pasta noodle. Lay them flat and with a bit more flour circle into piles. You want them thicker? Cut them thicker. Boom. Customized. 

Handmade Pasta

7. Cook and Enjoy 

At this point, toss the fresh pasta into a pot of boiling water and cook for about 1-2 minutes until the noodles are a perfect al dente. Alternatively, you can put the floured piles into a plastic bag and freeze or refrigerate to enjoy another day.

Switch it up with different sauces or meats for endless meals that will always leave you satisfied.


Viewing all 2425 articles
Browse latest View live


Latest Images