It's no secret I'm a huge space nerd, but I definitely thought this was worth sharing. Released last week, this 4K (Ultra HD) fly-through tour of the entire International Space Station is sure to turn your interior design sense upside down.
Its hypnotic music (saxophone? clarinet?) combined with the fisheye lens photography had a striking effect on me and got me thinking about ergonomics and utility in fully constructed living spaces. I'm constantly blown away by the design work that goes into our continual exploration of space. Check out the video below:
I'll admit it: when I was 24, and thinking about hosting friends for Thanksgiving for the very first time, I probably wouldn't have used a guide like this. For one thing, I was stubborn and willful, and liked to think I could figure everything out on my own (wrong!). For another, that was 2006, and the internet was a much newer, smaller place then: this type of guide probably wasn't out there.
Me at my first Friendsgiving. Don't be like me.
But you, my friends! You youngsters with your illogical catch phrases and shrug emojis and your ability to understand how to use Snapchat! You can be better! You can do what few young men before you have ever done! You can host an awesome Thanksgiving meal at your house, and it can look amazing, and you can even have fun doing it. C'mon, it's not going to be hard ...
Dude needs to
learn how to cook
The idea for this post started earlier this fall, when, through a series of weird and fortunate events, it turned out that my little brother, Grisha, who's 24, was going to be moving into the house I lived in when I was his age. Grisha's awesome: he's funny, smart, and four inches taller than me, which doesn't bother me at all ... not even one little bit...
But the one thing he's not so good at? Cooking. Eating, yes. Cooking, not really. And now that he has a steady girlfriend and nice new place to live, we thought it was about time this youngster grew some horns, rustled up a turkey and ... well, the cowboy idioms seem to be getting away from me here.
Bottom line: dude needs to learn how to cook and entertain his friends in his new place. And a Friendsgiving dinner is the perfect opportunity. When the folks at Murphy-Goode winery offered to chip in with some of their excellent, affordable wine, we knew had a good thing going.
So, here's a plan you can follow, step by step, that will get you all the way from the basic prep work to the after dinner nap time, and impress all your friends with what a warm, welcoming host you are. Feel free to skip or substitute; the idea is to make this kind of entertaining easy and accessible. Here we go:
We love Murphy-Goode wines because they taste great, and we like working with them because they care about the same things we do: bringing people together over great food and good wine.
Their wines have complex flavors that actually enhance the flavor of the food you're eating. At a meal like Thanksgiving, this is exactly the kind of experience you want.
Repeat after me: entertaining doesn't have to be painful. We're going to do things the simple way, with a focus on good food, good wine, and friends. But yeah, you do need to step it up a bit above pizza delivery and a twelve pack.
Why wine? Wine is designed to go with food. It's been doing it for thousands of years. It's simple, delicious, and everyone likes it. There's no measuring or mixing or buying extra stuff. It doesn't even need ice. Open, pour, enjoy. That's exactly the tone you want for a Thanksgiving with friends. No fuss, just a straightforward white with snacks, and a solid red with dinner, and everyone's happy. This is what we went with: Murphy-Goode California Chardonnay (2014), California Pinot Noir (2014), and California Merlot (2013).
By simple, we mean - don't go out and get a bunch of stuff you're only going to use once a year. You can make Thanksgiving work with the basics you already have, and a couple of inexpensive goodies that you can find easily.
What are your responsibilities?
At the risk of scaring away all my readers with that word, let's talk about what you need to have covered in order to make this a pleasant experience for your guests:
The main dishes: turkey, mashed potatoes, stuffing and dessert. Ask friends to bring the rest (side dishes, veggies, rolls, etc.)
The prep work: you make the house clean before the meal, your friends can help clean it up after.
Hosting: that means introducing people to each other, keeping the conversation going at the table, asking questions, listening. Have a good joke on hand in case things stall out.
You DON'T need a ...
You DO need a ...
Formal dining room, a giant dining table.
Place for everyone to sit
Dedicated, expensive turkey roasting pan you're never going to use
Real, cooked turkey (more on that later)
Multi-course menu with hors d'oeuvres, soup, salad, and palate cleansers
Some ready-made snacks to hold people over until dinner's ready
Gravy boat
Boatload of gravy
Homemade pie with perfect crust
Sweet dessert to finish up the evening
Fancy formal centerpiece, or any special decorations
Simple way to set the mood: plain white candles and string lights
Do These Things, In This Order
Prep the food
Three days ahead: buy groceries and wine
Two days ahead: salt the turkey, make snacks, make cranberry sauce
Day before: set up the space, make stuffing, prepare dessert toppings
Day of: cook the turkey, mash the potatoes and keep warm, sit back and enjoy your time with friends
Set up the space
Ask everyone to bring a chair (no, they don't need to match)
Make a table with a simple sheet of plywood and sawhorses (more on that, below) if you don't have one big enough
You don't need special decor, the food is the focus. Add some candles and string lights to help set the mood, and good music does the rest (see our playlist below). Cornucopias need not apply.
Turn on the football game, but keep the volume off. Score-checkers will have the details they need, and no one needs to be on their phone all afternoon.
Get dressed
Yes, jeans are fine.
No, that t-shirt with the moth holes and ketchup stains isn't fine.
Be casual, but let your clothing show you give a damn. Trying tucking in your shirt.
Don't make people take off their shoes
Smell good (you've been cooking a turkey all day, try not to smell like it)
Have a great dinner
Make sure your guests have wine and plenty of water.
Be prepared to make a toast. The focus is simple: tell everyone how thankful you are to be spending this holiday with them. Done.
SLOW DOWN! Don't rush through it. Let the conversation get going.
Clean up
Have plenty of food containers on hand for leftovers
If they're your real friends, your guests will offer to do the dishes. Just stand by with your wine and tell them where things go when they get put away.
Use recyclables wisely to save effort (the roasting pan, paper napkins, etc.)
The Menu
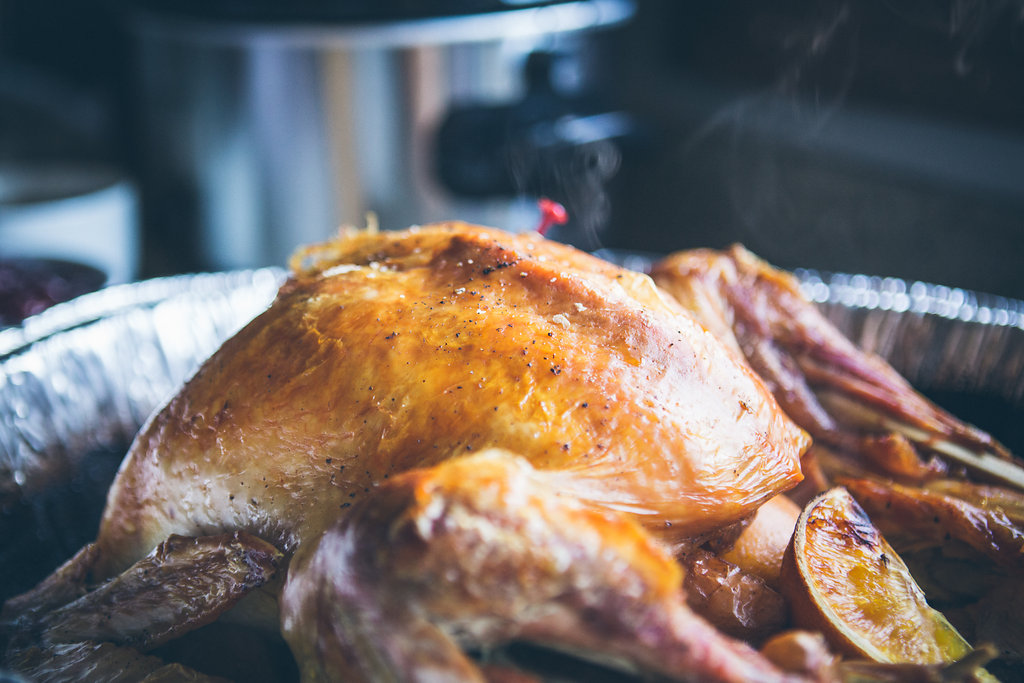
A simple roasted turkey can't miss, but since we were short on oven space, we did ours on the grill, and left the oven free for warming side dishes. Our starch isn't fancy, but it's reliable: Perfect Make-Ahead Mashed potatoes. To go with the protein we're adding a Classic Thanksgiving Stuffing with Sage Sausage, Walnuts and Cherries. And of course everything on your plate should be draped in a Red Wine & Cinnamon Cranberry Sauce.
Grill-Roasted Turkey
It's the centerpiece of the meal, but it's actually one of the simplest things to make if you prep ahead.
Ingredients:
14-16 lb. turkey
3-4 yellow onions
1 lb. carrots
1/2 lb. celery
1 apple
1 orange
Kosher salt
Pepper
Fresh sage
Steps:
Season the turkey liberally with salt three days ahead. Store covered in the fridge.
To cook, remove turkey and pat dry with paper towels. Rub skin with butter and sprinkle with black pepper. Stuff the cavity with halved apple, orange, and sage leaves
Preheat grill to 350°. Cover bottom of disposable aluminum pan with halved onions, rough chopped celery and carrots. Cover tightly with aluminum foil.
Grill until thickest part of thigh measures 160° F (around three hours). Rest for 30 minutes before carving.
Perfect Make Ahead Mashed Potatoes
Make the recipe in the morning, and save some of the starchy water left from boiling the potatoes
Ingredients:
1 - 5 lb bag Yukon gold potatoes, peeled and cut into 2" chunks
1 1/4 cup whole milk
1/2 cup half and half
2 bay leaves and handful of thyme springs
2 sticks of butter
Salt and pepper
Steps:
Place potatoes in a large pot. Cover with cold water 1-2" above the top of the potatoes. Add a fat pinch of kosher salt. Bring the water to a boil, and cook until tender, about 25 minutes.
Drain potatoes, reserving one cup of the cooking liquid. Slowly heat the milk, half and half, herbs, and 1.5 sticks of butter in a sauce pan.
Pass the hot potatoes through a ricer or food mill, or mash with a hand masher. Do NOT use an electric mixer.
Pour the milk and butter mixture into potatoes, removing herbs, and stir to combine. Season with salt and pepper.
Butter the slow cooker
Cover, and keep warm on low for up to six hours. Stir frequently, and add starchy water and additional butter and cream to finish to proper texture.
Classic Thanksgiving Stuffing with Sausage, Cherries and Walnuts
We followed this recipe from Serious Eats for this one, and just added cherries and walnuts into the mix. It turned out amazing. I mean, just look at the pictures:
Sage Red Wine Cranberry Sauce
I can't write anything about this cranberry sauce without my mouth watering uncontrollably, and that would damage my keyboard. So I won't.
Combine the wine, sugar, orange juice, cinnamon sticks, and several grinds of black pepper. Bring to a boil and stir to dissolve the sugar, then reduce heat and simmer for 4-5 minutes. Add cranberries and vanilla extract, and simmer for 14-15 minutes, until cranberries start to burst and the sauce has thickened.
Autumn Sundae Bar
This is the easiest, most amazingly satisfying dessert you will ever make.
Ingredients:
Coffee ice cream
Salted caramel ice cream
Vanilla ice cream
Toasted pumpkin seeds
Caramel corn
Roasted mixed nuts
Chocolate syrup
Steps:
Toast the mixed nuts and pumpkin seeds in a dry skillet or in the toaster oven until golden brown.
Put all the toppings out and let people fix their own sundae!
A Big, Cheap Plywood Table
Head over to The Goode Life blog for more details on our quick, easy, improvised dining table solution.
My brother has great taste in music, so he pretty much had this part covered. Hook up a good Bluetooth speaker system, start the playlist, and then don't think about it anymore. If you're lucky enough to have an amazing local alternative music station, like we do here (thanks, The Current), dial it in and enjoy.
What about all those glasses and dinnerware?
Yeah, I don't blame you for wondering. Most young people just getting their own place aren't going to have a full set of dishes, or enough wine glasses or forks for everyone. A few suggestions:
A full set of dinnerware might be worth buying. An eighteen-piece set (service for six) in simple white is just $20 at IKEA. You might need to get two (we had eight guests), but trust me, you'll use them for years.
Ditto silverware: just $10 for a 20-piece set at IKEA. BUT! Check your local thrift shop first. Silverware doesn't really have to match (at least not for this kind of gathering), so you might be able to put together a workable set for less.
Serving dishes: Goodwill, my friends. Serving platters really don't have to match (in fact, I kind of think they shouldn't), and your local secondhand store will have hundreds of them, in all kinds of unusual shapes and comical prints (Dutch windmills seem to be a thing). Have fun with it, but you don't need to spend much.
Serving spoons: please make sure you have some. Serving mashed potatoes with the one remaining teaspoon in the drawer is kind of stupid. Again, thrifted is great. Borrowed is good too. Ask friends to bring some along.
If you don't have wine glasses, you don't need to rush out and get a full set. Mason jars will work just fine - they're cheaper, and practically indestructible. The 8 ounce quilted jelly jars are about the right size.
How to carve a turkey
You'll probably just Google this, but just in case, here's how:
Make a cut between the legs and the breast, and detach both drumsticks.
Pull off the wings (they should just break off)
Slice downward along the breast bone on one side, all the way through. Then slice up from the outside bottom of the breast, back up toward the center, until you reach your first cut. The whole breast will then come off as a piece. Move it to a cutting board, then cut into 1/2" slices.
Wrapping it up
Entertaining isn't hard, but it's not without some effort either. And that's kind of the point, actually. Doing something special, that requires at least some extra effort, is exactly what holiday gatherings are all about. If we just got together and ordered pizza for Thanksgiving ... well ... ok, that would be awesome ... but not every year.
When you make an effort, put in a little more work, and make an evening your guests will enjoy and remember, you're building friendships, and establishing traditions that will last for years. And that's something that's definitely worth doing.
This post is sponsored by Murphy-Goode Winery, but all opinions are mine. Thanks for supporting the brands that support ManMade.
I love old pulleys. I love ropes and the sound of vintage things that creak and anything that bespeaks life on the high seas. Inasmuch as I can integrate those loves into my life, I'm happy to, and this standing desk / pulley lamps system seems like a great place to start...
In honesty, I'd be more inclined to start with a Craigslist/Ebay hunt for some vintage pulleys, John Culberton of Instructables.com recently trotted out this incredibly in-depth guide for making some entirely from scratch. We're talking right on down to the handmade LED wiring.
The heights are adjustable and the designs could easily be simplified to be constructed with fewer parts. Let us know what you think and if the pulleys' nautical feel can keep you from knocking peoples people's hats off.
We spend a lot of time picking out our craft beers lately. Those fancy brews deserve better than a cheap cardboard carrier, so why not make something a bit more classy? Here are four great projects you can whip up easily.
3. This vintage inspired carrier has a bit more character that really makes that beer travel in style. The details make the carrier a conversation piece that will make the brews inside a bit more classy by association.
4. For that big event, a few growlers is the only way to go. Here's a simple carrier that will keep those bottles of liquid gold protected and easy to carry around.
About once a year, I give my go-to cutting boards a good once over to make sure they stay in top shape along the way. Our cutting boards take a lot of abuse in the kitchen. Most of the time care looks like simply wiping them down and storing them back safely into the cupboard.
A solid wooden cutting board is worth investing in if you want a fully equipped kitchen. A thick, solid board makes chopping, slicing, and dicing everything a bit easier. Treat it right and it will serve well for years to come. Here's how I keep ours well oiled and smooth, ready for your knives.
1. Clean and Prep - The first step is a deep clean to get any residual and food particles off the board. I rub it down with a rag wet with a bit of dishsoap and warm water. Don't ever soak a wooden cutting board, as the water-soluble glue may fail at a joint, just wash with water and let dry stored horizontally to keep from warping the wood.
2. Sand the Surface - Generally, the cutting boards just need a light sanding to get any large slices smoothed out. Starting with 150 grit and moving up to 400, I sand the board with the grain to get the surface back to clean and smooth.
3. Oil the Surface - At this point, clean the surface again with a bit of dish soap and warm water, let dry completely then oil with food-grade beeswax or mineral oil. Stay away from olive or canola oil as they tend to go rancid and make the board unsanitary. Be sure to oil both sides of the board evenly and always store in a horizontal position to prevent warping.
Helpful Tips:
1. Don't cut meats on a wooden cutting board. I have a dedicated plastic board for meats that I can put in the dishwasher for a deep disinfection.
2. To take out stains on wooden boards, scrub the board with some salt or baking soda and rub it in with a halved lemon. Be sure to re-oil the board after a scrub like this.
That's it, do this simple rehab on all of your favorite cutting boards at least once a year and you will likely have it around for over a decade.
So I saw the movie ARRIVAL this weekend and loved it. Definitely check it out. A large part of the movie deals with language construction and trying to understand alien semantics, which got me diving down a Fibonacci sequence, which led me to looking and fractal imagery, which led me to geometrical design, which led me to these beautiful wood lamps...
Instructables user m8pilon has designed these wooden lamps utilizing the flexion-tension principle with some astounding results. The entire lamp shade surrounding the light bulb is made of thin strips of Birchwood that are simple folded around each other and then notched together. He has specific designs created in Rhino+Grasshopper, but he also shows you the principles of his design so you can apply his principles to your own creations.
Let's dispense with the formalities, shall we? You're here for stocking stuffer gift ideas, and we are here to give them to you. Here are all the things you should put in your stockings this year:
1. Leather Beard Oil, $19.95: Soften your whiskers and smell like tanned leather. If leather isn't your thing, the Date Nite Oil will make for a happy evening.
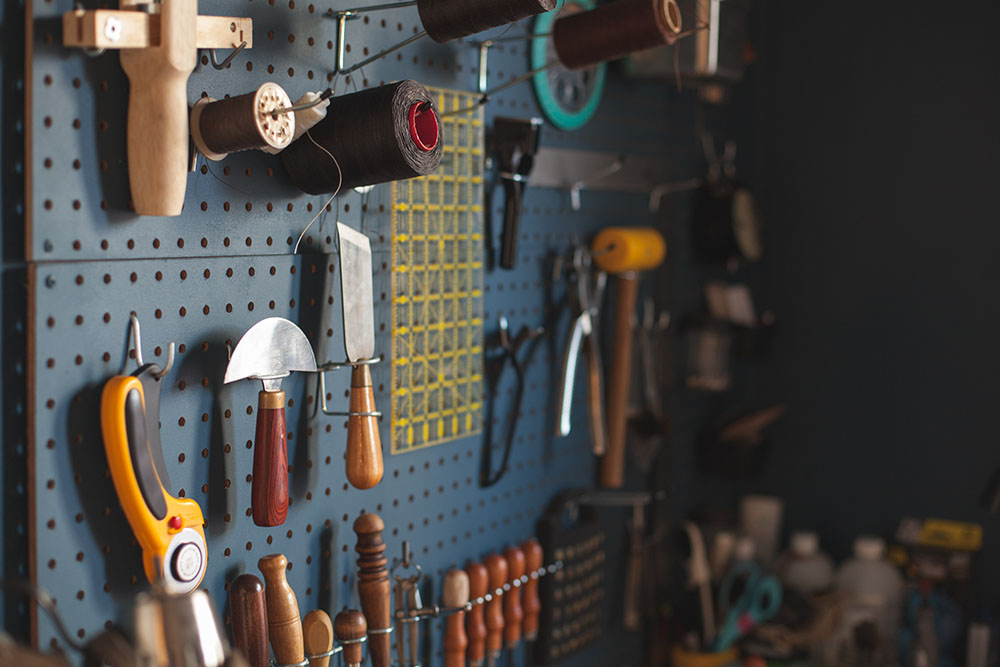
My journey in leatherworking started with disappointment. Disappointment in a pair of leather boots. I had purchased a pair of Steve Maddens from DSW for about $100. They didn’t last long... and I mean, they really didn’t last long. After a month of pretty irregular use, the grommets had fallen out, the surface of the leather had started to rip, and the dye was already starting to rub off. And as my shoe angst built, I thought, ‘I could make something better than this.’
Angst aside, I was right, I could. And you could too.
Seriously, it didn't take long before I was making leather items at a much higher quality than those boots, and it won't take you long either. Even though leather working is a lot less common than, say, wood working, it is actually super easy to get started. With starting costs being relatively low and easy to understand basic skills that are transferable to many projects, leather working is definitely a skill you should pick up.
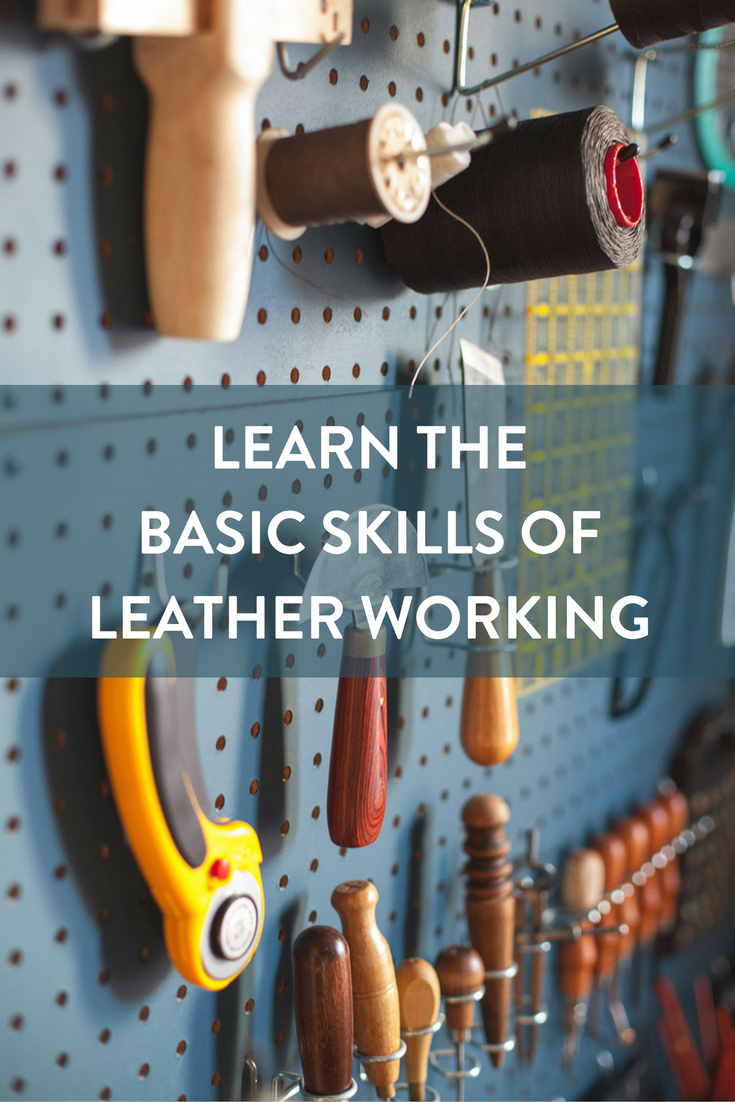
And you’re right, I’m biased. But give me a chance to prove it to you. Below is a list of basic skills that will help you complete most leather working projects. You’ll find that each of these skills are easy to understand, even if a bit tricky to master, and will quickly get you making some quality leather items, like laptop sleeves, journals, and more (those tutorials coming soon!). If you’d like to a more detailed explanation of the skills in the list below you can check out the Beginners Guide on my website: goldbarkleather.com
Cutting:
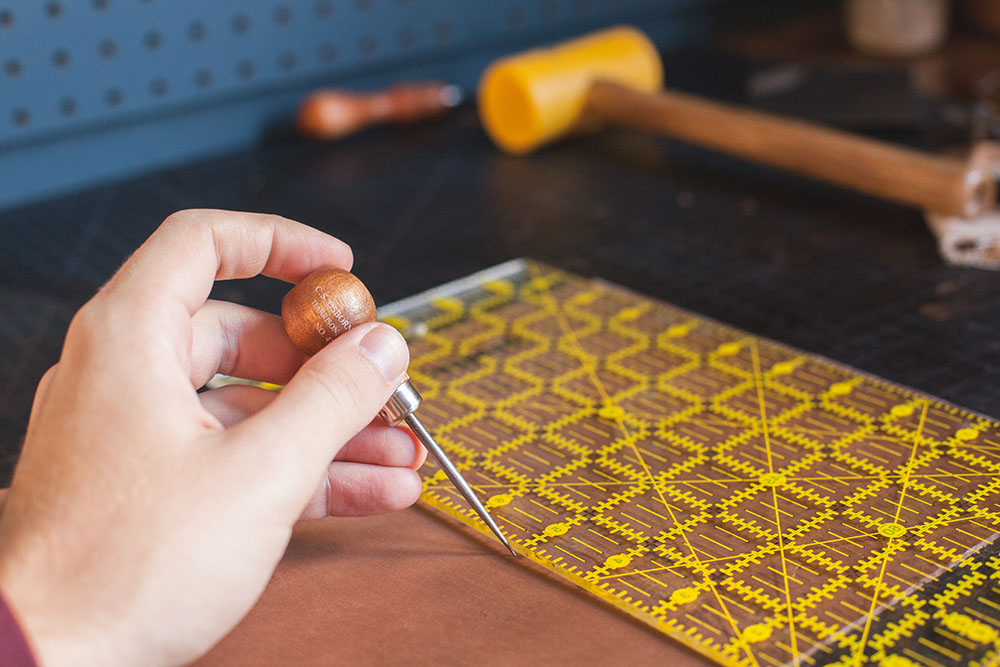
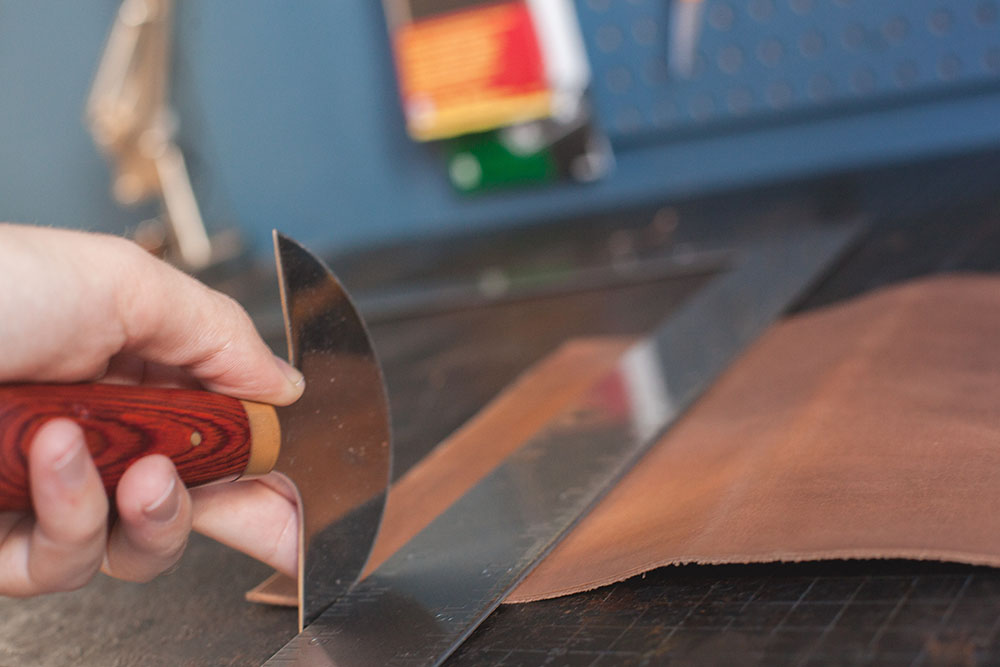
The first thing you’ll do is cut out the pieces for your project. And this is something that’s pretty easy, but there’s a right way to cut and a not so right way. Because cutting out the leather is generally the first step in making a leather item and your cuts effect the difficulty of the steps that follow. Clean cuts ensure that burnishing is easy and your stitching lines are straight. Getting a clean cut is all about scoring, using a ruler that won’t slip, and having a sharp knife.
First, trace out your project onto the leather using a scratch awl and ruler.
Next cut out each piece with a knife and a heavier ruler that isn't going to slip. There are a lot of different kinds of knives that work well when cutting leather. If you are just getting into leather working, rotary cutters work well.
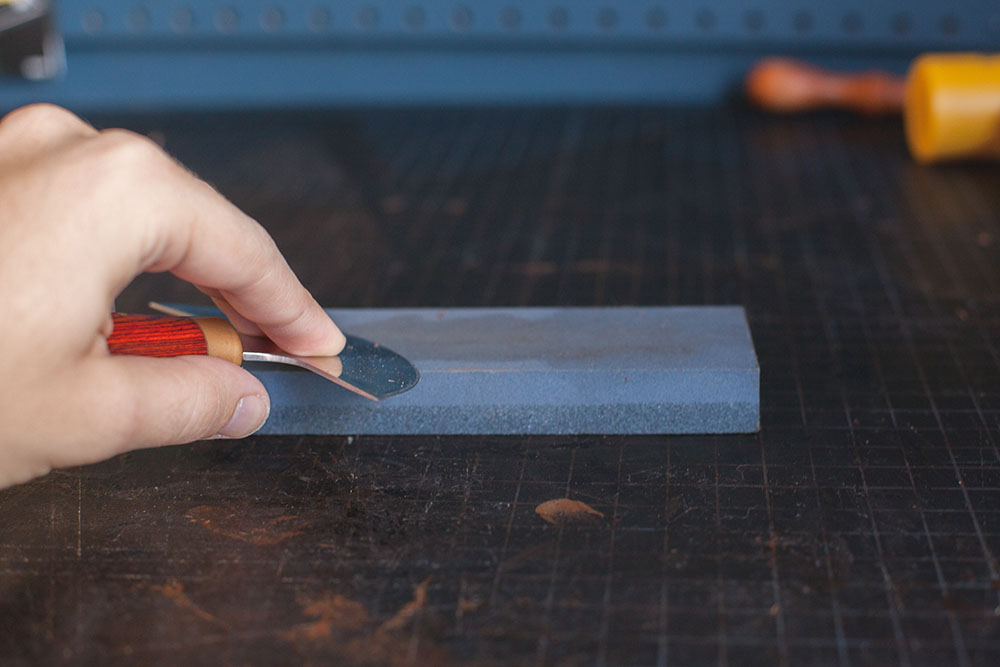
Finally it's insanely important to keep your knives sharp. Your cuts won't be as clean and you're prone to make more mistakes with a dull blade. Even if you're using a rotary cutter, make sure to keep it sharp. You can buy a rotary blade sharpener or replace the blade frequently.
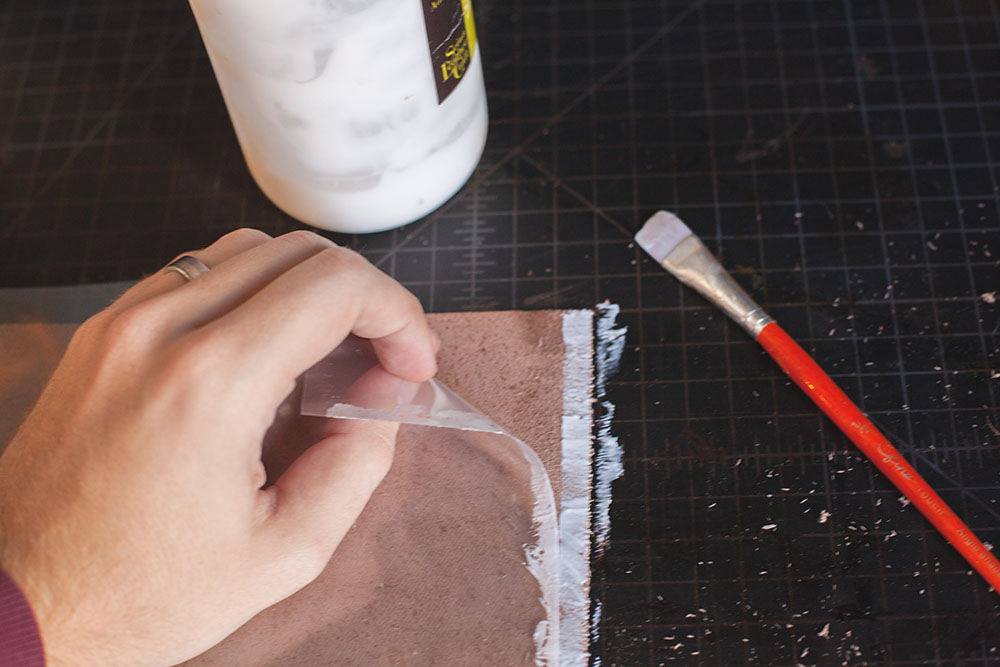
Gluing:
Gluing will keep your edges pressed together while you prepare the leather for stitching. You’ve been doing this one since first grade, so there’s not a whole lot to learn here. Applying the glue is not hard, but there are some ways that can improve how well the glue holds like sanding the area you’re gluing, making sure you glue only where you need with wax paper, and apply pressure when the glue is drying.
First, sand the area that you are planning on gluing, especially if it's on the flesh side (surface or top side) of the leather. This will make it so the glue can sink into the leather a bit and adhere much better.
Next lay down some wax paper and apply the glue with a paint brush. Getting glue in the wrong spot is a serious pain to try and clean up, so use wax paper to keep the glue where it needs to be.
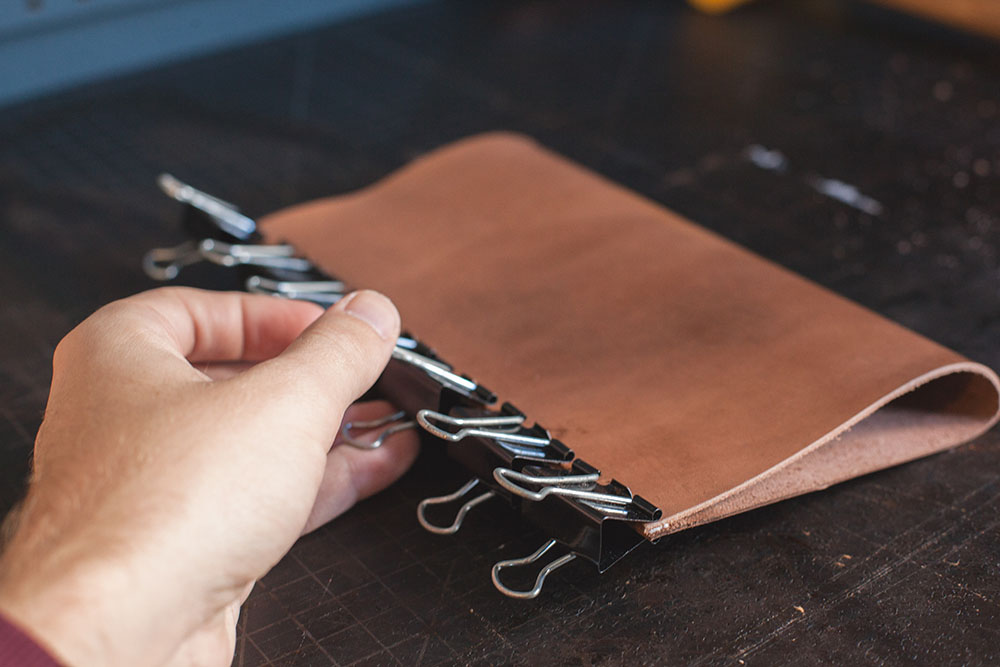
Finally, apply pressure while it dries. Often I will use binder clips, but make sure the leather you're using for your project doesn't get dented by the blinder clips. If that's the case, just lay a cloth over the edge and then clip on the binder clips.
Hand Stitching:
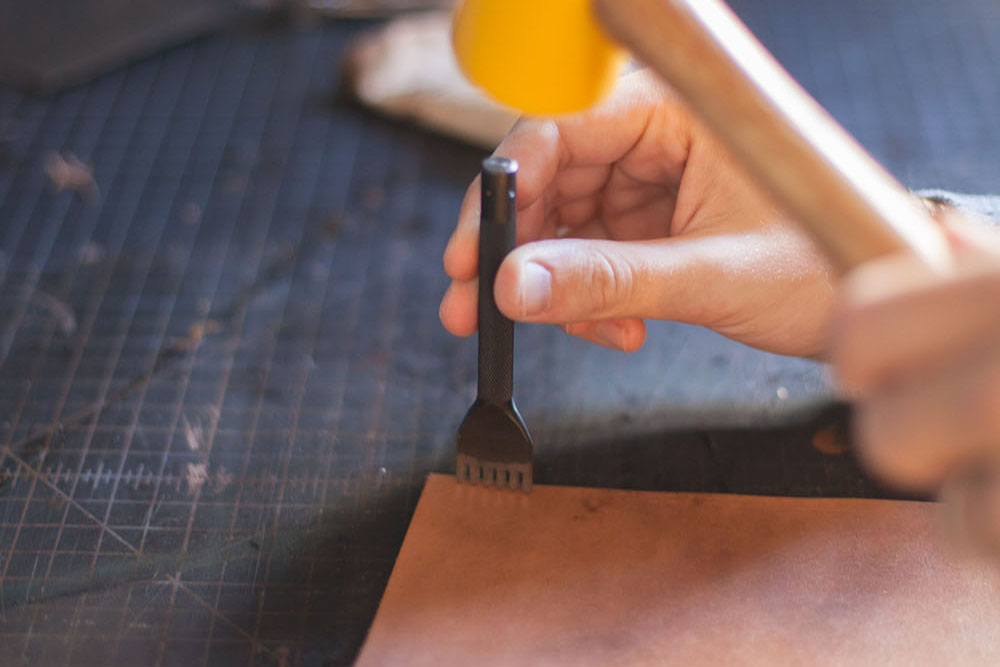
This is probably the hardest skill to learn out of them all, but still pretty easy to pick up. Stitching a leather project together is a multi-step process. It involves marking out your stitching lines, punching your stitching holes, and finally saddle stitching the item together. Saddle stitching is a hand stitch that is widely used in leather working due to its durability, and learning it isn’t that hard. Check out these five simple steps to learn how to saddle stitch.
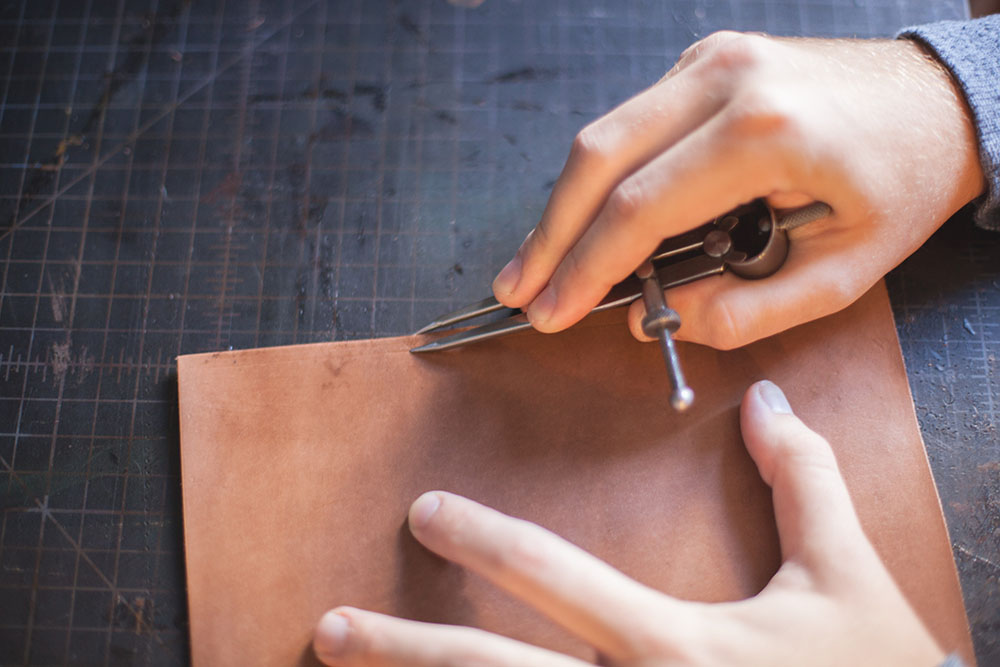
First, mark your stitching lines with a divider. If you're not sure how far to set your stitching in, a general rule of thumb is to have the distance between the stitching and the edge be the same as the thickness of the edge.
Next punch your stitching holes using a diamond chisel. The only trick to this is to make sure that your chisel is perfectly perpendicular to the leather. A slight angle one way or the other will make it so the stitching on the back side doesn't line up. This is especially a problem on thicker projects, like belts.
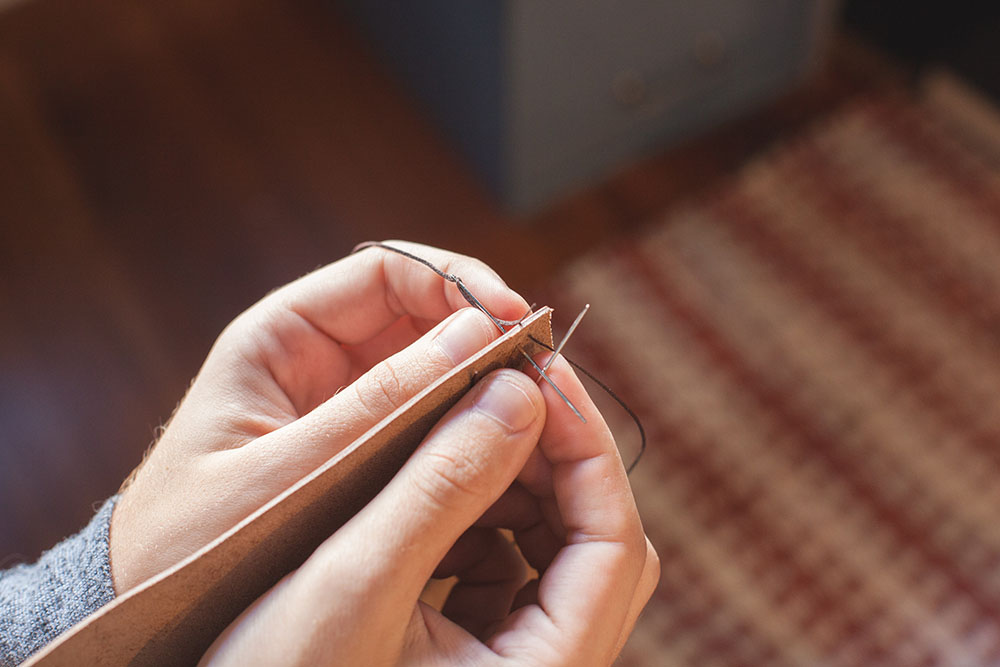
Now to the hard part: saddle stitching. Once you have the needles through the first hole, take your the needle on the left side and push it through the leather. Then, with the right needle, come behind the left needle to make a cross.
Next, with the right needle still behind the left needle, pull the left needle through and rotate your hand toward you so that the left needle is now facing you and the right needle is facing the stitching holes.
Finally, put the right needle through the same hole you just pulled the left needle through. If you used a diamond chisel, each hole will be a diamond shape. This mean that each hole has a high point and a low point. For your stitching to look uniform you need to consistently put the right needle back through the hole at the same point in the diamond, ideally the point of the diamond that is closest to you. Once the needle is through, pull both tight. At that point, you've finished your first saddle stitch. On to the next one. Once you've completed your entire stitching line, you'll need to back stitch. Back stitching is a saddle stitch that goes backwards two to three holes to make sure the thread won't come lose.
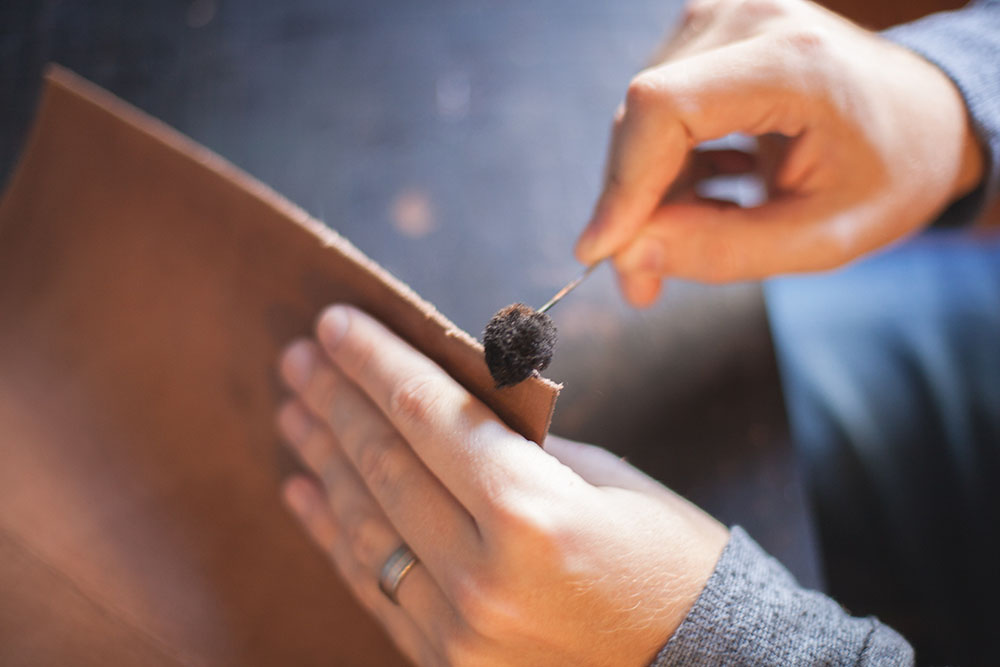
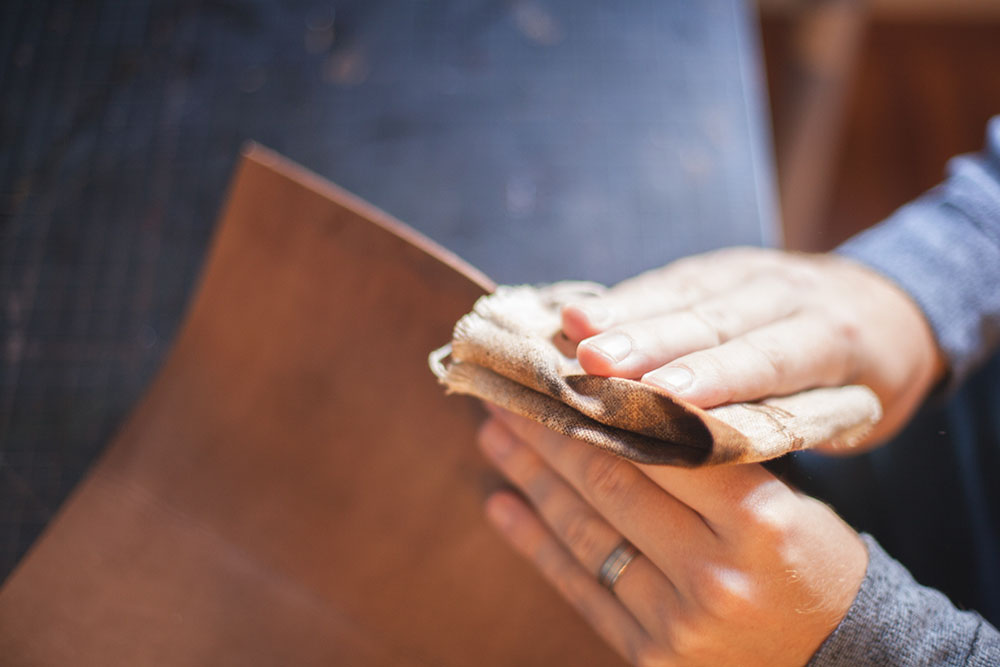
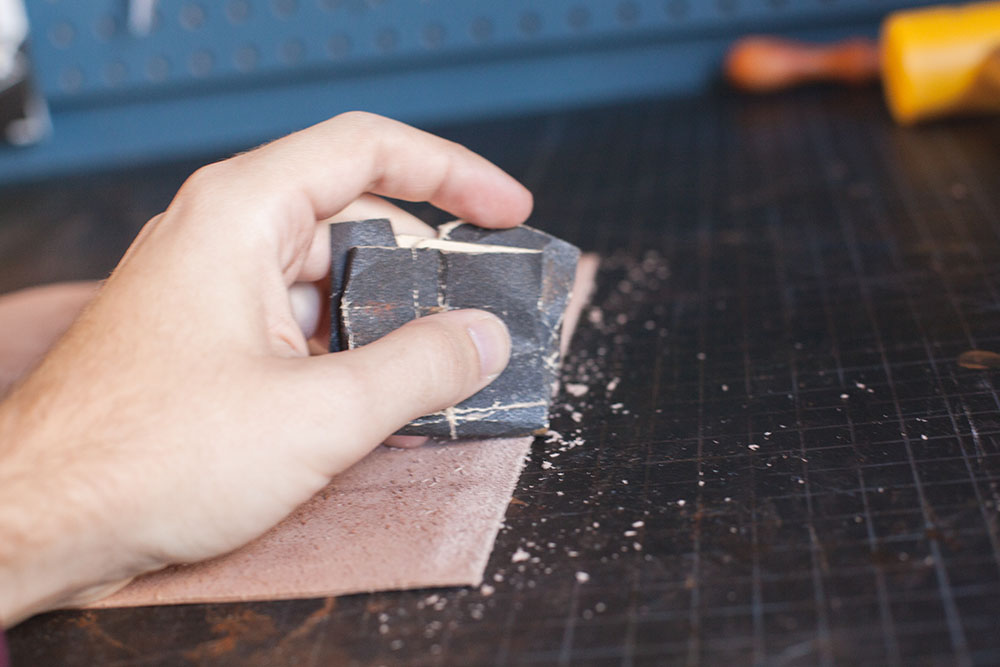
Once your project is stitched together, making sure to finish your edges will give your project a professional look. There are multiple ways to edge finish, the three main ways being: burnishing, edge painting, and edge turning. Burnishing is probably the easiest, and yields some great results. This process finishes the edges by melting the loose fibers together with heat created through friction. Basically that just means you rub the edges with a piece of canvas until it looks good. A simple burnishing process includes: beveling edges, sanding them, dying them, burnishing them with a piece of canvas cloth, and then finishing the edge with beeswax.
First you'll need to bevel your edges. The reason for this is that the surface of the leather will start to fold over as you sand the edge. Beveling basically removes that part that would fold over. Beveling is super easy. All you need to do it run the beveler along the edge with a moderate amount of force.
Next you'll need to ge the edges nice and smooth. Generally I hit it with a couple grits of sand paper. First, start with a 200 grit sand paper, this will even out any part of the edge that is not flat with the rest. Then, sand off loose fibers with a 600 grit sand paper.
Once the edges are smoothed out, it's time to dye the edge. I apply the dye with a wool dauber. But, dying the edge isn't something you have to do. If you want your edge to be a natural color, then don't dye it. Typically though, I will dye the edge with the same color I used to dye the surface. When you burnish the edges will naturally darken, so using the same dye provides a darker shade of the same color, which always looks good.
After the edges have been dyed, it's time to actually burnish. To do this, dip your finger in water and lightly wet the edges. Make sure not to soak the edges though. Leather becomes very pliable when soaked and can be molded. This is great for other things, but not so much when your burnishing. Once you've put water on the edges, rub a canvas cloth across it briskly until the edges start to darken and shine. You'll know you're done when you start to hear a tacky sound.
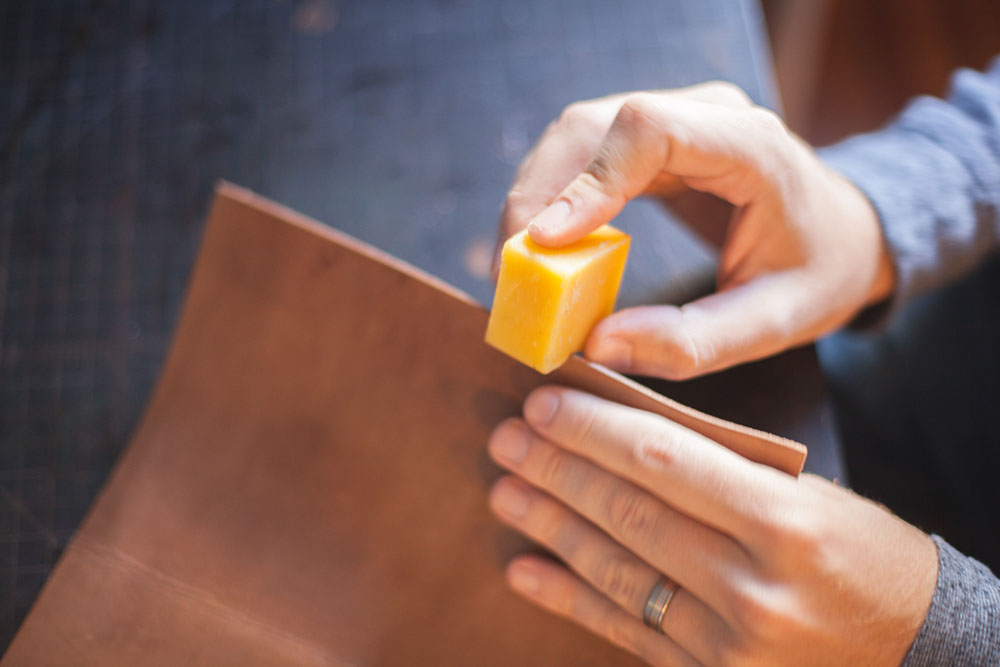
And finally, apply some beeswax to the edge. This helps keep the leather water resistant and makes the edges look dang good. After putting on the beeswax, make sure to buff the edges again with a piece of canvas. Then you're done.
See? It's not so bad. With a basic grasp of these skills, you’re already have the knowledge you need for your first project. Now's your chance to go make your first leather item.
Looking to add a little of the "roasting on open fire" flavor to some of your seasonal libations? Check out this cool technique for making smoked cocktail garnishes to add some toasty, earthy notes to your drinks.
Creative studio The Jewels of New York suggests placing a singed, smoking rosemary sprig in the glass, to add aroma and flavor to the drink. Here, they've paired with warm, spicy flavors like mezcal and allspice dram. We could see this working in a lot of places - anything with whiskey, tequila, or rum should be a good place to start. Besides rosemary, consider other toast-able, edible things like thyme and cinnamon sticks.
Or, to add other kinds of good, charred flavor, consider charring citrus in a grill pan or cast iron skillet, or using ingredients like smoked olives or rimming a glass in smoked salt.
One defining aspect of an interesting man is a cache of amazing tales. Someday, someone small will look up at you with admiration and you owe them a story worth telling. Living a life of adventure is not only possible, but necessary. If you're not doing it, today is a good day to start.
I woke up to the familiar feeling of a full bladder. Tonight, this meant I would have to venture out into the frigid cold to answer nature's call. Silently staring up at the bright moon, I swung lazily while savoring the contrast of an icy nose to the radiating warmth of goose down around the rest of me. I once read a story that your body takes a tremendous amount of energy to keep liquids in your body warm, so the survival side of my brain willed me to quickly unzip my bag and scamper a few feet into the dark woods to get rid of the hot chocolate and sips of Scotch from dinner.
I was out camping in November, at snow line, in a hammock. A wet October had brought early snowpack and the possibility of snowcamping, but warm weather had turned that hope into swollen creeks and unseasonably bright meadow grass. With gusts up to 40 mph and a 20% chance of rain, here really wasn't much reason I should have been swinging between those pine trees, but there I was - feeling incredibly alive.
As the morning sun finally broke over the East ridge I was already up, heating some coffee and wringing out a soggy sock that had fallen out when I migrated from hammock to tent to escape the steady rain. Did I mention I had a friend with me who was sleeping safely in the tent? Yep, in the wild always have a backup plan.
The rain lightly fell as we made our way back to civilization, with the world looking crisp and clean like only a rainstorm can make it. Sure we were a bit wet, a bit tired, but satisfied with an adventure well done. That, was my 24 hour adventure this month. I pulled out of my driveway about noon on Friday and was back by 11 the next day. My 24 hour adventures are a necessary part of a life well lived, and I highly encourage you to do the same. taking about a day per month to collect stories that are worth telling should be a part of every busy life. Here's how I started making them happen -
1. Make a list - Sit down with a friend and a pint and talk about the amazing things to see within a few hours of home. You'll be amazed at how quickly a respectable list comes together. I happen to live within a few hours of three national forests, one national park, and a dozen state parks, but there are always great things to do. For example, once I year I do an overnight brewery trip with friends.
2. Make a plan - If you don't put something on the schedule, it's not going to happen. Plan it out with friends and guard those trips. Start with once every few months on a long weekend, or near a holiday when schedules are more flexible.
3. Make it happen - Now get out there and make some memories. Really take the time to be present during the trip and make it a point to take it all in. I journal on my trips so I can look back and relive the adventure. For big accomplishments, bring home a stone or show ticket, or bottlecap to track the memory with something tangible, and put them somewhere safe so years from now those stories have an anchor to inspire from.
*Note: My November hammock adventure was planned with some basic safety in mind. I had extra layers, top notch gear, and an exit plan if needed. Don't tempt fate in the wild. The woods are very unforgiving so always carry the essential 10 and have a plan to stay safe, warm, and sheltered when nature tries to kill you.
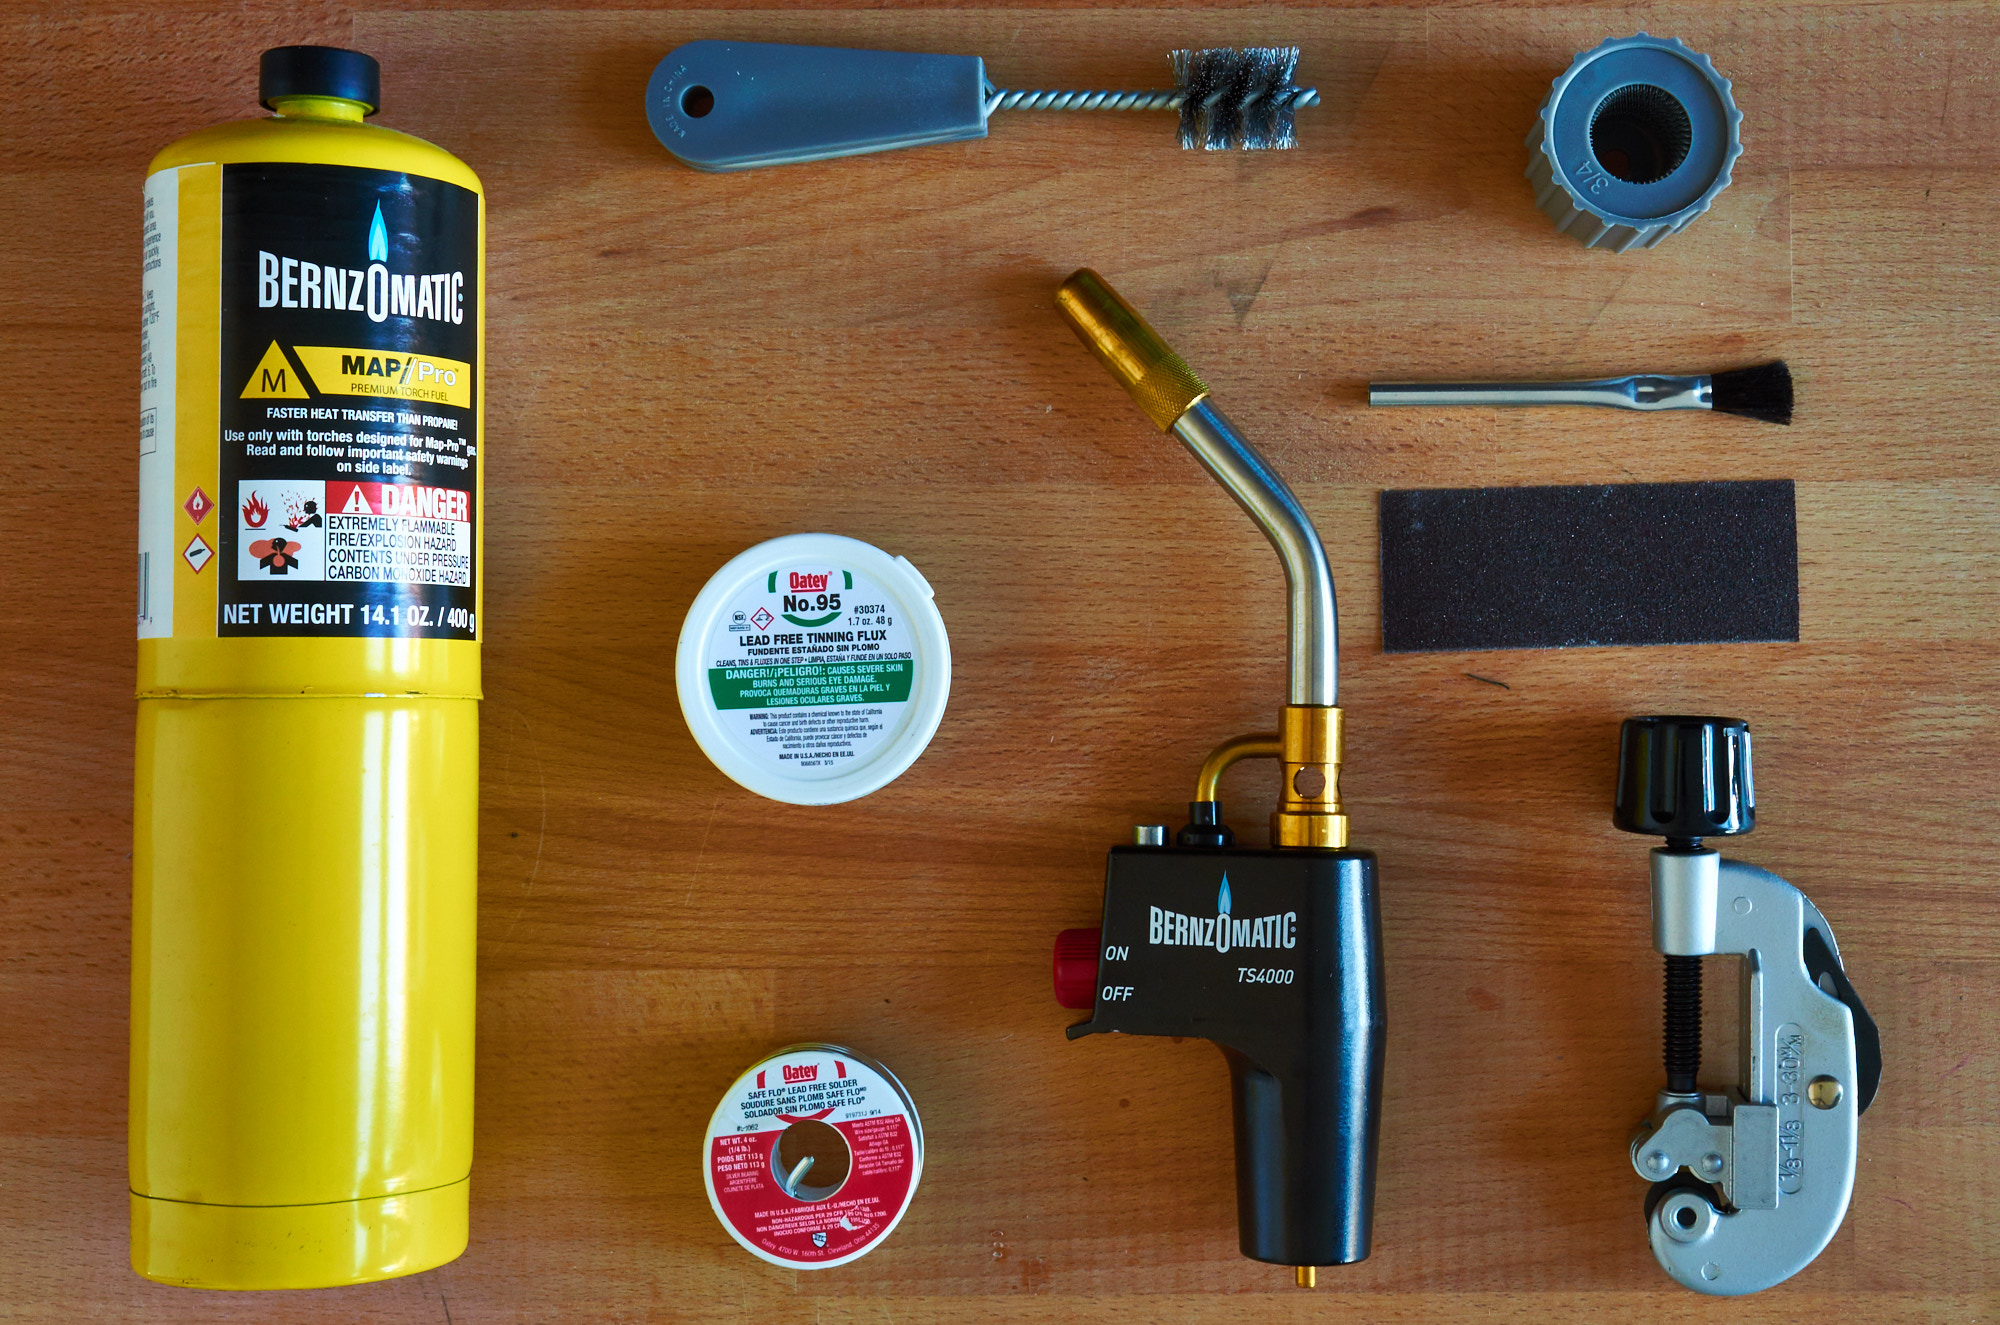
Most homes theses days have a fair bit of copper piping in them, and knowing how to make simple repairs (or installs) is worthwhile. Plus, soldering (aka 'sweating') pipe is one of those skills that's actually really easy to learn, and pretty hard to mess up (badly).
Here's the thing, though: soldering pipe can be dangerous, because it involves using a blow torch at high temperatures to heat the copper. Plus, you'll almost always be doing it it indoors, which is not my favorite place to use an open flame. So do it safely:
Safety Tips
Keep a working (recently-inspected) fire extinguisher on hand
A bucket of water, or a spray can, is useful too (if you're working on your plumbing, chances are your water will be turned off).
Keep a wet rag nearby
Use proper safety equipment: eye goggles of other eye protection, and work gloves. Long sleeves isn't a bad idea either (Oops: I shot the photos below in short sleeves! Don't be like me!)
Some background:
The most common way of joining copper pipe is by soldering (it's called 'sweating' mostly in the U.S., probably because the pipe 'sweats' as it heats up). A soldered copper joint is called a 'capillary' or 'lap' joint (see more here), because the fitting overlaps the tube end, leaving a capillary space between the two pieces. That space then gets filled with solder; heated, liquid metal, which cools to seal the gap. Brazing is basically the same process, put performed at a higher temperature (if the soldering metal melts above 840 degrees, the process is called brazing).
Flux is used to prevent oxidation in the copper when the heat is applied, and to 'wet' the metal, allowing the liquid solder to flow more easily into the joint. Charcoal was used as one of the earliest forms of flux. Pine rosin is also used as a flux in soft-soldering (electronics). Learn more.
This year ManMade is part of Bernzomatic's Torch Bearers program. We'll be following up over the next several months with some creative projects and clever ways to use a blowtorch around the house. In fact, this isn't the first time we've waxed poetic about the hottest tool in everyone's workshop; last year as part of our Essential Toolbox series, we made the case for the blowtorch as a must-have tool.
Step
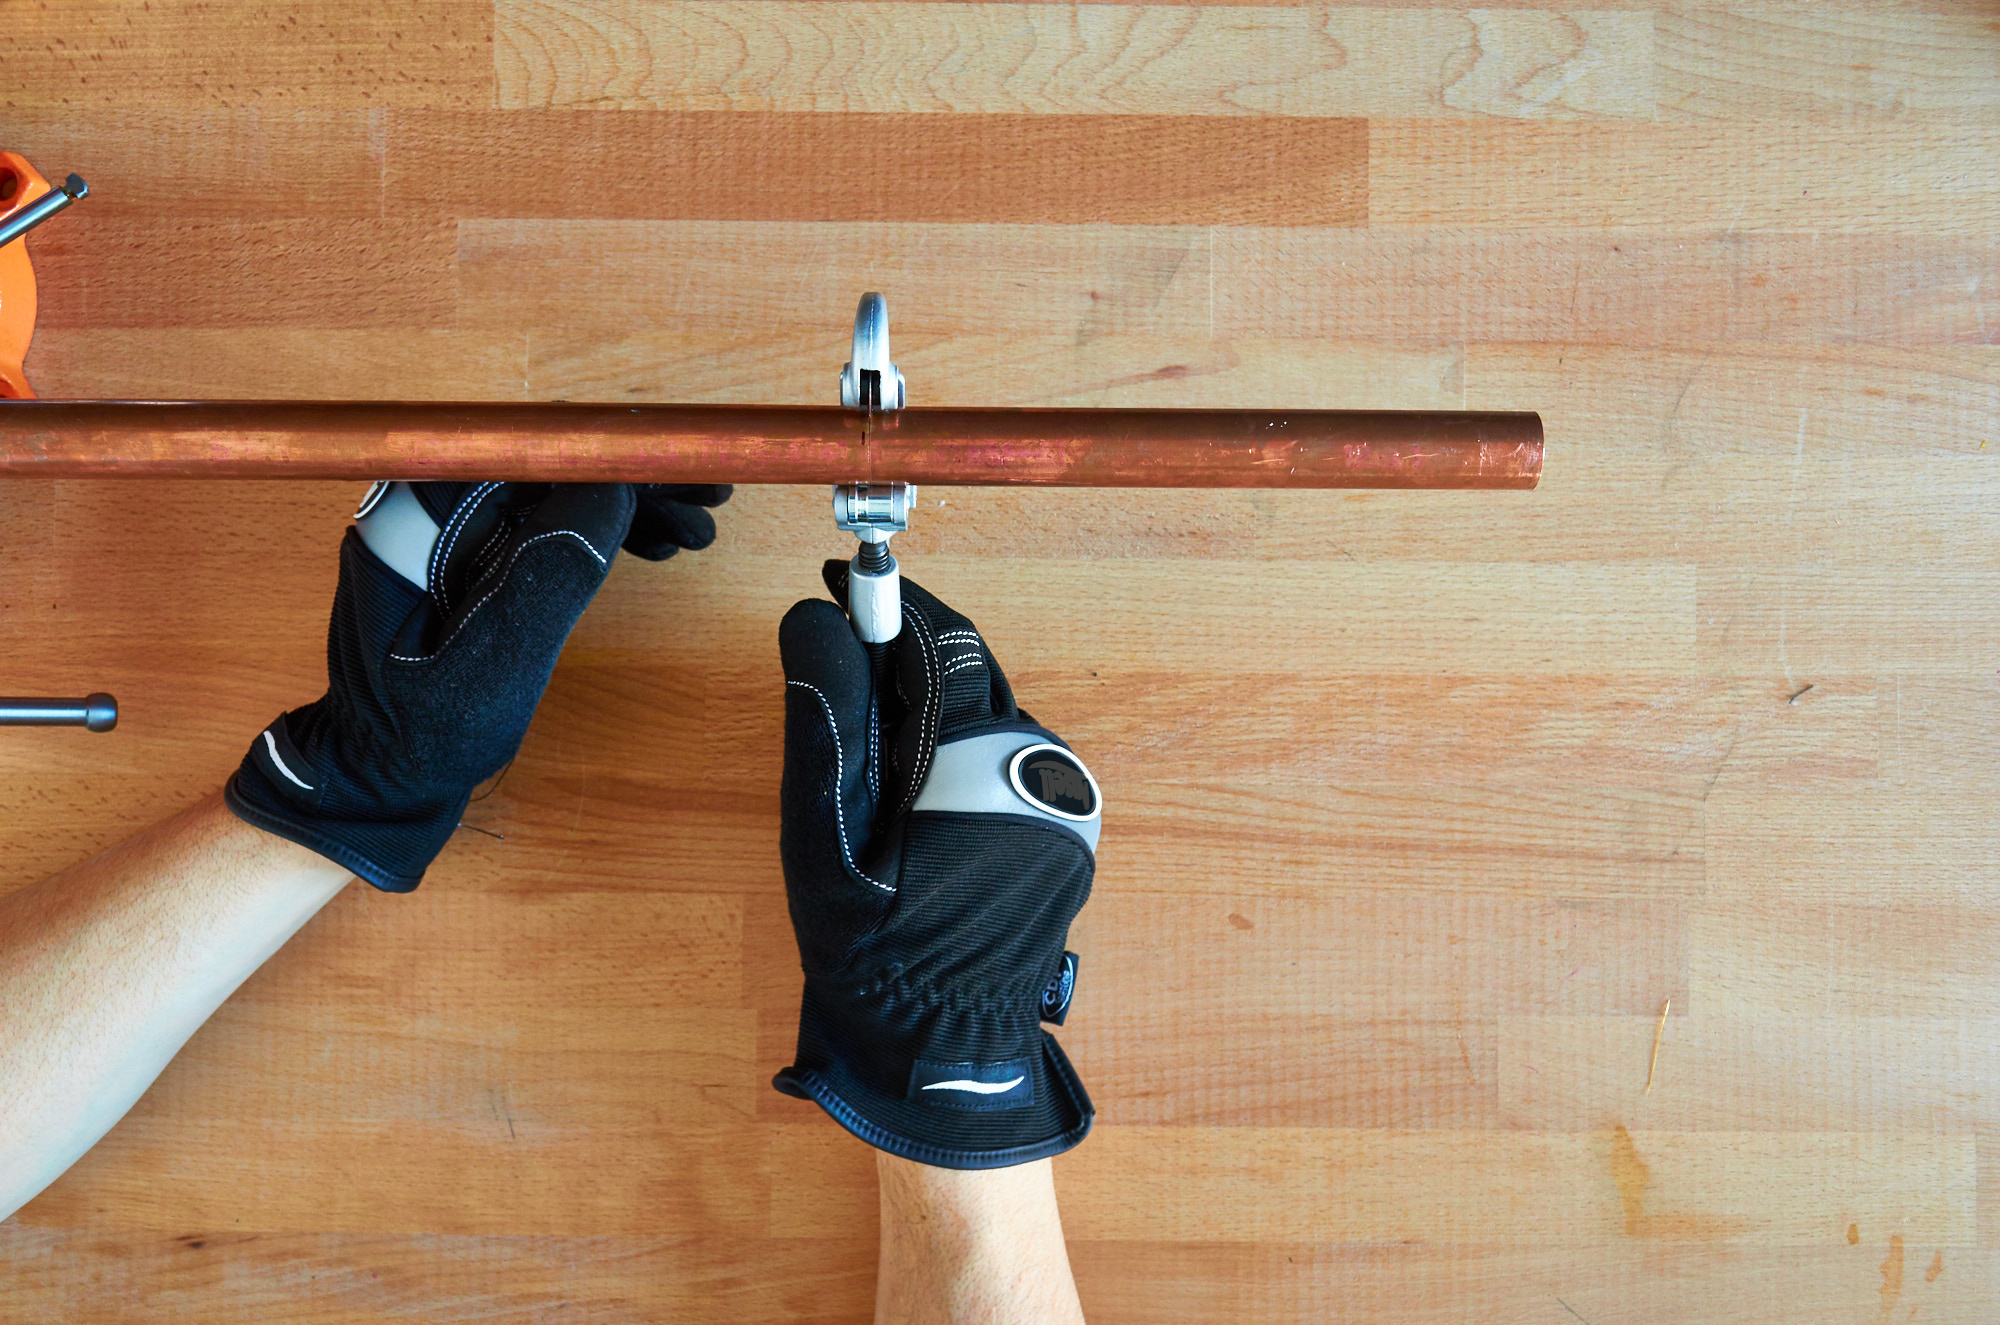
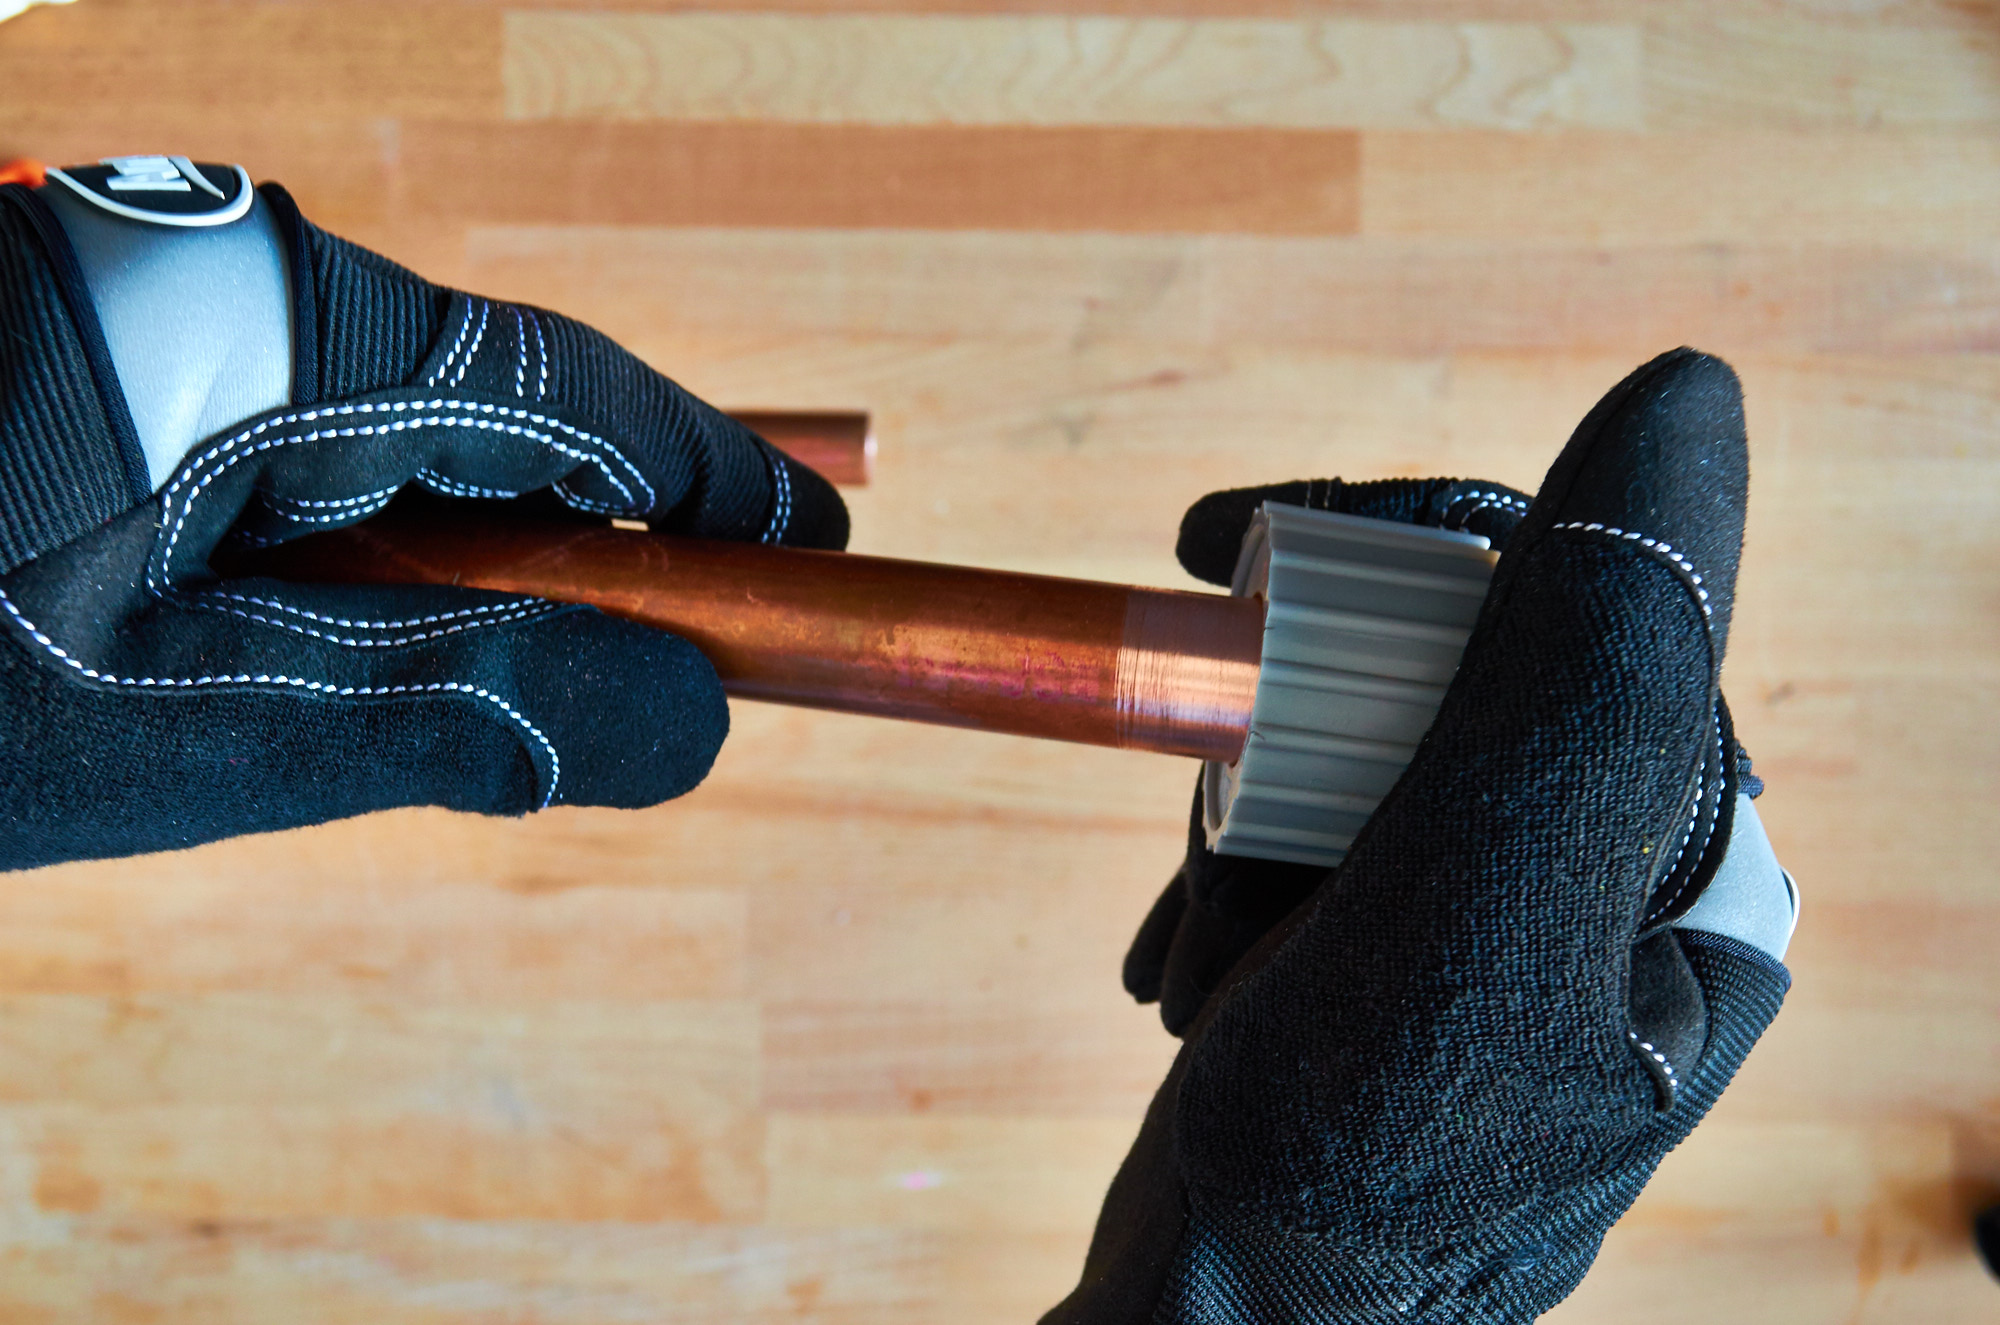
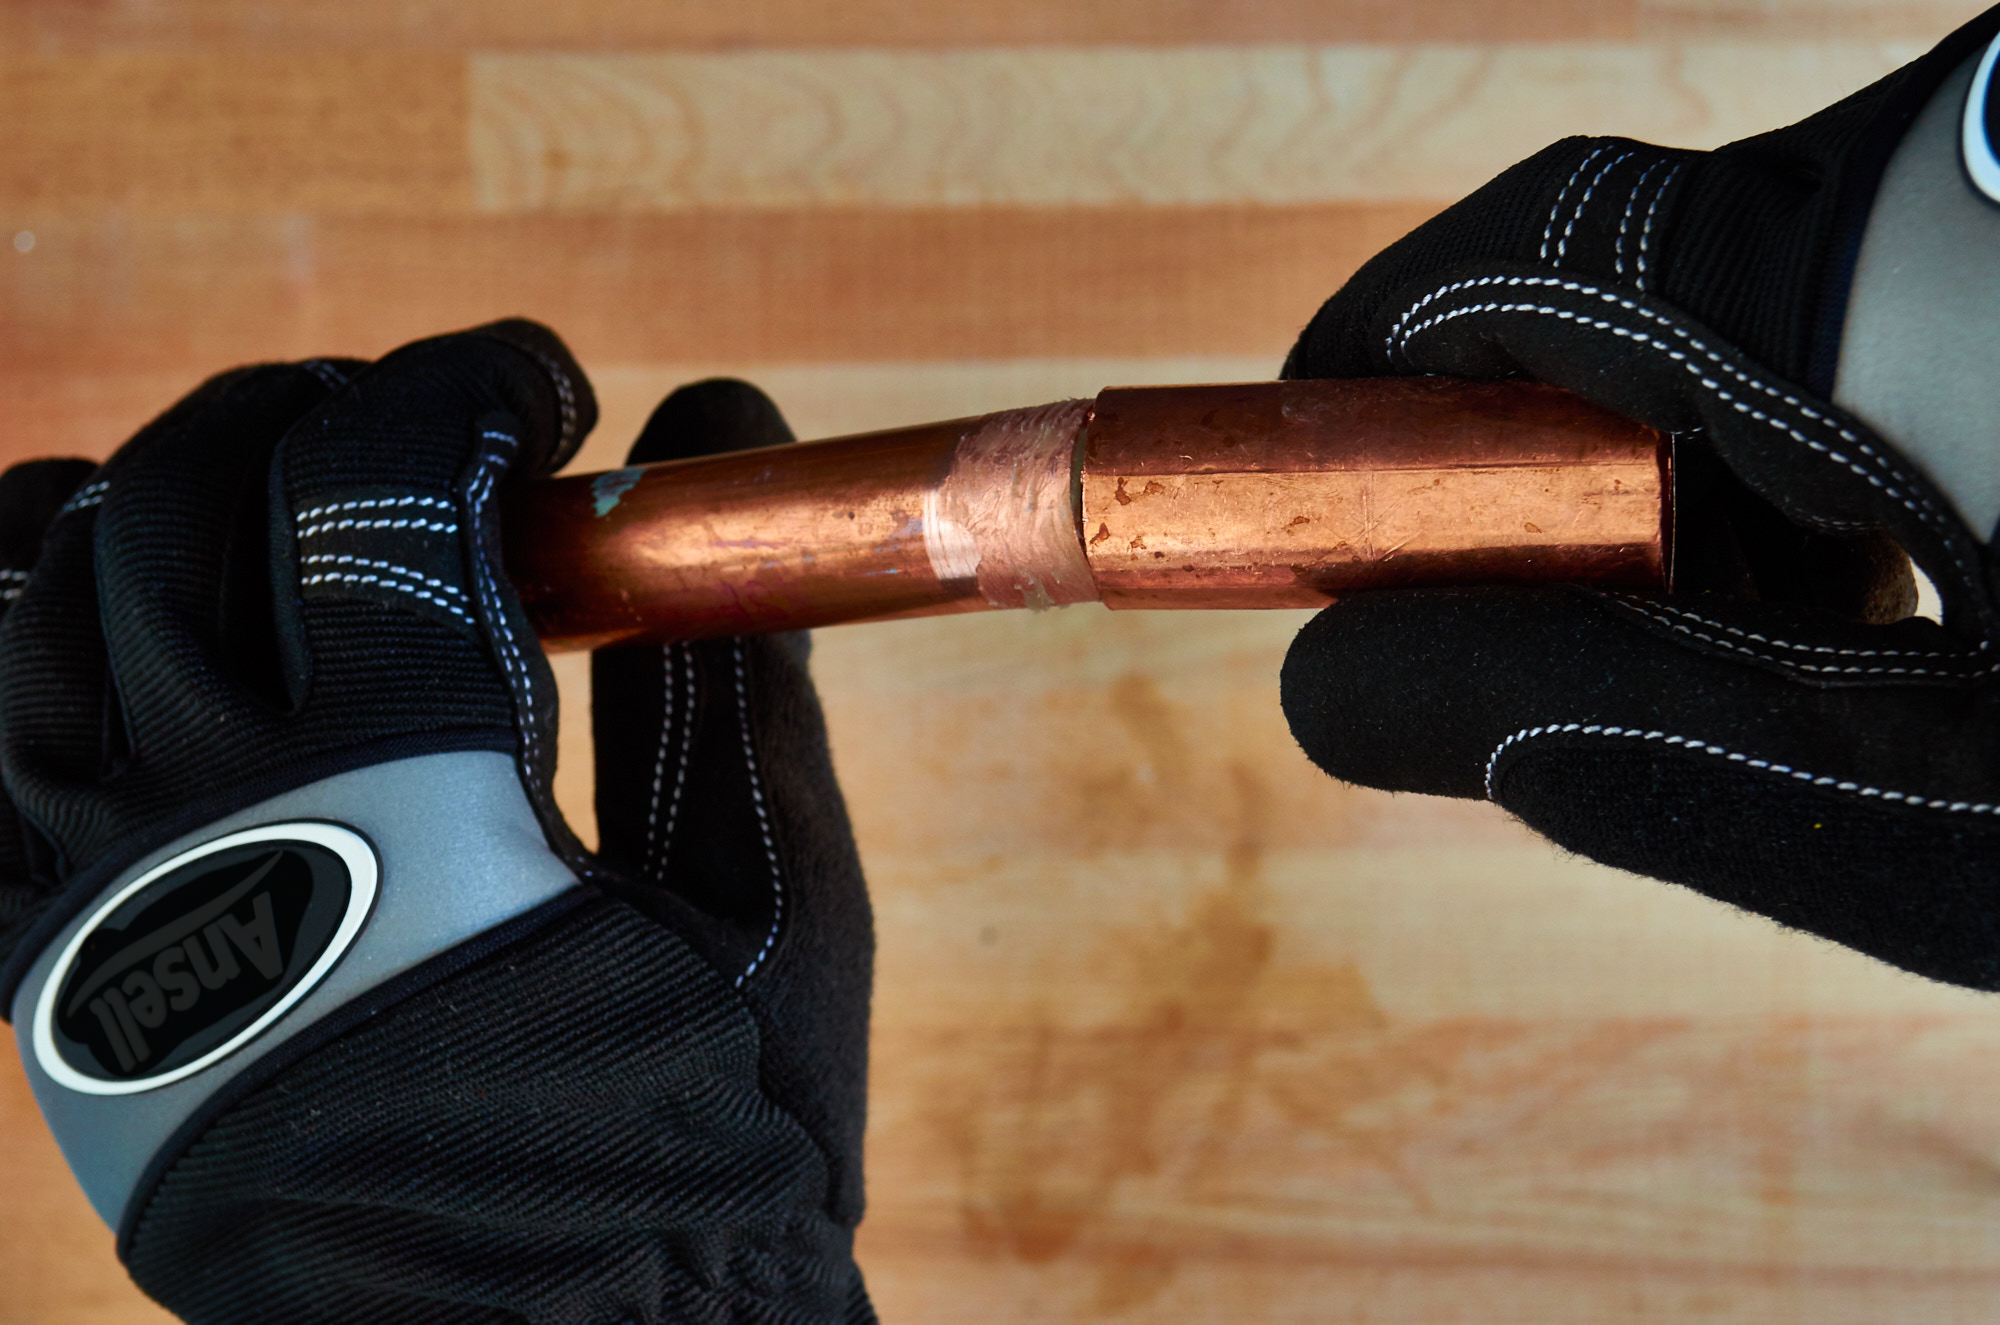
Measure your pipe to the correct length. Make sure to account for the size of the couplings that you'll be using).
Step
Cut the pipe to length using a hacksaw, or (better) a dedicated pipe-cutting tool. The pipe cutter makes a cleaner cut, and is safer and easier to use.
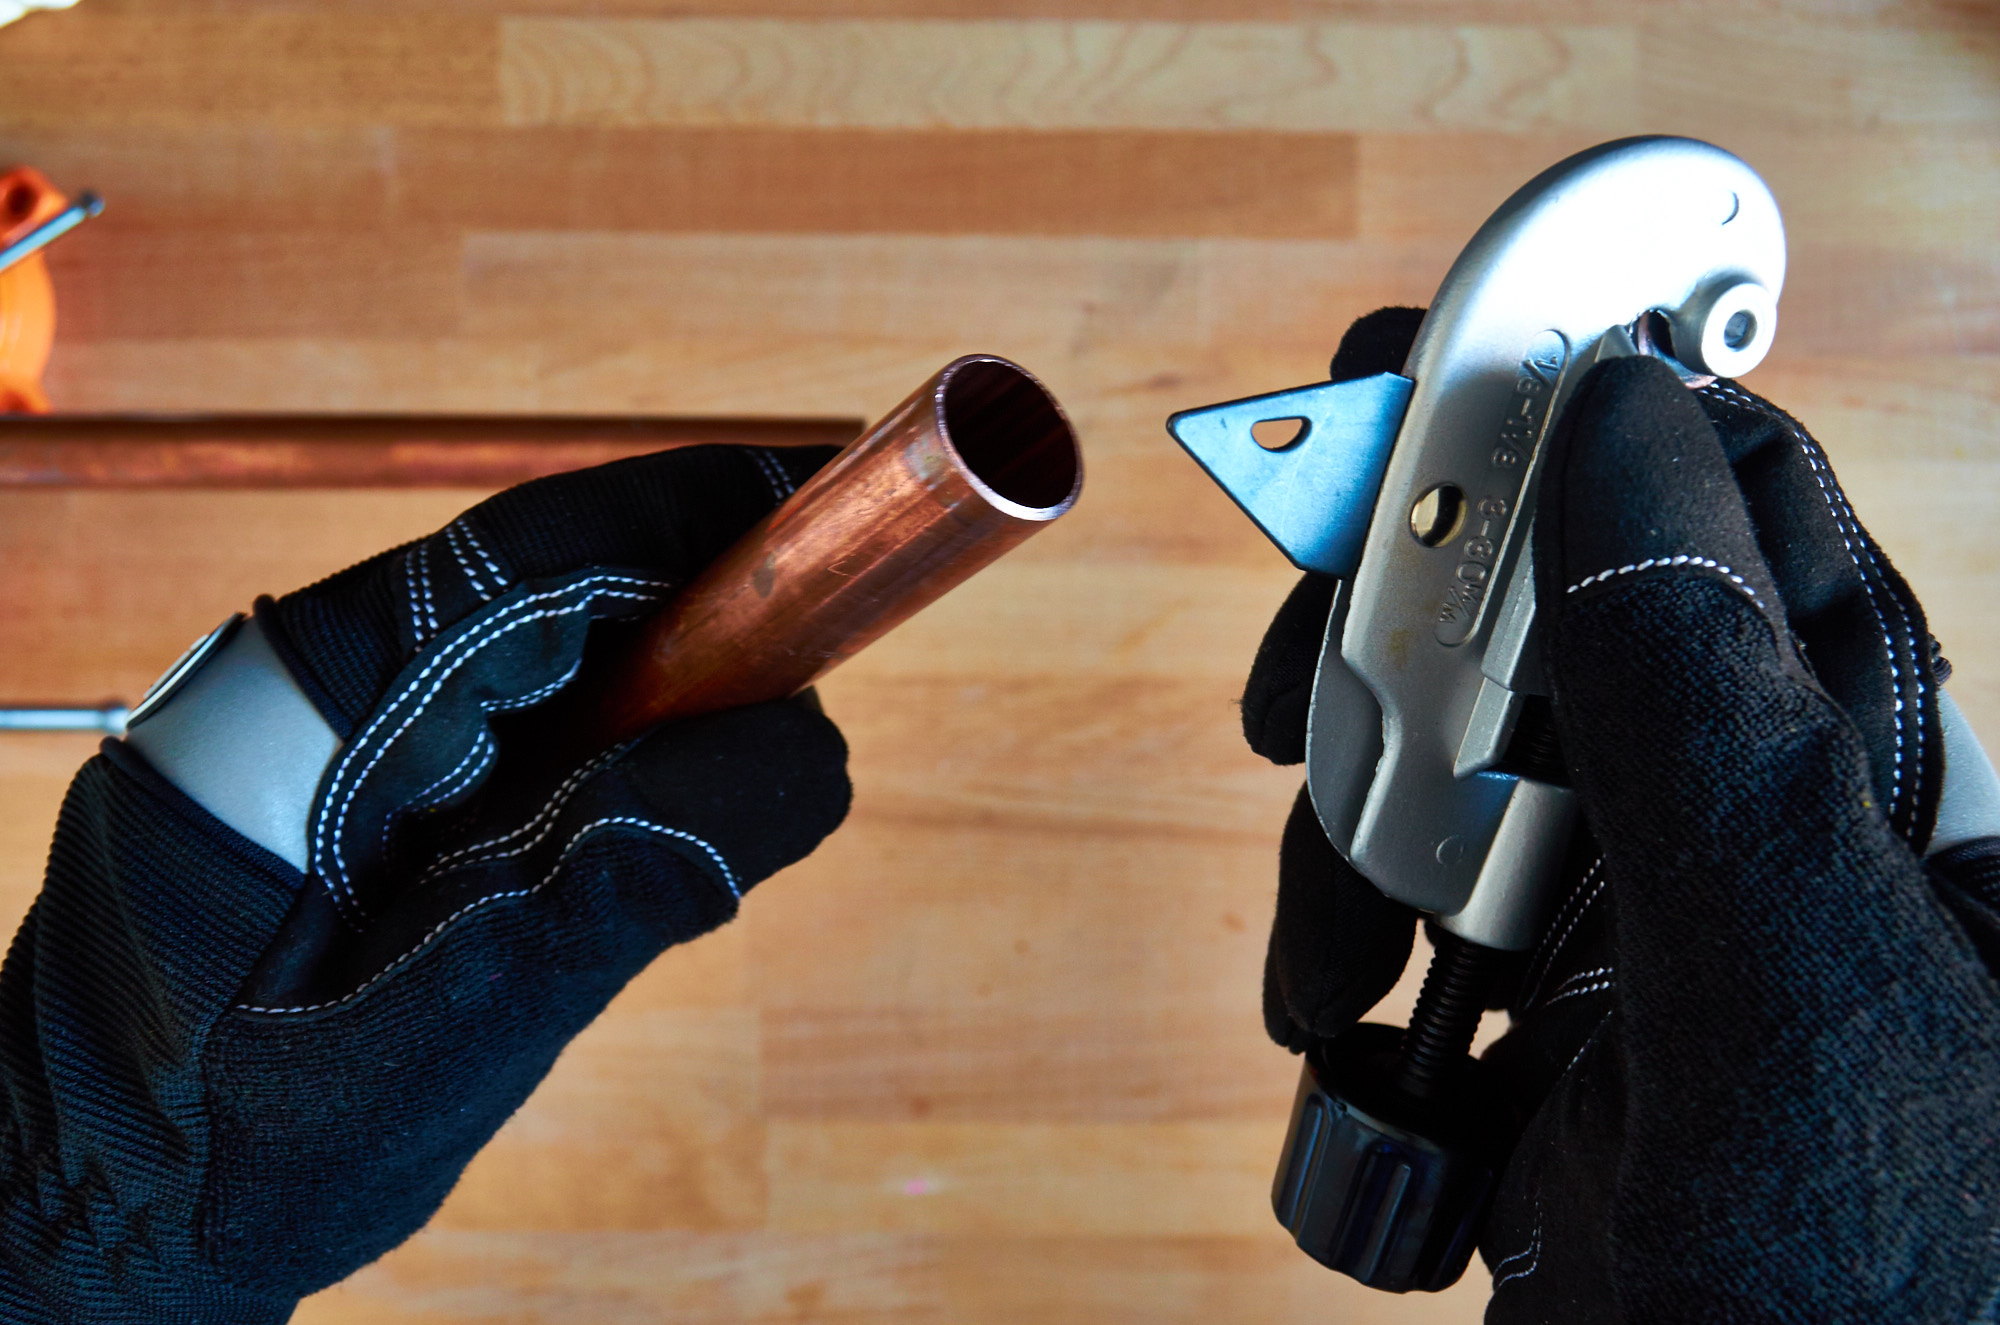
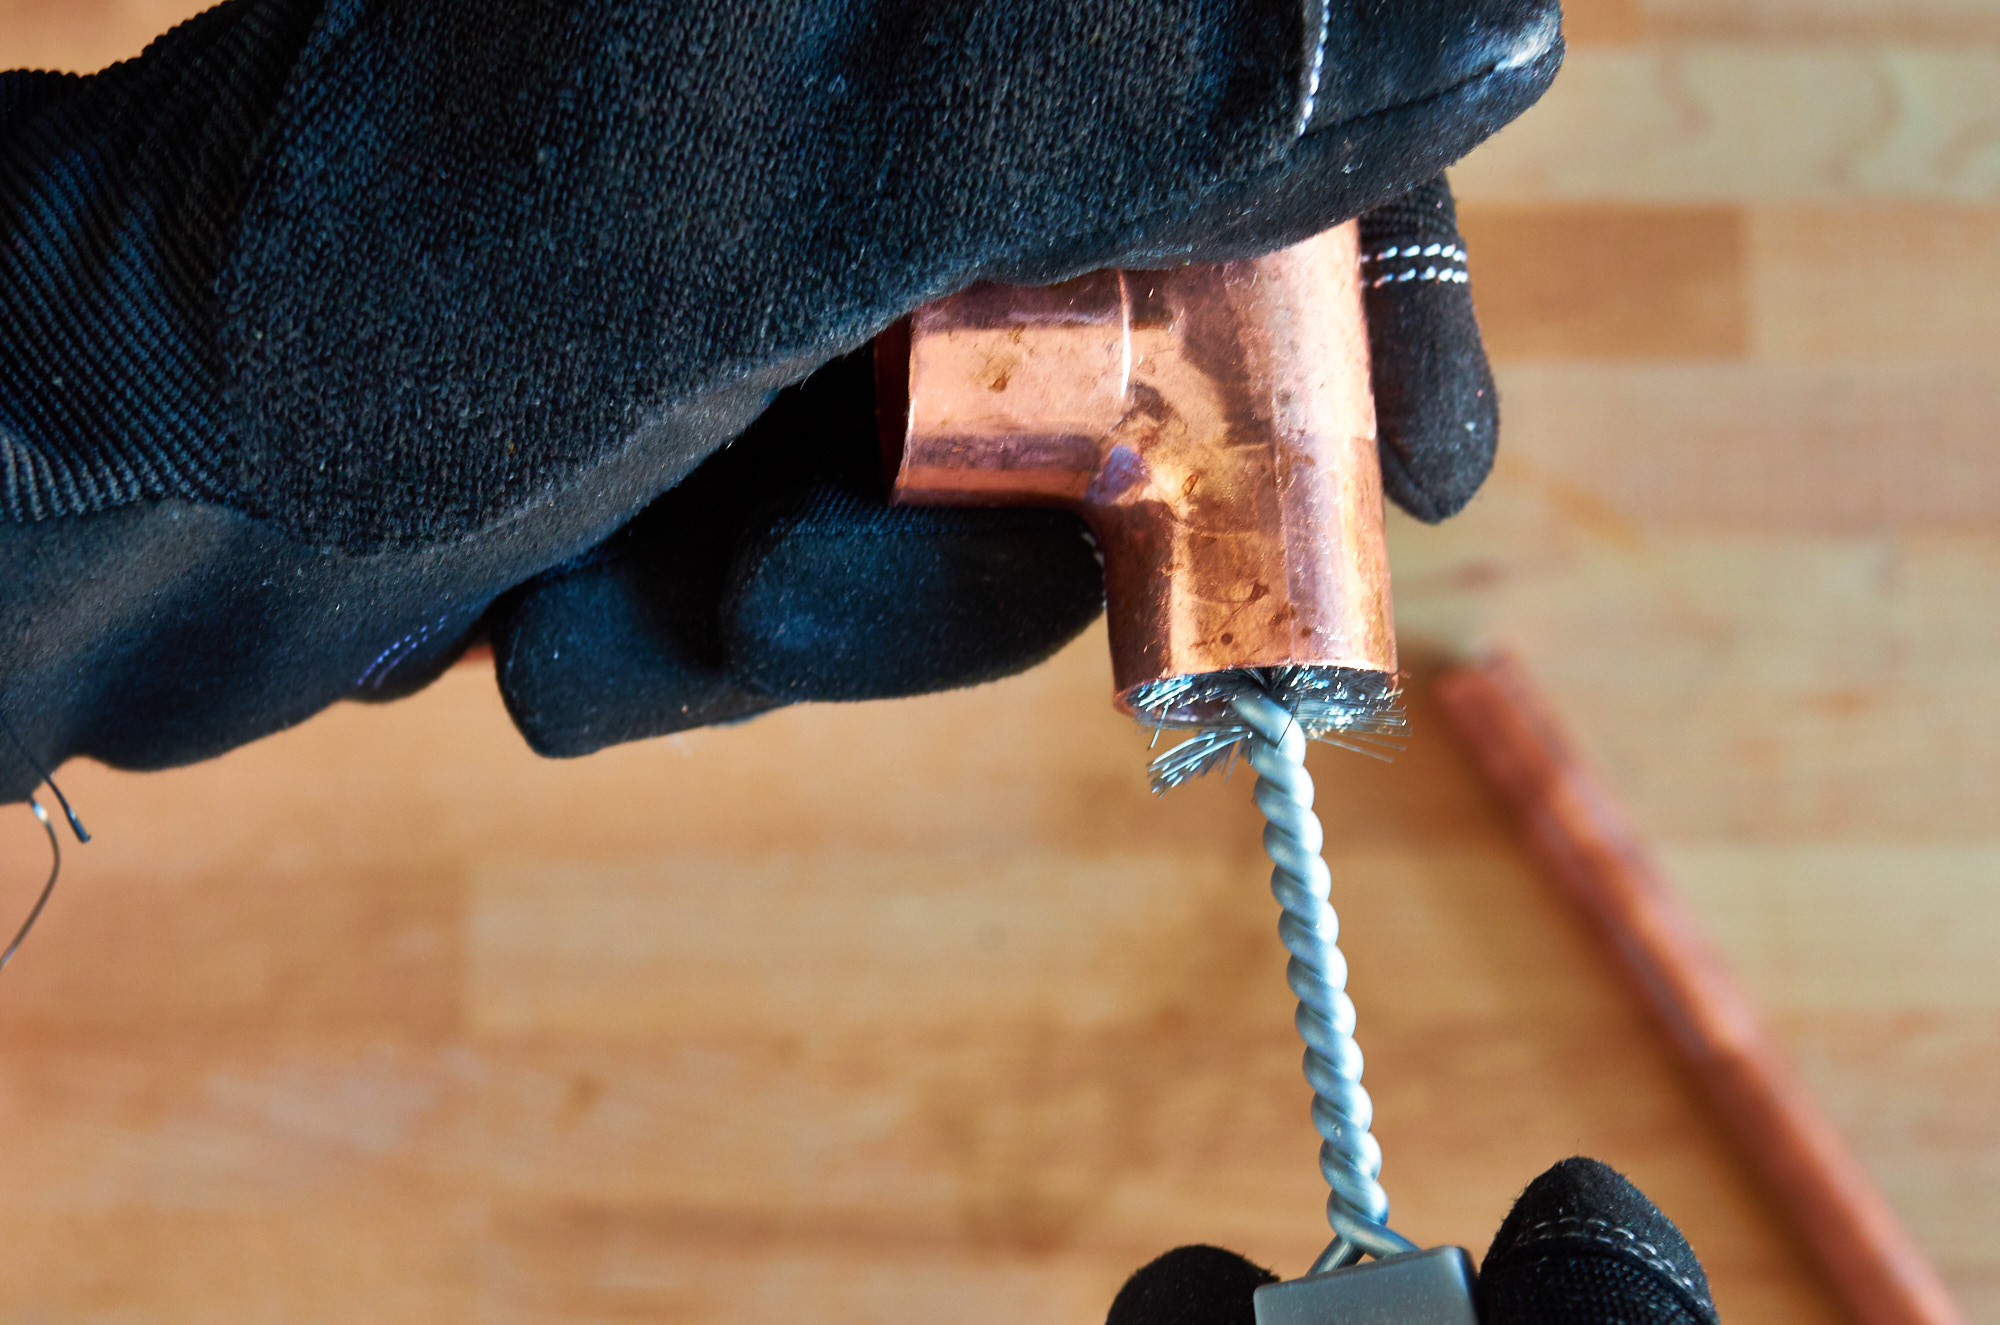
Step
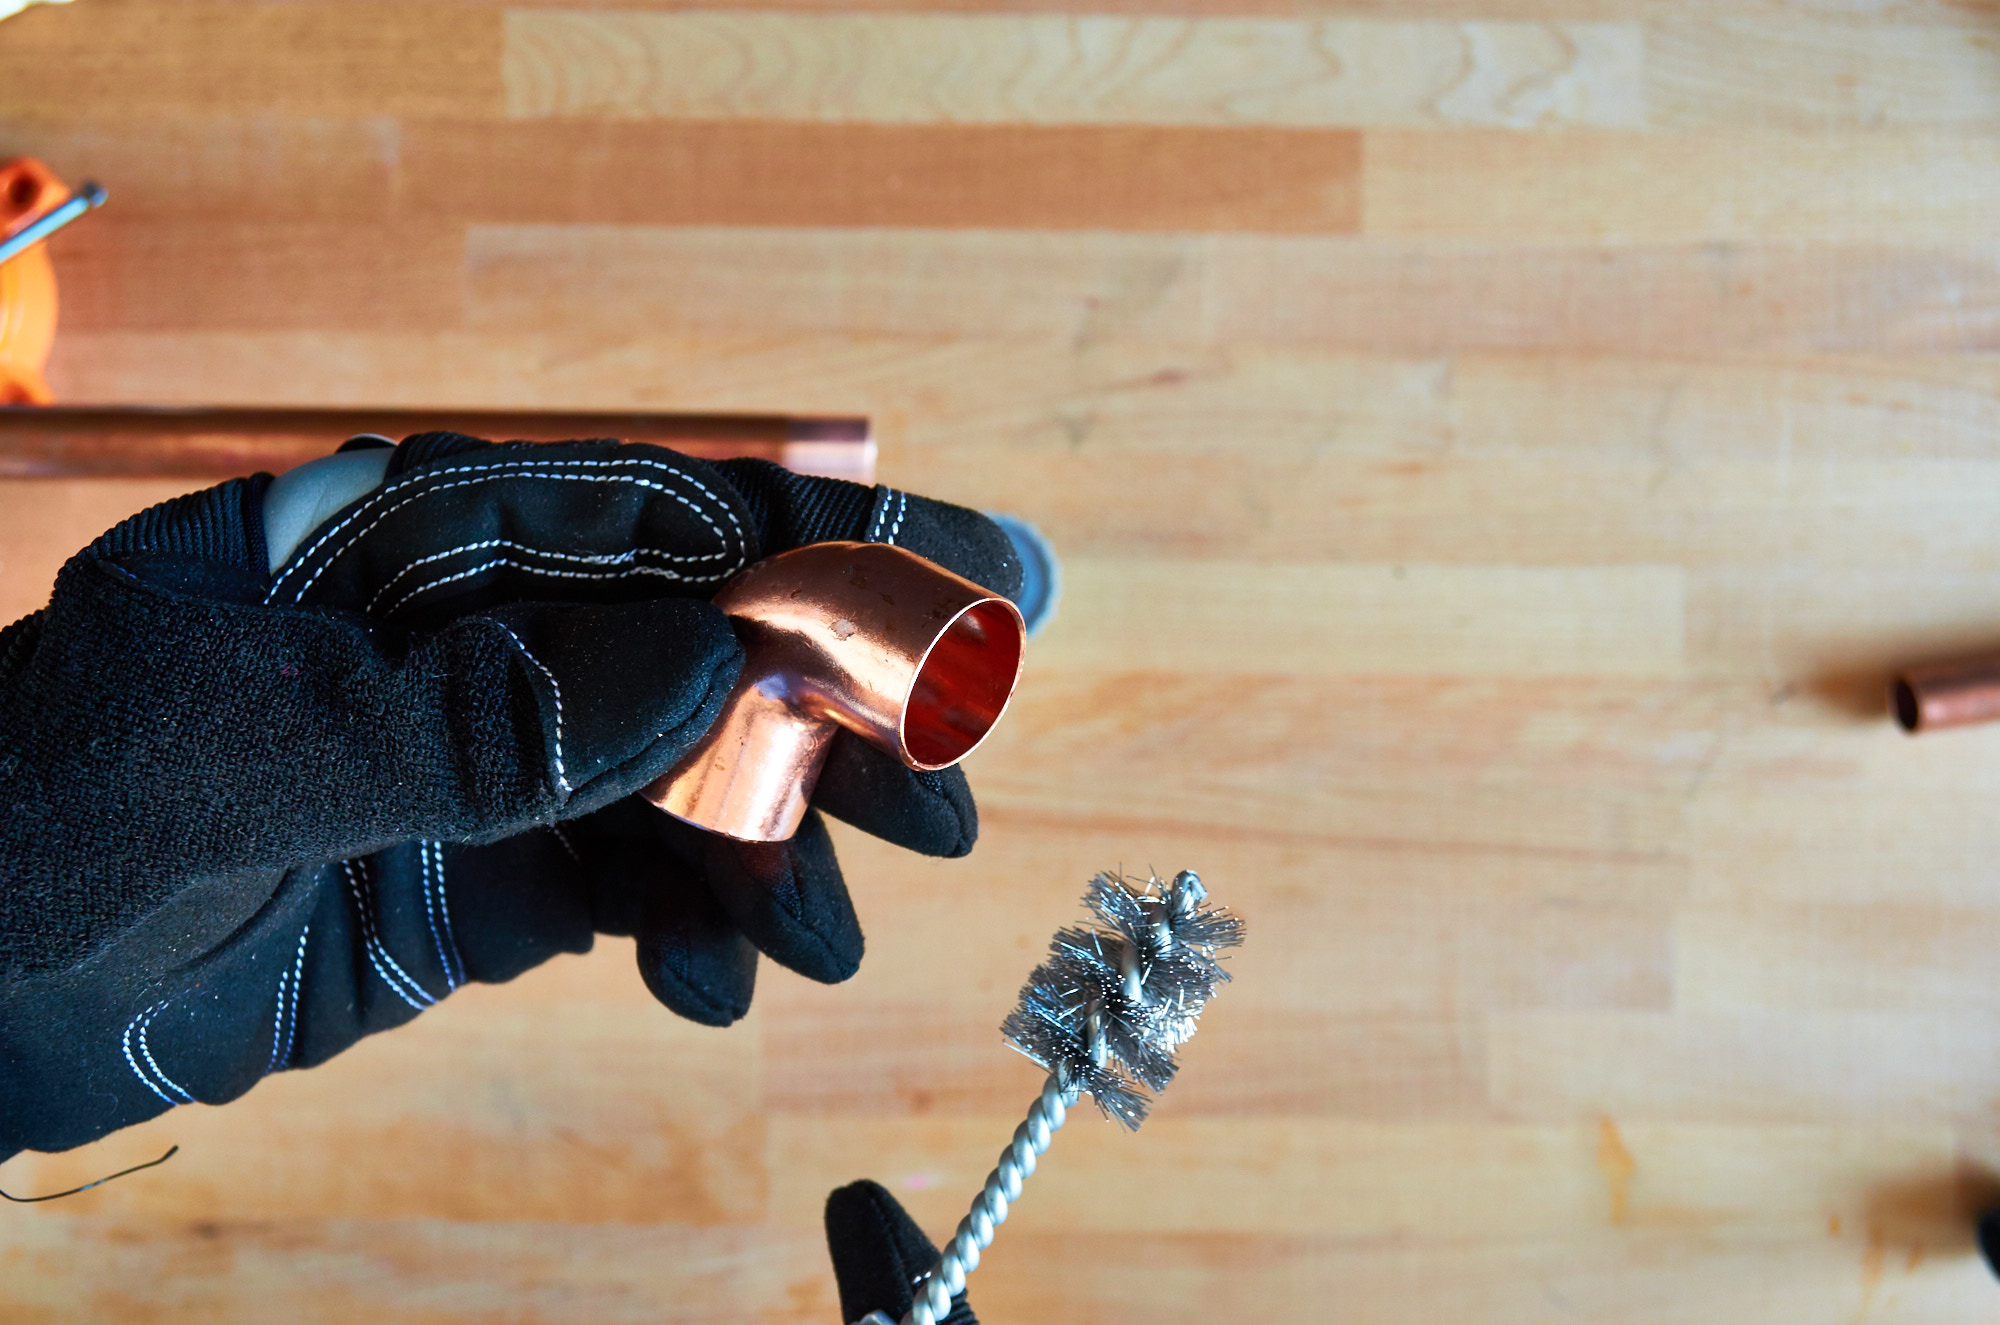
Ream out the inside of the pipe. You want the inside surface as clean and smooth as possible to prevent pitting, build up, and the potential for pinhole leaks.
Step
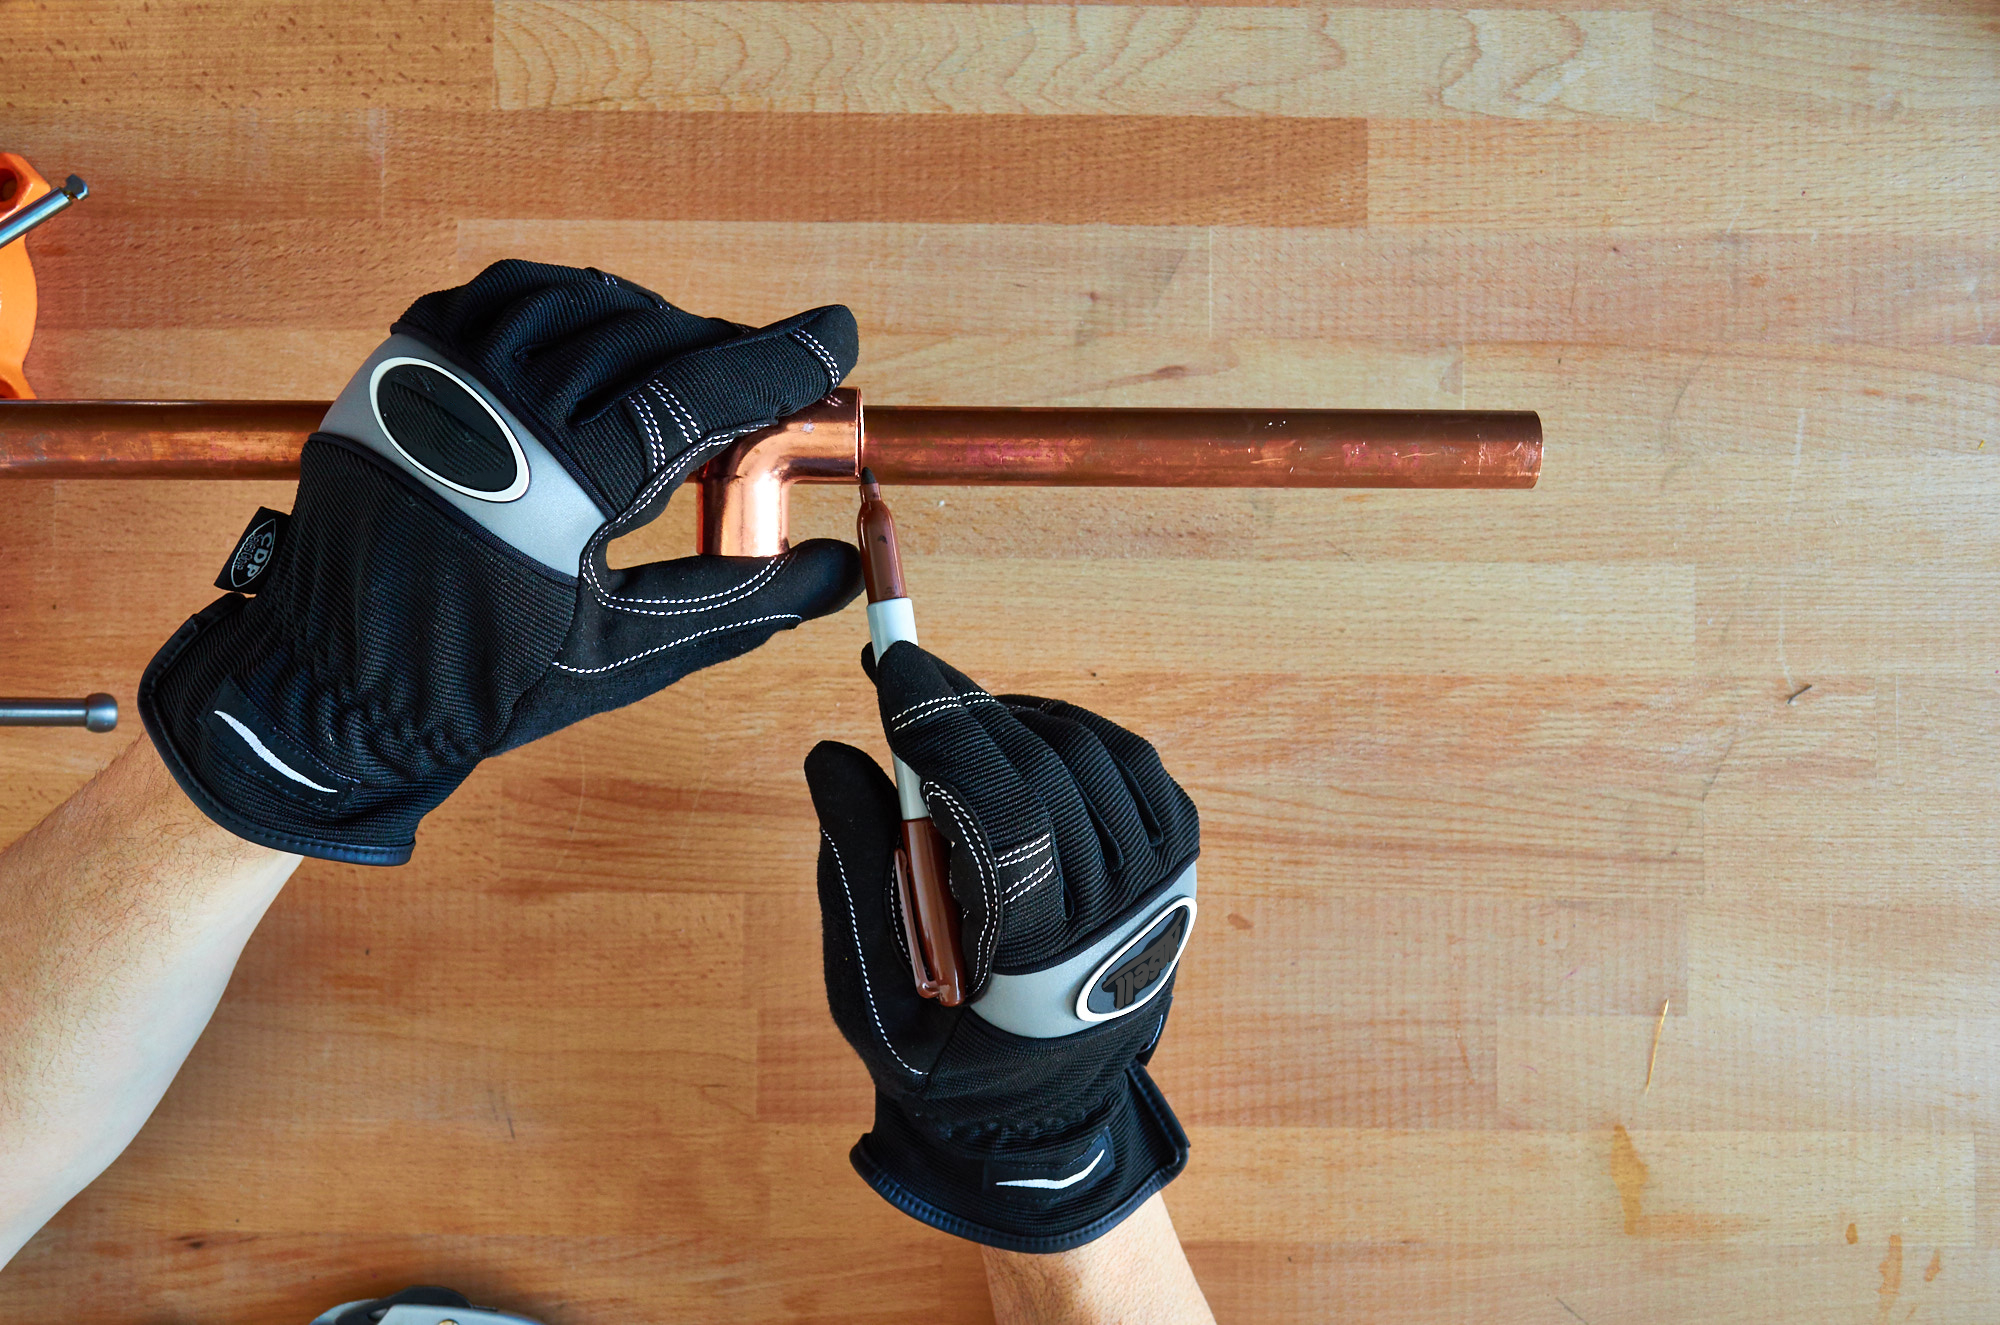
Clean the inside and outside of all the copper pieces (include the couplings).
Step
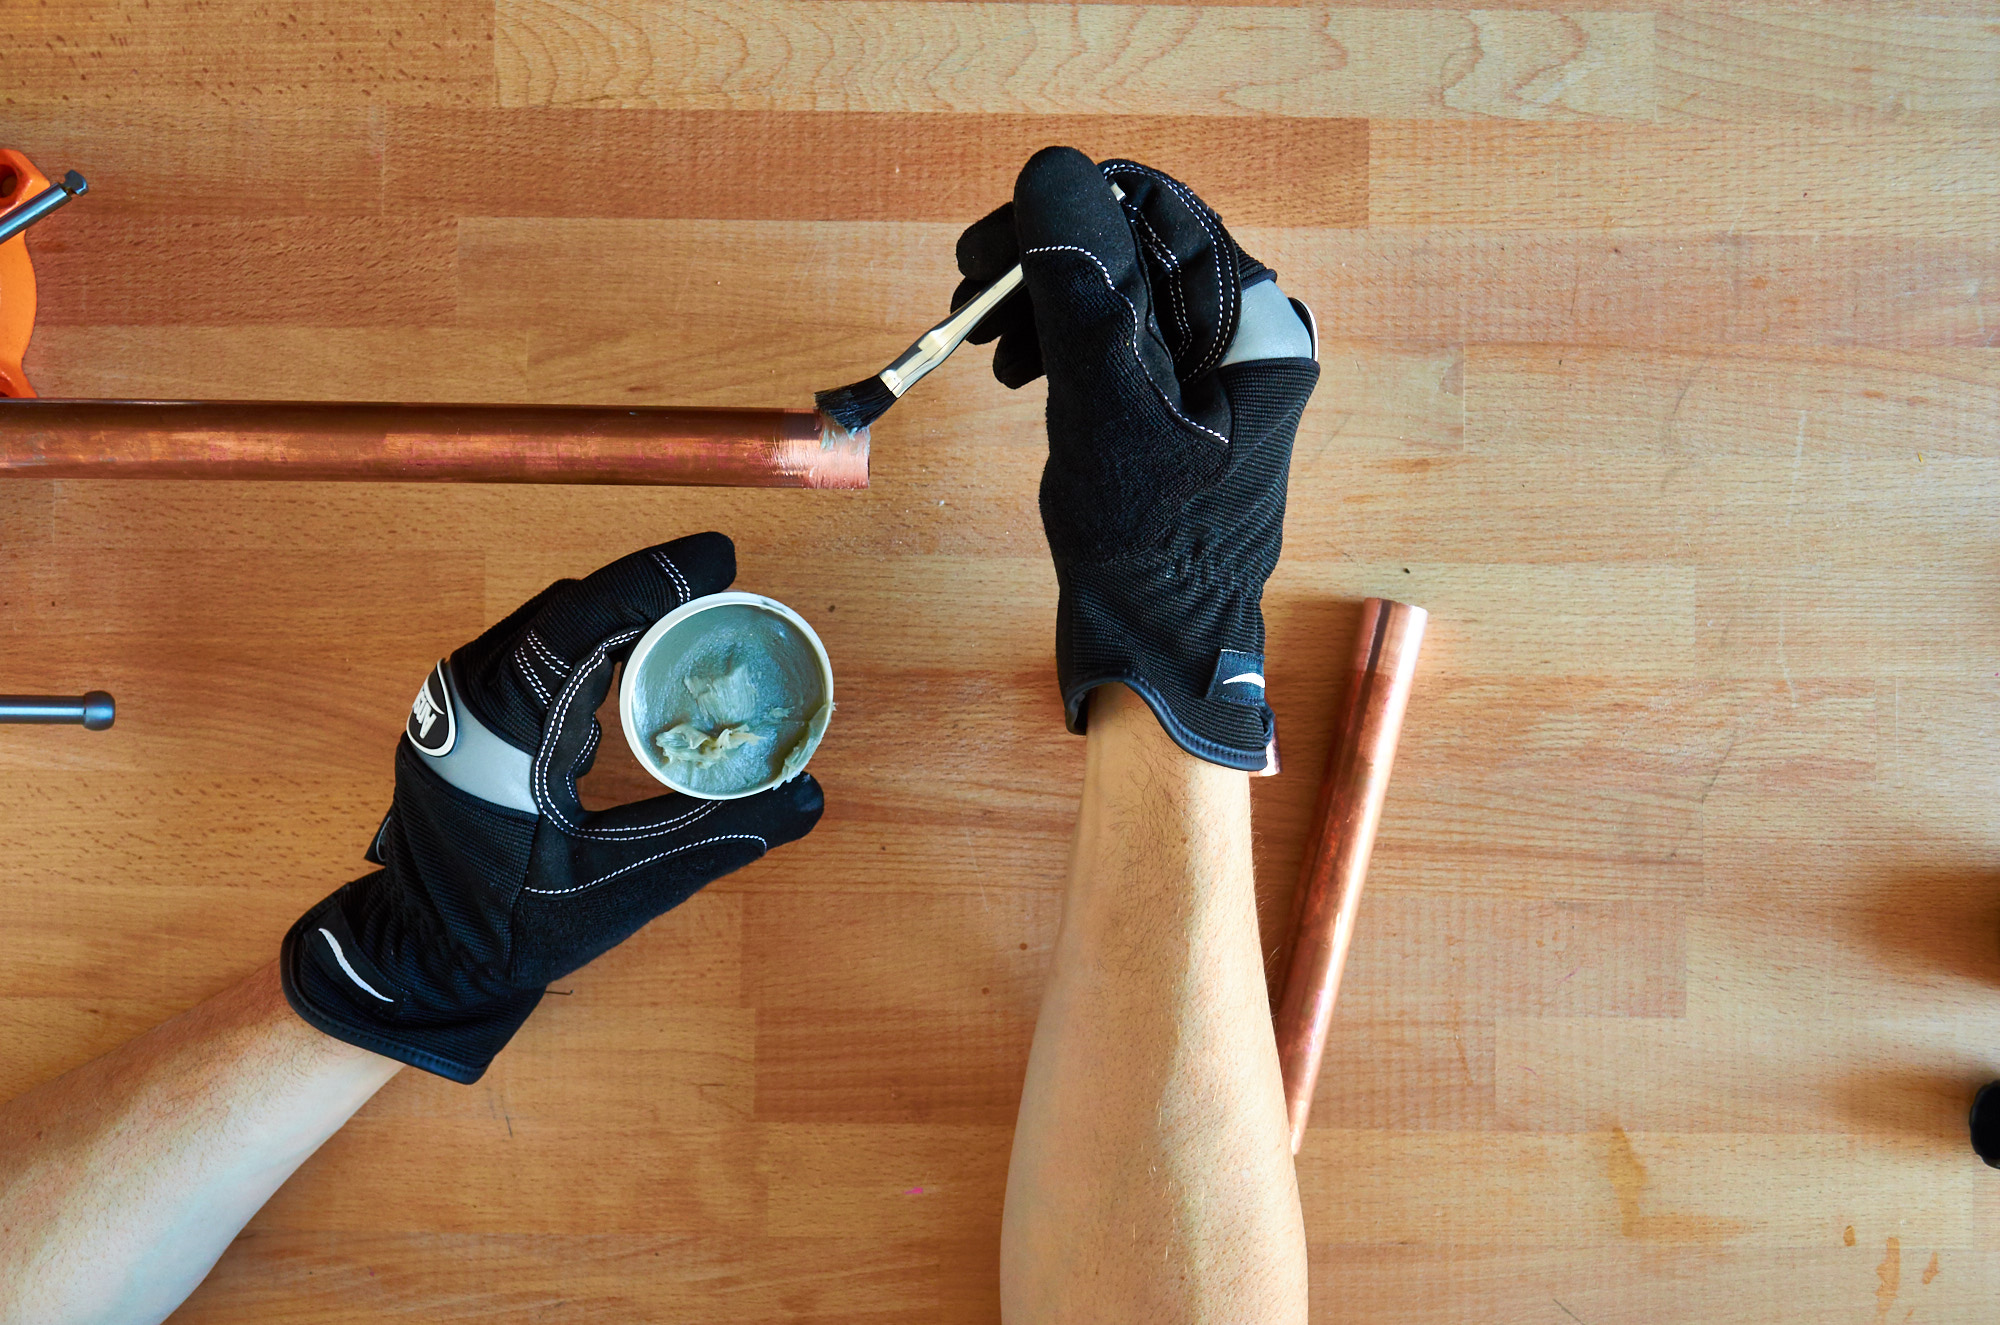
Apply a minimal amount of lead-free flux to the outside of the pipe and the inside of the coupling. Don't overdo it; you don't need a lot.
Step
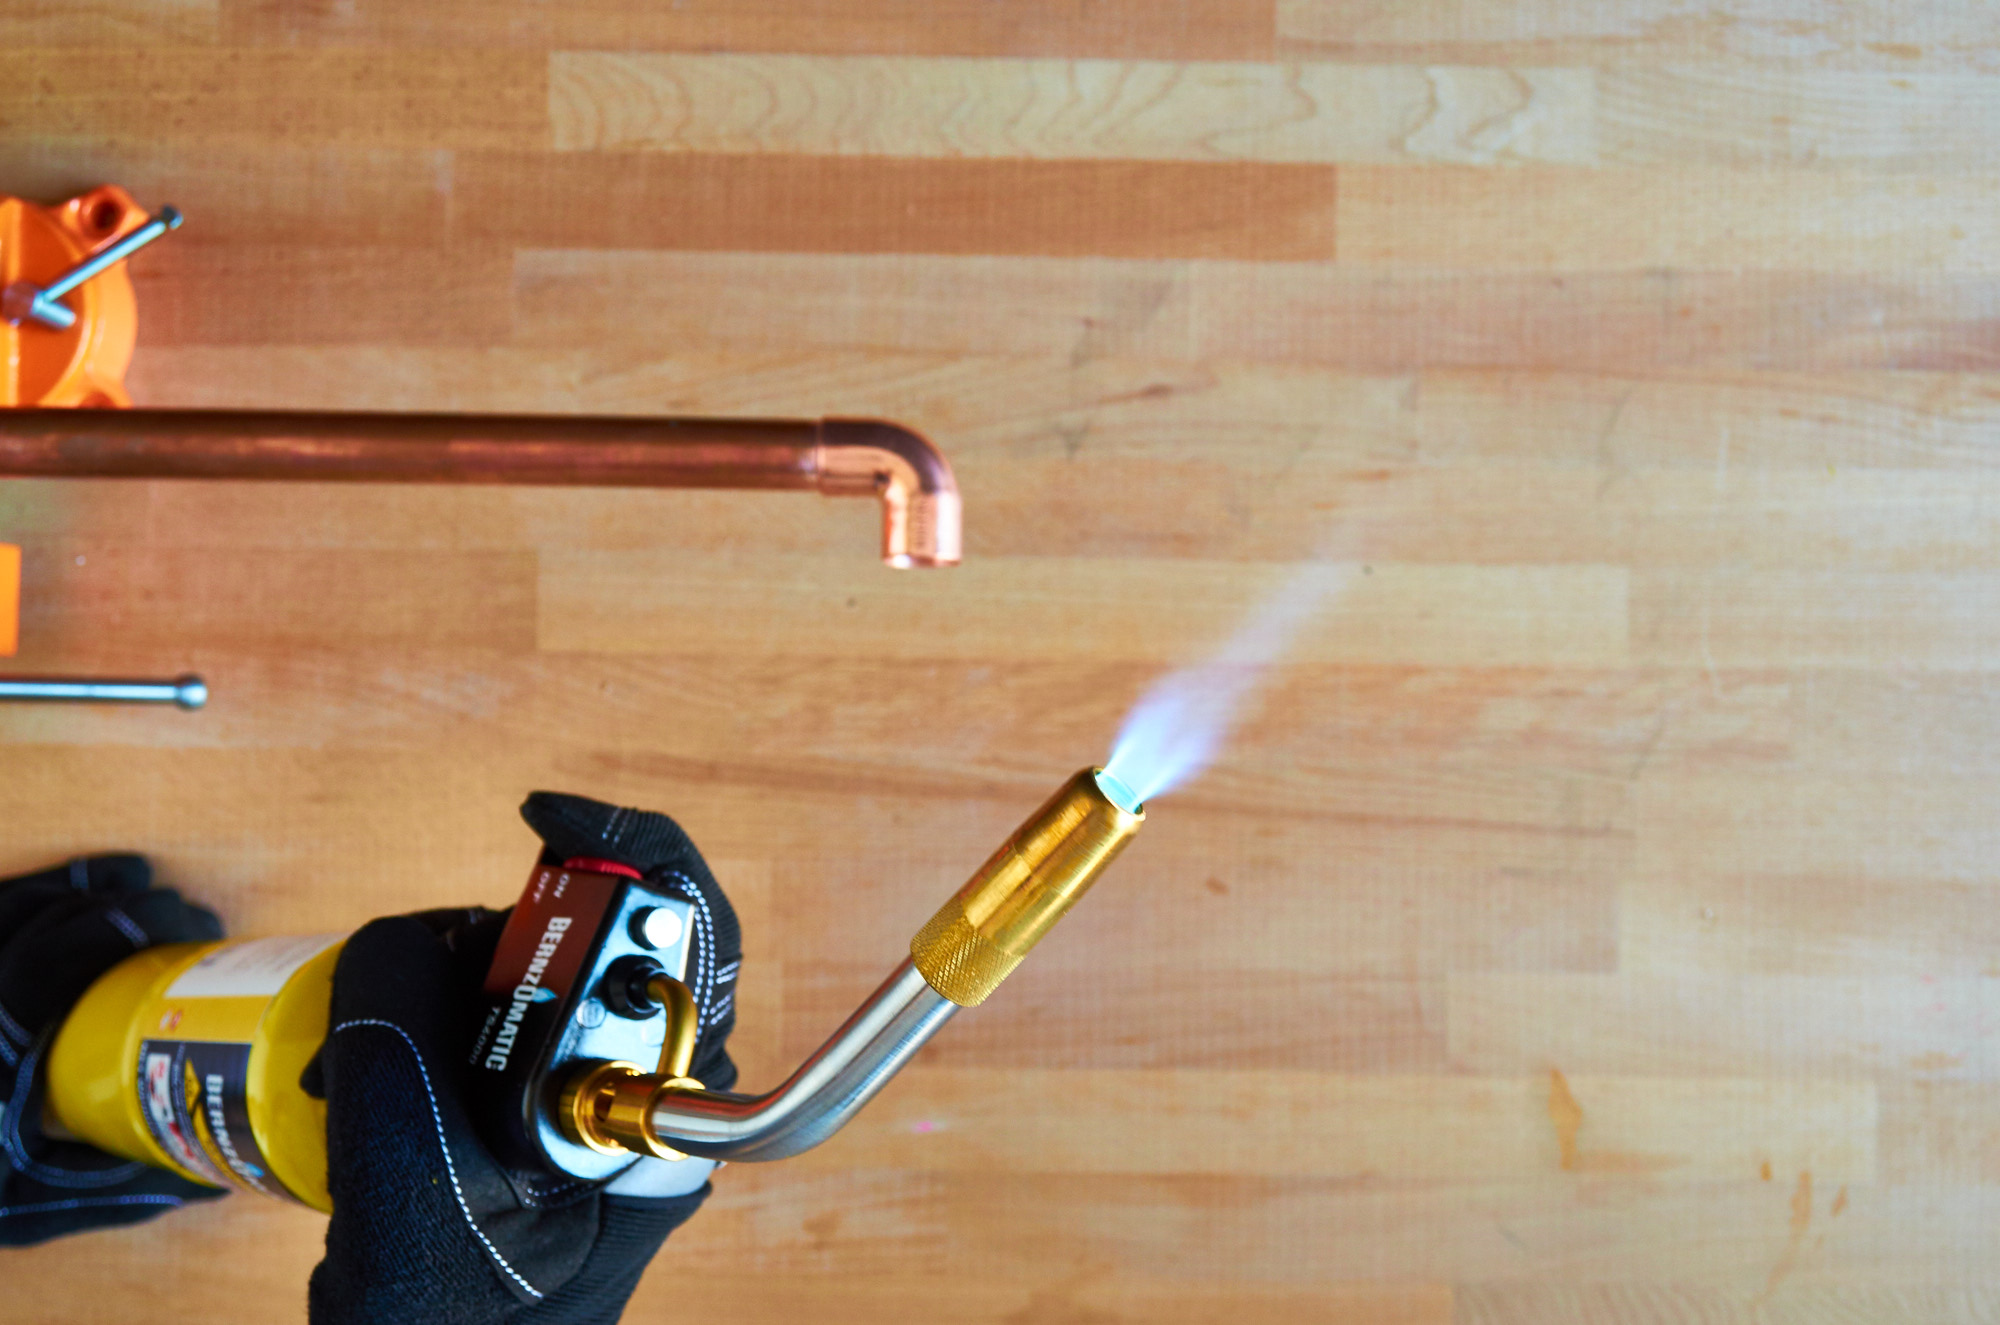
With the pipe secured firmly in place, and your work area clear of flammable objects, begin heating the copper about an inch below and above the joint. I used a MAPP-fueled torch because it burns hotter, and heats up the metal faster. The Bernzomatic TS4000 is the right tool for this job; it's super easy to light, with an auto-start/stop ignition. Just press the button and it goes on. Which is also why you should keep it disassembled when stored, and out of reach of children.
Did you know?
Inventor and craftsman Otto Bernz started out in 1876 selling plumbers’ tools, furnaces and gasoline torches. The first propane torch and fuel cylinder wasn't invented until the 1950s.
Step
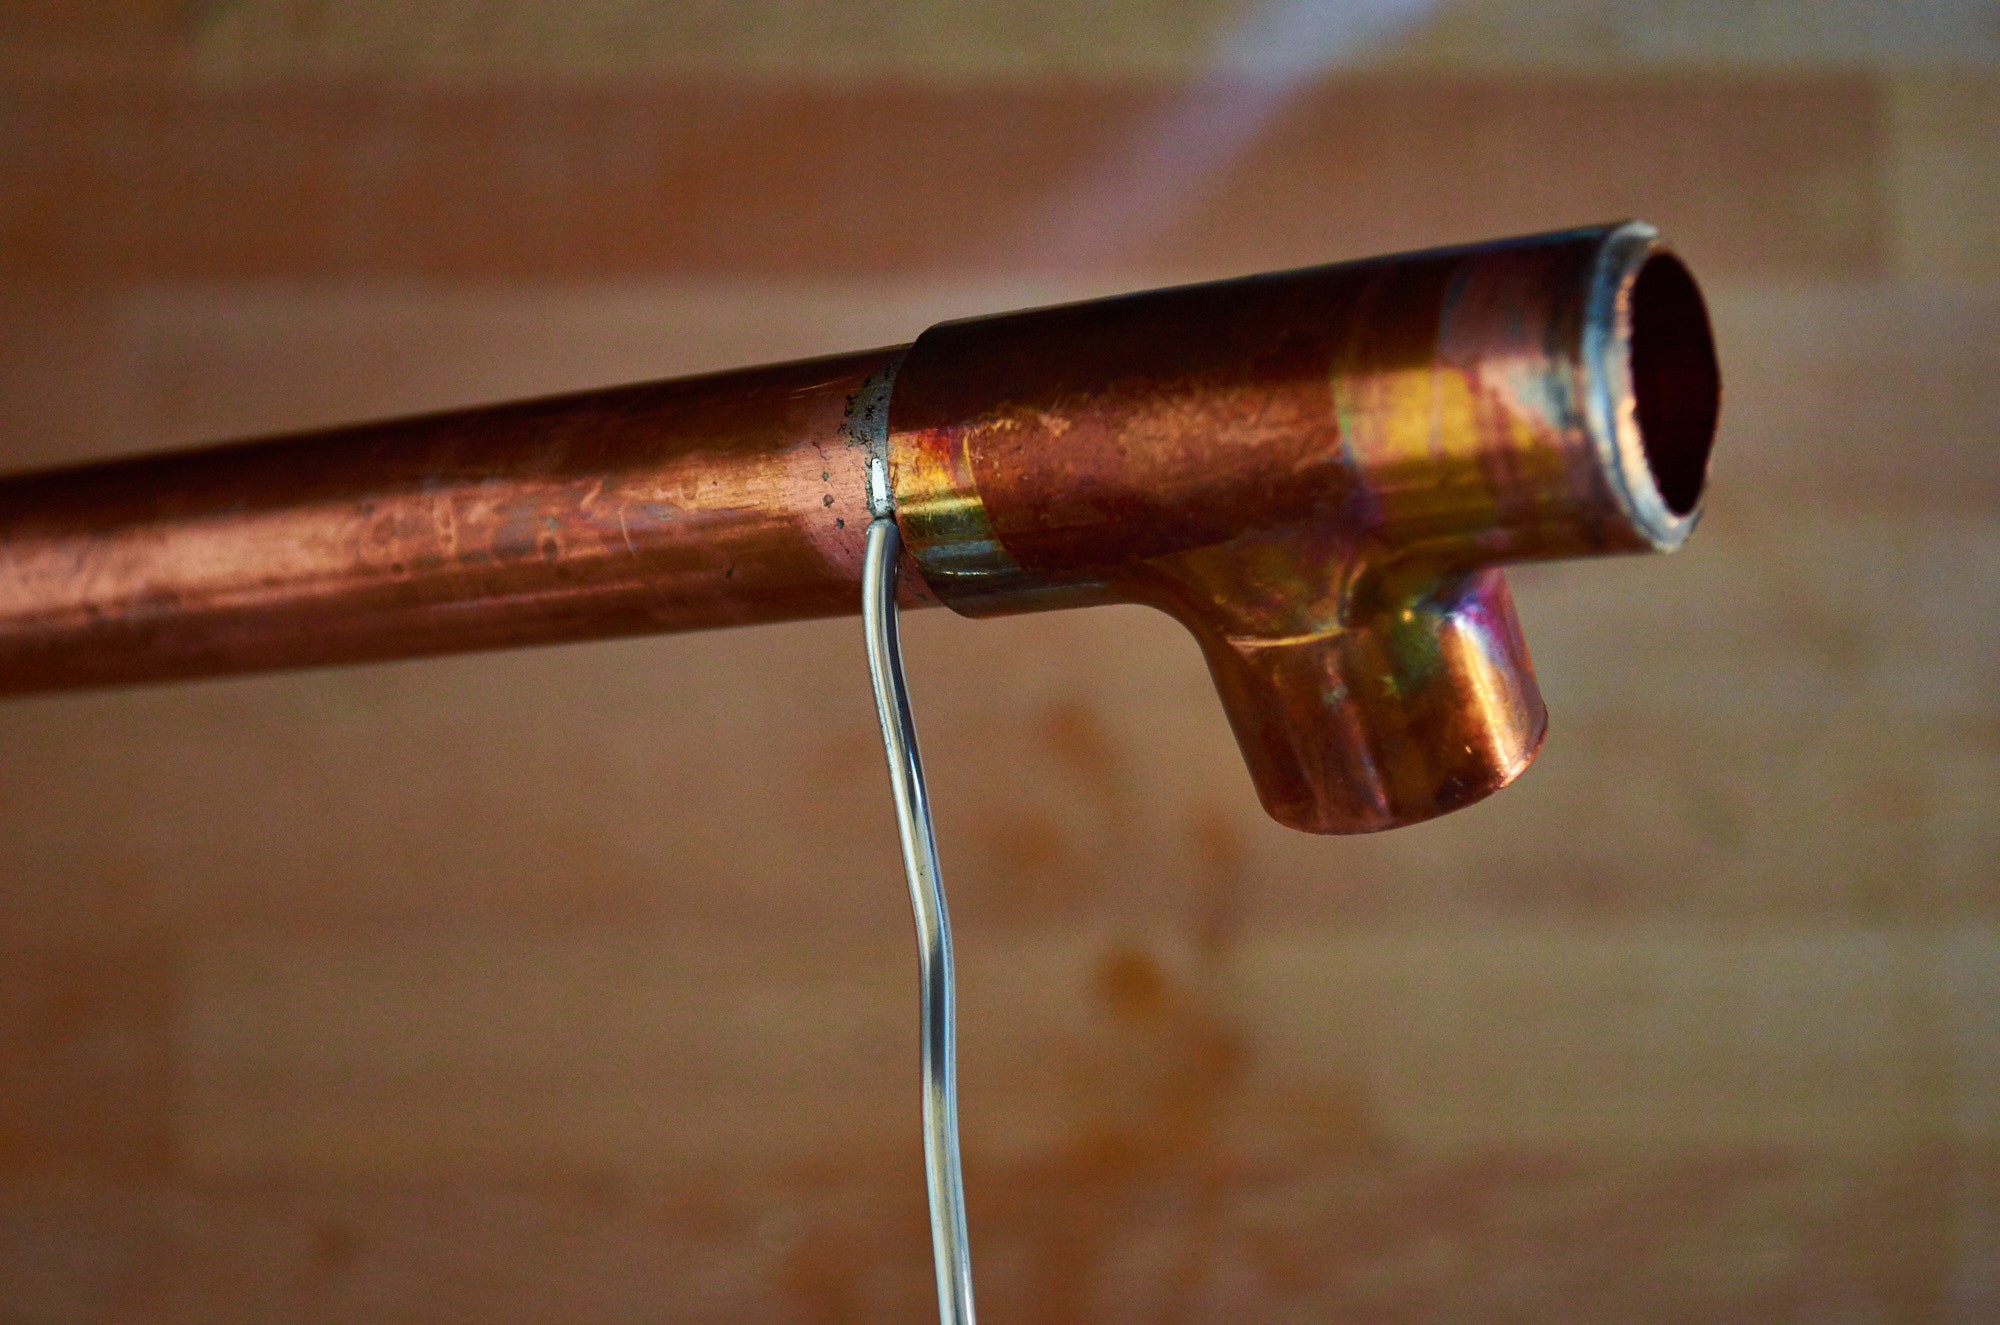
Begin heating copper, about an inch away from the joint. As you're heating the joint, keep touching the solder to the joint repeatedly. As soon as it starts to melt on contact, you're ready to go. You want to make sure you keep get the solder in there as soon as the metal reaches the correct temperature; if you overheat the copper, you'll see it start to discolor, which means it has been overheated, and has started to oxidize (and that could cause it to seal improperly).
Quickly apply a moderate amount of solder to the entire joint. Starting at the top on one side and working down, then repeating the other side. Keep the flame on the opposite side from the solder. The solder should follow the heat from the torch into the joint.
Here's a close up view of that whole process again:
1. Clean all the fittings.
2. Apply flux and fit the pieces together.
3. Touch the solder to the metal opposite the flame. As soon as it starts melting on contact, remove the flame and continue filling the entire joint with solder.
Step
While the solder is still hot, wipe any excess off with a damp rag. Remember, copper conducts heat really well, so even parts of the pipe that are far removed from the join could be hot. Handle with caution.
And that's it! Not terribly complicated, and easy to pick up if you make sure you're safe. There's a little art to it, and your first joints aren't going to be perfect or pretty (I ended up with more excess solder than I would've liked). But you'll get the hang of it in no time, and before long you'll be fixing pipes and even making stuff using your newfound skill. Which, by the way, is exactly what I'll be doing later in this series: making a DIY project (not plumbing) out of soldered copper tubing.
Stay tuned!
This post was sponsored by Bernzomatic, but all opinions are mine alone. Thanks for supporting the brands that support ManMade.
Perhaps you've drawn a name for the office Secret Santa and it's time to pony up for a solid gift that won't break the bank. Maybe it's for your brother-in-law, a buddy who helped you move. Perhaps, even though you're thirty-two, your mom keeps on insisting you give her a complete wishlist from which she'll select her favorites. Whatever the reason, it's gift giving season. Here are 50 options to find something they (or you) will love.
Over the holiday weekend, as we were digesting our second plate of leftovers, we stumbled across the 1983 film, The Big Chill. My mom, being the definition of a baby boomer, had seen it countless times and could list every track name on the soundtrack. My wife, being the child of baby boomers who happened to own it on VHS as a child, had also seen it repeatedly, and was full of quotes and minor plot points. And then there was me, who simply hadn't gotten around to it.
So, long story short, we put it on, and did that combo chatting, reading magazine, and movie watching thing that families do over holidays.
The film opens with a funeral, where all the college friends gather and return and discuss all their upcoming white people middle-agedness...serving a template for many quarter-life-crisis movies to come. And the funeral ends with a pop song goodbye: "You Can't Always Get What You Want"... begun on the church piano, and then fading into all its Rolling Stones glory as the procession makes its way to the cemetery.
Naturally, our family conversation led to question - what song would you choose? My mom - again, baby boomer - opted for:
My wife, cleverly, selected this obvious choice (and ain't it the truth)...
And me...well, honestly, I'd never thought about it. I have favorite songs, but none of them really rub against the message-giving, meaning-making poetry of playing them at a funeral.
So, for kicks, let's chat about it. Let's say your family and friends were to gather for your funeral today, and you happened to have arranged to have a piece of music played. What song would it be?
Would it be for the lyrical content? The tone you'd want to leave to your loved ones? Something so catchy and upbeat you'd force all the grievers into an inevitable dance party? Post your ideas in the comments below.
NOW is the time to start making those DIY gifts you want to give your loved ones this year. I have a bad habit of usually waiting until Christmas decorations start flooding my visual field before I remember that I want to make a bunch of DIY gifts each year, and by that time it's often too late to start working on the good ones. So don't make my same mistakes, get going no this DIY Leather Lunch Tote today!
Baking bread is one of those hard to qualify skills if you're looking at it from the outside with no real experience. On the one hand, people have been doing it for thousands of years in all sorts of climates with all sorts of varying available ingredients. On the other hand, it seems like a hard science that requires potentially its own baking contraption and yeast (who has baking yeast lying around?), meaning another trip to the grocery store. But here's the thing: it's not really that hard...
Forget the bread baker, Stillman Brown of PrimerMagazine.com makes this tasty bread in a dutch oven (you can check them out on Amazon for $36, otherwise ask a friend or find a garage sale). With no prior experience and just following the advice of his local bakery friend, Brown made this loaf of bread in these photos on his very first try.
Additionally, since the most time-intensive part of baking bread is actually giving the dough time to rise, this recipe is structured so that the instructions can be followed by the average joe working a 9-to-5 job. If you can bake some in time for Thanksgiving, more power to ya. If not, don't worry almost no one turns down freshly baked bread.
For awhile now Google has had its Popular Times feature which allows you to view a summary of a specific location's general busyness based on Google's metadata. But now - just in time for holiday shopping - you can do it all in real time...
According to The Verge, this new feature now allows you to check in and see how busy your destination is in real time so there will be less need to wait in long lines this season. Moreover, the feature shows you how long people are staying in any given place on average so you can figure out how long you ought to wait for it to die down. Or at least how long people are enjoying the atmosphere before deciding to scoot on for the night.
Looking for a warm drink that will give you energy without the jitters? You need to try this brewed South American tea.
For years, coffee has been my go-to AM brew, and I've been dedicated to grabbing a cuppa joe to get me through the morning. Sure, I mix it up with an espresso drink every now and then, but for the most part it's a few milligrams of caffeine that powers me through the mid-morning slump.
But these days - while I'm not going to go as far as swearing off the bitter roasted bean of coffee - I've been mixing it up with Yerba Mate every few days, and I'm seriously impressed.
Yerba Mate (pronounced "mah-tay") showed up in my life a few years ago when my globe-traveling uncle showed up with a curious gourd and a thermos of tea. The gourd was a quirky black orb with a silver rim, and he sipped from it through a filter straw to keep out the chunks of something floating around in there. That was my first look at Yerba Mate, a tea made from leaves grown in a South American Rain forest. Down there, Yerba Mate is consumed 6 to 1 over coffee (a lot of our coffee is grown down there), so the locals must know what's up. Yerba Mate is touted to have the strength of coffee, the health benefits of tea, and the euphoria of chocolate, and it doesn't taste like the bitter swill of old socks, so there are plenty of reasons to try a cup. Now that traditional cup - called a calabash is a hallowed out gourd with a silver filter straw called a Bombilla. You don't need these to enjoy a cup, but they sure make it authentic.
I've been drinking Yerba Mate off and on for the past few months. I still gravitate towards coffee often for the familiar, comforting taste I've become a bit dependent on. But there's definitely a time when a good cup of tea will do just fine and that's when I grab the sweet, energy rich Yerba Mate. The energy boost is solid and doesn't crash like similar caffeinated drinks. While there are plenty of claims of health benefits, I shouldn't need to tell you they're all to be taken with a grain of salt.
So, if you're looking for a solid alternative to coffee every now and then, grab a cup of Yerba Mateand see what you think.
Not every guy is in a relationship with a woman, but between sweethearts, siblings, parents, and friends and family, almost all of us will be buying something for the women in our lives this holiday. They're special, in a million different ways; here's a solid set of gift ideas that will let them know you care.
Exceptional gifts will leave an impression, but be sure to make it special with a thoughtful note to really make it stand out. I always like to use parchment paper and Seal with a little wax ($20) for a truly unique gift.


 Now to the hard part: saddle stitching. Once you have the needles through the first hole, take your the needle on the left side and push it through the leather. Then, with the right needle, come behind the left needle to make a cross.
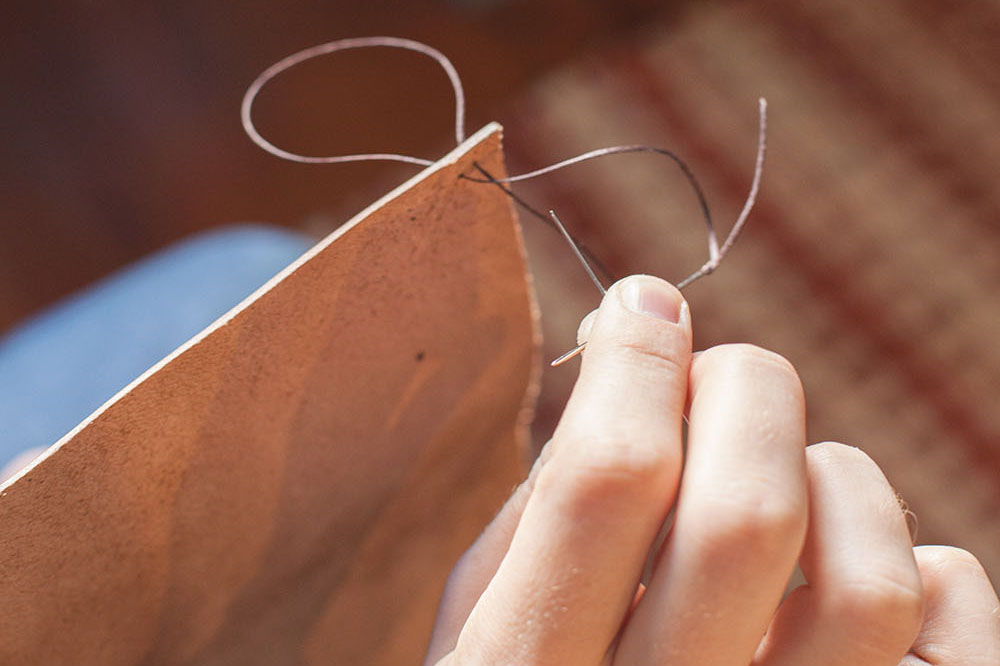 Next, with the right needle still behind the left needle, pull the left needle through and rotate your hand toward you so that the left needle is now facing you and the right needle is facing the stitching holes.
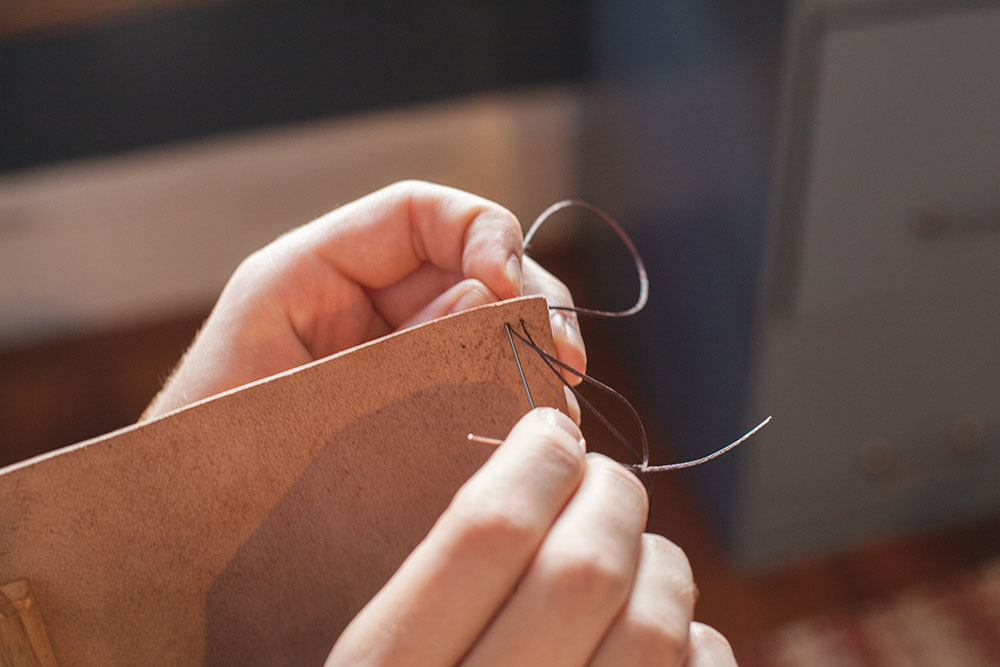
 First you'll need to bevel your edges. The reason for this is that the surface of the leather will start to fold over as you sand the edge. Beveling basically removes that part that would fold over. Beveling is super easy. All you need to do it run the beveler along the edge with a moderate amount of force.
 Next you'll need to ge the edges nice and smooth. Generally I hit it with a couple grits of sand paper. First, start with a 200 grit sand paper, this will even out any part of the edge that is not flat with the rest. Then, sand off loose fibers with a 600 grit sand paper.